Publishing creates an agent application with a stable endpoint. Once created, the agent application can then be published to Microsoft 365 Copilot and Teams or invoked using the Responses API protocol.
Use this article to publish an agent to Microsoft 365 Copilot and Teams so people can use it in those interfaces.
Prerequisites
-
Access to the Microsoft Foundry portal
-
A Foundry project with an agent version you tested and want to publish
-
The following role assignments:
-
An Azure subscription where you can create Azure Bot Service resources and Microsoft Entra ID app registrations
-
Test your agent thoroughly in the Foundry portal before publishing. Confirm it responds correctly and any tools work as expected.
-
Publish your agent as an agent application: A published agent application uses its own agent identity separate from your project identity. If your agent uses tools that access Azure resources, plan to reassign any required permissions after publishing. For details, see Agent identity concepts in Microsoft Foundry and Publish and share agents in Microsoft Foundry.
-
Verify that required Azure resource providers are registered in your subscription. The publishing process creates an Azure Bot Service resource, which requires the
Microsoft.BotService provider.
If you use Azure CLI, you can register the provider with:
az provider register --namespace Microsoft.BotService
Publish your agent as an agent application in the Foundry UI
For more information on publishing an agent as an application, see Publish and share agents.
-
In the Microsoft Foundry portal, select your agent version.
Expected result: The agent details page opens, showing the agent configuration and a Publish button.
-
Select Publish to create an agent application.
Expected result: A publishing dialog opens with distribution options.
Publish to Microsoft 365 and Teams in the Foundry UI
-
Select Publish again, and then select Publish to Teams and Microsoft 365 Copilot.
Expected result: The Microsoft 365 publishing configuration window opens.
-
Enter the information in the window that appears.
-
An application ID and tenant ID are created automatically. Note these values for troubleshooting.
-
In the Azure Bot Service dropdown, select Create an Azure Bot Service to create the bot resource.
Expected result: The portal creates an Azure Bot Service resource in your subscription and displays the resource name.
-
Complete the required metadata:
| Field | Description |
|---|
| Name | Display name for your agent (appears in the agent store) |
| Short description | Short one sentence description of what your agent does |
| Full description | Longer description of your agent responsibilities and the actions it can take |
| Publisher information | Your organization name or agent developer’s name |
| Website | URL to your website |
| Privacy statement URL | URL to your privacy policy |
| Terms of use URL | URL to your terms of use |
Don’t include secrets, API keys, or sensitive information in any metadata fields. These fields are visible to users.
-
Select Prepare Agent to start packaging the agent.
Expected result: The portal shows a progress indicator while it creates the Microsoft 365 publishing package. This process typically takes 1-2 minutes.
-
When the Microsoft 365 publishing package is ready, choose one of the following options:
- Download the package to test it locally before broad distribution.
- Continue the in-product publishing flow for Microsoft Teams and Microsoft 365 Copilot.
Verification: After the package is ready, confirm the status shows “Ready” or “Published” in the agent details page.
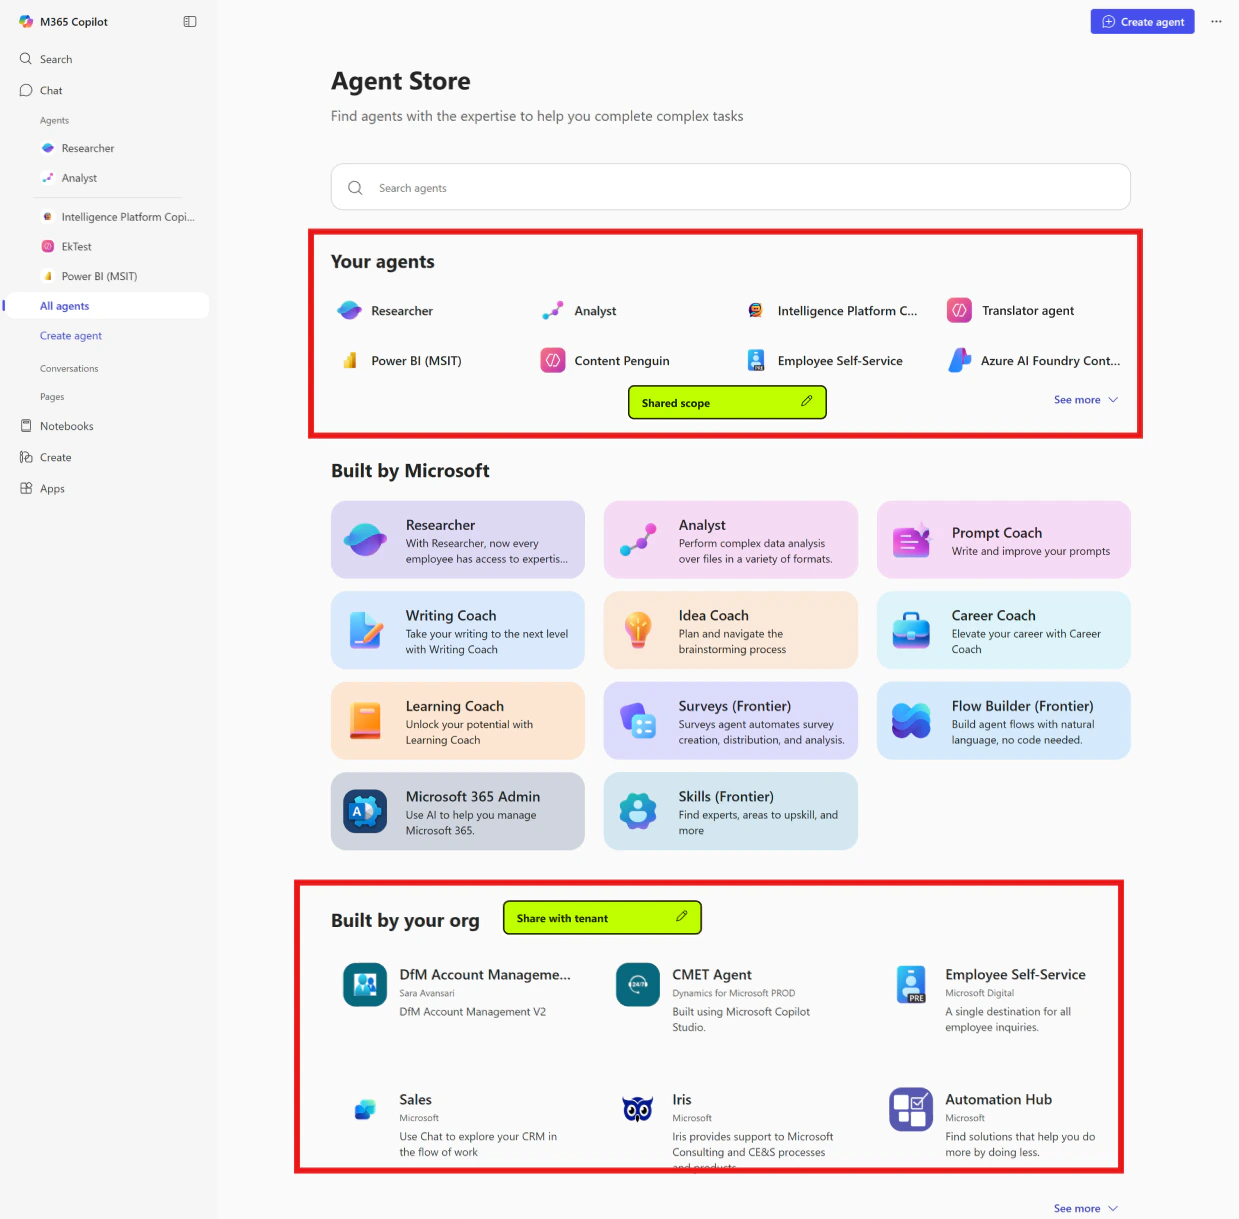
Choose a publish scope
Choose the scope that matches how you want people to discover your agent.
| Scope | Visibility | Admin approval | Best for |
|---|
| Individual scope | Appears under Your agents in the agent store | Not required | Personal testing, small teams, or pilots |
| Organization scope | Appears under Built by your org in the agent store | Required | Organization-wide distribution, production deployments |
- Individual scope: Best for personal or team-level use. No admin approval required.
- Organization scope: Best for organization-wide distribution. Requires admin approval before users can access it.
Individual scope details
- The agent is available immediately after publishing.
- Only the publisher can see and use the agent initially.
- You can share the agent with specific users by providing them with the agent link.
- No admin approval or tenant configuration required.
Organization scope details
- After you publish, an admin must approve the app in the Microsoft 365 admin center.
- Once approved, the agent appears in the Built by your org section for all users in your tenant.
- App policies in your tenant control which users can access the agent.
- To check approval status, go to the Microsoft 365 admin center and look for your agent under Requests.
If you don’t see the request, see Limitations and Troubleshooting for current workarounds.
Download and test the publishing package
If you download the package, test it before broad distribution.
-
After the package finishes preparing, download it from the publishing UI.
Expected result: A
.zip file downloads to your local machine.
-
In Microsoft Teams, upload the downloaded package for testing:
- Open Microsoft Teams.
- Go to Apps > Manage your apps > Upload an app.
- Select Upload a custom app and choose the downloaded
.zip file.
Expected result: Teams installs the app and shows it in your apps list.
-
Open the agent in Teams and send a test message.
Verification checklist:
- The agent responds to messages.
- Any configured tools work correctly.
- The agent identity has access to required Azure resources (if applicable).
- Response times are acceptable.
-
If your agent uses tools that access Azure resources, verify the published agent identity has the required role assignments. See Agent identity concepts in Microsoft Foundry for details on reassigning permissions.
Verify your publishing configuration
To confirm your agent is published correctly:
- In the Foundry portal, go to your agent and check the Published status.
- Note the Application ID and Tenant ID from the publishing details.
- In the Azure portal, verify the Azure Bot Service resource exists and is running.
- For organization scope, check the Microsoft 365 admin center for approval status.
Limitations
All of these limitations are temporary with fixes in progress.
| Limitation | Description |
|---|
| File uploads and image generation in Microsoft 365 | File uploads and image generation don’t work for agents published to Microsoft 365. These features work correctly in Microsoft Teams. |
| Private Link | Private Link isn’t supported for Teams or Azure Bot Service integrations. |
| Streaming and citations | Published agents don’t support streaming responses or citations. |
Troubleshooting
Use these checks to unblock common publishing issues.
| Issue | Cause | Resolution |
|---|
| Error preparing the agent | Invalid agent version or metadata | Verify you aren’t reusing an existing agent version. Ensure the agent version doesn’t start with 0. Confirm the developer name is 32 characters or fewer. |
| Azure Bot Service creation fails | Missing permissions or unregistered resource provider | Confirm you have permission to create resources in the selected Azure subscription. Register the Microsoft.BotService provider if needed. |
| Organization scope agent doesn’t appear | Admin approval pending or app policies block access | Confirm an admin approved the app in the Microsoft 365 admin center. Check that app policies in your tenant allow users to access it. |
| Agent works in Foundry but fails after publishing | Agent identity missing required role assignments | The published agent uses its own identity. Reassign RBAC permissions to the new agent identity for any Azure resources the agent accesses. See Agent identity concepts. |
| Package upload fails in Teams | Invalid package format or missing metadata | Verify all required metadata fields are complete. Redownload the package and try again. |
| Agent doesn’t respond in Teams | Bot Service configuration issue | Verify the Azure Bot Service resource is running. Check the Bot Service logs in the Azure portal for errors. |
| Users can’t find the agent in the store | Wrong scope or approval pending | For Individual scope, share the direct link. For Organization scope, confirm admin approval is complete. |
FAQs
If I select Organization (tenant) scope when publishing to Microsoft 365 Copilot and Teams, where should I go to approve the agent?
In the Microsoft Admin Center, you can approve Foundry agents published to M365/Teams. Once approved by an admin, the agent appears under Built by your org in the agent store for Microsoft 365 Copilot.
If I publish my agent to Individual Scope (previously called Shared Scope), how do I share it with others in my organization?
The agent appears under Your agents in the agent store for Microsoft 365 Copilot. You can share it by sending the agent link to selected users in your organization.
Related content