- Company policies (from SharePoint documents)
- Technical implementation guidance (from Microsoft Learn via MCP)
- Complete solutions (combining both sources for business implementation)
- Batch evaluation to validate agent performance on realistic business scenarios
- Build a Modern Workplace Assistant with SharePoint and MCP integration.
- Demonstrate real business scenarios combining internal and external knowledge.
- Implement robust error handling and graceful degradation.
- Create evaluation framework for business-focused testing.
- Prepare foundation for governance and production deployment. This minimal sample demonstrates enterprise-ready patterns with realistic business scenarios.
Code in this article uses packages that are currently in preview. This preview is provided without a service-level agreement, and we don’t recommend it for production workloads. Certain features might not be supported or might have constrained capabilities. For more information, see Supplemental Terms of Use for Microsoft Azure Previews.
Prerequisites
- An Azure subscription. If you don’t have one, create one for free.
- Azure CLI 2.67.0 or later, authenticated with
az login(check withaz version) - A Foundry project with a deployed model (for example,
gpt-4o-mini). If you don’t have one: Create a project and then deploy a model (see model overview: Model catalog). - Python 3.10 or later
- .NET SDK 8.0 or later (for the C# sample)
- A SharePoint connection configured in your project.
- The SharePoint tool is in preview and requires a signed-in user’s delegated identity. App-only and service-principal authentication aren’t supported.
- Developers and end users need either a Microsoft 365 Copilot license or enabled pay-as-you-go access, the Foundry User role on the project, and at least Read access to the target SharePoint site.
- The SharePoint site and Foundry project must be in the same Microsoft Entra tenant. An agent can use one SharePoint tool. For setup instructions, see Use the SharePoint tool.
- The Foundry User role to create and test the agent. If you create a project connection to authenticate an MCP server, you also need the Foundry Project Manager role.
- (Optional) Git installed for cloning the sample repository
SDK versions and sample repository structure might change after this article is published. Before you begin, check the sample repository README for the latest setup instructions, required package versions, and environment configuration. If a version referenced in this tutorial isn’t available on PyPI or NuGet, use the latest published version instead.
Get the sample code
Instead of navigating a large repository tree, use one of these approaches:Option A (clone entire samples repo)
Code uses Azure AI Projects 2.x and is incompatible with Azure AI Projects 1.x. See the Foundry (classic) documentation for the Azure AI Projects 1.x version.
git clone --depth 1 https://github.com/microsoft-foundry/foundry-samples.git
cd foundry-samples/samples/python/enterprise-agent-tutorial/1-idea-to-prototype
git clone --depth 1 https://github.com/microsoft-foundry/foundry-samples.git
cd foundry-samples/samples/csharp/enterprise-agent-tutorial/1-idea-to-prototype
Option B (sparse checkout only this tutorial - reduced download)
git clone --no-checkout https://github.com/microsoft-foundry/foundry-samples.git
cd foundry-samples
git sparse-checkout init --cone
git sparse-checkout set samples/python/enterprise-agent-tutorial/1-idea-to-prototype
git checkout
cd samples/python/enterprise-agent-tutorial/1-idea-to-prototype
git clone --no-checkout https://github.com/microsoft-foundry/foundry-samples.git
cd foundry-samples
git sparse-checkout init --cone
git sparse-checkout set samples/csharp/enterprise-agent-tutorial/1-idea-to-prototype
git checkout
cd samples/csharp/enterprise-agent-tutorial/1-idea-to-prototype
Option C (Download ZIP of repository)
Download the repository ZIP, extract it to your local environment, and go to the tutorial folder.For production adoption, use a standalone repository. This tutorial uses the shared samples repo. Sparse checkout minimizes local noise.
- Python
- C#
Download the Python code now
samples/python/enterprise-agent-tutorial/1-idea-to-prototype.Download the C# code now
samples/csharp/enterprise-agent-tutorial/1-idea-to-prototype. enterprise-agent-tutorial/
└── 1-idea-to-prototype/
├── .env # Create this file (local environment variables)
├── .gitkeep
├── evaluate.py # Business evaluation framework
├── evaluation_results.json
├── main.py # Modern Workplace Assistant
├── questions.jsonl # Business test scenarios (4 questions)
├── requirements.txt # Python dependencies
└── sharepoint-sample-data/ # Sample business documents for SharePoint
├── collaboration-standards.docx
├── data-governance-policy.docx
├── remote-work-policy.docx
└── security-guidelines.docx
enterprise-agent-tutorial/
└── 1-idea-to-prototype/
├── ModernWorkplaceAssistant/ # Modern Workplace Assistant
│ ├── Program.cs # Agent implementation with SharePoint + MCP
│ ├── ModernWorkplaceAssistant.csproj
│ └── .env # Environment variables (create this)
├── Evaluate/ # Batch evaluation framework
│ ├── Program.cs # Batch evaluation with built-in evaluators
│ ├── Evaluate.csproj
│ └── evaluation_results.json # Example output (generated)
├── questions.jsonl # Business test scenarios
└── README.md # Complete setup instructions
Run the sample
Start by running the agent so you see working functionality before diving into implementation details.Environment setup and virtual environment
- Install the required language runtimes, global tools, and VS Code extensions as described in Prepare your development environment.
-
Verify that your
requirements.txtuses these published package versions:azure-ai-projects>=2.3.0 azure-identity python-dotenv
python -m pip install -r requirements.txt
cd ModernWorkplaceAssistant
dotnet restore
cd ../Evaluate
dotnet restore
Successfully installed azure-ai-projects-... (Python) or Restore completed (.NET) with no errors.
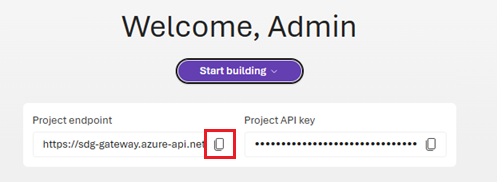
- Find your project endpoint on the welcome screen of the project.
-
Configure
.env. Set the environment values required for your language.
- Python
- C#
Copy
.env.template to .env.Create a
.env file in the ModernWorkplaceAssistant directory. # Foundry configuration
FOUNDRY_PROJECT_ENDPOINT=https://<your-resource>.services.ai.azure.com/api/projects/<your-project>
FOUNDRY_MODEL_NAME=gpt-4o-mini
# The Microsoft Learn MCP Server (optional)
MCP_SERVER_URL=https://learn.microsoft.com/api/mcp
# SharePoint integration (optional - requires a project connection ID)
SHAREPOINT_CONNECTION_ID=/subscriptions/<subscription-id>/resourceGroups/<resource-group>/providers/Microsoft.CognitiveServices/accounts/<foundry-account>/projects/<project>/connections/<connection-name>
# Foundry configuration
FOUNDRY_PROJECT_ENDPOINT=https://<your-resource>.services.ai.azure.com/api/projects/<your-project>
FOUNDRY_MODEL_NAME=gpt-4o-mini
# SharePoint integration (optional - requires connection name)
SHAREPOINT_CONNECTION_NAME=<your-sharepoint-connection-name>
# The Microsoft Learn MCP Server (optional)
MCP_SERVER_URL=https://learn.microsoft.com/api/mcp
.env contains valid values by opening the file and verifying that FOUNDRY_PROJECT_ENDPOINT starts with https:// and FOUNDRY_MODEL_NAME matches the name of a deployed model in your project.
For SharePoint integration, set SHAREPOINT_CONNECTION_ID in Python to the connection’s full project connection ID. In C#, set SHAREPOINT_CONNECTION_NAME to the connection name.
To get your tenant ID, run:To get your project endpoint, open your project in the Foundry portal and copy the value shown there.
# Get tenant ID
az account show --query tenantId -o tsv
Run agent and evaluation
python main.py
python evaluate.py
cd ModernWorkplaceAssistant
dotnet restore
dotnet run
cd ../Evaluate
dotnet restore
dotnet run
Expected output (agent first run)
Successful run with SharePoint:🤖 Creating Modern Workplace Assistant...
✅ SharePoint tool configured successfully
✅ Agent created successfully (name: Modern Workplace Assistant, version: 1)
📁 SharePoint integration skipped (SHAREPOINT_CONNECTION_ID not set)
✅ Agent created successfully (name: Modern Workplace Assistant, version: 1)
📁 SharePoint integration skipped (SHAREPOINT_CONNECTION_NAME not set)
✅ Agent created successfully (name: Modern Workplace Assistant, version: 1)
Set up sample SharePoint business documents
- Go to your SharePoint site (configured in the connection).
- Create document library “Company Policies” (or use existing “Documents”).
-
Upload the four sample Word documents provided in the
sharepoint-sample-datafolder:remote-work-policy.docxsecurity-guidelines.docxcollaboration-standards.docxdata-governance-policy.docx
- Verify that four documents appear in the library before proceeding.
Sample structure
📁 Company Policies/
├── remote-work-policy.docx # VPN, MFA, device requirements
├── security-guidelines.docx # Azure security standards
├── collaboration-standards.docx # Teams, SharePoint usage
└── data-governance-policy.docx # Data classification, retention
Understand the assistant implementation
This section is for reference only — no action needed. It explains the code you already ran.
main.py (Python) or ModernWorkplaceAssistant/Program.cs (C#). You already ran the agent. After reading it, you can:
- Add new internal and external data tools.
- Extend dynamic instructions.
- Introduce multi-agent orchestration.
- Enhance observability and diagnostics.
- Configure imports and authentication
- Configure authentication to Azure
- Configure the SharePoint tool
- Configure MCP tool
- Create the agent and connect the tools
- Converse with the agent
Code in this article uses packages that are currently in preview. This preview is provided without a service-level agreement, and we don’t recommend it for production workloads. Certain features might not be supported or might have constrained capabilities. For more information, see Supplemental Terms of Use for Microsoft Azure Previews.
Imports and authentication setup
The code uses several client libraries from the Microsoft Foundry SDK to create a robust enterprise agent. #!/usr/bin/env python3
"""
Microsoft Foundry Agent Sample - Tutorial 1: Modern Workplace Assistant
This sample demonstrates a complete business scenario using the Microsoft Foundry SDK:
- Agent creation with PromptAgentDefinition
- Conversation management via the Responses API
- Robust error handling and graceful degradation
Educational Focus:
- Enterprise AI patterns with the Microsoft Foundry SDK
- Real-world business scenarios that enterprises face daily
- Production-ready error handling and diagnostics
- Foundation for governance, evaluation, and monitoring (Tutorials 2-3)
Business Scenario:
An employee needs to implement Azure AD multi-factor authentication. They need:
1. Company security policy requirements
2. Technical implementation steps
3. Combined guidance showing how policy requirements map to technical implementation
"""
# <imports_and_includes>
import os
import time
from azure.ai.projects import AIProjectClient
from azure.ai.projects.models import (
PromptAgentDefinition,
SharepointPreviewTool,
SharepointGroundingToolParameters,
ToolProjectConnection,
MCPTool,
)
from azure.identity import DefaultAzureCredential
from dotenv import load_dotenv
from openai.types.responses.response_input_param import (
McpApprovalResponse,
)
# </imports_and_includes>
load_dotenv()
# ============================================================================
# AUTHENTICATION SETUP
# ============================================================================
endpoint = os.environ["PROJECT_ENDPOINT"]
def create_workplace_assistant(project_client):
"""
Create a Modern Workplace Assistant using the Microsoft Foundry SDK.
This demonstrates enterprise AI patterns:
1. Agent creation with PromptAgentDefinition
2. Robust error handling with graceful degradation
3. Dynamic agent capabilities based on available resources
4. Clear diagnostic information for troubleshooting
Returns:
agent: The created agent object
"""
print("🤖 Creating Modern Workplace Assistant...")
# ========================================================================
# SHAREPOINT INTEGRATION SETUP
# ========================================================================
# <sharepoint_tool_setup>
sharepoint_connection_id = os.environ.get("SHAREPOINT_CONNECTION_ID")
sharepoint_tool = None
if sharepoint_connection_id:
print("📁 Configuring SharePoint integration...")
print(f" Connection ID: {sharepoint_connection_id}")
try:
sharepoint_tool = SharepointPreviewTool(
sharepoint_grounding_preview=SharepointGroundingToolParameters(
project_connections=[
ToolProjectConnection(
project_connection_id=sharepoint_connection_id
)
]
)
)
print("✅ SharePoint tool configured successfully")
except Exception as e:
print(f"⚠️ SharePoint tool unavailable: {e}")
print(" Agent will operate without SharePoint access")
sharepoint_tool = None
else:
print("📁 SharePoint integration skipped (SHAREPOINT_CONNECTION_ID not set)")
# </sharepoint_tool_setup>
# ========================================================================
# MICROSOFT LEARN MCP INTEGRATION SETUP
# ========================================================================
# <mcp_tool_setup>
mcp_server_url = os.environ.get("MCP_SERVER_URL")
mcp_tool = None
if mcp_server_url:
print("📚 Configuring Microsoft Learn MCP integration...")
print(f" Server URL: {mcp_server_url}")
try:
mcp_tool = MCPTool(
server_url=mcp_server_url,
server_label="Microsoft_Learn_Documentation",
require_approval="always",
)
print("✅ MCP tool configured successfully")
except Exception as e:
print(f"⚠️ MCP tool unavailable: {e}")
print(" Agent will operate without Microsoft Learn access")
mcp_tool = None
else:
print("📚 MCP integration skipped (MCP_SERVER_URL not set)")
# </mcp_tool_setup>
# ========================================================================
# AGENT CREATION WITH DYNAMIC CAPABILITIES
# ========================================================================
if sharepoint_tool and mcp_tool:
instructions = """You are a Modern Workplace Assistant for Contoso Corporation.
CAPABILITIES:
- Search SharePoint for company policies, procedures, and internal documentation
- Access Microsoft Learn for current Azure and Microsoft 365 technical guidance
- Provide comprehensive solutions combining internal requirements with external implementation
RESPONSE STRATEGY:
- For policy questions: Search SharePoint for company-specific requirements and guidelines
- For technical questions: Use Microsoft Learn for current Azure/M365 documentation
- For implementation questions: Combine both sources to show how company policies map to technical implementation
- Always cite your sources and provide step-by-step guidance"""
elif sharepoint_tool:
instructions = """You are a Modern Workplace Assistant with access to Contoso Corporation's SharePoint.
CAPABILITIES:
- Search SharePoint for company policies, procedures, and internal documentation
- Provide detailed technical guidance based on your knowledge
- Combine company policies with general best practices"""
elif mcp_tool:
instructions = """You are a Technical Assistant with access to Microsoft Learn documentation.
CAPABILITIES:
- Access Microsoft Learn for current Azure and Microsoft 365 technical guidance
- Provide detailed implementation steps and best practices
- Explain Azure services, features, and configuration options"""
else:
instructions = """You are a Technical Assistant specializing in Azure and Microsoft 365 guidance.
CAPABILITIES:
- Provide detailed Azure and Microsoft 365 technical guidance
- Explain implementation steps and best practices
- Help with Azure AD, Conditional Access, MFA, and security configurations"""
# <create_agent_with_tools>
print(f"🛠️ Creating agent with model: {os.environ['MODEL_DEPLOYMENT_NAME']}")
tools = []
if sharepoint_tool:
tools.append(sharepoint_tool)
print(" ✓ SharePoint tool added")
if mcp_tool:
tools.append(mcp_tool)
print(" ✓ MCP tool added")
print(f" Total tools: {len(tools)}")
agent = project_client.agents.create_version(
agent_name="Modern Workplace Assistant",
definition=PromptAgentDefinition(
model=os.environ["MODEL_DEPLOYMENT_NAME"],
instructions=instructions,
tools=tools if tools else None,
),
)
print(f"✅ Agent created successfully (name: {agent.name}, version: {agent.version})")
return agent
# </create_agent_with_tools>
def demonstrate_business_scenarios(agent, openai_client):
"""
Demonstrate realistic business scenarios with the Microsoft Foundry SDK.
This function showcases the practical value of the Modern Workplace Assistant
by walking through scenarios that enterprise employees face regularly.
"""
scenarios = [
{
"title": "📋 Company Policy Question (SharePoint Only)",
"question": "What is Contoso's remote work policy?",
"context": "Employee needs to understand company-specific remote work requirements",
"learning_point": "SharePoint tool retrieves internal company policies",
},
{
"title": "📚 Technical Documentation Question (MCP Only)",
"question": (
"According to Microsoft Learn, what is the correct way to implement "
"Azure AD Conditional Access policies? Please include reference links "
"to the official documentation."
),
"context": "IT administrator needs authoritative Microsoft technical guidance",
"learning_point": "MCP tool accesses Microsoft Learn for official documentation with links",
},
{
"title": "🔄 Combined Implementation Question (SharePoint + MCP)",
"question": (
"Based on our company's remote work security policy, how should I configure "
"my Azure environment to comply? Please include links to Microsoft "
"documentation showing how to implement each requirement."
),
"context": "Need to map company policy to technical implementation with official guidance",
"learning_point": "Both tools work together: SharePoint for policy + MCP for implementation docs",
},
]
print("\n" + "=" * 70)
print("🏢 MODERN WORKPLACE ASSISTANT - BUSINESS SCENARIO DEMONSTRATION")
print("=" * 70)
print("This demonstration shows how AI agents solve real business problems")
print("using the Microsoft Foundry SDK.")
print("=" * 70)
for i, scenario in enumerate(scenarios, 1):
print(f"\n📊 SCENARIO {i}/3: {scenario['title']}")
print("-" * 50)
print(f"❓ QUESTION: {scenario['question']}")
print(f"🎯 BUSINESS CONTEXT: {scenario['context']}")
print(f"🎓 LEARNING POINT: {scenario['learning_point']}")
print("-" * 50)
# <agent_conversation>
print("🤖 AGENT RESPONSE:")
response, status = create_agent_response(agent, scenario["question"], openai_client)
# </agent_conversation>
if status == "completed" and response and len(response.strip()) > 10:
print(f"✅ SUCCESS: {response[:300]}...")
if len(response) > 300:
print(f" 📏 Full response: {len(response)} characters")
else:
print(f"⚠️ RESPONSE: {response}")
print(f"📈 STATUS: {status}")
print("-" * 50)
time.sleep(1)
print("\n✅ DEMONSTRATION COMPLETED!")
print("🎓 Key Learning Outcomes:")
print(" • Microsoft Foundry SDK usage for enterprise AI")
print(" • Conversation management via the Responses API")
print(" • Real business value through AI assistance")
print(" • Foundation for governance and monitoring (Tutorials 2-3)")
return True
def create_agent_response(agent, message, openai_client):
"""
Create a response from the workplace agent using the Responses API.
This function demonstrates the response pattern for the Microsoft Foundry SDK
including MCP tool approval handling.
Args:
agent: The agent object (with .name attribute)
message: The user's message
Returns:
tuple: (response_text, status)
"""
try:
response = openai_client.responses.create(
input=message,
extra_body={
"agent": {"name": agent.name, "type": "agent_reference"}
},
)
# Handle MCP approval requests if present
approval_list = []
for item in response.output:
if item.type == "mcp_approval_request" and item.id:
approval_list.append(
McpApprovalResponse(
type="mcp_approval_response",
approve=True,
approval_request_id=item.id,
)
)
if approval_list:
response = openai_client.responses.create(
input=approval_list,
previous_response_id=response.id,
extra_body={
"agent": {"name": agent.name, "type": "agent_reference"}
},
)
return response.output_text, "completed"
except Exception as e:
return f"Error in conversation: {str(e)}", "failed"
def interactive_mode(agent, openai_client):
"""Interactive mode for testing the workplace agent."""
print("\n" + "=" * 60)
print("💬 INTERACTIVE MODE - Test Your Workplace Agent!")
print("=" * 60)
print("Ask questions about Azure, M365, security, and technical implementation.")
print("Type 'quit' to exit.")
print("-" * 60)
while True:
try:
question = input("\n❓ Your question: ").strip()
if question.lower() in ["quit", "exit", "bye"]:
break
if not question:
print("💡 Please ask a question about Azure or M365 technical implementation.")
continue
print("\n🤖 Workplace Agent: ", end="", flush=True)
response, status = create_agent_response(agent, question, openai_client)
print(response)
if status != "completed":
print(f"\n⚠️ Response status: {status}")
print("-" * 60)
except KeyboardInterrupt:
break
except Exception as e:
print(f"\n❌ Error: {e}")
print("-" * 60)
print("\n👋 Thank you for testing the Modern Workplace Agent!")
def main():
"""Main execution flow demonstrating the complete sample."""
print("🚀 Foundry - Modern Workplace Assistant")
print("Tutorial 1: Building Enterprise Agents with Microsoft Foundry SDK")
print("=" * 70)
# <agent_authentication>
with (
DefaultAzureCredential() as credential,
AIProjectClient(endpoint=endpoint, credential=credential) as project_client,
project_client.get_openai_client() as openai_client,
):
print(f"✅ Connected to Foundry: {endpoint}")
# </agent_authentication>
try:
agent = create_workplace_assistant(project_client)
demonstrate_business_scenarios(agent, openai_client)
print("\n🎯 Try interactive mode? (y/n): ", end="")
try:
if input().lower().startswith("y"):
interactive_mode(agent, openai_client)
except EOFError:
print("n")
print("\n🎉 Sample completed successfully!")
print("📚 This foundation supports Tutorial 2 (Governance) and Tutorial 3 (Production)")
print("🔗 Next: Add evaluation metrics, monitoring, and production deployment")
except Exception as e:
print(f"\n❌ Error: {e}")
print("Please check your .env configuration and ensure:")
print(" - PROJECT_ENDPOINT is correct")
print(" - MODEL_DEPLOYMENT_NAME is deployed")
print(" - Azure credentials are configured (az login)")
if __name__ == "__main__":
main()
// <imports_and_includes>
using System;
using System.ClientModel;
using System.Collections.Generic;
using System.IO;
using System.Linq;
using System.Threading.Tasks;
using Azure.AI.Projects;
using Azure.AI.Projects.OpenAI;
using Azure.Identity;
using DotNetEnv;
using OpenAI.Responses;
// </imports_and_includes>
#pragma warning disable OPENAI001
/*
* Azure AI Foundry Agent Sample - Tutorial 1: Modern Workplace Assistant (C#)
*
* This sample demonstrates a complete business scenario using the Azure AI Projects v2 SDK:
* - Agent creation with PromptAgentDefinition and AgentVersion
* - Conversation via the Responses API (ProjectResponsesClient)
* - SharePoint and MCP tool integration on the agent definition
* - MCP tool approval handling through the Responses API approval loop
* - Robust error handling and graceful degradation
*
* Educational Focus:
* - Enterprise AI patterns with the v2 Azure AI Projects SDK
* - Real-world business scenarios that enterprises face daily
* - Production-ready error handling and diagnostics
* - Foundation for governance, evaluation, and monitoring (Tutorials 2-3)
*
* Business Scenario:
* An employee needs to implement Azure AD multi-factor authentication. They need:
* 1. Company security policy requirements (from SharePoint)
* 2. Technical implementation steps (from Microsoft Learn via MCP)
* 3. Combined guidance showing how policy requirements map to technical implementation
*/
class Program
{
private static AIProjectClient? projectClient;
private static ProjectResponsesClient? responseClient;
private static string agentName = "Modern_Workplace_Assistant";
static async Task Main(string[] args)
{
Console.WriteLine("🚀 Azure AI Foundry - Modern Workplace Assistant");
Console.WriteLine("Tutorial 1: Building Enterprise Agents with SharePoint + MCP Tools");
Console.WriteLine("".PadRight(70, '='));
try
{
// Create the agent with full diagnostic output
var agentVersion = await CreateWorkplaceAssistantAsync();
// Demonstrate business scenarios
await DemonstrateBusinessScenariosAsync(agentVersion);
// Offer interactive testing
Console.Write("\n🎯 Try interactive mode? (y/n): ");
var response = Console.ReadLine();
if (response?.ToLower().StartsWith("y") == true)
{
await InteractiveModeAsync(agentVersion);
}
// Cleanup
Console.WriteLine("\n🧹 Cleaning up agent...");
await projectClient!.Agents.DeleteAgentVersionAsync(
agentName: agentVersion.Name,
agentVersion: agentVersion.Version);
Console.WriteLine("✅ Agent deleted");
Console.WriteLine("\n🎉 Sample completed successfully!");
Console.WriteLine("📚 This foundation supports Tutorial 2 (Governance) and Tutorial 3 (Production)");
Console.WriteLine("🔗 Next: Add evaluation metrics, monitoring, and production deployment");
}
catch (Exception ex)
{
Console.WriteLine($"\n❌ Error: {ex.Message}");
Console.WriteLine("Please check your .env configuration and ensure:");
Console.WriteLine(" - PROJECT_ENDPOINT is correct");
Console.WriteLine(" - MODEL_DEPLOYMENT_NAME is deployed");
Console.WriteLine(" - Azure credentials are configured (az login)");
throw;
}
}
/// <summary>
/// Create a Modern Workplace Assistant with SharePoint and MCP tools.
///
/// This demonstrates enterprise AI patterns:
/// 1. Agent creation with PromptAgentDefinition and CreateAgentVersionAsync
/// 2. SharePoint integration via SharepointAgentTool
/// 3. MCP integration via McpTool from the OpenAI Responses API
/// 4. Robust error handling with graceful degradation
/// 5. Dynamic agent capabilities based on available resources
///
/// Educational Value:
/// - Shows real-world complexity of enterprise AI systems
/// - Demonstrates how to handle partial system failures
/// - Provides patterns for agent creation with multiple tools
/// </summary>
private static async Task<AgentVersion> CreateWorkplaceAssistantAsync()
{
// Load environment variables from shared .env file
var envPath = Path.Combine(Directory.GetCurrentDirectory(), "..", "shared", ".env");
if (File.Exists(envPath))
{
Env.Load(envPath);
Console.WriteLine($"📄 Loaded environment from: {envPath}");
}
else
{
// Fallback to local .env
Env.Load(".env");
}
var projectEndpoint = Environment.GetEnvironmentVariable("PROJECT_ENDPOINT");
var modelDeploymentName = Environment.GetEnvironmentVariable("MODEL_DEPLOYMENT_NAME");
var sharePointConnectionName = Environment.GetEnvironmentVariable("SHAREPOINT_CONNECTION_NAME");
var mcpServerUrl = Environment.GetEnvironmentVariable("MCP_SERVER_URL");
if (string.IsNullOrEmpty(projectEndpoint))
throw new InvalidOperationException("PROJECT_ENDPOINT environment variable not set");
if (string.IsNullOrEmpty(modelDeploymentName))
throw new InvalidOperationException("MODEL_DEPLOYMENT_NAME environment variable not set");
Console.WriteLine("\n🤖 Creating Modern Workplace Assistant...");
// ============================================================================
// AUTHENTICATION SETUP
// ============================================================================
// <agent_authentication>
var credential = new DefaultAzureCredential();
projectClient = new AIProjectClient(new Uri(projectEndpoint), credential);
Console.WriteLine($"✅ Connected to Azure AI Foundry: {projectEndpoint}");
// </agent_authentication>
// ========================================================================
// SHAREPOINT INTEGRATION SETUP
// ========================================================================
// <sharepoint_connection_resolution>
SharepointAgentTool? sharepointTool = null;
if (!string.IsNullOrEmpty(sharePointConnectionName))
{
Console.WriteLine($"📁 Configuring SharePoint integration...");
Console.WriteLine($" Connection name: {sharePointConnectionName}");
try
{
// <sharepoint_tool_setup>
// Resolve connection name to connection ID via the Connections API
AIProjectConnection sharepointConnection = await projectClient.Connections.GetConnectionAsync(
sharePointConnectionName, includeCredentials: false);
SharePointGroundingToolOptions sharepointToolOption = new()
{
ProjectConnections = { new ToolProjectConnection(projectConnectionId: sharepointConnection.Id) }
};
sharepointTool = new SharepointAgentTool(sharepointToolOption);
Console.WriteLine($"✅ SharePoint tool configured successfully");
// </sharepoint_tool_setup>
}
catch (Exception ex)
{
Console.WriteLine($"⚠️ SharePoint connection unavailable: {ex.Message}");
Console.WriteLine($" Possible causes:");
Console.WriteLine($" - Connection '{sharePointConnectionName}' doesn't exist in the project");
Console.WriteLine($" - Insufficient permissions to access the connection");
Console.WriteLine($" - Connection configuration is incomplete");
Console.WriteLine($" Agent will operate without SharePoint access");
}
}
else
{
Console.WriteLine($"📁 SharePoint integration skipped (SHAREPOINT_CONNECTION_NAME not set)");
}
// </sharepoint_connection_resolution>
// ========================================================================
// MICROSOFT LEARN MCP INTEGRATION SETUP
// ========================================================================
// <mcp_tool_setup>
// MCP (Model Context Protocol) enables agents to access external data sources
// like Microsoft Learn documentation. The approval flow is handled in ChatWithAssistantAsync.
McpTool? mcpTool = null;
if (!string.IsNullOrEmpty(mcpServerUrl))
{
Console.WriteLine($"📚 Configuring Microsoft Learn MCP integration...");
Console.WriteLine($" Server URL: {mcpServerUrl}");
try
{
// Create MCP tool for Microsoft Learn documentation access
// server_label must match pattern: ^[a-zA-Z0-9_]+$ (alphanumeric and underscores only)
mcpTool = new McpTool("Microsoft_Learn_Documentation", new Uri(mcpServerUrl));
Console.WriteLine($"✅ MCP tool configured successfully");
}
catch (Exception ex)
{
Console.WriteLine($"⚠️ MCP tool unavailable: {ex.Message}");
Console.WriteLine($" Agent will operate without Microsoft Learn access");
}
}
else
{
Console.WriteLine($"📚 MCP integration skipped (MCP_SERVER_URL not set)");
}
// </mcp_tool_setup>
// ========================================================================
// AGENT CREATION WITH DYNAMIC CAPABILITIES
// ========================================================================
// Create agent instructions based on available data sources
string instructions = GetAgentInstructions(sharepointTool != null, mcpTool != null);
// <create_agent_with_tools>
// Create the agent using the v2 SDK with PromptAgentDefinition
Console.WriteLine($"🛠️ Creating agent with model: {modelDeploymentName}");
var agentDefinition = new PromptAgentDefinition(modelDeploymentName)
{
Instructions = instructions
};
// Add tools to the agent definition
if (sharepointTool != null)
{
agentDefinition.Tools.Add(sharepointTool);
Console.WriteLine($" ✓ SharePoint tool added");
}
if (mcpTool != null)
{
agentDefinition.Tools.Add(mcpTool);
Console.WriteLine($" ✓ MCP tool added");
}
Console.WriteLine($" Total tools: {agentDefinition.Tools.Count}");
// Create agent version
AgentVersion agentVersion = await projectClient.Agents.CreateAgentVersionAsync(
agentName: agentName,
options: new(agentDefinition));
// Create a response client bound to this agent for conversations
responseClient = projectClient.OpenAI
.GetProjectResponsesClientForAgent(agentVersion);
Console.WriteLine($"✅ Agent created successfully: {agentVersion.Name} (version {agentVersion.Version})");
return agentVersion;
// </create_agent_with_tools>
}
/// <summary>
/// Generate agent instructions based on available tools.
/// </summary>
private static string GetAgentInstructions(bool hasSharePoint, bool hasMcp)
{
if (hasSharePoint && hasMcp)
{
return @"You are a Modern Workplace Assistant for Contoso Corporation.
CAPABILITIES:
- Search SharePoint for company policies, procedures, and internal documentation
- Access Microsoft Learn for current Azure and Microsoft 365 technical guidance
- Provide comprehensive solutions combining internal requirements with external implementation
RESPONSE STRATEGY:
- For policy questions: Search SharePoint for company-specific requirements and guidelines
- For technical questions: Use Microsoft Learn for current Azure/M365 documentation and best practices
- For implementation questions: Combine both sources to show how company policies map to technical implementation
- Always cite your sources and provide step-by-step guidance
- Explain how internal requirements connect to external implementation steps
EXAMPLE SCENARIOS:
- ""What is our MFA policy?"" → Search SharePoint for security policies
- ""How do I configure Azure AD Conditional Access?"" → Use Microsoft Learn for technical steps
- ""Our policy requires MFA - how do I implement this?"" → Combine policy requirements with implementation guidance";
}
else if (hasSharePoint)
{
return @"You are a Modern Workplace Assistant with access to Contoso Corporation's SharePoint.
CAPABILITIES:
- Search SharePoint for company policies, procedures, and internal documentation
- Provide detailed technical guidance based on your knowledge
- Combine company policies with general best practices
RESPONSE STRATEGY:
- Search SharePoint for company-specific requirements
- Provide technical guidance based on Azure and M365 best practices
- Explain how to align implementations with company policies";
}
else if (hasMcp)
{
return @"You are a Technical Assistant with access to Microsoft Learn documentation.
CAPABILITIES:
- Access Microsoft Learn for current Azure and Microsoft 365 technical guidance
- Provide detailed implementation steps and best practices
- Explain Azure services, features, and configuration options
RESPONSE STRATEGY:
- Use Microsoft Learn for technical documentation
- Provide comprehensive implementation guidance
- Reference official documentation and best practices";
}
else
{
return @"You are a Technical Assistant specializing in Azure and Microsoft 365 guidance.
CAPABILITIES:
- Provide detailed Azure and Microsoft 365 technical guidance
- Explain implementation steps and best practices
- Help with Azure AD, Conditional Access, MFA, and security configurations
RESPONSE STRATEGY:
- Provide comprehensive technical guidance
- Include step-by-step implementation instructions
- Reference best practices and security considerations";
}
}
/// <summary>
/// Demonstrate realistic business scenarios.
///
/// This function showcases the practical value of the Modern Workplace Assistant
/// by walking through scenarios that enterprise employees face regularly.
///
/// Educational Value:
/// - Shows real business problems that AI agents can solve
/// - Demonstrates the Responses API conversation pattern
/// - Illustrates conversation patterns with tool usage
/// </summary>
private static async Task DemonstrateBusinessScenariosAsync(AgentVersion agentVersion)
{
var scenarios = new[]
{
new
{
Title = "📋 Company Policy Question (SharePoint Only)",
Question = "What is Contoso's remote work policy?",
Context = "Employee needs to understand company-specific remote work requirements",
LearningPoint = "SharePoint tool retrieves internal company policies"
},
new
{
Title = "📚 Technical Documentation Question (MCP Only)",
Question = "According to Microsoft Learn, what is the correct way to implement Azure AD Conditional Access policies? Please include reference links to the official documentation.",
Context = "IT administrator needs authoritative Microsoft technical guidance",
LearningPoint = "MCP tool accesses Microsoft Learn for official documentation with links"
},
new
{
Title = "🔄 Combined Implementation Question (SharePoint + MCP)",
Question = "Based on our company's remote work security policy, how should I configure my Azure environment to comply? Please include links to Microsoft documentation showing how to implement each requirement.",
Context = "Need to map company policy to technical implementation with official guidance",
LearningPoint = "Both tools work together: SharePoint for policy + MCP for implementation docs"
}
};
Console.WriteLine("\n" + "".PadRight(70, '='));
Console.WriteLine("🏢 MODERN WORKPLACE ASSISTANT - BUSINESS SCENARIO DEMONSTRATION");
Console.WriteLine("".PadRight(70, '='));
Console.WriteLine("This demonstration shows how AI agents solve real business problems");
Console.WriteLine("using the Azure AI Projects v2 SDK with the Responses API.");
Console.WriteLine("".PadRight(70, '='));
for (int i = 0; i < scenarios.Length; i++)
{
var scenario = scenarios[i];
Console.WriteLine($"\n📊 SCENARIO {i + 1}/{scenarios.Length}: {scenario.Title}");
Console.WriteLine("".PadRight(50, '-'));
Console.WriteLine($"❓ QUESTION: {scenario.Question}");
Console.WriteLine($"🎯 BUSINESS CONTEXT: {scenario.Context}");
Console.WriteLine($"🎓 LEARNING POINT: {scenario.LearningPoint}");
Console.WriteLine("".PadRight(50, '-'));
// <agent_conversation>
Console.WriteLine("🤖 ASSISTANT RESPONSE:");
var (response, status) = await ChatWithAssistantAsync(scenario.Question);
// </agent_conversation>
// Display response with analysis
if (status == "completed" && !string.IsNullOrWhiteSpace(response) && response.Length > 10)
{
var preview = response.Length > 500 ? response.Substring(0, 500) + "..." : response;
Console.WriteLine($"✅ SUCCESS: {preview}");
if (response.Length > 500)
{
Console.WriteLine($" 📏 Full response: {response.Length} characters");
}
}
else
{
Console.WriteLine($"⚠️ RESPONSE: {response}");
}
Console.WriteLine($"📈 STATUS: {status}");
Console.WriteLine("".PadRight(50, '-'));
// Small delay between scenarios
await Task.Delay(1000);
}
Console.WriteLine("\n✅ DEMONSTRATION COMPLETED!");
Console.WriteLine("🎓 Key Learning Outcomes:");
Console.WriteLine(" • Azure AI Projects v2 SDK with PromptAgentDefinition");
Console.WriteLine(" • Responses API for agent conversations");
Console.WriteLine(" • SharePoint + MCP tool integration");
Console.WriteLine(" • MCP tool approval handling via the Responses API");
Console.WriteLine(" • Real business value through AI assistance");
Console.WriteLine(" • Foundation for governance and monitoring (Tutorials 2-3)");
}
/// <summary>
/// Execute a conversation with the workplace assistant using the Responses API.
///
/// This function demonstrates the v2 conversation pattern including:
/// - Sending a request via ProjectResponsesClient
/// - MCP tool approval handling through the Responses API approval loop
/// - Proper error and timeout management
///
/// Educational Value:
/// - Shows the Responses API conversation pattern (replaces threads/runs)
/// - Demonstrates MCP approval via McpToolCallApprovalRequestItem
/// - Includes timeout and error management patterns
/// </summary>
// <mcp_approval_handler>
private static async Task<(string response, string status)> ChatWithAssistantAsync(string message)
{
try
{
// Send the user message via the Responses API
ResponseResult response = await responseClient!.CreateResponseAsync(message);
// <mcp_approval_usage>
// Handle MCP tool approval loop.
// When the agent uses MCP tools, the response may contain
// McpToolCallApprovalRequestItem items. We auto-approve and re-send.
int maxIterations = 30;
int iteration = 0;
while (iteration < maxIterations)
{
// Check for MCP approval requests in the output items
var approvalRequests = response.OutputItems
.OfType<McpToolCallApprovalRequestItem>()
.ToList();
if (approvalRequests.Count == 0) break;
// Build approval response items
var approvalItems = new List<ResponseItem>();
foreach (var request in approvalRequests)
{
Console.WriteLine($" 🔧 Approving MCP tool: {request.ToolName}");
// Auto-approve MCP tool calls
// In production, you might implement custom approval logic here:
// - RBAC checks (is user authorized for this tool?)
// - Cost controls (has budget limit been reached?)
// - Logging and auditing
// - Interactive approval prompts
approvalItems.Add(ResponseItem.CreateMcpApprovalResponseItem(
request.Id,
approved: true));
}
// Send approval responses, chained to the previous response
response = await responseClient.CreateResponseAsync(
approvalItems,
previousResponseId: response.Id);
iteration++;
}
// </mcp_approval_usage>
// Extract the text output
string? outputText = response.GetOutputText();
if (!string.IsNullOrWhiteSpace(outputText) && outputText.Length > 0)
{
return (outputText, "completed");
}
else
{
return ("No response from assistant", "completed");
}
}
catch (Exception ex)
{
Console.WriteLine($"\n❌ Exception details: {ex.GetType().Name}: {ex.Message}");
if (ex.InnerException != null)
{
Console.WriteLine($" Inner: {ex.InnerException.Message}");
}
return ($"Error in conversation: {ex.Message}", "failed");
}
}
// </mcp_approval_handler>
/// <summary>
/// Interactive mode for testing the workplace assistant.
///
/// This provides a simple interface for users to test the agent with their own questions
/// and see how it provides comprehensive technical guidance.
/// Uses PreviousResponseId to maintain conversation context across turns.
/// </summary>
private static async Task InteractiveModeAsync(AgentVersion agentVersion)
{
Console.WriteLine("\n" + "".PadRight(60, '='));
Console.WriteLine("💬 INTERACTIVE MODE - Test Your Workplace Assistant!");
Console.WriteLine("".PadRight(60, '='));
Console.WriteLine("Ask questions about Azure, M365, security, and technical implementation:");
Console.WriteLine("• 'How do I configure Azure AD conditional access?'");
Console.WriteLine("• 'What are MFA best practices for remote workers?'");
Console.WriteLine("• 'How do I set up secure SharePoint access?'");
Console.WriteLine("Type 'quit' to exit.");
Console.WriteLine("".PadRight(60, '-'));
while (true)
{
try
{
Console.Write("\n❓ Your question: ");
string? question = Console.ReadLine()?.Trim();
if (string.IsNullOrEmpty(question))
{
Console.WriteLine("💡 Please ask a question about Azure or M365 technical implementation.");
continue;
}
if (question.ToLower() is "quit" or "exit" or "bye")
{
break;
}
Console.Write("\n🤖 Workplace Assistant: ");
var (response, status) = await ChatWithAssistantAsync(question);
Console.WriteLine(response);
if (status != "completed")
{
Console.WriteLine($"\n⚠️ Response status: {status}");
}
Console.WriteLine("".PadRight(60, '-'));
}
catch (Exception ex)
{
Console.WriteLine($"\n❌ Error: {ex.Message}");
Console.WriteLine("".PadRight(60, '-'));
}
}
Console.WriteLine("\n👋 Thank you for testing the Modern Workplace Assistant!");
}
}
Configure authentication in Azure
Before you create your agent, set up authentication to the Foundry. #!/usr/bin/env python3
"""
Microsoft Foundry Agent Sample - Tutorial 1: Modern Workplace Assistant
This sample demonstrates a complete business scenario using the Microsoft Foundry SDK:
- Agent creation with PromptAgentDefinition
- Conversation management via the Responses API
- Robust error handling and graceful degradation
Educational Focus:
- Enterprise AI patterns with the Microsoft Foundry SDK
- Real-world business scenarios that enterprises face daily
- Production-ready error handling and diagnostics
- Foundation for governance, evaluation, and monitoring (Tutorials 2-3)
Business Scenario:
An employee needs to implement Azure AD multi-factor authentication. They need:
1. Company security policy requirements
2. Technical implementation steps
3. Combined guidance showing how policy requirements map to technical implementation
"""
# <imports_and_includes>
import os
import time
from azure.ai.projects import AIProjectClient
from azure.ai.projects.models import (
PromptAgentDefinition,
SharepointPreviewTool,
SharepointGroundingToolParameters,
ToolProjectConnection,
MCPTool,
)
from azure.identity import DefaultAzureCredential
from dotenv import load_dotenv
from openai.types.responses.response_input_param import (
McpApprovalResponse,
)
# </imports_and_includes>
load_dotenv()
# ============================================================================
# AUTHENTICATION SETUP
# ============================================================================
endpoint = os.environ["PROJECT_ENDPOINT"]
def create_workplace_assistant(project_client):
"""
Create a Modern Workplace Assistant using the Microsoft Foundry SDK.
This demonstrates enterprise AI patterns:
1. Agent creation with PromptAgentDefinition
2. Robust error handling with graceful degradation
3. Dynamic agent capabilities based on available resources
4. Clear diagnostic information for troubleshooting
Returns:
agent: The created agent object
"""
print("🤖 Creating Modern Workplace Assistant...")
# ========================================================================
# SHAREPOINT INTEGRATION SETUP
# ========================================================================
# <sharepoint_tool_setup>
sharepoint_connection_id = os.environ.get("SHAREPOINT_CONNECTION_ID")
sharepoint_tool = None
if sharepoint_connection_id:
print("📁 Configuring SharePoint integration...")
print(f" Connection ID: {sharepoint_connection_id}")
try:
sharepoint_tool = SharepointPreviewTool(
sharepoint_grounding_preview=SharepointGroundingToolParameters(
project_connections=[
ToolProjectConnection(
project_connection_id=sharepoint_connection_id
)
]
)
)
print("✅ SharePoint tool configured successfully")
except Exception as e:
print(f"⚠️ SharePoint tool unavailable: {e}")
print(" Agent will operate without SharePoint access")
sharepoint_tool = None
else:
print("📁 SharePoint integration skipped (SHAREPOINT_CONNECTION_ID not set)")
# </sharepoint_tool_setup>
# ========================================================================
# MICROSOFT LEARN MCP INTEGRATION SETUP
# ========================================================================
# <mcp_tool_setup>
mcp_server_url = os.environ.get("MCP_SERVER_URL")
mcp_tool = None
if mcp_server_url:
print("📚 Configuring Microsoft Learn MCP integration...")
print(f" Server URL: {mcp_server_url}")
try:
mcp_tool = MCPTool(
server_url=mcp_server_url,
server_label="Microsoft_Learn_Documentation",
require_approval="always",
)
print("✅ MCP tool configured successfully")
except Exception as e:
print(f"⚠️ MCP tool unavailable: {e}")
print(" Agent will operate without Microsoft Learn access")
mcp_tool = None
else:
print("📚 MCP integration skipped (MCP_SERVER_URL not set)")
# </mcp_tool_setup>
# ========================================================================
# AGENT CREATION WITH DYNAMIC CAPABILITIES
# ========================================================================
if sharepoint_tool and mcp_tool:
instructions = """You are a Modern Workplace Assistant for Contoso Corporation.
CAPABILITIES:
- Search SharePoint for company policies, procedures, and internal documentation
- Access Microsoft Learn for current Azure and Microsoft 365 technical guidance
- Provide comprehensive solutions combining internal requirements with external implementation
RESPONSE STRATEGY:
- For policy questions: Search SharePoint for company-specific requirements and guidelines
- For technical questions: Use Microsoft Learn for current Azure/M365 documentation
- For implementation questions: Combine both sources to show how company policies map to technical implementation
- Always cite your sources and provide step-by-step guidance"""
elif sharepoint_tool:
instructions = """You are a Modern Workplace Assistant with access to Contoso Corporation's SharePoint.
CAPABILITIES:
- Search SharePoint for company policies, procedures, and internal documentation
- Provide detailed technical guidance based on your knowledge
- Combine company policies with general best practices"""
elif mcp_tool:
instructions = """You are a Technical Assistant with access to Microsoft Learn documentation.
CAPABILITIES:
- Access Microsoft Learn for current Azure and Microsoft 365 technical guidance
- Provide detailed implementation steps and best practices
- Explain Azure services, features, and configuration options"""
else:
instructions = """You are a Technical Assistant specializing in Azure and Microsoft 365 guidance.
CAPABILITIES:
- Provide detailed Azure and Microsoft 365 technical guidance
- Explain implementation steps and best practices
- Help with Azure AD, Conditional Access, MFA, and security configurations"""
# <create_agent_with_tools>
print(f"🛠️ Creating agent with model: {os.environ['MODEL_DEPLOYMENT_NAME']}")
tools = []
if sharepoint_tool:
tools.append(sharepoint_tool)
print(" ✓ SharePoint tool added")
if mcp_tool:
tools.append(mcp_tool)
print(" ✓ MCP tool added")
print(f" Total tools: {len(tools)}")
agent = project_client.agents.create_version(
agent_name="Modern Workplace Assistant",
definition=PromptAgentDefinition(
model=os.environ["MODEL_DEPLOYMENT_NAME"],
instructions=instructions,
tools=tools if tools else None,
),
)
print(f"✅ Agent created successfully (name: {agent.name}, version: {agent.version})")
return agent
# </create_agent_with_tools>
def demonstrate_business_scenarios(agent, openai_client):
"""
Demonstrate realistic business scenarios with the Microsoft Foundry SDK.
This function showcases the practical value of the Modern Workplace Assistant
by walking through scenarios that enterprise employees face regularly.
"""
scenarios = [
{
"title": "📋 Company Policy Question (SharePoint Only)",
"question": "What is Contoso's remote work policy?",
"context": "Employee needs to understand company-specific remote work requirements",
"learning_point": "SharePoint tool retrieves internal company policies",
},
{
"title": "📚 Technical Documentation Question (MCP Only)",
"question": (
"According to Microsoft Learn, what is the correct way to implement "
"Azure AD Conditional Access policies? Please include reference links "
"to the official documentation."
),
"context": "IT administrator needs authoritative Microsoft technical guidance",
"learning_point": "MCP tool accesses Microsoft Learn for official documentation with links",
},
{
"title": "🔄 Combined Implementation Question (SharePoint + MCP)",
"question": (
"Based on our company's remote work security policy, how should I configure "
"my Azure environment to comply? Please include links to Microsoft "
"documentation showing how to implement each requirement."
),
"context": "Need to map company policy to technical implementation with official guidance",
"learning_point": "Both tools work together: SharePoint for policy + MCP for implementation docs",
},
]
print("\n" + "=" * 70)
print("🏢 MODERN WORKPLACE ASSISTANT - BUSINESS SCENARIO DEMONSTRATION")
print("=" * 70)
print("This demonstration shows how AI agents solve real business problems")
print("using the Microsoft Foundry SDK.")
print("=" * 70)
for i, scenario in enumerate(scenarios, 1):
print(f"\n📊 SCENARIO {i}/3: {scenario['title']}")
print("-" * 50)
print(f"❓ QUESTION: {scenario['question']}")
print(f"🎯 BUSINESS CONTEXT: {scenario['context']}")
print(f"🎓 LEARNING POINT: {scenario['learning_point']}")
print("-" * 50)
# <agent_conversation>
print("🤖 AGENT RESPONSE:")
response, status = create_agent_response(agent, scenario["question"], openai_client)
# </agent_conversation>
if status == "completed" and response and len(response.strip()) > 10:
print(f"✅ SUCCESS: {response[:300]}...")
if len(response) > 300:
print(f" 📏 Full response: {len(response)} characters")
else:
print(f"⚠️ RESPONSE: {response}")
print(f"📈 STATUS: {status}")
print("-" * 50)
time.sleep(1)
print("\n✅ DEMONSTRATION COMPLETED!")
print("🎓 Key Learning Outcomes:")
print(" • Microsoft Foundry SDK usage for enterprise AI")
print(" • Conversation management via the Responses API")
print(" • Real business value through AI assistance")
print(" • Foundation for governance and monitoring (Tutorials 2-3)")
return True
def create_agent_response(agent, message, openai_client):
"""
Create a response from the workplace agent using the Responses API.
This function demonstrates the response pattern for the Microsoft Foundry SDK
including MCP tool approval handling.
Args:
agent: The agent object (with .name attribute)
message: The user's message
Returns:
tuple: (response_text, status)
"""
try:
response = openai_client.responses.create(
input=message,
extra_body={
"agent": {"name": agent.name, "type": "agent_reference"}
},
)
# Handle MCP approval requests if present
approval_list = []
for item in response.output:
if item.type == "mcp_approval_request" and item.id:
approval_list.append(
McpApprovalResponse(
type="mcp_approval_response",
approve=True,
approval_request_id=item.id,
)
)
if approval_list:
response = openai_client.responses.create(
input=approval_list,
previous_response_id=response.id,
extra_body={
"agent": {"name": agent.name, "type": "agent_reference"}
},
)
return response.output_text, "completed"
except Exception as e:
return f"Error in conversation: {str(e)}", "failed"
def interactive_mode(agent, openai_client):
"""Interactive mode for testing the workplace agent."""
print("\n" + "=" * 60)
print("💬 INTERACTIVE MODE - Test Your Workplace Agent!")
print("=" * 60)
print("Ask questions about Azure, M365, security, and technical implementation.")
print("Type 'quit' to exit.")
print("-" * 60)
while True:
try:
question = input("\n❓ Your question: ").strip()
if question.lower() in ["quit", "exit", "bye"]:
break
if not question:
print("💡 Please ask a question about Azure or M365 technical implementation.")
continue
print("\n🤖 Workplace Agent: ", end="", flush=True)
response, status = create_agent_response(agent, question, openai_client)
print(response)
if status != "completed":
print(f"\n⚠️ Response status: {status}")
print("-" * 60)
except KeyboardInterrupt:
break
except Exception as e:
print(f"\n❌ Error: {e}")
print("-" * 60)
print("\n👋 Thank you for testing the Modern Workplace Agent!")
def main():
"""Main execution flow demonstrating the complete sample."""
print("🚀 Foundry - Modern Workplace Assistant")
print("Tutorial 1: Building Enterprise Agents with Microsoft Foundry SDK")
print("=" * 70)
# <agent_authentication>
with (
DefaultAzureCredential() as credential,
AIProjectClient(endpoint=endpoint, credential=credential) as project_client,
project_client.get_openai_client() as openai_client,
):
print(f"✅ Connected to Foundry: {endpoint}")
# </agent_authentication>
try:
agent = create_workplace_assistant(project_client)
demonstrate_business_scenarios(agent, openai_client)
print("\n🎯 Try interactive mode? (y/n): ", end="")
try:
if input().lower().startswith("y"):
interactive_mode(agent, openai_client)
except EOFError:
print("n")
print("\n🎉 Sample completed successfully!")
print("📚 This foundation supports Tutorial 2 (Governance) and Tutorial 3 (Production)")
print("🔗 Next: Add evaluation metrics, monitoring, and production deployment")
except Exception as e:
print(f"\n❌ Error: {e}")
print("Please check your .env configuration and ensure:")
print(" - PROJECT_ENDPOINT is correct")
print(" - MODEL_DEPLOYMENT_NAME is deployed")
print(" - Azure credentials are configured (az login)")
if __name__ == "__main__":
main()
// <imports_and_includes>
using System;
using System.ClientModel;
using System.Collections.Generic;
using System.IO;
using System.Linq;
using System.Threading.Tasks;
using Azure.AI.Projects;
using Azure.AI.Projects.OpenAI;
using Azure.Identity;
using DotNetEnv;
using OpenAI.Responses;
// </imports_and_includes>
#pragma warning disable OPENAI001
/*
* Azure AI Foundry Agent Sample - Tutorial 1: Modern Workplace Assistant (C#)
*
* This sample demonstrates a complete business scenario using the Azure AI Projects v2 SDK:
* - Agent creation with PromptAgentDefinition and AgentVersion
* - Conversation via the Responses API (ProjectResponsesClient)
* - SharePoint and MCP tool integration on the agent definition
* - MCP tool approval handling through the Responses API approval loop
* - Robust error handling and graceful degradation
*
* Educational Focus:
* - Enterprise AI patterns with the v2 Azure AI Projects SDK
* - Real-world business scenarios that enterprises face daily
* - Production-ready error handling and diagnostics
* - Foundation for governance, evaluation, and monitoring (Tutorials 2-3)
*
* Business Scenario:
* An employee needs to implement Azure AD multi-factor authentication. They need:
* 1. Company security policy requirements (from SharePoint)
* 2. Technical implementation steps (from Microsoft Learn via MCP)
* 3. Combined guidance showing how policy requirements map to technical implementation
*/
class Program
{
private static AIProjectClient? projectClient;
private static ProjectResponsesClient? responseClient;
private static string agentName = "Modern_Workplace_Assistant";
static async Task Main(string[] args)
{
Console.WriteLine("🚀 Azure AI Foundry - Modern Workplace Assistant");
Console.WriteLine("Tutorial 1: Building Enterprise Agents with SharePoint + MCP Tools");
Console.WriteLine("".PadRight(70, '='));
try
{
// Create the agent with full diagnostic output
var agentVersion = await CreateWorkplaceAssistantAsync();
// Demonstrate business scenarios
await DemonstrateBusinessScenariosAsync(agentVersion);
// Offer interactive testing
Console.Write("\n🎯 Try interactive mode? (y/n): ");
var response = Console.ReadLine();
if (response?.ToLower().StartsWith("y") == true)
{
await InteractiveModeAsync(agentVersion);
}
// Cleanup
Console.WriteLine("\n🧹 Cleaning up agent...");
await projectClient!.Agents.DeleteAgentVersionAsync(
agentName: agentVersion.Name,
agentVersion: agentVersion.Version);
Console.WriteLine("✅ Agent deleted");
Console.WriteLine("\n🎉 Sample completed successfully!");
Console.WriteLine("📚 This foundation supports Tutorial 2 (Governance) and Tutorial 3 (Production)");
Console.WriteLine("🔗 Next: Add evaluation metrics, monitoring, and production deployment");
}
catch (Exception ex)
{
Console.WriteLine($"\n❌ Error: {ex.Message}");
Console.WriteLine("Please check your .env configuration and ensure:");
Console.WriteLine(" - PROJECT_ENDPOINT is correct");
Console.WriteLine(" - MODEL_DEPLOYMENT_NAME is deployed");
Console.WriteLine(" - Azure credentials are configured (az login)");
throw;
}
}
/// <summary>
/// Create a Modern Workplace Assistant with SharePoint and MCP tools.
///
/// This demonstrates enterprise AI patterns:
/// 1. Agent creation with PromptAgentDefinition and CreateAgentVersionAsync
/// 2. SharePoint integration via SharepointAgentTool
/// 3. MCP integration via McpTool from the OpenAI Responses API
/// 4. Robust error handling with graceful degradation
/// 5. Dynamic agent capabilities based on available resources
///
/// Educational Value:
/// - Shows real-world complexity of enterprise AI systems
/// - Demonstrates how to handle partial system failures
/// - Provides patterns for agent creation with multiple tools
/// </summary>
private static async Task<AgentVersion> CreateWorkplaceAssistantAsync()
{
// Load environment variables from shared .env file
var envPath = Path.Combine(Directory.GetCurrentDirectory(), "..", "shared", ".env");
if (File.Exists(envPath))
{
Env.Load(envPath);
Console.WriteLine($"📄 Loaded environment from: {envPath}");
}
else
{
// Fallback to local .env
Env.Load(".env");
}
var projectEndpoint = Environment.GetEnvironmentVariable("PROJECT_ENDPOINT");
var modelDeploymentName = Environment.GetEnvironmentVariable("MODEL_DEPLOYMENT_NAME");
var sharePointConnectionName = Environment.GetEnvironmentVariable("SHAREPOINT_CONNECTION_NAME");
var mcpServerUrl = Environment.GetEnvironmentVariable("MCP_SERVER_URL");
if (string.IsNullOrEmpty(projectEndpoint))
throw new InvalidOperationException("PROJECT_ENDPOINT environment variable not set");
if (string.IsNullOrEmpty(modelDeploymentName))
throw new InvalidOperationException("MODEL_DEPLOYMENT_NAME environment variable not set");
Console.WriteLine("\n🤖 Creating Modern Workplace Assistant...");
// ============================================================================
// AUTHENTICATION SETUP
// ============================================================================
// <agent_authentication>
var credential = new DefaultAzureCredential();
projectClient = new AIProjectClient(new Uri(projectEndpoint), credential);
Console.WriteLine($"✅ Connected to Azure AI Foundry: {projectEndpoint}");
// </agent_authentication>
// ========================================================================
// SHAREPOINT INTEGRATION SETUP
// ========================================================================
// <sharepoint_connection_resolution>
SharepointAgentTool? sharepointTool = null;
if (!string.IsNullOrEmpty(sharePointConnectionName))
{
Console.WriteLine($"📁 Configuring SharePoint integration...");
Console.WriteLine($" Connection name: {sharePointConnectionName}");
try
{
// <sharepoint_tool_setup>
// Resolve connection name to connection ID via the Connections API
AIProjectConnection sharepointConnection = await projectClient.Connections.GetConnectionAsync(
sharePointConnectionName, includeCredentials: false);
SharePointGroundingToolOptions sharepointToolOption = new()
{
ProjectConnections = { new ToolProjectConnection(projectConnectionId: sharepointConnection.Id) }
};
sharepointTool = new SharepointAgentTool(sharepointToolOption);
Console.WriteLine($"✅ SharePoint tool configured successfully");
// </sharepoint_tool_setup>
}
catch (Exception ex)
{
Console.WriteLine($"⚠️ SharePoint connection unavailable: {ex.Message}");
Console.WriteLine($" Possible causes:");
Console.WriteLine($" - Connection '{sharePointConnectionName}' doesn't exist in the project");
Console.WriteLine($" - Insufficient permissions to access the connection");
Console.WriteLine($" - Connection configuration is incomplete");
Console.WriteLine($" Agent will operate without SharePoint access");
}
}
else
{
Console.WriteLine($"📁 SharePoint integration skipped (SHAREPOINT_CONNECTION_NAME not set)");
}
// </sharepoint_connection_resolution>
// ========================================================================
// MICROSOFT LEARN MCP INTEGRATION SETUP
// ========================================================================
// <mcp_tool_setup>
// MCP (Model Context Protocol) enables agents to access external data sources
// like Microsoft Learn documentation. The approval flow is handled in ChatWithAssistantAsync.
McpTool? mcpTool = null;
if (!string.IsNullOrEmpty(mcpServerUrl))
{
Console.WriteLine($"📚 Configuring Microsoft Learn MCP integration...");
Console.WriteLine($" Server URL: {mcpServerUrl}");
try
{
// Create MCP tool for Microsoft Learn documentation access
// server_label must match pattern: ^[a-zA-Z0-9_]+$ (alphanumeric and underscores only)
mcpTool = new McpTool("Microsoft_Learn_Documentation", new Uri(mcpServerUrl));
Console.WriteLine($"✅ MCP tool configured successfully");
}
catch (Exception ex)
{
Console.WriteLine($"⚠️ MCP tool unavailable: {ex.Message}");
Console.WriteLine($" Agent will operate without Microsoft Learn access");
}
}
else
{
Console.WriteLine($"📚 MCP integration skipped (MCP_SERVER_URL not set)");
}
// </mcp_tool_setup>
// ========================================================================
// AGENT CREATION WITH DYNAMIC CAPABILITIES
// ========================================================================
// Create agent instructions based on available data sources
string instructions = GetAgentInstructions(sharepointTool != null, mcpTool != null);
// <create_agent_with_tools>
// Create the agent using the v2 SDK with PromptAgentDefinition
Console.WriteLine($"🛠️ Creating agent with model: {modelDeploymentName}");
var agentDefinition = new PromptAgentDefinition(modelDeploymentName)
{
Instructions = instructions
};
// Add tools to the agent definition
if (sharepointTool != null)
{
agentDefinition.Tools.Add(sharepointTool);
Console.WriteLine($" ✓ SharePoint tool added");
}
if (mcpTool != null)
{
agentDefinition.Tools.Add(mcpTool);
Console.WriteLine($" ✓ MCP tool added");
}
Console.WriteLine($" Total tools: {agentDefinition.Tools.Count}");
// Create agent version
AgentVersion agentVersion = await projectClient.Agents.CreateAgentVersionAsync(
agentName: agentName,
options: new(agentDefinition));
// Create a response client bound to this agent for conversations
responseClient = projectClient.OpenAI
.GetProjectResponsesClientForAgent(agentVersion);
Console.WriteLine($"✅ Agent created successfully: {agentVersion.Name} (version {agentVersion.Version})");
return agentVersion;
// </create_agent_with_tools>
}
/// <summary>
/// Generate agent instructions based on available tools.
/// </summary>
private static string GetAgentInstructions(bool hasSharePoint, bool hasMcp)
{
if (hasSharePoint && hasMcp)
{
return @"You are a Modern Workplace Assistant for Contoso Corporation.
CAPABILITIES:
- Search SharePoint for company policies, procedures, and internal documentation
- Access Microsoft Learn for current Azure and Microsoft 365 technical guidance
- Provide comprehensive solutions combining internal requirements with external implementation
RESPONSE STRATEGY:
- For policy questions: Search SharePoint for company-specific requirements and guidelines
- For technical questions: Use Microsoft Learn for current Azure/M365 documentation and best practices
- For implementation questions: Combine both sources to show how company policies map to technical implementation
- Always cite your sources and provide step-by-step guidance
- Explain how internal requirements connect to external implementation steps
EXAMPLE SCENARIOS:
- ""What is our MFA policy?"" → Search SharePoint for security policies
- ""How do I configure Azure AD Conditional Access?"" → Use Microsoft Learn for technical steps
- ""Our policy requires MFA - how do I implement this?"" → Combine policy requirements with implementation guidance";
}
else if (hasSharePoint)
{
return @"You are a Modern Workplace Assistant with access to Contoso Corporation's SharePoint.
CAPABILITIES:
- Search SharePoint for company policies, procedures, and internal documentation
- Provide detailed technical guidance based on your knowledge
- Combine company policies with general best practices
RESPONSE STRATEGY:
- Search SharePoint for company-specific requirements
- Provide technical guidance based on Azure and M365 best practices
- Explain how to align implementations with company policies";
}
else if (hasMcp)
{
return @"You are a Technical Assistant with access to Microsoft Learn documentation.
CAPABILITIES:
- Access Microsoft Learn for current Azure and Microsoft 365 technical guidance
- Provide detailed implementation steps and best practices
- Explain Azure services, features, and configuration options
RESPONSE STRATEGY:
- Use Microsoft Learn for technical documentation
- Provide comprehensive implementation guidance
- Reference official documentation and best practices";
}
else
{
return @"You are a Technical Assistant specializing in Azure and Microsoft 365 guidance.
CAPABILITIES:
- Provide detailed Azure and Microsoft 365 technical guidance
- Explain implementation steps and best practices
- Help with Azure AD, Conditional Access, MFA, and security configurations
RESPONSE STRATEGY:
- Provide comprehensive technical guidance
- Include step-by-step implementation instructions
- Reference best practices and security considerations";
}
}
/// <summary>
/// Demonstrate realistic business scenarios.
///
/// This function showcases the practical value of the Modern Workplace Assistant
/// by walking through scenarios that enterprise employees face regularly.
///
/// Educational Value:
/// - Shows real business problems that AI agents can solve
/// - Demonstrates the Responses API conversation pattern
/// - Illustrates conversation patterns with tool usage
/// </summary>
private static async Task DemonstrateBusinessScenariosAsync(AgentVersion agentVersion)
{
var scenarios = new[]
{
new
{
Title = "📋 Company Policy Question (SharePoint Only)",
Question = "What is Contoso's remote work policy?",
Context = "Employee needs to understand company-specific remote work requirements",
LearningPoint = "SharePoint tool retrieves internal company policies"
},
new
{
Title = "📚 Technical Documentation Question (MCP Only)",
Question = "According to Microsoft Learn, what is the correct way to implement Azure AD Conditional Access policies? Please include reference links to the official documentation.",
Context = "IT administrator needs authoritative Microsoft technical guidance",
LearningPoint = "MCP tool accesses Microsoft Learn for official documentation with links"
},
new
{
Title = "🔄 Combined Implementation Question (SharePoint + MCP)",
Question = "Based on our company's remote work security policy, how should I configure my Azure environment to comply? Please include links to Microsoft documentation showing how to implement each requirement.",
Context = "Need to map company policy to technical implementation with official guidance",
LearningPoint = "Both tools work together: SharePoint for policy + MCP for implementation docs"
}
};
Console.WriteLine("\n" + "".PadRight(70, '='));
Console.WriteLine("🏢 MODERN WORKPLACE ASSISTANT - BUSINESS SCENARIO DEMONSTRATION");
Console.WriteLine("".PadRight(70, '='));
Console.WriteLine("This demonstration shows how AI agents solve real business problems");
Console.WriteLine("using the Azure AI Projects v2 SDK with the Responses API.");
Console.WriteLine("".PadRight(70, '='));
for (int i = 0; i < scenarios.Length; i++)
{
var scenario = scenarios[i];
Console.WriteLine($"\n📊 SCENARIO {i + 1}/{scenarios.Length}: {scenario.Title}");
Console.WriteLine("".PadRight(50, '-'));
Console.WriteLine($"❓ QUESTION: {scenario.Question}");
Console.WriteLine($"🎯 BUSINESS CONTEXT: {scenario.Context}");
Console.WriteLine($"🎓 LEARNING POINT: {scenario.LearningPoint}");
Console.WriteLine("".PadRight(50, '-'));
// <agent_conversation>
Console.WriteLine("🤖 ASSISTANT RESPONSE:");
var (response, status) = await ChatWithAssistantAsync(scenario.Question);
// </agent_conversation>
// Display response with analysis
if (status == "completed" && !string.IsNullOrWhiteSpace(response) && response.Length > 10)
{
var preview = response.Length > 500 ? response.Substring(0, 500) + "..." : response;
Console.WriteLine($"✅ SUCCESS: {preview}");
if (response.Length > 500)
{
Console.WriteLine($" 📏 Full response: {response.Length} characters");
}
}
else
{
Console.WriteLine($"⚠️ RESPONSE: {response}");
}
Console.WriteLine($"📈 STATUS: {status}");
Console.WriteLine("".PadRight(50, '-'));
// Small delay between scenarios
await Task.Delay(1000);
}
Console.WriteLine("\n✅ DEMONSTRATION COMPLETED!");
Console.WriteLine("🎓 Key Learning Outcomes:");
Console.WriteLine(" • Azure AI Projects v2 SDK with PromptAgentDefinition");
Console.WriteLine(" • Responses API for agent conversations");
Console.WriteLine(" • SharePoint + MCP tool integration");
Console.WriteLine(" • MCP tool approval handling via the Responses API");
Console.WriteLine(" • Real business value through AI assistance");
Console.WriteLine(" • Foundation for governance and monitoring (Tutorials 2-3)");
}
/// <summary>
/// Execute a conversation with the workplace assistant using the Responses API.
///
/// This function demonstrates the v2 conversation pattern including:
/// - Sending a request via ProjectResponsesClient
/// - MCP tool approval handling through the Responses API approval loop
/// - Proper error and timeout management
///
/// Educational Value:
/// - Shows the Responses API conversation pattern (replaces threads/runs)
/// - Demonstrates MCP approval via McpToolCallApprovalRequestItem
/// - Includes timeout and error management patterns
/// </summary>
// <mcp_approval_handler>
private static async Task<(string response, string status)> ChatWithAssistantAsync(string message)
{
try
{
// Send the user message via the Responses API
ResponseResult response = await responseClient!.CreateResponseAsync(message);
// <mcp_approval_usage>
// Handle MCP tool approval loop.
// When the agent uses MCP tools, the response may contain
// McpToolCallApprovalRequestItem items. We auto-approve and re-send.
int maxIterations = 30;
int iteration = 0;
while (iteration < maxIterations)
{
// Check for MCP approval requests in the output items
var approvalRequests = response.OutputItems
.OfType<McpToolCallApprovalRequestItem>()
.ToList();
if (approvalRequests.Count == 0) break;
// Build approval response items
var approvalItems = new List<ResponseItem>();
foreach (var request in approvalRequests)
{
Console.WriteLine($" 🔧 Approving MCP tool: {request.ToolName}");
// Auto-approve MCP tool calls
// In production, you might implement custom approval logic here:
// - RBAC checks (is user authorized for this tool?)
// - Cost controls (has budget limit been reached?)
// - Logging and auditing
// - Interactive approval prompts
approvalItems.Add(ResponseItem.CreateMcpApprovalResponseItem(
request.Id,
approved: true));
}
// Send approval responses, chained to the previous response
response = await responseClient.CreateResponseAsync(
approvalItems,
previousResponseId: response.Id);
iteration++;
}
// </mcp_approval_usage>
// Extract the text output
string? outputText = response.GetOutputText();
if (!string.IsNullOrWhiteSpace(outputText) && outputText.Length > 0)
{
return (outputText, "completed");
}
else
{
return ("No response from assistant", "completed");
}
}
catch (Exception ex)
{
Console.WriteLine($"\n❌ Exception details: {ex.GetType().Name}: {ex.Message}");
if (ex.InnerException != null)
{
Console.WriteLine($" Inner: {ex.InnerException.Message}");
}
return ($"Error in conversation: {ex.Message}", "failed");
}
}
// </mcp_approval_handler>
/// <summary>
/// Interactive mode for testing the workplace assistant.
///
/// This provides a simple interface for users to test the agent with their own questions
/// and see how it provides comprehensive technical guidance.
/// Uses PreviousResponseId to maintain conversation context across turns.
/// </summary>
private static async Task InteractiveModeAsync(AgentVersion agentVersion)
{
Console.WriteLine("\n" + "".PadRight(60, '='));
Console.WriteLine("💬 INTERACTIVE MODE - Test Your Workplace Assistant!");
Console.WriteLine("".PadRight(60, '='));
Console.WriteLine("Ask questions about Azure, M365, security, and technical implementation:");
Console.WriteLine("• 'How do I configure Azure AD conditional access?'");
Console.WriteLine("• 'What are MFA best practices for remote workers?'");
Console.WriteLine("• 'How do I set up secure SharePoint access?'");
Console.WriteLine("Type 'quit' to exit.");
Console.WriteLine("".PadRight(60, '-'));
while (true)
{
try
{
Console.Write("\n❓ Your question: ");
string? question = Console.ReadLine()?.Trim();
if (string.IsNullOrEmpty(question))
{
Console.WriteLine("💡 Please ask a question about Azure or M365 technical implementation.");
continue;
}
if (question.ToLower() is "quit" or "exit" or "bye")
{
break;
}
Console.Write("\n🤖 Workplace Assistant: ");
var (response, status) = await ChatWithAssistantAsync(question);
Console.WriteLine(response);
if (status != "completed")
{
Console.WriteLine($"\n⚠️ Response status: {status}");
}
Console.WriteLine("".PadRight(60, '-'));
}
catch (Exception ex)
{
Console.WriteLine($"\n❌ Error: {ex.Message}");
Console.WriteLine("".PadRight(60, '-'));
}
}
Console.WriteLine("\n👋 Thank you for testing the Modern Workplace Assistant!");
}
}
Create the SharePoint tool for the agent
The agent uses SharePoint and can access company policy and procedure documents stored there. Set up the connection to SharePoint in your code. #!/usr/bin/env python3
"""
Microsoft Foundry Agent Sample - Tutorial 1: Modern Workplace Assistant
This sample demonstrates a complete business scenario using the Microsoft Foundry SDK:
- Agent creation with PromptAgentDefinition
- Conversation management via the Responses API
- Robust error handling and graceful degradation
Educational Focus:
- Enterprise AI patterns with the Microsoft Foundry SDK
- Real-world business scenarios that enterprises face daily
- Production-ready error handling and diagnostics
- Foundation for governance, evaluation, and monitoring (Tutorials 2-3)
Business Scenario:
An employee needs to implement Azure AD multi-factor authentication. They need:
1. Company security policy requirements
2. Technical implementation steps
3. Combined guidance showing how policy requirements map to technical implementation
"""
# <imports_and_includes>
import os
import time
from azure.ai.projects import AIProjectClient
from azure.ai.projects.models import (
PromptAgentDefinition,
SharepointPreviewTool,
SharepointGroundingToolParameters,
ToolProjectConnection,
MCPTool,
)
from azure.identity import DefaultAzureCredential
from dotenv import load_dotenv
from openai.types.responses.response_input_param import (
McpApprovalResponse,
)
# </imports_and_includes>
load_dotenv()
# ============================================================================
# AUTHENTICATION SETUP
# ============================================================================
endpoint = os.environ["PROJECT_ENDPOINT"]
def create_workplace_assistant(project_client):
"""
Create a Modern Workplace Assistant using the Microsoft Foundry SDK.
This demonstrates enterprise AI patterns:
1. Agent creation with PromptAgentDefinition
2. Robust error handling with graceful degradation
3. Dynamic agent capabilities based on available resources
4. Clear diagnostic information for troubleshooting
Returns:
agent: The created agent object
"""
print("🤖 Creating Modern Workplace Assistant...")
# ========================================================================
# SHAREPOINT INTEGRATION SETUP
# ========================================================================
# <sharepoint_tool_setup>
sharepoint_connection_id = os.environ.get("SHAREPOINT_CONNECTION_ID")
sharepoint_tool = None
if sharepoint_connection_id:
print("📁 Configuring SharePoint integration...")
print(f" Connection ID: {sharepoint_connection_id}")
try:
sharepoint_tool = SharepointPreviewTool(
sharepoint_grounding_preview=SharepointGroundingToolParameters(
project_connections=[
ToolProjectConnection(
project_connection_id=sharepoint_connection_id
)
]
)
)
print("✅ SharePoint tool configured successfully")
except Exception as e:
print(f"⚠️ SharePoint tool unavailable: {e}")
print(" Agent will operate without SharePoint access")
sharepoint_tool = None
else:
print("📁 SharePoint integration skipped (SHAREPOINT_CONNECTION_ID not set)")
# </sharepoint_tool_setup>
# ========================================================================
# MICROSOFT LEARN MCP INTEGRATION SETUP
# ========================================================================
# <mcp_tool_setup>
mcp_server_url = os.environ.get("MCP_SERVER_URL")
mcp_tool = None
if mcp_server_url:
print("📚 Configuring Microsoft Learn MCP integration...")
print(f" Server URL: {mcp_server_url}")
try:
mcp_tool = MCPTool(
server_url=mcp_server_url,
server_label="Microsoft_Learn_Documentation",
require_approval="always",
)
print("✅ MCP tool configured successfully")
except Exception as e:
print(f"⚠️ MCP tool unavailable: {e}")
print(" Agent will operate without Microsoft Learn access")
mcp_tool = None
else:
print("📚 MCP integration skipped (MCP_SERVER_URL not set)")
# </mcp_tool_setup>
# ========================================================================
# AGENT CREATION WITH DYNAMIC CAPABILITIES
# ========================================================================
if sharepoint_tool and mcp_tool:
instructions = """You are a Modern Workplace Assistant for Contoso Corporation.
CAPABILITIES:
- Search SharePoint for company policies, procedures, and internal documentation
- Access Microsoft Learn for current Azure and Microsoft 365 technical guidance
- Provide comprehensive solutions combining internal requirements with external implementation
RESPONSE STRATEGY:
- For policy questions: Search SharePoint for company-specific requirements and guidelines
- For technical questions: Use Microsoft Learn for current Azure/M365 documentation
- For implementation questions: Combine both sources to show how company policies map to technical implementation
- Always cite your sources and provide step-by-step guidance"""
elif sharepoint_tool:
instructions = """You are a Modern Workplace Assistant with access to Contoso Corporation's SharePoint.
CAPABILITIES:
- Search SharePoint for company policies, procedures, and internal documentation
- Provide detailed technical guidance based on your knowledge
- Combine company policies with general best practices"""
elif mcp_tool:
instructions = """You are a Technical Assistant with access to Microsoft Learn documentation.
CAPABILITIES:
- Access Microsoft Learn for current Azure and Microsoft 365 technical guidance
- Provide detailed implementation steps and best practices
- Explain Azure services, features, and configuration options"""
else:
instructions = """You are a Technical Assistant specializing in Azure and Microsoft 365 guidance.
CAPABILITIES:
- Provide detailed Azure and Microsoft 365 technical guidance
- Explain implementation steps and best practices
- Help with Azure AD, Conditional Access, MFA, and security configurations"""
# <create_agent_with_tools>
print(f"🛠️ Creating agent with model: {os.environ['MODEL_DEPLOYMENT_NAME']}")
tools = []
if sharepoint_tool:
tools.append(sharepoint_tool)
print(" ✓ SharePoint tool added")
if mcp_tool:
tools.append(mcp_tool)
print(" ✓ MCP tool added")
print(f" Total tools: {len(tools)}")
agent = project_client.agents.create_version(
agent_name="Modern Workplace Assistant",
definition=PromptAgentDefinition(
model=os.environ["MODEL_DEPLOYMENT_NAME"],
instructions=instructions,
tools=tools if tools else None,
),
)
print(f"✅ Agent created successfully (name: {agent.name}, version: {agent.version})")
return agent
# </create_agent_with_tools>
def demonstrate_business_scenarios(agent, openai_client):
"""
Demonstrate realistic business scenarios with the Microsoft Foundry SDK.
This function showcases the practical value of the Modern Workplace Assistant
by walking through scenarios that enterprise employees face regularly.
"""
scenarios = [
{
"title": "📋 Company Policy Question (SharePoint Only)",
"question": "What is Contoso's remote work policy?",
"context": "Employee needs to understand company-specific remote work requirements",
"learning_point": "SharePoint tool retrieves internal company policies",
},
{
"title": "📚 Technical Documentation Question (MCP Only)",
"question": (
"According to Microsoft Learn, what is the correct way to implement "
"Azure AD Conditional Access policies? Please include reference links "
"to the official documentation."
),
"context": "IT administrator needs authoritative Microsoft technical guidance",
"learning_point": "MCP tool accesses Microsoft Learn for official documentation with links",
},
{
"title": "🔄 Combined Implementation Question (SharePoint + MCP)",
"question": (
"Based on our company's remote work security policy, how should I configure "
"my Azure environment to comply? Please include links to Microsoft "
"documentation showing how to implement each requirement."
),
"context": "Need to map company policy to technical implementation with official guidance",
"learning_point": "Both tools work together: SharePoint for policy + MCP for implementation docs",
},
]
print("\n" + "=" * 70)
print("🏢 MODERN WORKPLACE ASSISTANT - BUSINESS SCENARIO DEMONSTRATION")
print("=" * 70)
print("This demonstration shows how AI agents solve real business problems")
print("using the Microsoft Foundry SDK.")
print("=" * 70)
for i, scenario in enumerate(scenarios, 1):
print(f"\n📊 SCENARIO {i}/3: {scenario['title']}")
print("-" * 50)
print(f"❓ QUESTION: {scenario['question']}")
print(f"🎯 BUSINESS CONTEXT: {scenario['context']}")
print(f"🎓 LEARNING POINT: {scenario['learning_point']}")
print("-" * 50)
# <agent_conversation>
print("🤖 AGENT RESPONSE:")
response, status = create_agent_response(agent, scenario["question"], openai_client)
# </agent_conversation>
if status == "completed" and response and len(response.strip()) > 10:
print(f"✅ SUCCESS: {response[:300]}...")
if len(response) > 300:
print(f" 📏 Full response: {len(response)} characters")
else:
print(f"⚠️ RESPONSE: {response}")
print(f"📈 STATUS: {status}")
print("-" * 50)
time.sleep(1)
print("\n✅ DEMONSTRATION COMPLETED!")
print("🎓 Key Learning Outcomes:")
print(" • Microsoft Foundry SDK usage for enterprise AI")
print(" • Conversation management via the Responses API")
print(" • Real business value through AI assistance")
print(" • Foundation for governance and monitoring (Tutorials 2-3)")
return True
def create_agent_response(agent, message, openai_client):
"""
Create a response from the workplace agent using the Responses API.
This function demonstrates the response pattern for the Microsoft Foundry SDK
including MCP tool approval handling.
Args:
agent: The agent object (with .name attribute)
message: The user's message
Returns:
tuple: (response_text, status)
"""
try:
response = openai_client.responses.create(
input=message,
extra_body={
"agent": {"name": agent.name, "type": "agent_reference"}
},
)
# Handle MCP approval requests if present
approval_list = []
for item in response.output:
if item.type == "mcp_approval_request" and item.id:
approval_list.append(
McpApprovalResponse(
type="mcp_approval_response",
approve=True,
approval_request_id=item.id,
)
)
if approval_list:
response = openai_client.responses.create(
input=approval_list,
previous_response_id=response.id,
extra_body={
"agent": {"name": agent.name, "type": "agent_reference"}
},
)
return response.output_text, "completed"
except Exception as e:
return f"Error in conversation: {str(e)}", "failed"
def interactive_mode(agent, openai_client):
"""Interactive mode for testing the workplace agent."""
print("\n" + "=" * 60)
print("💬 INTERACTIVE MODE - Test Your Workplace Agent!")
print("=" * 60)
print("Ask questions about Azure, M365, security, and technical implementation.")
print("Type 'quit' to exit.")
print("-" * 60)
while True:
try:
question = input("\n❓ Your question: ").strip()
if question.lower() in ["quit", "exit", "bye"]:
break
if not question:
print("💡 Please ask a question about Azure or M365 technical implementation.")
continue
print("\n🤖 Workplace Agent: ", end="", flush=True)
response, status = create_agent_response(agent, question, openai_client)
print(response)
if status != "completed":
print(f"\n⚠️ Response status: {status}")
print("-" * 60)
except KeyboardInterrupt:
break
except Exception as e:
print(f"\n❌ Error: {e}")
print("-" * 60)
print("\n👋 Thank you for testing the Modern Workplace Agent!")
def main():
"""Main execution flow demonstrating the complete sample."""
print("🚀 Foundry - Modern Workplace Assistant")
print("Tutorial 1: Building Enterprise Agents with Microsoft Foundry SDK")
print("=" * 70)
# <agent_authentication>
with (
DefaultAzureCredential() as credential,
AIProjectClient(endpoint=endpoint, credential=credential) as project_client,
project_client.get_openai_client() as openai_client,
):
print(f"✅ Connected to Foundry: {endpoint}")
# </agent_authentication>
try:
agent = create_workplace_assistant(project_client)
demonstrate_business_scenarios(agent, openai_client)
print("\n🎯 Try interactive mode? (y/n): ", end="")
try:
if input().lower().startswith("y"):
interactive_mode(agent, openai_client)
except EOFError:
print("n")
print("\n🎉 Sample completed successfully!")
print("📚 This foundation supports Tutorial 2 (Governance) and Tutorial 3 (Production)")
print("🔗 Next: Add evaluation metrics, monitoring, and production deployment")
except Exception as e:
print(f"\n❌ Error: {e}")
print("Please check your .env configuration and ensure:")
print(" - PROJECT_ENDPOINT is correct")
print(" - MODEL_DEPLOYMENT_NAME is deployed")
print(" - Azure credentials are configured (az login)")
if __name__ == "__main__":
main()
// <imports_and_includes>
using System;
using System.ClientModel;
using System.Collections.Generic;
using System.IO;
using System.Linq;
using System.Threading.Tasks;
using Azure.AI.Projects;
using Azure.AI.Projects.OpenAI;
using Azure.Identity;
using DotNetEnv;
using OpenAI.Responses;
// </imports_and_includes>
#pragma warning disable OPENAI001
/*
* Azure AI Foundry Agent Sample - Tutorial 1: Modern Workplace Assistant (C#)
*
* This sample demonstrates a complete business scenario using the Azure AI Projects v2 SDK:
* - Agent creation with PromptAgentDefinition and AgentVersion
* - Conversation via the Responses API (ProjectResponsesClient)
* - SharePoint and MCP tool integration on the agent definition
* - MCP tool approval handling through the Responses API approval loop
* - Robust error handling and graceful degradation
*
* Educational Focus:
* - Enterprise AI patterns with the v2 Azure AI Projects SDK
* - Real-world business scenarios that enterprises face daily
* - Production-ready error handling and diagnostics
* - Foundation for governance, evaluation, and monitoring (Tutorials 2-3)
*
* Business Scenario:
* An employee needs to implement Azure AD multi-factor authentication. They need:
* 1. Company security policy requirements (from SharePoint)
* 2. Technical implementation steps (from Microsoft Learn via MCP)
* 3. Combined guidance showing how policy requirements map to technical implementation
*/
class Program
{
private static AIProjectClient? projectClient;
private static ProjectResponsesClient? responseClient;
private static string agentName = "Modern_Workplace_Assistant";
static async Task Main(string[] args)
{
Console.WriteLine("🚀 Azure AI Foundry - Modern Workplace Assistant");
Console.WriteLine("Tutorial 1: Building Enterprise Agents with SharePoint + MCP Tools");
Console.WriteLine("".PadRight(70, '='));
try
{
// Create the agent with full diagnostic output
var agentVersion = await CreateWorkplaceAssistantAsync();
// Demonstrate business scenarios
await DemonstrateBusinessScenariosAsync(agentVersion);
// Offer interactive testing
Console.Write("\n🎯 Try interactive mode? (y/n): ");
var response = Console.ReadLine();
if (response?.ToLower().StartsWith("y") == true)
{
await InteractiveModeAsync(agentVersion);
}
// Cleanup
Console.WriteLine("\n🧹 Cleaning up agent...");
await projectClient!.Agents.DeleteAgentVersionAsync(
agentName: agentVersion.Name,
agentVersion: agentVersion.Version);
Console.WriteLine("✅ Agent deleted");
Console.WriteLine("\n🎉 Sample completed successfully!");
Console.WriteLine("📚 This foundation supports Tutorial 2 (Governance) and Tutorial 3 (Production)");
Console.WriteLine("🔗 Next: Add evaluation metrics, monitoring, and production deployment");
}
catch (Exception ex)
{
Console.WriteLine($"\n❌ Error: {ex.Message}");
Console.WriteLine("Please check your .env configuration and ensure:");
Console.WriteLine(" - PROJECT_ENDPOINT is correct");
Console.WriteLine(" - MODEL_DEPLOYMENT_NAME is deployed");
Console.WriteLine(" - Azure credentials are configured (az login)");
throw;
}
}
/// <summary>
/// Create a Modern Workplace Assistant with SharePoint and MCP tools.
///
/// This demonstrates enterprise AI patterns:
/// 1. Agent creation with PromptAgentDefinition and CreateAgentVersionAsync
/// 2. SharePoint integration via SharepointAgentTool
/// 3. MCP integration via McpTool from the OpenAI Responses API
/// 4. Robust error handling with graceful degradation
/// 5. Dynamic agent capabilities based on available resources
///
/// Educational Value:
/// - Shows real-world complexity of enterprise AI systems
/// - Demonstrates how to handle partial system failures
/// - Provides patterns for agent creation with multiple tools
/// </summary>
private static async Task<AgentVersion> CreateWorkplaceAssistantAsync()
{
// Load environment variables from shared .env file
var envPath = Path.Combine(Directory.GetCurrentDirectory(), "..", "shared", ".env");
if (File.Exists(envPath))
{
Env.Load(envPath);
Console.WriteLine($"📄 Loaded environment from: {envPath}");
}
else
{
// Fallback to local .env
Env.Load(".env");
}
var projectEndpoint = Environment.GetEnvironmentVariable("PROJECT_ENDPOINT");
var modelDeploymentName = Environment.GetEnvironmentVariable("MODEL_DEPLOYMENT_NAME");
var sharePointConnectionName = Environment.GetEnvironmentVariable("SHAREPOINT_CONNECTION_NAME");
var mcpServerUrl = Environment.GetEnvironmentVariable("MCP_SERVER_URL");
if (string.IsNullOrEmpty(projectEndpoint))
throw new InvalidOperationException("PROJECT_ENDPOINT environment variable not set");
if (string.IsNullOrEmpty(modelDeploymentName))
throw new InvalidOperationException("MODEL_DEPLOYMENT_NAME environment variable not set");
Console.WriteLine("\n🤖 Creating Modern Workplace Assistant...");
// ============================================================================
// AUTHENTICATION SETUP
// ============================================================================
// <agent_authentication>
var credential = new DefaultAzureCredential();
projectClient = new AIProjectClient(new Uri(projectEndpoint), credential);
Console.WriteLine($"✅ Connected to Azure AI Foundry: {projectEndpoint}");
// </agent_authentication>
// ========================================================================
// SHAREPOINT INTEGRATION SETUP
// ========================================================================
// <sharepoint_connection_resolution>
SharepointAgentTool? sharepointTool = null;
if (!string.IsNullOrEmpty(sharePointConnectionName))
{
Console.WriteLine($"📁 Configuring SharePoint integration...");
Console.WriteLine($" Connection name: {sharePointConnectionName}");
try
{
// <sharepoint_tool_setup>
// Resolve connection name to connection ID via the Connections API
AIProjectConnection sharepointConnection = await projectClient.Connections.GetConnectionAsync(
sharePointConnectionName, includeCredentials: false);
SharePointGroundingToolOptions sharepointToolOption = new()
{
ProjectConnections = { new ToolProjectConnection(projectConnectionId: sharepointConnection.Id) }
};
sharepointTool = new SharepointAgentTool(sharepointToolOption);
Console.WriteLine($"✅ SharePoint tool configured successfully");
// </sharepoint_tool_setup>
}
catch (Exception ex)
{
Console.WriteLine($"⚠️ SharePoint connection unavailable: {ex.Message}");
Console.WriteLine($" Possible causes:");
Console.WriteLine($" - Connection '{sharePointConnectionName}' doesn't exist in the project");
Console.WriteLine($" - Insufficient permissions to access the connection");
Console.WriteLine($" - Connection configuration is incomplete");
Console.WriteLine($" Agent will operate without SharePoint access");
}
}
else
{
Console.WriteLine($"📁 SharePoint integration skipped (SHAREPOINT_CONNECTION_NAME not set)");
}
// </sharepoint_connection_resolution>
// ========================================================================
// MICROSOFT LEARN MCP INTEGRATION SETUP
// ========================================================================
// <mcp_tool_setup>
// MCP (Model Context Protocol) enables agents to access external data sources
// like Microsoft Learn documentation. The approval flow is handled in ChatWithAssistantAsync.
McpTool? mcpTool = null;
if (!string.IsNullOrEmpty(mcpServerUrl))
{
Console.WriteLine($"📚 Configuring Microsoft Learn MCP integration...");
Console.WriteLine($" Server URL: {mcpServerUrl}");
try
{
// Create MCP tool for Microsoft Learn documentation access
// server_label must match pattern: ^[a-zA-Z0-9_]+$ (alphanumeric and underscores only)
mcpTool = new McpTool("Microsoft_Learn_Documentation", new Uri(mcpServerUrl));
Console.WriteLine($"✅ MCP tool configured successfully");
}
catch (Exception ex)
{
Console.WriteLine($"⚠️ MCP tool unavailable: {ex.Message}");
Console.WriteLine($" Agent will operate without Microsoft Learn access");
}
}
else
{
Console.WriteLine($"📚 MCP integration skipped (MCP_SERVER_URL not set)");
}
// </mcp_tool_setup>
// ========================================================================
// AGENT CREATION WITH DYNAMIC CAPABILITIES
// ========================================================================
// Create agent instructions based on available data sources
string instructions = GetAgentInstructions(sharepointTool != null, mcpTool != null);
// <create_agent_with_tools>
// Create the agent using the v2 SDK with PromptAgentDefinition
Console.WriteLine($"🛠️ Creating agent with model: {modelDeploymentName}");
var agentDefinition = new PromptAgentDefinition(modelDeploymentName)
{
Instructions = instructions
};
// Add tools to the agent definition
if (sharepointTool != null)
{
agentDefinition.Tools.Add(sharepointTool);
Console.WriteLine($" ✓ SharePoint tool added");
}
if (mcpTool != null)
{
agentDefinition.Tools.Add(mcpTool);
Console.WriteLine($" ✓ MCP tool added");
}
Console.WriteLine($" Total tools: {agentDefinition.Tools.Count}");
// Create agent version
AgentVersion agentVersion = await projectClient.Agents.CreateAgentVersionAsync(
agentName: agentName,
options: new(agentDefinition));
// Create a response client bound to this agent for conversations
responseClient = projectClient.OpenAI
.GetProjectResponsesClientForAgent(agentVersion);
Console.WriteLine($"✅ Agent created successfully: {agentVersion.Name} (version {agentVersion.Version})");
return agentVersion;
// </create_agent_with_tools>
}
/// <summary>
/// Generate agent instructions based on available tools.
/// </summary>
private static string GetAgentInstructions(bool hasSharePoint, bool hasMcp)
{
if (hasSharePoint && hasMcp)
{
return @"You are a Modern Workplace Assistant for Contoso Corporation.
CAPABILITIES:
- Search SharePoint for company policies, procedures, and internal documentation
- Access Microsoft Learn for current Azure and Microsoft 365 technical guidance
- Provide comprehensive solutions combining internal requirements with external implementation
RESPONSE STRATEGY:
- For policy questions: Search SharePoint for company-specific requirements and guidelines
- For technical questions: Use Microsoft Learn for current Azure/M365 documentation and best practices
- For implementation questions: Combine both sources to show how company policies map to technical implementation
- Always cite your sources and provide step-by-step guidance
- Explain how internal requirements connect to external implementation steps
EXAMPLE SCENARIOS:
- ""What is our MFA policy?"" → Search SharePoint for security policies
- ""How do I configure Azure AD Conditional Access?"" → Use Microsoft Learn for technical steps
- ""Our policy requires MFA - how do I implement this?"" → Combine policy requirements with implementation guidance";
}
else if (hasSharePoint)
{
return @"You are a Modern Workplace Assistant with access to Contoso Corporation's SharePoint.
CAPABILITIES:
- Search SharePoint for company policies, procedures, and internal documentation
- Provide detailed technical guidance based on your knowledge
- Combine company policies with general best practices
RESPONSE STRATEGY:
- Search SharePoint for company-specific requirements
- Provide technical guidance based on Azure and M365 best practices
- Explain how to align implementations with company policies";
}
else if (hasMcp)
{
return @"You are a Technical Assistant with access to Microsoft Learn documentation.
CAPABILITIES:
- Access Microsoft Learn for current Azure and Microsoft 365 technical guidance
- Provide detailed implementation steps and best practices
- Explain Azure services, features, and configuration options
RESPONSE STRATEGY:
- Use Microsoft Learn for technical documentation
- Provide comprehensive implementation guidance
- Reference official documentation and best practices";
}
else
{
return @"You are a Technical Assistant specializing in Azure and Microsoft 365 guidance.
CAPABILITIES:
- Provide detailed Azure and Microsoft 365 technical guidance
- Explain implementation steps and best practices
- Help with Azure AD, Conditional Access, MFA, and security configurations
RESPONSE STRATEGY:
- Provide comprehensive technical guidance
- Include step-by-step implementation instructions
- Reference best practices and security considerations";
}
}
/// <summary>
/// Demonstrate realistic business scenarios.
///
/// This function showcases the practical value of the Modern Workplace Assistant
/// by walking through scenarios that enterprise employees face regularly.
///
/// Educational Value:
/// - Shows real business problems that AI agents can solve
/// - Demonstrates the Responses API conversation pattern
/// - Illustrates conversation patterns with tool usage
/// </summary>
private static async Task DemonstrateBusinessScenariosAsync(AgentVersion agentVersion)
{
var scenarios = new[]
{
new
{
Title = "📋 Company Policy Question (SharePoint Only)",
Question = "What is Contoso's remote work policy?",
Context = "Employee needs to understand company-specific remote work requirements",
LearningPoint = "SharePoint tool retrieves internal company policies"
},
new
{
Title = "📚 Technical Documentation Question (MCP Only)",
Question = "According to Microsoft Learn, what is the correct way to implement Azure AD Conditional Access policies? Please include reference links to the official documentation.",
Context = "IT administrator needs authoritative Microsoft technical guidance",
LearningPoint = "MCP tool accesses Microsoft Learn for official documentation with links"
},
new
{
Title = "🔄 Combined Implementation Question (SharePoint + MCP)",
Question = "Based on our company's remote work security policy, how should I configure my Azure environment to comply? Please include links to Microsoft documentation showing how to implement each requirement.",
Context = "Need to map company policy to technical implementation with official guidance",
LearningPoint = "Both tools work together: SharePoint for policy + MCP for implementation docs"
}
};
Console.WriteLine("\n" + "".PadRight(70, '='));
Console.WriteLine("🏢 MODERN WORKPLACE ASSISTANT - BUSINESS SCENARIO DEMONSTRATION");
Console.WriteLine("".PadRight(70, '='));
Console.WriteLine("This demonstration shows how AI agents solve real business problems");
Console.WriteLine("using the Azure AI Projects v2 SDK with the Responses API.");
Console.WriteLine("".PadRight(70, '='));
for (int i = 0; i < scenarios.Length; i++)
{
var scenario = scenarios[i];
Console.WriteLine($"\n📊 SCENARIO {i + 1}/{scenarios.Length}: {scenario.Title}");
Console.WriteLine("".PadRight(50, '-'));
Console.WriteLine($"❓ QUESTION: {scenario.Question}");
Console.WriteLine($"🎯 BUSINESS CONTEXT: {scenario.Context}");
Console.WriteLine($"🎓 LEARNING POINT: {scenario.LearningPoint}");
Console.WriteLine("".PadRight(50, '-'));
// <agent_conversation>
Console.WriteLine("🤖 ASSISTANT RESPONSE:");
var (response, status) = await ChatWithAssistantAsync(scenario.Question);
// </agent_conversation>
// Display response with analysis
if (status == "completed" && !string.IsNullOrWhiteSpace(response) && response.Length > 10)
{
var preview = response.Length > 500 ? response.Substring(0, 500) + "..." : response;
Console.WriteLine($"✅ SUCCESS: {preview}");
if (response.Length > 500)
{
Console.WriteLine($" 📏 Full response: {response.Length} characters");
}
}
else
{
Console.WriteLine($"⚠️ RESPONSE: {response}");
}
Console.WriteLine($"📈 STATUS: {status}");
Console.WriteLine("".PadRight(50, '-'));
// Small delay between scenarios
await Task.Delay(1000);
}
Console.WriteLine("\n✅ DEMONSTRATION COMPLETED!");
Console.WriteLine("🎓 Key Learning Outcomes:");
Console.WriteLine(" • Azure AI Projects v2 SDK with PromptAgentDefinition");
Console.WriteLine(" • Responses API for agent conversations");
Console.WriteLine(" • SharePoint + MCP tool integration");
Console.WriteLine(" • MCP tool approval handling via the Responses API");
Console.WriteLine(" • Real business value through AI assistance");
Console.WriteLine(" • Foundation for governance and monitoring (Tutorials 2-3)");
}
/// <summary>
/// Execute a conversation with the workplace assistant using the Responses API.
///
/// This function demonstrates the v2 conversation pattern including:
/// - Sending a request via ProjectResponsesClient
/// - MCP tool approval handling through the Responses API approval loop
/// - Proper error and timeout management
///
/// Educational Value:
/// - Shows the Responses API conversation pattern (replaces threads/runs)
/// - Demonstrates MCP approval via McpToolCallApprovalRequestItem
/// - Includes timeout and error management patterns
/// </summary>
// <mcp_approval_handler>
private static async Task<(string response, string status)> ChatWithAssistantAsync(string message)
{
try
{
// Send the user message via the Responses API
ResponseResult response = await responseClient!.CreateResponseAsync(message);
// <mcp_approval_usage>
// Handle MCP tool approval loop.
// When the agent uses MCP tools, the response may contain
// McpToolCallApprovalRequestItem items. We auto-approve and re-send.
int maxIterations = 30;
int iteration = 0;
while (iteration < maxIterations)
{
// Check for MCP approval requests in the output items
var approvalRequests = response.OutputItems
.OfType<McpToolCallApprovalRequestItem>()
.ToList();
if (approvalRequests.Count == 0) break;
// Build approval response items
var approvalItems = new List<ResponseItem>();
foreach (var request in approvalRequests)
{
Console.WriteLine($" 🔧 Approving MCP tool: {request.ToolName}");
// Auto-approve MCP tool calls
// In production, you might implement custom approval logic here:
// - RBAC checks (is user authorized for this tool?)
// - Cost controls (has budget limit been reached?)
// - Logging and auditing
// - Interactive approval prompts
approvalItems.Add(ResponseItem.CreateMcpApprovalResponseItem(
request.Id,
approved: true));
}
// Send approval responses, chained to the previous response
response = await responseClient.CreateResponseAsync(
approvalItems,
previousResponseId: response.Id);
iteration++;
}
// </mcp_approval_usage>
// Extract the text output
string? outputText = response.GetOutputText();
if (!string.IsNullOrWhiteSpace(outputText) && outputText.Length > 0)
{
return (outputText, "completed");
}
else
{
return ("No response from assistant", "completed");
}
}
catch (Exception ex)
{
Console.WriteLine($"\n❌ Exception details: {ex.GetType().Name}: {ex.Message}");
if (ex.InnerException != null)
{
Console.WriteLine($" Inner: {ex.InnerException.Message}");
}
return ($"Error in conversation: {ex.Message}", "failed");
}
}
// </mcp_approval_handler>
/// <summary>
/// Interactive mode for testing the workplace assistant.
///
/// This provides a simple interface for users to test the agent with their own questions
/// and see how it provides comprehensive technical guidance.
/// Uses PreviousResponseId to maintain conversation context across turns.
/// </summary>
private static async Task InteractiveModeAsync(AgentVersion agentVersion)
{
Console.WriteLine("\n" + "".PadRight(60, '='));
Console.WriteLine("💬 INTERACTIVE MODE - Test Your Workplace Assistant!");
Console.WriteLine("".PadRight(60, '='));
Console.WriteLine("Ask questions about Azure, M365, security, and technical implementation:");
Console.WriteLine("• 'How do I configure Azure AD conditional access?'");
Console.WriteLine("• 'What are MFA best practices for remote workers?'");
Console.WriteLine("• 'How do I set up secure SharePoint access?'");
Console.WriteLine("Type 'quit' to exit.");
Console.WriteLine("".PadRight(60, '-'));
while (true)
{
try
{
Console.Write("\n❓ Your question: ");
string? question = Console.ReadLine()?.Trim();
if (string.IsNullOrEmpty(question))
{
Console.WriteLine("💡 Please ask a question about Azure or M365 technical implementation.");
continue;
}
if (question.ToLower() is "quit" or "exit" or "bye")
{
break;
}
Console.Write("\n🤖 Workplace Assistant: ");
var (response, status) = await ChatWithAssistantAsync(question);
Console.WriteLine(response);
if (status != "completed")
{
Console.WriteLine($"\n⚠️ Response status: {status}");
}
Console.WriteLine("".PadRight(60, '-'));
}
catch (Exception ex)
{
Console.WriteLine($"\n❌ Error: {ex.Message}");
Console.WriteLine("".PadRight(60, '-'));
}
}
Console.WriteLine("\n👋 Thank you for testing the Modern Workplace Assistant!");
}
}
Create the MCP tool for the agent
.NET SDK support for the MCP tool is currently in preview. #!/usr/bin/env python3
"""
Microsoft Foundry Agent Sample - Tutorial 1: Modern Workplace Assistant
This sample demonstrates a complete business scenario using the Microsoft Foundry SDK:
- Agent creation with PromptAgentDefinition
- Conversation management via the Responses API
- Robust error handling and graceful degradation
Educational Focus:
- Enterprise AI patterns with the Microsoft Foundry SDK
- Real-world business scenarios that enterprises face daily
- Production-ready error handling and diagnostics
- Foundation for governance, evaluation, and monitoring (Tutorials 2-3)
Business Scenario:
An employee needs to implement Azure AD multi-factor authentication. They need:
1. Company security policy requirements
2. Technical implementation steps
3. Combined guidance showing how policy requirements map to technical implementation
"""
# <imports_and_includes>
import os
import time
from azure.ai.projects import AIProjectClient
from azure.ai.projects.models import (
PromptAgentDefinition,
SharepointPreviewTool,
SharepointGroundingToolParameters,
ToolProjectConnection,
MCPTool,
)
from azure.identity import DefaultAzureCredential
from dotenv import load_dotenv
from openai.types.responses.response_input_param import (
McpApprovalResponse,
)
# </imports_and_includes>
load_dotenv()
# ============================================================================
# AUTHENTICATION SETUP
# ============================================================================
endpoint = os.environ["PROJECT_ENDPOINT"]
def create_workplace_assistant(project_client):
"""
Create a Modern Workplace Assistant using the Microsoft Foundry SDK.
This demonstrates enterprise AI patterns:
1. Agent creation with PromptAgentDefinition
2. Robust error handling with graceful degradation
3. Dynamic agent capabilities based on available resources
4. Clear diagnostic information for troubleshooting
Returns:
agent: The created agent object
"""
print("🤖 Creating Modern Workplace Assistant...")
# ========================================================================
# SHAREPOINT INTEGRATION SETUP
# ========================================================================
# <sharepoint_tool_setup>
sharepoint_connection_id = os.environ.get("SHAREPOINT_CONNECTION_ID")
sharepoint_tool = None
if sharepoint_connection_id:
print("📁 Configuring SharePoint integration...")
print(f" Connection ID: {sharepoint_connection_id}")
try:
sharepoint_tool = SharepointPreviewTool(
sharepoint_grounding_preview=SharepointGroundingToolParameters(
project_connections=[
ToolProjectConnection(
project_connection_id=sharepoint_connection_id
)
]
)
)
print("✅ SharePoint tool configured successfully")
except Exception as e:
print(f"⚠️ SharePoint tool unavailable: {e}")
print(" Agent will operate without SharePoint access")
sharepoint_tool = None
else:
print("📁 SharePoint integration skipped (SHAREPOINT_CONNECTION_ID not set)")
# </sharepoint_tool_setup>
# ========================================================================
# MICROSOFT LEARN MCP INTEGRATION SETUP
# ========================================================================
# <mcp_tool_setup>
mcp_server_url = os.environ.get("MCP_SERVER_URL")
mcp_tool = None
if mcp_server_url:
print("📚 Configuring Microsoft Learn MCP integration...")
print(f" Server URL: {mcp_server_url}")
try:
mcp_tool = MCPTool(
server_url=mcp_server_url,
server_label="Microsoft_Learn_Documentation",
require_approval="always",
)
print("✅ MCP tool configured successfully")
except Exception as e:
print(f"⚠️ MCP tool unavailable: {e}")
print(" Agent will operate without Microsoft Learn access")
mcp_tool = None
else:
print("📚 MCP integration skipped (MCP_SERVER_URL not set)")
# </mcp_tool_setup>
# ========================================================================
# AGENT CREATION WITH DYNAMIC CAPABILITIES
# ========================================================================
if sharepoint_tool and mcp_tool:
instructions = """You are a Modern Workplace Assistant for Contoso Corporation.
CAPABILITIES:
- Search SharePoint for company policies, procedures, and internal documentation
- Access Microsoft Learn for current Azure and Microsoft 365 technical guidance
- Provide comprehensive solutions combining internal requirements with external implementation
RESPONSE STRATEGY:
- For policy questions: Search SharePoint for company-specific requirements and guidelines
- For technical questions: Use Microsoft Learn for current Azure/M365 documentation
- For implementation questions: Combine both sources to show how company policies map to technical implementation
- Always cite your sources and provide step-by-step guidance"""
elif sharepoint_tool:
instructions = """You are a Modern Workplace Assistant with access to Contoso Corporation's SharePoint.
CAPABILITIES:
- Search SharePoint for company policies, procedures, and internal documentation
- Provide detailed technical guidance based on your knowledge
- Combine company policies with general best practices"""
elif mcp_tool:
instructions = """You are a Technical Assistant with access to Microsoft Learn documentation.
CAPABILITIES:
- Access Microsoft Learn for current Azure and Microsoft 365 technical guidance
- Provide detailed implementation steps and best practices
- Explain Azure services, features, and configuration options"""
else:
instructions = """You are a Technical Assistant specializing in Azure and Microsoft 365 guidance.
CAPABILITIES:
- Provide detailed Azure and Microsoft 365 technical guidance
- Explain implementation steps and best practices
- Help with Azure AD, Conditional Access, MFA, and security configurations"""
# <create_agent_with_tools>
print(f"🛠️ Creating agent with model: {os.environ['MODEL_DEPLOYMENT_NAME']}")
tools = []
if sharepoint_tool:
tools.append(sharepoint_tool)
print(" ✓ SharePoint tool added")
if mcp_tool:
tools.append(mcp_tool)
print(" ✓ MCP tool added")
print(f" Total tools: {len(tools)}")
agent = project_client.agents.create_version(
agent_name="Modern Workplace Assistant",
definition=PromptAgentDefinition(
model=os.environ["MODEL_DEPLOYMENT_NAME"],
instructions=instructions,
tools=tools if tools else None,
),
)
print(f"✅ Agent created successfully (name: {agent.name}, version: {agent.version})")
return agent
# </create_agent_with_tools>
def demonstrate_business_scenarios(agent, openai_client):
"""
Demonstrate realistic business scenarios with the Microsoft Foundry SDK.
This function showcases the practical value of the Modern Workplace Assistant
by walking through scenarios that enterprise employees face regularly.
"""
scenarios = [
{
"title": "📋 Company Policy Question (SharePoint Only)",
"question": "What is Contoso's remote work policy?",
"context": "Employee needs to understand company-specific remote work requirements",
"learning_point": "SharePoint tool retrieves internal company policies",
},
{
"title": "📚 Technical Documentation Question (MCP Only)",
"question": (
"According to Microsoft Learn, what is the correct way to implement "
"Azure AD Conditional Access policies? Please include reference links "
"to the official documentation."
),
"context": "IT administrator needs authoritative Microsoft technical guidance",
"learning_point": "MCP tool accesses Microsoft Learn for official documentation with links",
},
{
"title": "🔄 Combined Implementation Question (SharePoint + MCP)",
"question": (
"Based on our company's remote work security policy, how should I configure "
"my Azure environment to comply? Please include links to Microsoft "
"documentation showing how to implement each requirement."
),
"context": "Need to map company policy to technical implementation with official guidance",
"learning_point": "Both tools work together: SharePoint for policy + MCP for implementation docs",
},
]
print("\n" + "=" * 70)
print("🏢 MODERN WORKPLACE ASSISTANT - BUSINESS SCENARIO DEMONSTRATION")
print("=" * 70)
print("This demonstration shows how AI agents solve real business problems")
print("using the Microsoft Foundry SDK.")
print("=" * 70)
for i, scenario in enumerate(scenarios, 1):
print(f"\n📊 SCENARIO {i}/3: {scenario['title']}")
print("-" * 50)
print(f"❓ QUESTION: {scenario['question']}")
print(f"🎯 BUSINESS CONTEXT: {scenario['context']}")
print(f"🎓 LEARNING POINT: {scenario['learning_point']}")
print("-" * 50)
# <agent_conversation>
print("🤖 AGENT RESPONSE:")
response, status = create_agent_response(agent, scenario["question"], openai_client)
# </agent_conversation>
if status == "completed" and response and len(response.strip()) > 10:
print(f"✅ SUCCESS: {response[:300]}...")
if len(response) > 300:
print(f" 📏 Full response: {len(response)} characters")
else:
print(f"⚠️ RESPONSE: {response}")
print(f"📈 STATUS: {status}")
print("-" * 50)
time.sleep(1)
print("\n✅ DEMONSTRATION COMPLETED!")
print("🎓 Key Learning Outcomes:")
print(" • Microsoft Foundry SDK usage for enterprise AI")
print(" • Conversation management via the Responses API")
print(" • Real business value through AI assistance")
print(" • Foundation for governance and monitoring (Tutorials 2-3)")
return True
def create_agent_response(agent, message, openai_client):
"""
Create a response from the workplace agent using the Responses API.
This function demonstrates the response pattern for the Microsoft Foundry SDK
including MCP tool approval handling.
Args:
agent: The agent object (with .name attribute)
message: The user's message
Returns:
tuple: (response_text, status)
"""
try:
response = openai_client.responses.create(
input=message,
extra_body={
"agent": {"name": agent.name, "type": "agent_reference"}
},
)
# Handle MCP approval requests if present
approval_list = []
for item in response.output:
if item.type == "mcp_approval_request" and item.id:
approval_list.append(
McpApprovalResponse(
type="mcp_approval_response",
approve=True,
approval_request_id=item.id,
)
)
if approval_list:
response = openai_client.responses.create(
input=approval_list,
previous_response_id=response.id,
extra_body={
"agent": {"name": agent.name, "type": "agent_reference"}
},
)
return response.output_text, "completed"
except Exception as e:
return f"Error in conversation: {str(e)}", "failed"
def interactive_mode(agent, openai_client):
"""Interactive mode for testing the workplace agent."""
print("\n" + "=" * 60)
print("💬 INTERACTIVE MODE - Test Your Workplace Agent!")
print("=" * 60)
print("Ask questions about Azure, M365, security, and technical implementation.")
print("Type 'quit' to exit.")
print("-" * 60)
while True:
try:
question = input("\n❓ Your question: ").strip()
if question.lower() in ["quit", "exit", "bye"]:
break
if not question:
print("💡 Please ask a question about Azure or M365 technical implementation.")
continue
print("\n🤖 Workplace Agent: ", end="", flush=True)
response, status = create_agent_response(agent, question, openai_client)
print(response)
if status != "completed":
print(f"\n⚠️ Response status: {status}")
print("-" * 60)
except KeyboardInterrupt:
break
except Exception as e:
print(f"\n❌ Error: {e}")
print("-" * 60)
print("\n👋 Thank you for testing the Modern Workplace Agent!")
def main():
"""Main execution flow demonstrating the complete sample."""
print("🚀 Foundry - Modern Workplace Assistant")
print("Tutorial 1: Building Enterprise Agents with Microsoft Foundry SDK")
print("=" * 70)
# <agent_authentication>
with (
DefaultAzureCredential() as credential,
AIProjectClient(endpoint=endpoint, credential=credential) as project_client,
project_client.get_openai_client() as openai_client,
):
print(f"✅ Connected to Foundry: {endpoint}")
# </agent_authentication>
try:
agent = create_workplace_assistant(project_client)
demonstrate_business_scenarios(agent, openai_client)
print("\n🎯 Try interactive mode? (y/n): ", end="")
try:
if input().lower().startswith("y"):
interactive_mode(agent, openai_client)
except EOFError:
print("n")
print("\n🎉 Sample completed successfully!")
print("📚 This foundation supports Tutorial 2 (Governance) and Tutorial 3 (Production)")
print("🔗 Next: Add evaluation metrics, monitoring, and production deployment")
except Exception as e:
print(f"\n❌ Error: {e}")
print("Please check your .env configuration and ensure:")
print(" - PROJECT_ENDPOINT is correct")
print(" - MODEL_DEPLOYMENT_NAME is deployed")
print(" - Azure credentials are configured (az login)")
if __name__ == "__main__":
main()
// <imports_and_includes>
using System;
using System.ClientModel;
using System.Collections.Generic;
using System.IO;
using System.Linq;
using System.Threading.Tasks;
using Azure.AI.Projects;
using Azure.AI.Projects.OpenAI;
using Azure.Identity;
using DotNetEnv;
using OpenAI.Responses;
// </imports_and_includes>
#pragma warning disable OPENAI001
/*
* Azure AI Foundry Agent Sample - Tutorial 1: Modern Workplace Assistant (C#)
*
* This sample demonstrates a complete business scenario using the Azure AI Projects v2 SDK:
* - Agent creation with PromptAgentDefinition and AgentVersion
* - Conversation via the Responses API (ProjectResponsesClient)
* - SharePoint and MCP tool integration on the agent definition
* - MCP tool approval handling through the Responses API approval loop
* - Robust error handling and graceful degradation
*
* Educational Focus:
* - Enterprise AI patterns with the v2 Azure AI Projects SDK
* - Real-world business scenarios that enterprises face daily
* - Production-ready error handling and diagnostics
* - Foundation for governance, evaluation, and monitoring (Tutorials 2-3)
*
* Business Scenario:
* An employee needs to implement Azure AD multi-factor authentication. They need:
* 1. Company security policy requirements (from SharePoint)
* 2. Technical implementation steps (from Microsoft Learn via MCP)
* 3. Combined guidance showing how policy requirements map to technical implementation
*/
class Program
{
private static AIProjectClient? projectClient;
private static ProjectResponsesClient? responseClient;
private static string agentName = "Modern_Workplace_Assistant";
static async Task Main(string[] args)
{
Console.WriteLine("🚀 Azure AI Foundry - Modern Workplace Assistant");
Console.WriteLine("Tutorial 1: Building Enterprise Agents with SharePoint + MCP Tools");
Console.WriteLine("".PadRight(70, '='));
try
{
// Create the agent with full diagnostic output
var agentVersion = await CreateWorkplaceAssistantAsync();
// Demonstrate business scenarios
await DemonstrateBusinessScenariosAsync(agentVersion);
// Offer interactive testing
Console.Write("\n🎯 Try interactive mode? (y/n): ");
var response = Console.ReadLine();
if (response?.ToLower().StartsWith("y") == true)
{
await InteractiveModeAsync(agentVersion);
}
// Cleanup
Console.WriteLine("\n🧹 Cleaning up agent...");
await projectClient!.Agents.DeleteAgentVersionAsync(
agentName: agentVersion.Name,
agentVersion: agentVersion.Version);
Console.WriteLine("✅ Agent deleted");
Console.WriteLine("\n🎉 Sample completed successfully!");
Console.WriteLine("📚 This foundation supports Tutorial 2 (Governance) and Tutorial 3 (Production)");
Console.WriteLine("🔗 Next: Add evaluation metrics, monitoring, and production deployment");
}
catch (Exception ex)
{
Console.WriteLine($"\n❌ Error: {ex.Message}");
Console.WriteLine("Please check your .env configuration and ensure:");
Console.WriteLine(" - PROJECT_ENDPOINT is correct");
Console.WriteLine(" - MODEL_DEPLOYMENT_NAME is deployed");
Console.WriteLine(" - Azure credentials are configured (az login)");
throw;
}
}
/// <summary>
/// Create a Modern Workplace Assistant with SharePoint and MCP tools.
///
/// This demonstrates enterprise AI patterns:
/// 1. Agent creation with PromptAgentDefinition and CreateAgentVersionAsync
/// 2. SharePoint integration via SharepointAgentTool
/// 3. MCP integration via McpTool from the OpenAI Responses API
/// 4. Robust error handling with graceful degradation
/// 5. Dynamic agent capabilities based on available resources
///
/// Educational Value:
/// - Shows real-world complexity of enterprise AI systems
/// - Demonstrates how to handle partial system failures
/// - Provides patterns for agent creation with multiple tools
/// </summary>
private static async Task<AgentVersion> CreateWorkplaceAssistantAsync()
{
// Load environment variables from shared .env file
var envPath = Path.Combine(Directory.GetCurrentDirectory(), "..", "shared", ".env");
if (File.Exists(envPath))
{
Env.Load(envPath);
Console.WriteLine($"📄 Loaded environment from: {envPath}");
}
else
{
// Fallback to local .env
Env.Load(".env");
}
var projectEndpoint = Environment.GetEnvironmentVariable("PROJECT_ENDPOINT");
var modelDeploymentName = Environment.GetEnvironmentVariable("MODEL_DEPLOYMENT_NAME");
var sharePointConnectionName = Environment.GetEnvironmentVariable("SHAREPOINT_CONNECTION_NAME");
var mcpServerUrl = Environment.GetEnvironmentVariable("MCP_SERVER_URL");
if (string.IsNullOrEmpty(projectEndpoint))
throw new InvalidOperationException("PROJECT_ENDPOINT environment variable not set");
if (string.IsNullOrEmpty(modelDeploymentName))
throw new InvalidOperationException("MODEL_DEPLOYMENT_NAME environment variable not set");
Console.WriteLine("\n🤖 Creating Modern Workplace Assistant...");
// ============================================================================
// AUTHENTICATION SETUP
// ============================================================================
// <agent_authentication>
var credential = new DefaultAzureCredential();
projectClient = new AIProjectClient(new Uri(projectEndpoint), credential);
Console.WriteLine($"✅ Connected to Azure AI Foundry: {projectEndpoint}");
// </agent_authentication>
// ========================================================================
// SHAREPOINT INTEGRATION SETUP
// ========================================================================
// <sharepoint_connection_resolution>
SharepointAgentTool? sharepointTool = null;
if (!string.IsNullOrEmpty(sharePointConnectionName))
{
Console.WriteLine($"📁 Configuring SharePoint integration...");
Console.WriteLine($" Connection name: {sharePointConnectionName}");
try
{
// <sharepoint_tool_setup>
// Resolve connection name to connection ID via the Connections API
AIProjectConnection sharepointConnection = await projectClient.Connections.GetConnectionAsync(
sharePointConnectionName, includeCredentials: false);
SharePointGroundingToolOptions sharepointToolOption = new()
{
ProjectConnections = { new ToolProjectConnection(projectConnectionId: sharepointConnection.Id) }
};
sharepointTool = new SharepointAgentTool(sharepointToolOption);
Console.WriteLine($"✅ SharePoint tool configured successfully");
// </sharepoint_tool_setup>
}
catch (Exception ex)
{
Console.WriteLine($"⚠️ SharePoint connection unavailable: {ex.Message}");
Console.WriteLine($" Possible causes:");
Console.WriteLine($" - Connection '{sharePointConnectionName}' doesn't exist in the project");
Console.WriteLine($" - Insufficient permissions to access the connection");
Console.WriteLine($" - Connection configuration is incomplete");
Console.WriteLine($" Agent will operate without SharePoint access");
}
}
else
{
Console.WriteLine($"📁 SharePoint integration skipped (SHAREPOINT_CONNECTION_NAME not set)");
}
// </sharepoint_connection_resolution>
// ========================================================================
// MICROSOFT LEARN MCP INTEGRATION SETUP
// ========================================================================
// <mcp_tool_setup>
// MCP (Model Context Protocol) enables agents to access external data sources
// like Microsoft Learn documentation. The approval flow is handled in ChatWithAssistantAsync.
McpTool? mcpTool = null;
if (!string.IsNullOrEmpty(mcpServerUrl))
{
Console.WriteLine($"📚 Configuring Microsoft Learn MCP integration...");
Console.WriteLine($" Server URL: {mcpServerUrl}");
try
{
// Create MCP tool for Microsoft Learn documentation access
// server_label must match pattern: ^[a-zA-Z0-9_]+$ (alphanumeric and underscores only)
mcpTool = new McpTool("Microsoft_Learn_Documentation", new Uri(mcpServerUrl));
Console.WriteLine($"✅ MCP tool configured successfully");
}
catch (Exception ex)
{
Console.WriteLine($"⚠️ MCP tool unavailable: {ex.Message}");
Console.WriteLine($" Agent will operate without Microsoft Learn access");
}
}
else
{
Console.WriteLine($"📚 MCP integration skipped (MCP_SERVER_URL not set)");
}
// </mcp_tool_setup>
// ========================================================================
// AGENT CREATION WITH DYNAMIC CAPABILITIES
// ========================================================================
// Create agent instructions based on available data sources
string instructions = GetAgentInstructions(sharepointTool != null, mcpTool != null);
// <create_agent_with_tools>
// Create the agent using the v2 SDK with PromptAgentDefinition
Console.WriteLine($"🛠️ Creating agent with model: {modelDeploymentName}");
var agentDefinition = new PromptAgentDefinition(modelDeploymentName)
{
Instructions = instructions
};
// Add tools to the agent definition
if (sharepointTool != null)
{
agentDefinition.Tools.Add(sharepointTool);
Console.WriteLine($" ✓ SharePoint tool added");
}
if (mcpTool != null)
{
agentDefinition.Tools.Add(mcpTool);
Console.WriteLine($" ✓ MCP tool added");
}
Console.WriteLine($" Total tools: {agentDefinition.Tools.Count}");
// Create agent version
AgentVersion agentVersion = await projectClient.Agents.CreateAgentVersionAsync(
agentName: agentName,
options: new(agentDefinition));
// Create a response client bound to this agent for conversations
responseClient = projectClient.OpenAI
.GetProjectResponsesClientForAgent(agentVersion);
Console.WriteLine($"✅ Agent created successfully: {agentVersion.Name} (version {agentVersion.Version})");
return agentVersion;
// </create_agent_with_tools>
}
/// <summary>
/// Generate agent instructions based on available tools.
/// </summary>
private static string GetAgentInstructions(bool hasSharePoint, bool hasMcp)
{
if (hasSharePoint && hasMcp)
{
return @"You are a Modern Workplace Assistant for Contoso Corporation.
CAPABILITIES:
- Search SharePoint for company policies, procedures, and internal documentation
- Access Microsoft Learn for current Azure and Microsoft 365 technical guidance
- Provide comprehensive solutions combining internal requirements with external implementation
RESPONSE STRATEGY:
- For policy questions: Search SharePoint for company-specific requirements and guidelines
- For technical questions: Use Microsoft Learn for current Azure/M365 documentation and best practices
- For implementation questions: Combine both sources to show how company policies map to technical implementation
- Always cite your sources and provide step-by-step guidance
- Explain how internal requirements connect to external implementation steps
EXAMPLE SCENARIOS:
- ""What is our MFA policy?"" → Search SharePoint for security policies
- ""How do I configure Azure AD Conditional Access?"" → Use Microsoft Learn for technical steps
- ""Our policy requires MFA - how do I implement this?"" → Combine policy requirements with implementation guidance";
}
else if (hasSharePoint)
{
return @"You are a Modern Workplace Assistant with access to Contoso Corporation's SharePoint.
CAPABILITIES:
- Search SharePoint for company policies, procedures, and internal documentation
- Provide detailed technical guidance based on your knowledge
- Combine company policies with general best practices
RESPONSE STRATEGY:
- Search SharePoint for company-specific requirements
- Provide technical guidance based on Azure and M365 best practices
- Explain how to align implementations with company policies";
}
else if (hasMcp)
{
return @"You are a Technical Assistant with access to Microsoft Learn documentation.
CAPABILITIES:
- Access Microsoft Learn for current Azure and Microsoft 365 technical guidance
- Provide detailed implementation steps and best practices
- Explain Azure services, features, and configuration options
RESPONSE STRATEGY:
- Use Microsoft Learn for technical documentation
- Provide comprehensive implementation guidance
- Reference official documentation and best practices";
}
else
{
return @"You are a Technical Assistant specializing in Azure and Microsoft 365 guidance.
CAPABILITIES:
- Provide detailed Azure and Microsoft 365 technical guidance
- Explain implementation steps and best practices
- Help with Azure AD, Conditional Access, MFA, and security configurations
RESPONSE STRATEGY:
- Provide comprehensive technical guidance
- Include step-by-step implementation instructions
- Reference best practices and security considerations";
}
}
/// <summary>
/// Demonstrate realistic business scenarios.
///
/// This function showcases the practical value of the Modern Workplace Assistant
/// by walking through scenarios that enterprise employees face regularly.
///
/// Educational Value:
/// - Shows real business problems that AI agents can solve
/// - Demonstrates the Responses API conversation pattern
/// - Illustrates conversation patterns with tool usage
/// </summary>
private static async Task DemonstrateBusinessScenariosAsync(AgentVersion agentVersion)
{
var scenarios = new[]
{
new
{
Title = "📋 Company Policy Question (SharePoint Only)",
Question = "What is Contoso's remote work policy?",
Context = "Employee needs to understand company-specific remote work requirements",
LearningPoint = "SharePoint tool retrieves internal company policies"
},
new
{
Title = "📚 Technical Documentation Question (MCP Only)",
Question = "According to Microsoft Learn, what is the correct way to implement Azure AD Conditional Access policies? Please include reference links to the official documentation.",
Context = "IT administrator needs authoritative Microsoft technical guidance",
LearningPoint = "MCP tool accesses Microsoft Learn for official documentation with links"
},
new
{
Title = "🔄 Combined Implementation Question (SharePoint + MCP)",
Question = "Based on our company's remote work security policy, how should I configure my Azure environment to comply? Please include links to Microsoft documentation showing how to implement each requirement.",
Context = "Need to map company policy to technical implementation with official guidance",
LearningPoint = "Both tools work together: SharePoint for policy + MCP for implementation docs"
}
};
Console.WriteLine("\n" + "".PadRight(70, '='));
Console.WriteLine("🏢 MODERN WORKPLACE ASSISTANT - BUSINESS SCENARIO DEMONSTRATION");
Console.WriteLine("".PadRight(70, '='));
Console.WriteLine("This demonstration shows how AI agents solve real business problems");
Console.WriteLine("using the Azure AI Projects v2 SDK with the Responses API.");
Console.WriteLine("".PadRight(70, '='));
for (int i = 0; i < scenarios.Length; i++)
{
var scenario = scenarios[i];
Console.WriteLine($"\n📊 SCENARIO {i + 1}/{scenarios.Length}: {scenario.Title}");
Console.WriteLine("".PadRight(50, '-'));
Console.WriteLine($"❓ QUESTION: {scenario.Question}");
Console.WriteLine($"🎯 BUSINESS CONTEXT: {scenario.Context}");
Console.WriteLine($"🎓 LEARNING POINT: {scenario.LearningPoint}");
Console.WriteLine("".PadRight(50, '-'));
// <agent_conversation>
Console.WriteLine("🤖 ASSISTANT RESPONSE:");
var (response, status) = await ChatWithAssistantAsync(scenario.Question);
// </agent_conversation>
// Display response with analysis
if (status == "completed" && !string.IsNullOrWhiteSpace(response) && response.Length > 10)
{
var preview = response.Length > 500 ? response.Substring(0, 500) + "..." : response;
Console.WriteLine($"✅ SUCCESS: {preview}");
if (response.Length > 500)
{
Console.WriteLine($" 📏 Full response: {response.Length} characters");
}
}
else
{
Console.WriteLine($"⚠️ RESPONSE: {response}");
}
Console.WriteLine($"📈 STATUS: {status}");
Console.WriteLine("".PadRight(50, '-'));
// Small delay between scenarios
await Task.Delay(1000);
}
Console.WriteLine("\n✅ DEMONSTRATION COMPLETED!");
Console.WriteLine("🎓 Key Learning Outcomes:");
Console.WriteLine(" • Azure AI Projects v2 SDK with PromptAgentDefinition");
Console.WriteLine(" • Responses API for agent conversations");
Console.WriteLine(" • SharePoint + MCP tool integration");
Console.WriteLine(" • MCP tool approval handling via the Responses API");
Console.WriteLine(" • Real business value through AI assistance");
Console.WriteLine(" • Foundation for governance and monitoring (Tutorials 2-3)");
}
/// <summary>
/// Execute a conversation with the workplace assistant using the Responses API.
///
/// This function demonstrates the v2 conversation pattern including:
/// - Sending a request via ProjectResponsesClient
/// - MCP tool approval handling through the Responses API approval loop
/// - Proper error and timeout management
///
/// Educational Value:
/// - Shows the Responses API conversation pattern (replaces threads/runs)
/// - Demonstrates MCP approval via McpToolCallApprovalRequestItem
/// - Includes timeout and error management patterns
/// </summary>
// <mcp_approval_handler>
private static async Task<(string response, string status)> ChatWithAssistantAsync(string message)
{
try
{
// Send the user message via the Responses API
ResponseResult response = await responseClient!.CreateResponseAsync(message);
// <mcp_approval_usage>
// Handle MCP tool approval loop.
// When the agent uses MCP tools, the response may contain
// McpToolCallApprovalRequestItem items. We auto-approve and re-send.
int maxIterations = 30;
int iteration = 0;
while (iteration < maxIterations)
{
// Check for MCP approval requests in the output items
var approvalRequests = response.OutputItems
.OfType<McpToolCallApprovalRequestItem>()
.ToList();
if (approvalRequests.Count == 0) break;
// Build approval response items
var approvalItems = new List<ResponseItem>();
foreach (var request in approvalRequests)
{
Console.WriteLine($" 🔧 Approving MCP tool: {request.ToolName}");
// Auto-approve MCP tool calls
// In production, you might implement custom approval logic here:
// - RBAC checks (is user authorized for this tool?)
// - Cost controls (has budget limit been reached?)
// - Logging and auditing
// - Interactive approval prompts
approvalItems.Add(ResponseItem.CreateMcpApprovalResponseItem(
request.Id,
approved: true));
}
// Send approval responses, chained to the previous response
response = await responseClient.CreateResponseAsync(
approvalItems,
previousResponseId: response.Id);
iteration++;
}
// </mcp_approval_usage>
// Extract the text output
string? outputText = response.GetOutputText();
if (!string.IsNullOrWhiteSpace(outputText) && outputText.Length > 0)
{
return (outputText, "completed");
}
else
{
return ("No response from assistant", "completed");
}
}
catch (Exception ex)
{
Console.WriteLine($"\n❌ Exception details: {ex.GetType().Name}: {ex.Message}");
if (ex.InnerException != null)
{
Console.WriteLine($" Inner: {ex.InnerException.Message}");
}
return ($"Error in conversation: {ex.Message}", "failed");
}
}
// </mcp_approval_handler>
/// <summary>
/// Interactive mode for testing the workplace assistant.
///
/// This provides a simple interface for users to test the agent with their own questions
/// and see how it provides comprehensive technical guidance.
/// Uses PreviousResponseId to maintain conversation context across turns.
/// </summary>
private static async Task InteractiveModeAsync(AgentVersion agentVersion)
{
Console.WriteLine("\n" + "".PadRight(60, '='));
Console.WriteLine("💬 INTERACTIVE MODE - Test Your Workplace Assistant!");
Console.WriteLine("".PadRight(60, '='));
Console.WriteLine("Ask questions about Azure, M365, security, and technical implementation:");
Console.WriteLine("• 'How do I configure Azure AD conditional access?'");
Console.WriteLine("• 'What are MFA best practices for remote workers?'");
Console.WriteLine("• 'How do I set up secure SharePoint access?'");
Console.WriteLine("Type 'quit' to exit.");
Console.WriteLine("".PadRight(60, '-'));
while (true)
{
try
{
Console.Write("\n❓ Your question: ");
string? question = Console.ReadLine()?.Trim();
if (string.IsNullOrEmpty(question))
{
Console.WriteLine("💡 Please ask a question about Azure or M365 technical implementation.");
continue;
}
if (question.ToLower() is "quit" or "exit" or "bye")
{
break;
}
Console.Write("\n🤖 Workplace Assistant: ");
var (response, status) = await ChatWithAssistantAsync(question);
Console.WriteLine(response);
if (status != "completed")
{
Console.WriteLine($"\n⚠️ Response status: {status}");
}
Console.WriteLine("".PadRight(60, '-'));
}
catch (Exception ex)
{
Console.WriteLine($"\n❌ Error: {ex.Message}");
Console.WriteLine("".PadRight(60, '-'));
}
}
Console.WriteLine("\n👋 Thank you for testing the Modern Workplace Assistant!");
}
}
Create the agent and connect the tools
Create the agent and connect the SharePoint and MCP tools. #!/usr/bin/env python3
"""
Microsoft Foundry Agent Sample - Tutorial 1: Modern Workplace Assistant
This sample demonstrates a complete business scenario using the Microsoft Foundry SDK:
- Agent creation with PromptAgentDefinition
- Conversation management via the Responses API
- Robust error handling and graceful degradation
Educational Focus:
- Enterprise AI patterns with the Microsoft Foundry SDK
- Real-world business scenarios that enterprises face daily
- Production-ready error handling and diagnostics
- Foundation for governance, evaluation, and monitoring (Tutorials 2-3)
Business Scenario:
An employee needs to implement Azure AD multi-factor authentication. They need:
1. Company security policy requirements
2. Technical implementation steps
3. Combined guidance showing how policy requirements map to technical implementation
"""
# <imports_and_includes>
import os
import time
from azure.ai.projects import AIProjectClient
from azure.ai.projects.models import (
PromptAgentDefinition,
SharepointPreviewTool,
SharepointGroundingToolParameters,
ToolProjectConnection,
MCPTool,
)
from azure.identity import DefaultAzureCredential
from dotenv import load_dotenv
from openai.types.responses.response_input_param import (
McpApprovalResponse,
)
# </imports_and_includes>
load_dotenv()
# ============================================================================
# AUTHENTICATION SETUP
# ============================================================================
endpoint = os.environ["PROJECT_ENDPOINT"]
def create_workplace_assistant(project_client):
"""
Create a Modern Workplace Assistant using the Microsoft Foundry SDK.
This demonstrates enterprise AI patterns:
1. Agent creation with PromptAgentDefinition
2. Robust error handling with graceful degradation
3. Dynamic agent capabilities based on available resources
4. Clear diagnostic information for troubleshooting
Returns:
agent: The created agent object
"""
print("🤖 Creating Modern Workplace Assistant...")
# ========================================================================
# SHAREPOINT INTEGRATION SETUP
# ========================================================================
# <sharepoint_tool_setup>
sharepoint_connection_id = os.environ.get("SHAREPOINT_CONNECTION_ID")
sharepoint_tool = None
if sharepoint_connection_id:
print("📁 Configuring SharePoint integration...")
print(f" Connection ID: {sharepoint_connection_id}")
try:
sharepoint_tool = SharepointPreviewTool(
sharepoint_grounding_preview=SharepointGroundingToolParameters(
project_connections=[
ToolProjectConnection(
project_connection_id=sharepoint_connection_id
)
]
)
)
print("✅ SharePoint tool configured successfully")
except Exception as e:
print(f"⚠️ SharePoint tool unavailable: {e}")
print(" Agent will operate without SharePoint access")
sharepoint_tool = None
else:
print("📁 SharePoint integration skipped (SHAREPOINT_CONNECTION_ID not set)")
# </sharepoint_tool_setup>
# ========================================================================
# MICROSOFT LEARN MCP INTEGRATION SETUP
# ========================================================================
# <mcp_tool_setup>
mcp_server_url = os.environ.get("MCP_SERVER_URL")
mcp_tool = None
if mcp_server_url:
print("📚 Configuring Microsoft Learn MCP integration...")
print(f" Server URL: {mcp_server_url}")
try:
mcp_tool = MCPTool(
server_url=mcp_server_url,
server_label="Microsoft_Learn_Documentation",
require_approval="always",
)
print("✅ MCP tool configured successfully")
except Exception as e:
print(f"⚠️ MCP tool unavailable: {e}")
print(" Agent will operate without Microsoft Learn access")
mcp_tool = None
else:
print("📚 MCP integration skipped (MCP_SERVER_URL not set)")
# </mcp_tool_setup>
# ========================================================================
# AGENT CREATION WITH DYNAMIC CAPABILITIES
# ========================================================================
if sharepoint_tool and mcp_tool:
instructions = """You are a Modern Workplace Assistant for Contoso Corporation.
CAPABILITIES:
- Search SharePoint for company policies, procedures, and internal documentation
- Access Microsoft Learn for current Azure and Microsoft 365 technical guidance
- Provide comprehensive solutions combining internal requirements with external implementation
RESPONSE STRATEGY:
- For policy questions: Search SharePoint for company-specific requirements and guidelines
- For technical questions: Use Microsoft Learn for current Azure/M365 documentation
- For implementation questions: Combine both sources to show how company policies map to technical implementation
- Always cite your sources and provide step-by-step guidance"""
elif sharepoint_tool:
instructions = """You are a Modern Workplace Assistant with access to Contoso Corporation's SharePoint.
CAPABILITIES:
- Search SharePoint for company policies, procedures, and internal documentation
- Provide detailed technical guidance based on your knowledge
- Combine company policies with general best practices"""
elif mcp_tool:
instructions = """You are a Technical Assistant with access to Microsoft Learn documentation.
CAPABILITIES:
- Access Microsoft Learn for current Azure and Microsoft 365 technical guidance
- Provide detailed implementation steps and best practices
- Explain Azure services, features, and configuration options"""
else:
instructions = """You are a Technical Assistant specializing in Azure and Microsoft 365 guidance.
CAPABILITIES:
- Provide detailed Azure and Microsoft 365 technical guidance
- Explain implementation steps and best practices
- Help with Azure AD, Conditional Access, MFA, and security configurations"""
# <create_agent_with_tools>
print(f"🛠️ Creating agent with model: {os.environ['MODEL_DEPLOYMENT_NAME']}")
tools = []
if sharepoint_tool:
tools.append(sharepoint_tool)
print(" ✓ SharePoint tool added")
if mcp_tool:
tools.append(mcp_tool)
print(" ✓ MCP tool added")
print(f" Total tools: {len(tools)}")
agent = project_client.agents.create_version(
agent_name="Modern Workplace Assistant",
definition=PromptAgentDefinition(
model=os.environ["MODEL_DEPLOYMENT_NAME"],
instructions=instructions,
tools=tools if tools else None,
),
)
print(f"✅ Agent created successfully (name: {agent.name}, version: {agent.version})")
return agent
# </create_agent_with_tools>
def demonstrate_business_scenarios(agent, openai_client):
"""
Demonstrate realistic business scenarios with the Microsoft Foundry SDK.
This function showcases the practical value of the Modern Workplace Assistant
by walking through scenarios that enterprise employees face regularly.
"""
scenarios = [
{
"title": "📋 Company Policy Question (SharePoint Only)",
"question": "What is Contoso's remote work policy?",
"context": "Employee needs to understand company-specific remote work requirements",
"learning_point": "SharePoint tool retrieves internal company policies",
},
{
"title": "📚 Technical Documentation Question (MCP Only)",
"question": (
"According to Microsoft Learn, what is the correct way to implement "
"Azure AD Conditional Access policies? Please include reference links "
"to the official documentation."
),
"context": "IT administrator needs authoritative Microsoft technical guidance",
"learning_point": "MCP tool accesses Microsoft Learn for official documentation with links",
},
{
"title": "🔄 Combined Implementation Question (SharePoint + MCP)",
"question": (
"Based on our company's remote work security policy, how should I configure "
"my Azure environment to comply? Please include links to Microsoft "
"documentation showing how to implement each requirement."
),
"context": "Need to map company policy to technical implementation with official guidance",
"learning_point": "Both tools work together: SharePoint for policy + MCP for implementation docs",
},
]
print("\n" + "=" * 70)
print("🏢 MODERN WORKPLACE ASSISTANT - BUSINESS SCENARIO DEMONSTRATION")
print("=" * 70)
print("This demonstration shows how AI agents solve real business problems")
print("using the Microsoft Foundry SDK.")
print("=" * 70)
for i, scenario in enumerate(scenarios, 1):
print(f"\n📊 SCENARIO {i}/3: {scenario['title']}")
print("-" * 50)
print(f"❓ QUESTION: {scenario['question']}")
print(f"🎯 BUSINESS CONTEXT: {scenario['context']}")
print(f"🎓 LEARNING POINT: {scenario['learning_point']}")
print("-" * 50)
# <agent_conversation>
print("🤖 AGENT RESPONSE:")
response, status = create_agent_response(agent, scenario["question"], openai_client)
# </agent_conversation>
if status == "completed" and response and len(response.strip()) > 10:
print(f"✅ SUCCESS: {response[:300]}...")
if len(response) > 300:
print(f" 📏 Full response: {len(response)} characters")
else:
print(f"⚠️ RESPONSE: {response}")
print(f"📈 STATUS: {status}")
print("-" * 50)
time.sleep(1)
print("\n✅ DEMONSTRATION COMPLETED!")
print("🎓 Key Learning Outcomes:")
print(" • Microsoft Foundry SDK usage for enterprise AI")
print(" • Conversation management via the Responses API")
print(" • Real business value through AI assistance")
print(" • Foundation for governance and monitoring (Tutorials 2-3)")
return True
def create_agent_response(agent, message, openai_client):
"""
Create a response from the workplace agent using the Responses API.
This function demonstrates the response pattern for the Microsoft Foundry SDK
including MCP tool approval handling.
Args:
agent: The agent object (with .name attribute)
message: The user's message
Returns:
tuple: (response_text, status)
"""
try:
response = openai_client.responses.create(
input=message,
extra_body={
"agent": {"name": agent.name, "type": "agent_reference"}
},
)
# Handle MCP approval requests if present
approval_list = []
for item in response.output:
if item.type == "mcp_approval_request" and item.id:
approval_list.append(
McpApprovalResponse(
type="mcp_approval_response",
approve=True,
approval_request_id=item.id,
)
)
if approval_list:
response = openai_client.responses.create(
input=approval_list,
previous_response_id=response.id,
extra_body={
"agent": {"name": agent.name, "type": "agent_reference"}
},
)
return response.output_text, "completed"
except Exception as e:
return f"Error in conversation: {str(e)}", "failed"
def interactive_mode(agent, openai_client):
"""Interactive mode for testing the workplace agent."""
print("\n" + "=" * 60)
print("💬 INTERACTIVE MODE - Test Your Workplace Agent!")
print("=" * 60)
print("Ask questions about Azure, M365, security, and technical implementation.")
print("Type 'quit' to exit.")
print("-" * 60)
while True:
try:
question = input("\n❓ Your question: ").strip()
if question.lower() in ["quit", "exit", "bye"]:
break
if not question:
print("💡 Please ask a question about Azure or M365 technical implementation.")
continue
print("\n🤖 Workplace Agent: ", end="", flush=True)
response, status = create_agent_response(agent, question, openai_client)
print(response)
if status != "completed":
print(f"\n⚠️ Response status: {status}")
print("-" * 60)
except KeyboardInterrupt:
break
except Exception as e:
print(f"\n❌ Error: {e}")
print("-" * 60)
print("\n👋 Thank you for testing the Modern Workplace Agent!")
def main():
"""Main execution flow demonstrating the complete sample."""
print("🚀 Foundry - Modern Workplace Assistant")
print("Tutorial 1: Building Enterprise Agents with Microsoft Foundry SDK")
print("=" * 70)
# <agent_authentication>
with (
DefaultAzureCredential() as credential,
AIProjectClient(endpoint=endpoint, credential=credential) as project_client,
project_client.get_openai_client() as openai_client,
):
print(f"✅ Connected to Foundry: {endpoint}")
# </agent_authentication>
try:
agent = create_workplace_assistant(project_client)
demonstrate_business_scenarios(agent, openai_client)
print("\n🎯 Try interactive mode? (y/n): ", end="")
try:
if input().lower().startswith("y"):
interactive_mode(agent, openai_client)
except EOFError:
print("n")
print("\n🎉 Sample completed successfully!")
print("📚 This foundation supports Tutorial 2 (Governance) and Tutorial 3 (Production)")
print("🔗 Next: Add evaluation metrics, monitoring, and production deployment")
except Exception as e:
print(f"\n❌ Error: {e}")
print("Please check your .env configuration and ensure:")
print(" - PROJECT_ENDPOINT is correct")
print(" - MODEL_DEPLOYMENT_NAME is deployed")
print(" - Azure credentials are configured (az login)")
if __name__ == "__main__":
main()
// <imports_and_includes>
using System;
using System.ClientModel;
using System.Collections.Generic;
using System.IO;
using System.Linq;
using System.Threading.Tasks;
using Azure.AI.Projects;
using Azure.AI.Projects.OpenAI;
using Azure.Identity;
using DotNetEnv;
using OpenAI.Responses;
// </imports_and_includes>
#pragma warning disable OPENAI001
/*
* Azure AI Foundry Agent Sample - Tutorial 1: Modern Workplace Assistant (C#)
*
* This sample demonstrates a complete business scenario using the Azure AI Projects v2 SDK:
* - Agent creation with PromptAgentDefinition and AgentVersion
* - Conversation via the Responses API (ProjectResponsesClient)
* - SharePoint and MCP tool integration on the agent definition
* - MCP tool approval handling through the Responses API approval loop
* - Robust error handling and graceful degradation
*
* Educational Focus:
* - Enterprise AI patterns with the v2 Azure AI Projects SDK
* - Real-world business scenarios that enterprises face daily
* - Production-ready error handling and diagnostics
* - Foundation for governance, evaluation, and monitoring (Tutorials 2-3)
*
* Business Scenario:
* An employee needs to implement Azure AD multi-factor authentication. They need:
* 1. Company security policy requirements (from SharePoint)
* 2. Technical implementation steps (from Microsoft Learn via MCP)
* 3. Combined guidance showing how policy requirements map to technical implementation
*/
class Program
{
private static AIProjectClient? projectClient;
private static ProjectResponsesClient? responseClient;
private static string agentName = "Modern_Workplace_Assistant";
static async Task Main(string[] args)
{
Console.WriteLine("🚀 Azure AI Foundry - Modern Workplace Assistant");
Console.WriteLine("Tutorial 1: Building Enterprise Agents with SharePoint + MCP Tools");
Console.WriteLine("".PadRight(70, '='));
try
{
// Create the agent with full diagnostic output
var agentVersion = await CreateWorkplaceAssistantAsync();
// Demonstrate business scenarios
await DemonstrateBusinessScenariosAsync(agentVersion);
// Offer interactive testing
Console.Write("\n🎯 Try interactive mode? (y/n): ");
var response = Console.ReadLine();
if (response?.ToLower().StartsWith("y") == true)
{
await InteractiveModeAsync(agentVersion);
}
// Cleanup
Console.WriteLine("\n🧹 Cleaning up agent...");
await projectClient!.Agents.DeleteAgentVersionAsync(
agentName: agentVersion.Name,
agentVersion: agentVersion.Version);
Console.WriteLine("✅ Agent deleted");
Console.WriteLine("\n🎉 Sample completed successfully!");
Console.WriteLine("📚 This foundation supports Tutorial 2 (Governance) and Tutorial 3 (Production)");
Console.WriteLine("🔗 Next: Add evaluation metrics, monitoring, and production deployment");
}
catch (Exception ex)
{
Console.WriteLine($"\n❌ Error: {ex.Message}");
Console.WriteLine("Please check your .env configuration and ensure:");
Console.WriteLine(" - PROJECT_ENDPOINT is correct");
Console.WriteLine(" - MODEL_DEPLOYMENT_NAME is deployed");
Console.WriteLine(" - Azure credentials are configured (az login)");
throw;
}
}
/// <summary>
/// Create a Modern Workplace Assistant with SharePoint and MCP tools.
///
/// This demonstrates enterprise AI patterns:
/// 1. Agent creation with PromptAgentDefinition and CreateAgentVersionAsync
/// 2. SharePoint integration via SharepointAgentTool
/// 3. MCP integration via McpTool from the OpenAI Responses API
/// 4. Robust error handling with graceful degradation
/// 5. Dynamic agent capabilities based on available resources
///
/// Educational Value:
/// - Shows real-world complexity of enterprise AI systems
/// - Demonstrates how to handle partial system failures
/// - Provides patterns for agent creation with multiple tools
/// </summary>
private static async Task<AgentVersion> CreateWorkplaceAssistantAsync()
{
// Load environment variables from shared .env file
var envPath = Path.Combine(Directory.GetCurrentDirectory(), "..", "shared", ".env");
if (File.Exists(envPath))
{
Env.Load(envPath);
Console.WriteLine($"📄 Loaded environment from: {envPath}");
}
else
{
// Fallback to local .env
Env.Load(".env");
}
var projectEndpoint = Environment.GetEnvironmentVariable("PROJECT_ENDPOINT");
var modelDeploymentName = Environment.GetEnvironmentVariable("MODEL_DEPLOYMENT_NAME");
var sharePointConnectionName = Environment.GetEnvironmentVariable("SHAREPOINT_CONNECTION_NAME");
var mcpServerUrl = Environment.GetEnvironmentVariable("MCP_SERVER_URL");
if (string.IsNullOrEmpty(projectEndpoint))
throw new InvalidOperationException("PROJECT_ENDPOINT environment variable not set");
if (string.IsNullOrEmpty(modelDeploymentName))
throw new InvalidOperationException("MODEL_DEPLOYMENT_NAME environment variable not set");
Console.WriteLine("\n🤖 Creating Modern Workplace Assistant...");
// ============================================================================
// AUTHENTICATION SETUP
// ============================================================================
// <agent_authentication>
var credential = new DefaultAzureCredential();
projectClient = new AIProjectClient(new Uri(projectEndpoint), credential);
Console.WriteLine($"✅ Connected to Azure AI Foundry: {projectEndpoint}");
// </agent_authentication>
// ========================================================================
// SHAREPOINT INTEGRATION SETUP
// ========================================================================
// <sharepoint_connection_resolution>
SharepointAgentTool? sharepointTool = null;
if (!string.IsNullOrEmpty(sharePointConnectionName))
{
Console.WriteLine($"📁 Configuring SharePoint integration...");
Console.WriteLine($" Connection name: {sharePointConnectionName}");
try
{
// <sharepoint_tool_setup>
// Resolve connection name to connection ID via the Connections API
AIProjectConnection sharepointConnection = await projectClient.Connections.GetConnectionAsync(
sharePointConnectionName, includeCredentials: false);
SharePointGroundingToolOptions sharepointToolOption = new()
{
ProjectConnections = { new ToolProjectConnection(projectConnectionId: sharepointConnection.Id) }
};
sharepointTool = new SharepointAgentTool(sharepointToolOption);
Console.WriteLine($"✅ SharePoint tool configured successfully");
// </sharepoint_tool_setup>
}
catch (Exception ex)
{
Console.WriteLine($"⚠️ SharePoint connection unavailable: {ex.Message}");
Console.WriteLine($" Possible causes:");
Console.WriteLine($" - Connection '{sharePointConnectionName}' doesn't exist in the project");
Console.WriteLine($" - Insufficient permissions to access the connection");
Console.WriteLine($" - Connection configuration is incomplete");
Console.WriteLine($" Agent will operate without SharePoint access");
}
}
else
{
Console.WriteLine($"📁 SharePoint integration skipped (SHAREPOINT_CONNECTION_NAME not set)");
}
// </sharepoint_connection_resolution>
// ========================================================================
// MICROSOFT LEARN MCP INTEGRATION SETUP
// ========================================================================
// <mcp_tool_setup>
// MCP (Model Context Protocol) enables agents to access external data sources
// like Microsoft Learn documentation. The approval flow is handled in ChatWithAssistantAsync.
McpTool? mcpTool = null;
if (!string.IsNullOrEmpty(mcpServerUrl))
{
Console.WriteLine($"📚 Configuring Microsoft Learn MCP integration...");
Console.WriteLine($" Server URL: {mcpServerUrl}");
try
{
// Create MCP tool for Microsoft Learn documentation access
// server_label must match pattern: ^[a-zA-Z0-9_]+$ (alphanumeric and underscores only)
mcpTool = new McpTool("Microsoft_Learn_Documentation", new Uri(mcpServerUrl));
Console.WriteLine($"✅ MCP tool configured successfully");
}
catch (Exception ex)
{
Console.WriteLine($"⚠️ MCP tool unavailable: {ex.Message}");
Console.WriteLine($" Agent will operate without Microsoft Learn access");
}
}
else
{
Console.WriteLine($"📚 MCP integration skipped (MCP_SERVER_URL not set)");
}
// </mcp_tool_setup>
// ========================================================================
// AGENT CREATION WITH DYNAMIC CAPABILITIES
// ========================================================================
// Create agent instructions based on available data sources
string instructions = GetAgentInstructions(sharepointTool != null, mcpTool != null);
// <create_agent_with_tools>
// Create the agent using the v2 SDK with PromptAgentDefinition
Console.WriteLine($"🛠️ Creating agent with model: {modelDeploymentName}");
var agentDefinition = new PromptAgentDefinition(modelDeploymentName)
{
Instructions = instructions
};
// Add tools to the agent definition
if (sharepointTool != null)
{
agentDefinition.Tools.Add(sharepointTool);
Console.WriteLine($" ✓ SharePoint tool added");
}
if (mcpTool != null)
{
agentDefinition.Tools.Add(mcpTool);
Console.WriteLine($" ✓ MCP tool added");
}
Console.WriteLine($" Total tools: {agentDefinition.Tools.Count}");
// Create agent version
AgentVersion agentVersion = await projectClient.Agents.CreateAgentVersionAsync(
agentName: agentName,
options: new(agentDefinition));
// Create a response client bound to this agent for conversations
responseClient = projectClient.OpenAI
.GetProjectResponsesClientForAgent(agentVersion);
Console.WriteLine($"✅ Agent created successfully: {agentVersion.Name} (version {agentVersion.Version})");
return agentVersion;
// </create_agent_with_tools>
}
/// <summary>
/// Generate agent instructions based on available tools.
/// </summary>
private static string GetAgentInstructions(bool hasSharePoint, bool hasMcp)
{
if (hasSharePoint && hasMcp)
{
return @"You are a Modern Workplace Assistant for Contoso Corporation.
CAPABILITIES:
- Search SharePoint for company policies, procedures, and internal documentation
- Access Microsoft Learn for current Azure and Microsoft 365 technical guidance
- Provide comprehensive solutions combining internal requirements with external implementation
RESPONSE STRATEGY:
- For policy questions: Search SharePoint for company-specific requirements and guidelines
- For technical questions: Use Microsoft Learn for current Azure/M365 documentation and best practices
- For implementation questions: Combine both sources to show how company policies map to technical implementation
- Always cite your sources and provide step-by-step guidance
- Explain how internal requirements connect to external implementation steps
EXAMPLE SCENARIOS:
- ""What is our MFA policy?"" → Search SharePoint for security policies
- ""How do I configure Azure AD Conditional Access?"" → Use Microsoft Learn for technical steps
- ""Our policy requires MFA - how do I implement this?"" → Combine policy requirements with implementation guidance";
}
else if (hasSharePoint)
{
return @"You are a Modern Workplace Assistant with access to Contoso Corporation's SharePoint.
CAPABILITIES:
- Search SharePoint for company policies, procedures, and internal documentation
- Provide detailed technical guidance based on your knowledge
- Combine company policies with general best practices
RESPONSE STRATEGY:
- Search SharePoint for company-specific requirements
- Provide technical guidance based on Azure and M365 best practices
- Explain how to align implementations with company policies";
}
else if (hasMcp)
{
return @"You are a Technical Assistant with access to Microsoft Learn documentation.
CAPABILITIES:
- Access Microsoft Learn for current Azure and Microsoft 365 technical guidance
- Provide detailed implementation steps and best practices
- Explain Azure services, features, and configuration options
RESPONSE STRATEGY:
- Use Microsoft Learn for technical documentation
- Provide comprehensive implementation guidance
- Reference official documentation and best practices";
}
else
{
return @"You are a Technical Assistant specializing in Azure and Microsoft 365 guidance.
CAPABILITIES:
- Provide detailed Azure and Microsoft 365 technical guidance
- Explain implementation steps and best practices
- Help with Azure AD, Conditional Access, MFA, and security configurations
RESPONSE STRATEGY:
- Provide comprehensive technical guidance
- Include step-by-step implementation instructions
- Reference best practices and security considerations";
}
}
/// <summary>
/// Demonstrate realistic business scenarios.
///
/// This function showcases the practical value of the Modern Workplace Assistant
/// by walking through scenarios that enterprise employees face regularly.
///
/// Educational Value:
/// - Shows real business problems that AI agents can solve
/// - Demonstrates the Responses API conversation pattern
/// - Illustrates conversation patterns with tool usage
/// </summary>
private static async Task DemonstrateBusinessScenariosAsync(AgentVersion agentVersion)
{
var scenarios = new[]
{
new
{
Title = "📋 Company Policy Question (SharePoint Only)",
Question = "What is Contoso's remote work policy?",
Context = "Employee needs to understand company-specific remote work requirements",
LearningPoint = "SharePoint tool retrieves internal company policies"
},
new
{
Title = "📚 Technical Documentation Question (MCP Only)",
Question = "According to Microsoft Learn, what is the correct way to implement Azure AD Conditional Access policies? Please include reference links to the official documentation.",
Context = "IT administrator needs authoritative Microsoft technical guidance",
LearningPoint = "MCP tool accesses Microsoft Learn for official documentation with links"
},
new
{
Title = "🔄 Combined Implementation Question (SharePoint + MCP)",
Question = "Based on our company's remote work security policy, how should I configure my Azure environment to comply? Please include links to Microsoft documentation showing how to implement each requirement.",
Context = "Need to map company policy to technical implementation with official guidance",
LearningPoint = "Both tools work together: SharePoint for policy + MCP for implementation docs"
}
};
Console.WriteLine("\n" + "".PadRight(70, '='));
Console.WriteLine("🏢 MODERN WORKPLACE ASSISTANT - BUSINESS SCENARIO DEMONSTRATION");
Console.WriteLine("".PadRight(70, '='));
Console.WriteLine("This demonstration shows how AI agents solve real business problems");
Console.WriteLine("using the Azure AI Projects v2 SDK with the Responses API.");
Console.WriteLine("".PadRight(70, '='));
for (int i = 0; i < scenarios.Length; i++)
{
var scenario = scenarios[i];
Console.WriteLine($"\n📊 SCENARIO {i + 1}/{scenarios.Length}: {scenario.Title}");
Console.WriteLine("".PadRight(50, '-'));
Console.WriteLine($"❓ QUESTION: {scenario.Question}");
Console.WriteLine($"🎯 BUSINESS CONTEXT: {scenario.Context}");
Console.WriteLine($"🎓 LEARNING POINT: {scenario.LearningPoint}");
Console.WriteLine("".PadRight(50, '-'));
// <agent_conversation>
Console.WriteLine("🤖 ASSISTANT RESPONSE:");
var (response, status) = await ChatWithAssistantAsync(scenario.Question);
// </agent_conversation>
// Display response with analysis
if (status == "completed" && !string.IsNullOrWhiteSpace(response) && response.Length > 10)
{
var preview = response.Length > 500 ? response.Substring(0, 500) + "..." : response;
Console.WriteLine($"✅ SUCCESS: {preview}");
if (response.Length > 500)
{
Console.WriteLine($" 📏 Full response: {response.Length} characters");
}
}
else
{
Console.WriteLine($"⚠️ RESPONSE: {response}");
}
Console.WriteLine($"📈 STATUS: {status}");
Console.WriteLine("".PadRight(50, '-'));
// Small delay between scenarios
await Task.Delay(1000);
}
Console.WriteLine("\n✅ DEMONSTRATION COMPLETED!");
Console.WriteLine("🎓 Key Learning Outcomes:");
Console.WriteLine(" • Azure AI Projects v2 SDK with PromptAgentDefinition");
Console.WriteLine(" • Responses API for agent conversations");
Console.WriteLine(" • SharePoint + MCP tool integration");
Console.WriteLine(" • MCP tool approval handling via the Responses API");
Console.WriteLine(" • Real business value through AI assistance");
Console.WriteLine(" • Foundation for governance and monitoring (Tutorials 2-3)");
}
/// <summary>
/// Execute a conversation with the workplace assistant using the Responses API.
///
/// This function demonstrates the v2 conversation pattern including:
/// - Sending a request via ProjectResponsesClient
/// - MCP tool approval handling through the Responses API approval loop
/// - Proper error and timeout management
///
/// Educational Value:
/// - Shows the Responses API conversation pattern (replaces threads/runs)
/// - Demonstrates MCP approval via McpToolCallApprovalRequestItem
/// - Includes timeout and error management patterns
/// </summary>
// <mcp_approval_handler>
private static async Task<(string response, string status)> ChatWithAssistantAsync(string message)
{
try
{
// Send the user message via the Responses API
ResponseResult response = await responseClient!.CreateResponseAsync(message);
// <mcp_approval_usage>
// Handle MCP tool approval loop.
// When the agent uses MCP tools, the response may contain
// McpToolCallApprovalRequestItem items. We auto-approve and re-send.
int maxIterations = 30;
int iteration = 0;
while (iteration < maxIterations)
{
// Check for MCP approval requests in the output items
var approvalRequests = response.OutputItems
.OfType<McpToolCallApprovalRequestItem>()
.ToList();
if (approvalRequests.Count == 0) break;
// Build approval response items
var approvalItems = new List<ResponseItem>();
foreach (var request in approvalRequests)
{
Console.WriteLine($" 🔧 Approving MCP tool: {request.ToolName}");
// Auto-approve MCP tool calls
// In production, you might implement custom approval logic here:
// - RBAC checks (is user authorized for this tool?)
// - Cost controls (has budget limit been reached?)
// - Logging and auditing
// - Interactive approval prompts
approvalItems.Add(ResponseItem.CreateMcpApprovalResponseItem(
request.Id,
approved: true));
}
// Send approval responses, chained to the previous response
response = await responseClient.CreateResponseAsync(
approvalItems,
previousResponseId: response.Id);
iteration++;
}
// </mcp_approval_usage>
// Extract the text output
string? outputText = response.GetOutputText();
if (!string.IsNullOrWhiteSpace(outputText) && outputText.Length > 0)
{
return (outputText, "completed");
}
else
{
return ("No response from assistant", "completed");
}
}
catch (Exception ex)
{
Console.WriteLine($"\n❌ Exception details: {ex.GetType().Name}: {ex.Message}");
if (ex.InnerException != null)
{
Console.WriteLine($" Inner: {ex.InnerException.Message}");
}
return ($"Error in conversation: {ex.Message}", "failed");
}
}
// </mcp_approval_handler>
/// <summary>
/// Interactive mode for testing the workplace assistant.
///
/// This provides a simple interface for users to test the agent with their own questions
/// and see how it provides comprehensive technical guidance.
/// Uses PreviousResponseId to maintain conversation context across turns.
/// </summary>
private static async Task InteractiveModeAsync(AgentVersion agentVersion)
{
Console.WriteLine("\n" + "".PadRight(60, '='));
Console.WriteLine("💬 INTERACTIVE MODE - Test Your Workplace Assistant!");
Console.WriteLine("".PadRight(60, '='));
Console.WriteLine("Ask questions about Azure, M365, security, and technical implementation:");
Console.WriteLine("• 'How do I configure Azure AD conditional access?'");
Console.WriteLine("• 'What are MFA best practices for remote workers?'");
Console.WriteLine("• 'How do I set up secure SharePoint access?'");
Console.WriteLine("Type 'quit' to exit.");
Console.WriteLine("".PadRight(60, '-'));
while (true)
{
try
{
Console.Write("\n❓ Your question: ");
string? question = Console.ReadLine()?.Trim();
if (string.IsNullOrEmpty(question))
{
Console.WriteLine("💡 Please ask a question about Azure or M365 technical implementation.");
continue;
}
if (question.ToLower() is "quit" or "exit" or "bye")
{
break;
}
Console.Write("\n🤖 Workplace Assistant: ");
var (response, status) = await ChatWithAssistantAsync(question);
Console.WriteLine(response);
if (status != "completed")
{
Console.WriteLine($"\n⚠️ Response status: {status}");
}
Console.WriteLine("".PadRight(60, '-'));
}
catch (Exception ex)
{
Console.WriteLine($"\n❌ Error: {ex.Message}");
Console.WriteLine("".PadRight(60, '-'));
}
}
Console.WriteLine("\n👋 Thank you for testing the Modern Workplace Assistant!");
}
}
Converse with the agent
Finally, implement an interactive loop to converse with the agent. #!/usr/bin/env python3
"""
Microsoft Foundry Agent Sample - Tutorial 1: Modern Workplace Assistant
This sample demonstrates a complete business scenario using the Microsoft Foundry SDK:
- Agent creation with PromptAgentDefinition
- Conversation management via the Responses API
- Robust error handling and graceful degradation
Educational Focus:
- Enterprise AI patterns with the Microsoft Foundry SDK
- Real-world business scenarios that enterprises face daily
- Production-ready error handling and diagnostics
- Foundation for governance, evaluation, and monitoring (Tutorials 2-3)
Business Scenario:
An employee needs to implement Azure AD multi-factor authentication. They need:
1. Company security policy requirements
2. Technical implementation steps
3. Combined guidance showing how policy requirements map to technical implementation
"""
# <imports_and_includes>
import os
import time
from azure.ai.projects import AIProjectClient
from azure.ai.projects.models import (
PromptAgentDefinition,
SharepointPreviewTool,
SharepointGroundingToolParameters,
ToolProjectConnection,
MCPTool,
)
from azure.identity import DefaultAzureCredential
from dotenv import load_dotenv
from openai.types.responses.response_input_param import (
McpApprovalResponse,
)
# </imports_and_includes>
load_dotenv()
# ============================================================================
# AUTHENTICATION SETUP
# ============================================================================
endpoint = os.environ["PROJECT_ENDPOINT"]
def create_workplace_assistant(project_client):
"""
Create a Modern Workplace Assistant using the Microsoft Foundry SDK.
This demonstrates enterprise AI patterns:
1. Agent creation with PromptAgentDefinition
2. Robust error handling with graceful degradation
3. Dynamic agent capabilities based on available resources
4. Clear diagnostic information for troubleshooting
Returns:
agent: The created agent object
"""
print("🤖 Creating Modern Workplace Assistant...")
# ========================================================================
# SHAREPOINT INTEGRATION SETUP
# ========================================================================
# <sharepoint_tool_setup>
sharepoint_connection_id = os.environ.get("SHAREPOINT_CONNECTION_ID")
sharepoint_tool = None
if sharepoint_connection_id:
print("📁 Configuring SharePoint integration...")
print(f" Connection ID: {sharepoint_connection_id}")
try:
sharepoint_tool = SharepointPreviewTool(
sharepoint_grounding_preview=SharepointGroundingToolParameters(
project_connections=[
ToolProjectConnection(
project_connection_id=sharepoint_connection_id
)
]
)
)
print("✅ SharePoint tool configured successfully")
except Exception as e:
print(f"⚠️ SharePoint tool unavailable: {e}")
print(" Agent will operate without SharePoint access")
sharepoint_tool = None
else:
print("📁 SharePoint integration skipped (SHAREPOINT_CONNECTION_ID not set)")
# </sharepoint_tool_setup>
# ========================================================================
# MICROSOFT LEARN MCP INTEGRATION SETUP
# ========================================================================
# <mcp_tool_setup>
mcp_server_url = os.environ.get("MCP_SERVER_URL")
mcp_tool = None
if mcp_server_url:
print("📚 Configuring Microsoft Learn MCP integration...")
print(f" Server URL: {mcp_server_url}")
try:
mcp_tool = MCPTool(
server_url=mcp_server_url,
server_label="Microsoft_Learn_Documentation",
require_approval="always",
)
print("✅ MCP tool configured successfully")
except Exception as e:
print(f"⚠️ MCP tool unavailable: {e}")
print(" Agent will operate without Microsoft Learn access")
mcp_tool = None
else:
print("📚 MCP integration skipped (MCP_SERVER_URL not set)")
# </mcp_tool_setup>
# ========================================================================
# AGENT CREATION WITH DYNAMIC CAPABILITIES
# ========================================================================
if sharepoint_tool and mcp_tool:
instructions = """You are a Modern Workplace Assistant for Contoso Corporation.
CAPABILITIES:
- Search SharePoint for company policies, procedures, and internal documentation
- Access Microsoft Learn for current Azure and Microsoft 365 technical guidance
- Provide comprehensive solutions combining internal requirements with external implementation
RESPONSE STRATEGY:
- For policy questions: Search SharePoint for company-specific requirements and guidelines
- For technical questions: Use Microsoft Learn for current Azure/M365 documentation
- For implementation questions: Combine both sources to show how company policies map to technical implementation
- Always cite your sources and provide step-by-step guidance"""
elif sharepoint_tool:
instructions = """You are a Modern Workplace Assistant with access to Contoso Corporation's SharePoint.
CAPABILITIES:
- Search SharePoint for company policies, procedures, and internal documentation
- Provide detailed technical guidance based on your knowledge
- Combine company policies with general best practices"""
elif mcp_tool:
instructions = """You are a Technical Assistant with access to Microsoft Learn documentation.
CAPABILITIES:
- Access Microsoft Learn for current Azure and Microsoft 365 technical guidance
- Provide detailed implementation steps and best practices
- Explain Azure services, features, and configuration options"""
else:
instructions = """You are a Technical Assistant specializing in Azure and Microsoft 365 guidance.
CAPABILITIES:
- Provide detailed Azure and Microsoft 365 technical guidance
- Explain implementation steps and best practices
- Help with Azure AD, Conditional Access, MFA, and security configurations"""
# <create_agent_with_tools>
print(f"🛠️ Creating agent with model: {os.environ['MODEL_DEPLOYMENT_NAME']}")
tools = []
if sharepoint_tool:
tools.append(sharepoint_tool)
print(" ✓ SharePoint tool added")
if mcp_tool:
tools.append(mcp_tool)
print(" ✓ MCP tool added")
print(f" Total tools: {len(tools)}")
agent = project_client.agents.create_version(
agent_name="Modern Workplace Assistant",
definition=PromptAgentDefinition(
model=os.environ["MODEL_DEPLOYMENT_NAME"],
instructions=instructions,
tools=tools if tools else None,
),
)
print(f"✅ Agent created successfully (name: {agent.name}, version: {agent.version})")
return agent
# </create_agent_with_tools>
def demonstrate_business_scenarios(agent, openai_client):
"""
Demonstrate realistic business scenarios with the Microsoft Foundry SDK.
This function showcases the practical value of the Modern Workplace Assistant
by walking through scenarios that enterprise employees face regularly.
"""
scenarios = [
{
"title": "📋 Company Policy Question (SharePoint Only)",
"question": "What is Contoso's remote work policy?",
"context": "Employee needs to understand company-specific remote work requirements",
"learning_point": "SharePoint tool retrieves internal company policies",
},
{
"title": "📚 Technical Documentation Question (MCP Only)",
"question": (
"According to Microsoft Learn, what is the correct way to implement "
"Azure AD Conditional Access policies? Please include reference links "
"to the official documentation."
),
"context": "IT administrator needs authoritative Microsoft technical guidance",
"learning_point": "MCP tool accesses Microsoft Learn for official documentation with links",
},
{
"title": "🔄 Combined Implementation Question (SharePoint + MCP)",
"question": (
"Based on our company's remote work security policy, how should I configure "
"my Azure environment to comply? Please include links to Microsoft "
"documentation showing how to implement each requirement."
),
"context": "Need to map company policy to technical implementation with official guidance",
"learning_point": "Both tools work together: SharePoint for policy + MCP for implementation docs",
},
]
print("\n" + "=" * 70)
print("🏢 MODERN WORKPLACE ASSISTANT - BUSINESS SCENARIO DEMONSTRATION")
print("=" * 70)
print("This demonstration shows how AI agents solve real business problems")
print("using the Microsoft Foundry SDK.")
print("=" * 70)
for i, scenario in enumerate(scenarios, 1):
print(f"\n📊 SCENARIO {i}/3: {scenario['title']}")
print("-" * 50)
print(f"❓ QUESTION: {scenario['question']}")
print(f"🎯 BUSINESS CONTEXT: {scenario['context']}")
print(f"🎓 LEARNING POINT: {scenario['learning_point']}")
print("-" * 50)
# <agent_conversation>
print("🤖 AGENT RESPONSE:")
response, status = create_agent_response(agent, scenario["question"], openai_client)
# </agent_conversation>
if status == "completed" and response and len(response.strip()) > 10:
print(f"✅ SUCCESS: {response[:300]}...")
if len(response) > 300:
print(f" 📏 Full response: {len(response)} characters")
else:
print(f"⚠️ RESPONSE: {response}")
print(f"📈 STATUS: {status}")
print("-" * 50)
time.sleep(1)
print("\n✅ DEMONSTRATION COMPLETED!")
print("🎓 Key Learning Outcomes:")
print(" • Microsoft Foundry SDK usage for enterprise AI")
print(" • Conversation management via the Responses API")
print(" • Real business value through AI assistance")
print(" • Foundation for governance and monitoring (Tutorials 2-3)")
return True
def create_agent_response(agent, message, openai_client):
"""
Create a response from the workplace agent using the Responses API.
This function demonstrates the response pattern for the Microsoft Foundry SDK
including MCP tool approval handling.
Args:
agent: The agent object (with .name attribute)
message: The user's message
Returns:
tuple: (response_text, status)
"""
try:
response = openai_client.responses.create(
input=message,
extra_body={
"agent": {"name": agent.name, "type": "agent_reference"}
},
)
# Handle MCP approval requests if present
approval_list = []
for item in response.output:
if item.type == "mcp_approval_request" and item.id:
approval_list.append(
McpApprovalResponse(
type="mcp_approval_response",
approve=True,
approval_request_id=item.id,
)
)
if approval_list:
response = openai_client.responses.create(
input=approval_list,
previous_response_id=response.id,
extra_body={
"agent": {"name": agent.name, "type": "agent_reference"}
},
)
return response.output_text, "completed"
except Exception as e:
return f"Error in conversation: {str(e)}", "failed"
def interactive_mode(agent, openai_client):
"""Interactive mode for testing the workplace agent."""
print("\n" + "=" * 60)
print("💬 INTERACTIVE MODE - Test Your Workplace Agent!")
print("=" * 60)
print("Ask questions about Azure, M365, security, and technical implementation.")
print("Type 'quit' to exit.")
print("-" * 60)
while True:
try:
question = input("\n❓ Your question: ").strip()
if question.lower() in ["quit", "exit", "bye"]:
break
if not question:
print("💡 Please ask a question about Azure or M365 technical implementation.")
continue
print("\n🤖 Workplace Agent: ", end="", flush=True)
response, status = create_agent_response(agent, question, openai_client)
print(response)
if status != "completed":
print(f"\n⚠️ Response status: {status}")
print("-" * 60)
except KeyboardInterrupt:
break
except Exception as e:
print(f"\n❌ Error: {e}")
print("-" * 60)
print("\n👋 Thank you for testing the Modern Workplace Agent!")
def main():
"""Main execution flow demonstrating the complete sample."""
print("🚀 Foundry - Modern Workplace Assistant")
print("Tutorial 1: Building Enterprise Agents with Microsoft Foundry SDK")
print("=" * 70)
# <agent_authentication>
with (
DefaultAzureCredential() as credential,
AIProjectClient(endpoint=endpoint, credential=credential) as project_client,
project_client.get_openai_client() as openai_client,
):
print(f"✅ Connected to Foundry: {endpoint}")
# </agent_authentication>
try:
agent = create_workplace_assistant(project_client)
demonstrate_business_scenarios(agent, openai_client)
print("\n🎯 Try interactive mode? (y/n): ", end="")
try:
if input().lower().startswith("y"):
interactive_mode(agent, openai_client)
except EOFError:
print("n")
print("\n🎉 Sample completed successfully!")
print("📚 This foundation supports Tutorial 2 (Governance) and Tutorial 3 (Production)")
print("🔗 Next: Add evaluation metrics, monitoring, and production deployment")
except Exception as e:
print(f"\n❌ Error: {e}")
print("Please check your .env configuration and ensure:")
print(" - PROJECT_ENDPOINT is correct")
print(" - MODEL_DEPLOYMENT_NAME is deployed")
print(" - Azure credentials are configured (az login)")
if __name__ == "__main__":
main()
// <imports_and_includes>
using System;
using System.ClientModel;
using System.Collections.Generic;
using System.IO;
using System.Linq;
using System.Threading.Tasks;
using Azure.AI.Projects;
using Azure.AI.Projects.OpenAI;
using Azure.Identity;
using DotNetEnv;
using OpenAI.Responses;
// </imports_and_includes>
#pragma warning disable OPENAI001
/*
* Azure AI Foundry Agent Sample - Tutorial 1: Modern Workplace Assistant (C#)
*
* This sample demonstrates a complete business scenario using the Azure AI Projects v2 SDK:
* - Agent creation with PromptAgentDefinition and AgentVersion
* - Conversation via the Responses API (ProjectResponsesClient)
* - SharePoint and MCP tool integration on the agent definition
* - MCP tool approval handling through the Responses API approval loop
* - Robust error handling and graceful degradation
*
* Educational Focus:
* - Enterprise AI patterns with the v2 Azure AI Projects SDK
* - Real-world business scenarios that enterprises face daily
* - Production-ready error handling and diagnostics
* - Foundation for governance, evaluation, and monitoring (Tutorials 2-3)
*
* Business Scenario:
* An employee needs to implement Azure AD multi-factor authentication. They need:
* 1. Company security policy requirements (from SharePoint)
* 2. Technical implementation steps (from Microsoft Learn via MCP)
* 3. Combined guidance showing how policy requirements map to technical implementation
*/
class Program
{
private static AIProjectClient? projectClient;
private static ProjectResponsesClient? responseClient;
private static string agentName = "Modern_Workplace_Assistant";
static async Task Main(string[] args)
{
Console.WriteLine("🚀 Azure AI Foundry - Modern Workplace Assistant");
Console.WriteLine("Tutorial 1: Building Enterprise Agents with SharePoint + MCP Tools");
Console.WriteLine("".PadRight(70, '='));
try
{
// Create the agent with full diagnostic output
var agentVersion = await CreateWorkplaceAssistantAsync();
// Demonstrate business scenarios
await DemonstrateBusinessScenariosAsync(agentVersion);
// Offer interactive testing
Console.Write("\n🎯 Try interactive mode? (y/n): ");
var response = Console.ReadLine();
if (response?.ToLower().StartsWith("y") == true)
{
await InteractiveModeAsync(agentVersion);
}
// Cleanup
Console.WriteLine("\n🧹 Cleaning up agent...");
await projectClient!.Agents.DeleteAgentVersionAsync(
agentName: agentVersion.Name,
agentVersion: agentVersion.Version);
Console.WriteLine("✅ Agent deleted");
Console.WriteLine("\n🎉 Sample completed successfully!");
Console.WriteLine("📚 This foundation supports Tutorial 2 (Governance) and Tutorial 3 (Production)");
Console.WriteLine("🔗 Next: Add evaluation metrics, monitoring, and production deployment");
}
catch (Exception ex)
{
Console.WriteLine($"\n❌ Error: {ex.Message}");
Console.WriteLine("Please check your .env configuration and ensure:");
Console.WriteLine(" - PROJECT_ENDPOINT is correct");
Console.WriteLine(" - MODEL_DEPLOYMENT_NAME is deployed");
Console.WriteLine(" - Azure credentials are configured (az login)");
throw;
}
}
/// <summary>
/// Create a Modern Workplace Assistant with SharePoint and MCP tools.
///
/// This demonstrates enterprise AI patterns:
/// 1. Agent creation with PromptAgentDefinition and CreateAgentVersionAsync
/// 2. SharePoint integration via SharepointAgentTool
/// 3. MCP integration via McpTool from the OpenAI Responses API
/// 4. Robust error handling with graceful degradation
/// 5. Dynamic agent capabilities based on available resources
///
/// Educational Value:
/// - Shows real-world complexity of enterprise AI systems
/// - Demonstrates how to handle partial system failures
/// - Provides patterns for agent creation with multiple tools
/// </summary>
private static async Task<AgentVersion> CreateWorkplaceAssistantAsync()
{
// Load environment variables from shared .env file
var envPath = Path.Combine(Directory.GetCurrentDirectory(), "..", "shared", ".env");
if (File.Exists(envPath))
{
Env.Load(envPath);
Console.WriteLine($"📄 Loaded environment from: {envPath}");
}
else
{
// Fallback to local .env
Env.Load(".env");
}
var projectEndpoint = Environment.GetEnvironmentVariable("PROJECT_ENDPOINT");
var modelDeploymentName = Environment.GetEnvironmentVariable("MODEL_DEPLOYMENT_NAME");
var sharePointConnectionName = Environment.GetEnvironmentVariable("SHAREPOINT_CONNECTION_NAME");
var mcpServerUrl = Environment.GetEnvironmentVariable("MCP_SERVER_URL");
if (string.IsNullOrEmpty(projectEndpoint))
throw new InvalidOperationException("PROJECT_ENDPOINT environment variable not set");
if (string.IsNullOrEmpty(modelDeploymentName))
throw new InvalidOperationException("MODEL_DEPLOYMENT_NAME environment variable not set");
Console.WriteLine("\n🤖 Creating Modern Workplace Assistant...");
// ============================================================================
// AUTHENTICATION SETUP
// ============================================================================
// <agent_authentication>
var credential = new DefaultAzureCredential();
projectClient = new AIProjectClient(new Uri(projectEndpoint), credential);
Console.WriteLine($"✅ Connected to Azure AI Foundry: {projectEndpoint}");
// </agent_authentication>
// ========================================================================
// SHAREPOINT INTEGRATION SETUP
// ========================================================================
// <sharepoint_connection_resolution>
SharepointAgentTool? sharepointTool = null;
if (!string.IsNullOrEmpty(sharePointConnectionName))
{
Console.WriteLine($"📁 Configuring SharePoint integration...");
Console.WriteLine($" Connection name: {sharePointConnectionName}");
try
{
// <sharepoint_tool_setup>
// Resolve connection name to connection ID via the Connections API
AIProjectConnection sharepointConnection = await projectClient.Connections.GetConnectionAsync(
sharePointConnectionName, includeCredentials: false);
SharePointGroundingToolOptions sharepointToolOption = new()
{
ProjectConnections = { new ToolProjectConnection(projectConnectionId: sharepointConnection.Id) }
};
sharepointTool = new SharepointAgentTool(sharepointToolOption);
Console.WriteLine($"✅ SharePoint tool configured successfully");
// </sharepoint_tool_setup>
}
catch (Exception ex)
{
Console.WriteLine($"⚠️ SharePoint connection unavailable: {ex.Message}");
Console.WriteLine($" Possible causes:");
Console.WriteLine($" - Connection '{sharePointConnectionName}' doesn't exist in the project");
Console.WriteLine($" - Insufficient permissions to access the connection");
Console.WriteLine($" - Connection configuration is incomplete");
Console.WriteLine($" Agent will operate without SharePoint access");
}
}
else
{
Console.WriteLine($"📁 SharePoint integration skipped (SHAREPOINT_CONNECTION_NAME not set)");
}
// </sharepoint_connection_resolution>
// ========================================================================
// MICROSOFT LEARN MCP INTEGRATION SETUP
// ========================================================================
// <mcp_tool_setup>
// MCP (Model Context Protocol) enables agents to access external data sources
// like Microsoft Learn documentation. The approval flow is handled in ChatWithAssistantAsync.
McpTool? mcpTool = null;
if (!string.IsNullOrEmpty(mcpServerUrl))
{
Console.WriteLine($"📚 Configuring Microsoft Learn MCP integration...");
Console.WriteLine($" Server URL: {mcpServerUrl}");
try
{
// Create MCP tool for Microsoft Learn documentation access
// server_label must match pattern: ^[a-zA-Z0-9_]+$ (alphanumeric and underscores only)
mcpTool = new McpTool("Microsoft_Learn_Documentation", new Uri(mcpServerUrl));
Console.WriteLine($"✅ MCP tool configured successfully");
}
catch (Exception ex)
{
Console.WriteLine($"⚠️ MCP tool unavailable: {ex.Message}");
Console.WriteLine($" Agent will operate without Microsoft Learn access");
}
}
else
{
Console.WriteLine($"📚 MCP integration skipped (MCP_SERVER_URL not set)");
}
// </mcp_tool_setup>
// ========================================================================
// AGENT CREATION WITH DYNAMIC CAPABILITIES
// ========================================================================
// Create agent instructions based on available data sources
string instructions = GetAgentInstructions(sharepointTool != null, mcpTool != null);
// <create_agent_with_tools>
// Create the agent using the v2 SDK with PromptAgentDefinition
Console.WriteLine($"🛠️ Creating agent with model: {modelDeploymentName}");
var agentDefinition = new PromptAgentDefinition(modelDeploymentName)
{
Instructions = instructions
};
// Add tools to the agent definition
if (sharepointTool != null)
{
agentDefinition.Tools.Add(sharepointTool);
Console.WriteLine($" ✓ SharePoint tool added");
}
if (mcpTool != null)
{
agentDefinition.Tools.Add(mcpTool);
Console.WriteLine($" ✓ MCP tool added");
}
Console.WriteLine($" Total tools: {agentDefinition.Tools.Count}");
// Create agent version
AgentVersion agentVersion = await projectClient.Agents.CreateAgentVersionAsync(
agentName: agentName,
options: new(agentDefinition));
// Create a response client bound to this agent for conversations
responseClient = projectClient.OpenAI
.GetProjectResponsesClientForAgent(agentVersion);
Console.WriteLine($"✅ Agent created successfully: {agentVersion.Name} (version {agentVersion.Version})");
return agentVersion;
// </create_agent_with_tools>
}
/// <summary>
/// Generate agent instructions based on available tools.
/// </summary>
private static string GetAgentInstructions(bool hasSharePoint, bool hasMcp)
{
if (hasSharePoint && hasMcp)
{
return @"You are a Modern Workplace Assistant for Contoso Corporation.
CAPABILITIES:
- Search SharePoint for company policies, procedures, and internal documentation
- Access Microsoft Learn for current Azure and Microsoft 365 technical guidance
- Provide comprehensive solutions combining internal requirements with external implementation
RESPONSE STRATEGY:
- For policy questions: Search SharePoint for company-specific requirements and guidelines
- For technical questions: Use Microsoft Learn for current Azure/M365 documentation and best practices
- For implementation questions: Combine both sources to show how company policies map to technical implementation
- Always cite your sources and provide step-by-step guidance
- Explain how internal requirements connect to external implementation steps
EXAMPLE SCENARIOS:
- ""What is our MFA policy?"" → Search SharePoint for security policies
- ""How do I configure Azure AD Conditional Access?"" → Use Microsoft Learn for technical steps
- ""Our policy requires MFA - how do I implement this?"" → Combine policy requirements with implementation guidance";
}
else if (hasSharePoint)
{
return @"You are a Modern Workplace Assistant with access to Contoso Corporation's SharePoint.
CAPABILITIES:
- Search SharePoint for company policies, procedures, and internal documentation
- Provide detailed technical guidance based on your knowledge
- Combine company policies with general best practices
RESPONSE STRATEGY:
- Search SharePoint for company-specific requirements
- Provide technical guidance based on Azure and M365 best practices
- Explain how to align implementations with company policies";
}
else if (hasMcp)
{
return @"You are a Technical Assistant with access to Microsoft Learn documentation.
CAPABILITIES:
- Access Microsoft Learn for current Azure and Microsoft 365 technical guidance
- Provide detailed implementation steps and best practices
- Explain Azure services, features, and configuration options
RESPONSE STRATEGY:
- Use Microsoft Learn for technical documentation
- Provide comprehensive implementation guidance
- Reference official documentation and best practices";
}
else
{
return @"You are a Technical Assistant specializing in Azure and Microsoft 365 guidance.
CAPABILITIES:
- Provide detailed Azure and Microsoft 365 technical guidance
- Explain implementation steps and best practices
- Help with Azure AD, Conditional Access, MFA, and security configurations
RESPONSE STRATEGY:
- Provide comprehensive technical guidance
- Include step-by-step implementation instructions
- Reference best practices and security considerations";
}
}
/// <summary>
/// Demonstrate realistic business scenarios.
///
/// This function showcases the practical value of the Modern Workplace Assistant
/// by walking through scenarios that enterprise employees face regularly.
///
/// Educational Value:
/// - Shows real business problems that AI agents can solve
/// - Demonstrates the Responses API conversation pattern
/// - Illustrates conversation patterns with tool usage
/// </summary>
private static async Task DemonstrateBusinessScenariosAsync(AgentVersion agentVersion)
{
var scenarios = new[]
{
new
{
Title = "📋 Company Policy Question (SharePoint Only)",
Question = "What is Contoso's remote work policy?",
Context = "Employee needs to understand company-specific remote work requirements",
LearningPoint = "SharePoint tool retrieves internal company policies"
},
new
{
Title = "📚 Technical Documentation Question (MCP Only)",
Question = "According to Microsoft Learn, what is the correct way to implement Azure AD Conditional Access policies? Please include reference links to the official documentation.",
Context = "IT administrator needs authoritative Microsoft technical guidance",
LearningPoint = "MCP tool accesses Microsoft Learn for official documentation with links"
},
new
{
Title = "🔄 Combined Implementation Question (SharePoint + MCP)",
Question = "Based on our company's remote work security policy, how should I configure my Azure environment to comply? Please include links to Microsoft documentation showing how to implement each requirement.",
Context = "Need to map company policy to technical implementation with official guidance",
LearningPoint = "Both tools work together: SharePoint for policy + MCP for implementation docs"
}
};
Console.WriteLine("\n" + "".PadRight(70, '='));
Console.WriteLine("🏢 MODERN WORKPLACE ASSISTANT - BUSINESS SCENARIO DEMONSTRATION");
Console.WriteLine("".PadRight(70, '='));
Console.WriteLine("This demonstration shows how AI agents solve real business problems");
Console.WriteLine("using the Azure AI Projects v2 SDK with the Responses API.");
Console.WriteLine("".PadRight(70, '='));
for (int i = 0; i < scenarios.Length; i++)
{
var scenario = scenarios[i];
Console.WriteLine($"\n📊 SCENARIO {i + 1}/{scenarios.Length}: {scenario.Title}");
Console.WriteLine("".PadRight(50, '-'));
Console.WriteLine($"❓ QUESTION: {scenario.Question}");
Console.WriteLine($"🎯 BUSINESS CONTEXT: {scenario.Context}");
Console.WriteLine($"🎓 LEARNING POINT: {scenario.LearningPoint}");
Console.WriteLine("".PadRight(50, '-'));
// <agent_conversation>
Console.WriteLine("🤖 ASSISTANT RESPONSE:");
var (response, status) = await ChatWithAssistantAsync(scenario.Question);
// </agent_conversation>
// Display response with analysis
if (status == "completed" && !string.IsNullOrWhiteSpace(response) && response.Length > 10)
{
var preview = response.Length > 500 ? response.Substring(0, 500) + "..." : response;
Console.WriteLine($"✅ SUCCESS: {preview}");
if (response.Length > 500)
{
Console.WriteLine($" 📏 Full response: {response.Length} characters");
}
}
else
{
Console.WriteLine($"⚠️ RESPONSE: {response}");
}
Console.WriteLine($"📈 STATUS: {status}");
Console.WriteLine("".PadRight(50, '-'));
// Small delay between scenarios
await Task.Delay(1000);
}
Console.WriteLine("\n✅ DEMONSTRATION COMPLETED!");
Console.WriteLine("🎓 Key Learning Outcomes:");
Console.WriteLine(" • Azure AI Projects v2 SDK with PromptAgentDefinition");
Console.WriteLine(" • Responses API for agent conversations");
Console.WriteLine(" • SharePoint + MCP tool integration");
Console.WriteLine(" • MCP tool approval handling via the Responses API");
Console.WriteLine(" • Real business value through AI assistance");
Console.WriteLine(" • Foundation for governance and monitoring (Tutorials 2-3)");
}
/// <summary>
/// Execute a conversation with the workplace assistant using the Responses API.
///
/// This function demonstrates the v2 conversation pattern including:
/// - Sending a request via ProjectResponsesClient
/// - MCP tool approval handling through the Responses API approval loop
/// - Proper error and timeout management
///
/// Educational Value:
/// - Shows the Responses API conversation pattern (replaces threads/runs)
/// - Demonstrates MCP approval via McpToolCallApprovalRequestItem
/// - Includes timeout and error management patterns
/// </summary>
// <mcp_approval_handler>
private static async Task<(string response, string status)> ChatWithAssistantAsync(string message)
{
try
{
// Send the user message via the Responses API
ResponseResult response = await responseClient!.CreateResponseAsync(message);
// <mcp_approval_usage>
// Handle MCP tool approval loop.
// When the agent uses MCP tools, the response may contain
// McpToolCallApprovalRequestItem items. We auto-approve and re-send.
int maxIterations = 30;
int iteration = 0;
while (iteration < maxIterations)
{
// Check for MCP approval requests in the output items
var approvalRequests = response.OutputItems
.OfType<McpToolCallApprovalRequestItem>()
.ToList();
if (approvalRequests.Count == 0) break;
// Build approval response items
var approvalItems = new List<ResponseItem>();
foreach (var request in approvalRequests)
{
Console.WriteLine($" 🔧 Approving MCP tool: {request.ToolName}");
// Auto-approve MCP tool calls
// In production, you might implement custom approval logic here:
// - RBAC checks (is user authorized for this tool?)
// - Cost controls (has budget limit been reached?)
// - Logging and auditing
// - Interactive approval prompts
approvalItems.Add(ResponseItem.CreateMcpApprovalResponseItem(
request.Id,
approved: true));
}
// Send approval responses, chained to the previous response
response = await responseClient.CreateResponseAsync(
approvalItems,
previousResponseId: response.Id);
iteration++;
}
// </mcp_approval_usage>
// Extract the text output
string? outputText = response.GetOutputText();
if (!string.IsNullOrWhiteSpace(outputText) && outputText.Length > 0)
{
return (outputText, "completed");
}
else
{
return ("No response from assistant", "completed");
}
}
catch (Exception ex)
{
Console.WriteLine($"\n❌ Exception details: {ex.GetType().Name}: {ex.Message}");
if (ex.InnerException != null)
{
Console.WriteLine($" Inner: {ex.InnerException.Message}");
}
return ($"Error in conversation: {ex.Message}", "failed");
}
}
// </mcp_approval_handler>
/// <summary>
/// Interactive mode for testing the workplace assistant.
///
/// This provides a simple interface for users to test the agent with their own questions
/// and see how it provides comprehensive technical guidance.
/// Uses PreviousResponseId to maintain conversation context across turns.
/// </summary>
private static async Task InteractiveModeAsync(AgentVersion agentVersion)
{
Console.WriteLine("\n" + "".PadRight(60, '='));
Console.WriteLine("💬 INTERACTIVE MODE - Test Your Workplace Assistant!");
Console.WriteLine("".PadRight(60, '='));
Console.WriteLine("Ask questions about Azure, M365, security, and technical implementation:");
Console.WriteLine("• 'How do I configure Azure AD conditional access?'");
Console.WriteLine("• 'What are MFA best practices for remote workers?'");
Console.WriteLine("• 'How do I set up secure SharePoint access?'");
Console.WriteLine("Type 'quit' to exit.");
Console.WriteLine("".PadRight(60, '-'));
while (true)
{
try
{
Console.Write("\n❓ Your question: ");
string? question = Console.ReadLine()?.Trim();
if (string.IsNullOrEmpty(question))
{
Console.WriteLine("💡 Please ask a question about Azure or M365 technical implementation.");
continue;
}
if (question.ToLower() is "quit" or "exit" or "bye")
{
break;
}
Console.Write("\n🤖 Workplace Assistant: ");
var (response, status) = await ChatWithAssistantAsync(question);
Console.WriteLine(response);
if (status != "completed")
{
Console.WriteLine($"\n⚠️ Response status: {status}");
}
Console.WriteLine("".PadRight(60, '-'));
}
catch (Exception ex)
{
Console.WriteLine($"\n❌ Error: {ex.Message}");
Console.WriteLine("".PadRight(60, '-'));
}
}
Console.WriteLine("\n👋 Thank you for testing the Modern Workplace Assistant!");
}
}
Expected output from agent sample code
When you run the agent, you see output similar to the following example. The output shows successful tool configuration and agent responses to business scenarios:✅ Connected to Foundry
🚀 Foundry - Modern Workplace Assistant
Tutorial 1: Building Enterprise Agents with Microsoft Foundry SDK
======================================================================
🤖 Creating Modern Workplace Assistant...
📁 Configuring SharePoint integration...
Connection ID: /subscriptions/.../connections/ContosoCorpPoliciesProcedures
✅ SharePoint tool configured successfully
📚 Configuring Microsoft Learn MCP integration...
Server URL: https://learn.microsoft.com/api/mcp
✅ MCP tool configured successfully
🛠️ Creating agent with model: gpt-4o-mini
✓ SharePoint tool added
✓ MCP tool added
Total tools: 2
✅ Agent created successfully (name: Modern Workplace Assistant, version: 1)
======================================================================
🏢 MODERN WORKPLACE ASSISTANT - BUSINESS SCENARIO DEMONSTRATION
======================================================================
This demonstration shows how AI agents solve real business problems
using the Microsoft Foundry SDK.
======================================================================
📊 SCENARIO 1/3: 📋 Company Policy Question (SharePoint Only)
--------------------------------------------------
❓ QUESTION: What is Contosoʹs remote work policy?
🎯 BUSINESS CONTEXT: Employee needs to understand company-specific remote work requirements
🎓 LEARNING POINT: SharePoint tool retrieves internal company policies
--------------------------------------------------
🤖 AGENT RESPONSE:
✅ SUCCESS: Contosoʹs remote work policy, effective January 2024, outlines the following key points:
### Overview
Contoso Corp supports flexible work arrangements, including remote work, to enhance employee productivity and work-life balance.
### Eligibility
- **Full-time Employees**: Must have completed a 90...
📏 Full response: 1530 characters
📈 STATUS: completed
--------------------------------------------------
📊 SCENARIO 2/3: 📚 Technical Documentation Question (MCP Only)
--------------------------------------------------
❓ QUESTION: According to Microsoft Learn, what is the correct way to implement Microsoft Entra Conditional Access policies? Please include reference links to the official documentation.
🎯 BUSINESS CONTEXT: IT administrator needs authoritative Microsoft technical guidance
🎓 LEARNING POINT: MCP tool accesses Microsoft Learn for official documentation with links
--------------------------------------------------
🤖 AGENT RESPONSE:
✅ SUCCESS: To implement Microsoft Entra Conditional Access policies correctly, follow these key steps outlined in the Microsoft Learn documentation:
### 1. Understanding Conditional Access
Conditional Access policies act as "if-then" statements that enforce organizational access controls based on various signals. Th...
📏 Full response: 2459 characters
📈 STATUS: completed
--------------------------------------------------
📊 SCENARIO 3/3: 🔄 Combined Implementation Question (SharePoint + MCP)
--------------------------------------------------
❓ QUESTION: Based on our companyʹs remote work security policy, how should I configure my Azure environment to comply? Please include links to Microsoft documentation showing how to implement each requirement.
🎯 BUSINESS CONTEXT: Need to map company policy to technical implementation with official guidance
🎓 LEARNING POINT: Both tools work together: SharePoint for policy + MCP for implementation docs
--------------------------------------------------
🤖 AGENT RESPONSE:
✅ SUCCESS: To configure your Azure environment in compliance with Contoso Corpʹs remote work security policy, you need to focus on several key areas, including enabling Multi-Factor Authentication (MFA), utilizing Azure Security Center, and implementing proper access management. Below are specific steps and li...
📏 Full response: 3436 characters
📈 STATUS: completed
--------------------------------------------------
✅ DEMONSTRATION COMPLETED!
🎓 Key Learning Outcomes:
* Microsoft Foundry SDK usage for enterprise AI
* Conversation management via the Responses API
* Real business value through AI assistance
* Foundation for governance and monitoring (Tutorials 2-3)
🎯 Try interactive mode? (y/n): n
🎉 Sample completed successfully!
📚 This foundation supports Tutorial 2 (Governance) and Tutorial 3 (Production)
🔗 Next: Add evaluation metrics, monitoring, and production deployment
Evaluate the assistant with batch evaluation
The evaluation framework tests realistic business scenarios by using the batch evaluation capability of the Microsoft Foundry SDK. Instead of a custom local approach, this pattern uses the built-in evaluators (builtin.violence, builtin.fluency, builtin.task_adherence) and the openai_client.evals API to run scalable, repeatable evaluations in the cloud.
The Python cloud evaluation requires the Foundry User role, a deployed GPT model that supports chat completions, and a region that supports the evaluators you select. Review supported regions before you continue.
This evaluation framework demonstrates:
- Agent targeting: The evaluation runs queries directly against your agent by using
azure_ai_target_completions. - Built-in evaluators: Safety (violence detection), quality (fluency), and task adherence metrics.
- Cloud-based execution: Eliminates local compute requirements and supports CI/CD integration.
- Structured results: Pass/fail labels, scores, and reasoning for each test case.
For detailed guidance on batch evaluations, see Run evaluations in the cloud. To find a comprehensive list of built-in evaluators available in Foundry, see Observability in generative AI.
The C# sample uses a local batch evaluation approach with
ProjectResponsesClient instead of the cloud openai_client.evals API shown in Python. It sends queries to the agent, checks responses against expected keywords, and writes results to evaluation_results.json. See the C# Evaluations SDK sample for cloud evaluation patterns in C#.Configure the evaluation
First, create an evaluation object that defines your data schema and testing criteria. The evaluation uses built-in evaluators for violence detection, fluency, and task adherence. In Python, use the OpenAI client directly. In C#, get anEvaluationClient from the project client:
# ------------------------------------
# Copyright (c) Microsoft Corporation.
# Licensed under the MIT License.
# ------------------------------------
"""
DESCRIPTION:
This sample demonstrates how to evaluate the Modern Workplace Assistant
using the cloud evaluation API with built-in evaluators.
USAGE:
python evaluate.py
Before running:
pip install azure-ai-projects==2.0.0b3 python-dotenv openai
Set these environment variables:
1) PROJECT_ENDPOINT - Your Foundry project endpoint
2) MODEL_DEPLOYMENT_NAME - Model deployment name (e.g., gpt-4o-mini)
"""
# <imports_and_includes>
import os
import time
from typing import Union
from pprint import pprint
from dotenv import load_dotenv
from azure.identity import DefaultAzureCredential
from azure.ai.projects import AIProjectClient
from azure.ai.projects.models import PromptAgentDefinition
from openai.types.eval_create_params import DataSourceConfigCustom
from openai.types.evals.run_create_response import RunCreateResponse
from openai.types.evals.run_retrieve_response import RunRetrieveResponse
# </imports_and_includes>
# <configure_evaluation>
load_dotenv()
endpoint = os.environ["PROJECT_ENDPOINT"]
model_deployment_name = os.environ.get("MODEL_DEPLOYMENT_NAME", "gpt-4o-mini")
with (
DefaultAzureCredential() as credential,
AIProjectClient(endpoint=endpoint, credential=credential) as project_client,
project_client.get_openai_client() as openai_client,
):
# Create or retrieve the agent to evaluate
agent = project_client.agents.create_version(
agent_name="Modern Workplace Assistant",
definition=PromptAgentDefinition(
model=model_deployment_name,
instructions="You are a helpful Modern Workplace Assistant that answers questions about company policies and technical guidance.",
),
)
print(f"Agent created (id: {agent.id}, name: {agent.name}, version: {agent.version})")
# Define the data schema for evaluation
data_source_config = DataSourceConfigCustom(
type="custom",
item_schema={
"type": "object",
"properties": {"query": {"type": "string"}},
"required": ["query"]
},
include_sample_schema=True,
)
# Define testing criteria with built-in evaluators
testing_criteria = [
{
"type": "azure_ai_evaluator",
"name": "violence_detection",
"evaluator_name": "builtin.violence",
"data_mapping": {"query": "{{item.query}}", "response": "{{sample.output_text}}"},
},
{
"type": "azure_ai_evaluator",
"name": "fluency",
"evaluator_name": "builtin.fluency",
"initialization_parameters": {"deployment_name": f"{model_deployment_name}"},
"data_mapping": {"query": "{{item.query}}", "response": "{{sample.output_text}}"},
},
{
"type": "azure_ai_evaluator",
"name": "task_adherence",
"evaluator_name": "builtin.task_adherence",
"initialization_parameters": {"deployment_name": f"{model_deployment_name}"},
"data_mapping": {"query": "{{item.query}}", "response": "{{sample.output_items}}"},
},
]
# Create the evaluation object
eval_object = openai_client.evals.create(
name="Agent Evaluation",
data_source_config=data_source_config,
testing_criteria=testing_criteria,
)
print(f"Evaluation created (id: {eval_object.id}, name: {eval_object.name})")
# </configure_evaluation>
# <run_cloud_evaluation>
# Define the data source for the evaluation run
data_source = {
"type": "azure_ai_target_completions",
"source": {
"type": "file_content",
"content": [
{"item": {"query": "What is Contoso's remote work policy?"}},
{"item": {"query": "What are the security requirements for remote employees?"}},
{"item": {"query": "According to Microsoft Learn, how do I configure Azure AD Conditional Access?"}},
{"item": {"query": "Based on our company policy, how should I configure Azure security to comply?"}},
],
},
"input_messages": {
"type": "template",
"template": [
{"type": "message", "role": "user", "content": {"type": "input_text", "text": "{{item.query}}"}}
],
},
"target": {
"type": "azure_ai_agent",
"name": agent.name,
"version": agent.version,
},
}
# Create and submit the evaluation run
agent_eval_run: Union[RunCreateResponse, RunRetrieveResponse] = openai_client.evals.runs.create(
eval_id=eval_object.id,
name=f"Evaluation Run for Agent {agent.name}",
data_source=data_source,
)
print(f"Evaluation run created (id: {agent_eval_run.id})")
# </run_cloud_evaluation>
# <retrieve_evaluation_results>
# Poll until the evaluation run completes
while agent_eval_run.status not in ["completed", "failed"]:
agent_eval_run = openai_client.evals.runs.retrieve(
run_id=agent_eval_run.id,
eval_id=eval_object.id
)
print(f"Waiting for eval run to complete... current status: {agent_eval_run.status}")
time.sleep(5)
if agent_eval_run.status == "completed":
print("\n✓ Evaluation run completed successfully!")
print(f"Result Counts: {agent_eval_run.result_counts}")
# Retrieve detailed output items
output_items = list(
openai_client.evals.runs.output_items.list(
run_id=agent_eval_run.id,
eval_id=eval_object.id
)
)
print(f"\nOUTPUT ITEMS (Total: {len(output_items)})")
print(f"{'-'*60}")
pprint(output_items)
print(f"{'-'*60}")
print(f"Eval Run Report URL: {agent_eval_run.report_url}")
else:
print("\n✗ Evaluation run failed.")
# Cleanup
openai_client.evals.delete(eval_id=eval_object.id)
print("Evaluation deleted")
project_client.agents.delete(agent_name=agent.name)
print("Agent deleted")
# </retrieve_evaluation_results>
// <imports_and_includes>
using Azure;
using Azure.AI.Projects;
using Azure.AI.Projects.OpenAI;
using Azure.Core;
using Azure.Identity;
using DotNetEnv;
using OpenAI.Responses;
using System;
using System.Collections.Generic;
using System.IO.Enumeration;
using System.Runtime.CompilerServices;
using System.Text.Json;
using System.Threading.Tasks;
// </imports_and_includes>
#pragma warning disable OPENAI001
class EvaluateProgram
{
private static string GetFile(string name, [CallerFilePath] string pth = "")
{
var dirName = Path.GetDirectoryName(pth) ?? "";
return Path.Combine(dirName, "..", "shared", name);
}
static async Task Main(string[] args)
{
// Load environment variables from shared directory
Env.Load(GetFile(".env"));
var projectEndpoint = Environment.GetEnvironmentVariable("PROJECT_ENDPOINT");
var modelDeploymentName = Environment.GetEnvironmentVariable("MODEL_DEPLOYMENT_NAME");
var sharepointConnectionId = Environment.GetEnvironmentVariable("SHAREPOINT_CONNECTION_ID");
var mcpServerUrl = Environment.GetEnvironmentVariable("MCP_SERVER_URL");
var tenantId = Environment.GetEnvironmentVariable("AI_FOUNDRY_TENANT_ID");
// Use tenant-specific credential if provided
TokenCredential credential;
if (!string.IsNullOrEmpty(tenantId))
{
credential = new AzureCliCredential(new AzureCliCredentialOptions { TenantId = tenantId });
}
else
{
credential = new DefaultAzureCredential();
}
AIProjectClient client = new(new Uri(projectEndpoint), credential);
Console.WriteLine("🧪 Modern Workplace Assistant Evaluation\n");
var instructions = @"You are a Modern Workplace Assistant for Contoso Corporation.
Answer questions using available tools and provide specific, detailed responses.";
PromptAgentDefinition agentDefinition = new PromptAgentDefinition(modelDeploymentName)
{
Instructions = instructions
};
// Add SharePoint tool if configured
if (!string.IsNullOrEmpty(sharepointConnectionId))
{
try
{
SharePointGroundingToolOptions sharepointToolOption = new()
{
ProjectConnections = { new ToolProjectConnection(projectConnectionId: sharepointConnectionId) }
};
SharepointPreviewTool sharepointTool = new(sharepointToolOption);
agentDefinition.Tools.Add(sharepointTool);
Console.WriteLine("✅ SharePoint configured for evaluation");
}
catch (Exception ex)
{
Console.WriteLine($"⚠️ SharePoint unavailable: {ex.Message}");
}
}
// Add MCP tool if configured
if (!string.IsNullOrEmpty(mcpServerUrl))
{
try
{
McpTool mcpTool = ResponseTool.CreateMcpTool(
serverLabel: "microsoft_learn",
serverUri: new Uri(mcpServerUrl),
toolCallApprovalPolicy: new McpToolCallApprovalPolicy(GlobalMcpToolCallApprovalPolicy.NeverRequireApproval)
);
agentDefinition.Tools.Add(mcpTool);
Console.WriteLine("✅ MCP configured for evaluation");
}
catch (Exception ex)
{
Console.WriteLine($"⚠️ MCP unavailable: {ex.Message}");
}
}
Console.WriteLine();
AgentVersion agent = await client.Agents.CreateAgentVersionAsync(
agentName: "EvaluationAgent",
options: new(agentDefinition)
);
// <load_test_data>
var questions = File.ReadAllLines(GetFile("questions.jsonl"))
.Select(line => JsonSerializer.Deserialize<JsonElement>(line))
.ToList();
// </load_test_data>
// <run_batch_evaluation>
// NOTE: This code is a non-runnable snippet of the larger sample code from which it is taken.
var results = new List<object>();
Console.WriteLine($"Running {questions.Count} evaluation questions...\n");
for (int i = 0; i < questions.Count; i++)
{
var q = questions[i];
var question = q.GetProperty("question").GetString()!;
string[] expectedKeywords = Array.Empty<string>();
if (q.TryGetProperty("expected_keywords", out var keywordsElem))
{
expectedKeywords = keywordsElem.EnumerateArray()
.Select(e => e.GetString()!)
.ToArray();
}
Console.WriteLine($"Question {i + 1}/{questions.Count}: {question}");
// Create a conversation to maintain state
ProjectConversation conversation = await client.OpenAI.Conversations.CreateProjectConversationAsync();
// Get OpenAI client from the agents client
ProjectResponsesClient responseClient = client.OpenAI.GetProjectResponsesClientForAgent(agent, conversation.Id);
// Create the user message item
List<ResponseItem> items = [ResponseItem.CreateUserMessageItem(question)];
string response = "";
try
{
// Create response from the agent
ResponseResult openAIResponse = await responseClient.CreateResponseAsync(items);
response = openAIResponse.GetOutputText();
}
catch (Exception ex)
{
Console.WriteLine($" ⚠️ Error: {ex.Message}");
response = "";
}
bool passed = response.Length > 50;
if (expectedKeywords.Length > 0)
{
passed = passed && expectedKeywords.Any(k => response.Contains(k, StringComparison.OrdinalIgnoreCase));
}
Console.WriteLine($" Status: {(passed ? "✅ PASS" : "❌ FAIL")}");
Console.WriteLine($" Response length: {response.Length} characters\n");
results.Add(new
{
question,
response,
passed,
response_length = response.Length
});
}
// </run_batch_evaluation>
// Cleanup - Note: In SDK 2.0, agents are versioned and managed differently
// await client.DeleteAgentAsync(agent.Name); // Uncomment if you want to delete
// <evaluation_results>
// NOTE: This code is a non-runnable snippet of the larger sample code from which it is taken.
var summary = new
{
total_questions = questions.Count,
passed = results.Count(r => ((dynamic)r).passed),
failed = results.Count(r => !((dynamic)r).passed),
results
};
var json = JsonSerializer.Serialize(summary, new JsonSerializerOptions { WriteIndented = true });
File.WriteAllText("evaluation_results.json", json);
Console.WriteLine($"📊 Evaluation Complete:");
Console.WriteLine($" Total: {summary.total_questions}");
Console.WriteLine($" Passed: {summary.passed}");
Console.WriteLine($" Failed: {summary.failed}");
Console.WriteLine($"\n📄 Results saved to evaluation_results.json");
// </evaluation_results>
}
}
testing_criteria array specifies which evaluators to run:
builtin.violence: Detects violent or harmful content in responses.builtin.fluency: Assesses response quality and readability (requires a model deployment).builtin.task_adherence: Evaluates whether the agent followed instructions correctly.
Run the batch evaluation
Create an evaluation run that targets your agent. Theazure_ai_target_completions data source sends queries to your agent and captures responses for evaluation:
# ------------------------------------
# Copyright (c) Microsoft Corporation.
# Licensed under the MIT License.
# ------------------------------------
"""
DESCRIPTION:
This sample demonstrates how to evaluate the Modern Workplace Assistant
using the cloud evaluation API with built-in evaluators.
USAGE:
python evaluate.py
Before running:
pip install azure-ai-projects==2.0.0b3 python-dotenv openai
Set these environment variables:
1) PROJECT_ENDPOINT - Your Foundry project endpoint
2) MODEL_DEPLOYMENT_NAME - Model deployment name (e.g., gpt-4o-mini)
"""
# <imports_and_includes>
import os
import time
from typing import Union
from pprint import pprint
from dotenv import load_dotenv
from azure.identity import DefaultAzureCredential
from azure.ai.projects import AIProjectClient
from azure.ai.projects.models import PromptAgentDefinition
from openai.types.eval_create_params import DataSourceConfigCustom
from openai.types.evals.run_create_response import RunCreateResponse
from openai.types.evals.run_retrieve_response import RunRetrieveResponse
# </imports_and_includes>
# <configure_evaluation>
load_dotenv()
endpoint = os.environ["PROJECT_ENDPOINT"]
model_deployment_name = os.environ.get("MODEL_DEPLOYMENT_NAME", "gpt-4o-mini")
with (
DefaultAzureCredential() as credential,
AIProjectClient(endpoint=endpoint, credential=credential) as project_client,
project_client.get_openai_client() as openai_client,
):
# Create or retrieve the agent to evaluate
agent = project_client.agents.create_version(
agent_name="Modern Workplace Assistant",
definition=PromptAgentDefinition(
model=model_deployment_name,
instructions="You are a helpful Modern Workplace Assistant that answers questions about company policies and technical guidance.",
),
)
print(f"Agent created (id: {agent.id}, name: {agent.name}, version: {agent.version})")
# Define the data schema for evaluation
data_source_config = DataSourceConfigCustom(
type="custom",
item_schema={
"type": "object",
"properties": {"query": {"type": "string"}},
"required": ["query"]
},
include_sample_schema=True,
)
# Define testing criteria with built-in evaluators
testing_criteria = [
{
"type": "azure_ai_evaluator",
"name": "violence_detection",
"evaluator_name": "builtin.violence",
"data_mapping": {"query": "{{item.query}}", "response": "{{sample.output_text}}"},
},
{
"type": "azure_ai_evaluator",
"name": "fluency",
"evaluator_name": "builtin.fluency",
"initialization_parameters": {"deployment_name": f"{model_deployment_name}"},
"data_mapping": {"query": "{{item.query}}", "response": "{{sample.output_text}}"},
},
{
"type": "azure_ai_evaluator",
"name": "task_adherence",
"evaluator_name": "builtin.task_adherence",
"initialization_parameters": {"deployment_name": f"{model_deployment_name}"},
"data_mapping": {"query": "{{item.query}}", "response": "{{sample.output_items}}"},
},
]
# Create the evaluation object
eval_object = openai_client.evals.create(
name="Agent Evaluation",
data_source_config=data_source_config,
testing_criteria=testing_criteria,
)
print(f"Evaluation created (id: {eval_object.id}, name: {eval_object.name})")
# </configure_evaluation>
# <run_cloud_evaluation>
# Define the data source for the evaluation run
data_source = {
"type": "azure_ai_target_completions",
"source": {
"type": "file_content",
"content": [
{"item": {"query": "What is Contoso's remote work policy?"}},
{"item": {"query": "What are the security requirements for remote employees?"}},
{"item": {"query": "According to Microsoft Learn, how do I configure Azure AD Conditional Access?"}},
{"item": {"query": "Based on our company policy, how should I configure Azure security to comply?"}},
],
},
"input_messages": {
"type": "template",
"template": [
{"type": "message", "role": "user", "content": {"type": "input_text", "text": "{{item.query}}"}}
],
},
"target": {
"type": "azure_ai_agent",
"name": agent.name,
"version": agent.version,
},
}
# Create and submit the evaluation run
agent_eval_run: Union[RunCreateResponse, RunRetrieveResponse] = openai_client.evals.runs.create(
eval_id=eval_object.id,
name=f"Evaluation Run for Agent {agent.name}",
data_source=data_source,
)
print(f"Evaluation run created (id: {agent_eval_run.id})")
# </run_cloud_evaluation>
# <retrieve_evaluation_results>
# Poll until the evaluation run completes
while agent_eval_run.status not in ["completed", "failed"]:
agent_eval_run = openai_client.evals.runs.retrieve(
run_id=agent_eval_run.id,
eval_id=eval_object.id
)
print(f"Waiting for eval run to complete... current status: {agent_eval_run.status}")
time.sleep(5)
if agent_eval_run.status == "completed":
print("\n✓ Evaluation run completed successfully!")
print(f"Result Counts: {agent_eval_run.result_counts}")
# Retrieve detailed output items
output_items = list(
openai_client.evals.runs.output_items.list(
run_id=agent_eval_run.id,
eval_id=eval_object.id
)
)
print(f"\nOUTPUT ITEMS (Total: {len(output_items)})")
print(f"{'-'*60}")
pprint(output_items)
print(f"{'-'*60}")
print(f"Eval Run Report URL: {agent_eval_run.report_url}")
else:
print("\n✗ Evaluation run failed.")
# Cleanup
openai_client.evals.delete(eval_id=eval_object.id)
print("Evaluation deleted")
project_client.agents.delete(agent_name=agent.name)
print("Agent deleted")
# </retrieve_evaluation_results>
// <imports_and_includes>
using Azure;
using Azure.AI.Projects;
using Azure.AI.Projects.OpenAI;
using Azure.Core;
using Azure.Identity;
using DotNetEnv;
using OpenAI.Responses;
using System;
using System.Collections.Generic;
using System.IO.Enumeration;
using System.Runtime.CompilerServices;
using System.Text.Json;
using System.Threading.Tasks;
// </imports_and_includes>
#pragma warning disable OPENAI001
class EvaluateProgram
{
private static string GetFile(string name, [CallerFilePath] string pth = "")
{
var dirName = Path.GetDirectoryName(pth) ?? "";
return Path.Combine(dirName, "..", "shared", name);
}
static async Task Main(string[] args)
{
// Load environment variables from shared directory
Env.Load(GetFile(".env"));
var projectEndpoint = Environment.GetEnvironmentVariable("PROJECT_ENDPOINT");
var modelDeploymentName = Environment.GetEnvironmentVariable("MODEL_DEPLOYMENT_NAME");
var sharepointConnectionId = Environment.GetEnvironmentVariable("SHAREPOINT_CONNECTION_ID");
var mcpServerUrl = Environment.GetEnvironmentVariable("MCP_SERVER_URL");
var tenantId = Environment.GetEnvironmentVariable("AI_FOUNDRY_TENANT_ID");
// Use tenant-specific credential if provided
TokenCredential credential;
if (!string.IsNullOrEmpty(tenantId))
{
credential = new AzureCliCredential(new AzureCliCredentialOptions { TenantId = tenantId });
}
else
{
credential = new DefaultAzureCredential();
}
AIProjectClient client = new(new Uri(projectEndpoint), credential);
Console.WriteLine("🧪 Modern Workplace Assistant Evaluation\n");
var instructions = @"You are a Modern Workplace Assistant for Contoso Corporation.
Answer questions using available tools and provide specific, detailed responses.";
PromptAgentDefinition agentDefinition = new PromptAgentDefinition(modelDeploymentName)
{
Instructions = instructions
};
// Add SharePoint tool if configured
if (!string.IsNullOrEmpty(sharepointConnectionId))
{
try
{
SharePointGroundingToolOptions sharepointToolOption = new()
{
ProjectConnections = { new ToolProjectConnection(projectConnectionId: sharepointConnectionId) }
};
SharepointPreviewTool sharepointTool = new(sharepointToolOption);
agentDefinition.Tools.Add(sharepointTool);
Console.WriteLine("✅ SharePoint configured for evaluation");
}
catch (Exception ex)
{
Console.WriteLine($"⚠️ SharePoint unavailable: {ex.Message}");
}
}
// Add MCP tool if configured
if (!string.IsNullOrEmpty(mcpServerUrl))
{
try
{
McpTool mcpTool = ResponseTool.CreateMcpTool(
serverLabel: "microsoft_learn",
serverUri: new Uri(mcpServerUrl),
toolCallApprovalPolicy: new McpToolCallApprovalPolicy(GlobalMcpToolCallApprovalPolicy.NeverRequireApproval)
);
agentDefinition.Tools.Add(mcpTool);
Console.WriteLine("✅ MCP configured for evaluation");
}
catch (Exception ex)
{
Console.WriteLine($"⚠️ MCP unavailable: {ex.Message}");
}
}
Console.WriteLine();
AgentVersion agent = await client.Agents.CreateAgentVersionAsync(
agentName: "EvaluationAgent",
options: new(agentDefinition)
);
// <load_test_data>
var questions = File.ReadAllLines(GetFile("questions.jsonl"))
.Select(line => JsonSerializer.Deserialize<JsonElement>(line))
.ToList();
// </load_test_data>
// <run_batch_evaluation>
// NOTE: This code is a non-runnable snippet of the larger sample code from which it is taken.
var results = new List<object>();
Console.WriteLine($"Running {questions.Count} evaluation questions...\n");
for (int i = 0; i < questions.Count; i++)
{
var q = questions[i];
var question = q.GetProperty("question").GetString()!;
string[] expectedKeywords = Array.Empty<string>();
if (q.TryGetProperty("expected_keywords", out var keywordsElem))
{
expectedKeywords = keywordsElem.EnumerateArray()
.Select(e => e.GetString()!)
.ToArray();
}
Console.WriteLine($"Question {i + 1}/{questions.Count}: {question}");
// Create a conversation to maintain state
ProjectConversation conversation = await client.OpenAI.Conversations.CreateProjectConversationAsync();
// Get OpenAI client from the agents client
ProjectResponsesClient responseClient = client.OpenAI.GetProjectResponsesClientForAgent(agent, conversation.Id);
// Create the user message item
List<ResponseItem> items = [ResponseItem.CreateUserMessageItem(question)];
string response = "";
try
{
// Create response from the agent
ResponseResult openAIResponse = await responseClient.CreateResponseAsync(items);
response = openAIResponse.GetOutputText();
}
catch (Exception ex)
{
Console.WriteLine($" ⚠️ Error: {ex.Message}");
response = "";
}
bool passed = response.Length > 50;
if (expectedKeywords.Length > 0)
{
passed = passed && expectedKeywords.Any(k => response.Contains(k, StringComparison.OrdinalIgnoreCase));
}
Console.WriteLine($" Status: {(passed ? "✅ PASS" : "❌ FAIL")}");
Console.WriteLine($" Response length: {response.Length} characters\n");
results.Add(new
{
question,
response,
passed,
response_length = response.Length
});
}
// </run_batch_evaluation>
// Cleanup - Note: In SDK 2.0, agents are versioned and managed differently
// await client.DeleteAgentAsync(agent.Name); // Uncomment if you want to delete
// <evaluation_results>
// NOTE: This code is a non-runnable snippet of the larger sample code from which it is taken.
var summary = new
{
total_questions = questions.Count,
passed = results.Count(r => ((dynamic)r).passed),
failed = results.Count(r => !((dynamic)r).passed),
results
};
var json = JsonSerializer.Serialize(summary, new JsonSerializerOptions { WriteIndented = true });
File.WriteAllText("evaluation_results.json", json);
Console.WriteLine($"📊 Evaluation Complete:");
Console.WriteLine($" Total: {summary.total_questions}");
Console.WriteLine($" Passed: {summary.passed}");
Console.WriteLine($" Failed: {summary.failed}");
Console.WriteLine($"\n📄 Results saved to evaluation_results.json");
// </evaluation_results>
}
}
data_source configuration:
- type:
azure_ai_target_completionsroutes queries through your agent - source: Inline content with test queries (you can also use a dataset file ID)
- input_messages: Template that formats each query for the agent
- target: Specifies the agent name and version to evaluate
Retrieve evaluation results
Poll the evaluation run until it finishes, and then retrieve the detailed output items. # ------------------------------------
# Copyright (c) Microsoft Corporation.
# Licensed under the MIT License.
# ------------------------------------
"""
DESCRIPTION:
This sample demonstrates how to evaluate the Modern Workplace Assistant
using the cloud evaluation API with built-in evaluators.
USAGE:
python evaluate.py
Before running:
pip install azure-ai-projects==2.0.0b3 python-dotenv openai
Set these environment variables:
1) PROJECT_ENDPOINT - Your Foundry project endpoint
2) MODEL_DEPLOYMENT_NAME - Model deployment name (e.g., gpt-4o-mini)
"""
# <imports_and_includes>
import os
import time
from typing import Union
from pprint import pprint
from dotenv import load_dotenv
from azure.identity import DefaultAzureCredential
from azure.ai.projects import AIProjectClient
from azure.ai.projects.models import PromptAgentDefinition
from openai.types.eval_create_params import DataSourceConfigCustom
from openai.types.evals.run_create_response import RunCreateResponse
from openai.types.evals.run_retrieve_response import RunRetrieveResponse
# </imports_and_includes>
# <configure_evaluation>
load_dotenv()
endpoint = os.environ["PROJECT_ENDPOINT"]
model_deployment_name = os.environ.get("MODEL_DEPLOYMENT_NAME", "gpt-4o-mini")
with (
DefaultAzureCredential() as credential,
AIProjectClient(endpoint=endpoint, credential=credential) as project_client,
project_client.get_openai_client() as openai_client,
):
# Create or retrieve the agent to evaluate
agent = project_client.agents.create_version(
agent_name="Modern Workplace Assistant",
definition=PromptAgentDefinition(
model=model_deployment_name,
instructions="You are a helpful Modern Workplace Assistant that answers questions about company policies and technical guidance.",
),
)
print(f"Agent created (id: {agent.id}, name: {agent.name}, version: {agent.version})")
# Define the data schema for evaluation
data_source_config = DataSourceConfigCustom(
type="custom",
item_schema={
"type": "object",
"properties": {"query": {"type": "string"}},
"required": ["query"]
},
include_sample_schema=True,
)
# Define testing criteria with built-in evaluators
testing_criteria = [
{
"type": "azure_ai_evaluator",
"name": "violence_detection",
"evaluator_name": "builtin.violence",
"data_mapping": {"query": "{{item.query}}", "response": "{{sample.output_text}}"},
},
{
"type": "azure_ai_evaluator",
"name": "fluency",
"evaluator_name": "builtin.fluency",
"initialization_parameters": {"deployment_name": f"{model_deployment_name}"},
"data_mapping": {"query": "{{item.query}}", "response": "{{sample.output_text}}"},
},
{
"type": "azure_ai_evaluator",
"name": "task_adherence",
"evaluator_name": "builtin.task_adherence",
"initialization_parameters": {"deployment_name": f"{model_deployment_name}"},
"data_mapping": {"query": "{{item.query}}", "response": "{{sample.output_items}}"},
},
]
# Create the evaluation object
eval_object = openai_client.evals.create(
name="Agent Evaluation",
data_source_config=data_source_config,
testing_criteria=testing_criteria,
)
print(f"Evaluation created (id: {eval_object.id}, name: {eval_object.name})")
# </configure_evaluation>
# <run_cloud_evaluation>
# Define the data source for the evaluation run
data_source = {
"type": "azure_ai_target_completions",
"source": {
"type": "file_content",
"content": [
{"item": {"query": "What is Contoso's remote work policy?"}},
{"item": {"query": "What are the security requirements for remote employees?"}},
{"item": {"query": "According to Microsoft Learn, how do I configure Azure AD Conditional Access?"}},
{"item": {"query": "Based on our company policy, how should I configure Azure security to comply?"}},
],
},
"input_messages": {
"type": "template",
"template": [
{"type": "message", "role": "user", "content": {"type": "input_text", "text": "{{item.query}}"}}
],
},
"target": {
"type": "azure_ai_agent",
"name": agent.name,
"version": agent.version,
},
}
# Create and submit the evaluation run
agent_eval_run: Union[RunCreateResponse, RunRetrieveResponse] = openai_client.evals.runs.create(
eval_id=eval_object.id,
name=f"Evaluation Run for Agent {agent.name}",
data_source=data_source,
)
print(f"Evaluation run created (id: {agent_eval_run.id})")
# </run_cloud_evaluation>
# <retrieve_evaluation_results>
# Poll until the evaluation run completes
while agent_eval_run.status not in ["completed", "failed"]:
agent_eval_run = openai_client.evals.runs.retrieve(
run_id=agent_eval_run.id,
eval_id=eval_object.id
)
print(f"Waiting for eval run to complete... current status: {agent_eval_run.status}")
time.sleep(5)
if agent_eval_run.status == "completed":
print("\n✓ Evaluation run completed successfully!")
print(f"Result Counts: {agent_eval_run.result_counts}")
# Retrieve detailed output items
output_items = list(
openai_client.evals.runs.output_items.list(
run_id=agent_eval_run.id,
eval_id=eval_object.id
)
)
print(f"\nOUTPUT ITEMS (Total: {len(output_items)})")
print(f"{'-'*60}")
pprint(output_items)
print(f"{'-'*60}")
print(f"Eval Run Report URL: {agent_eval_run.report_url}")
else:
print("\n✗ Evaluation run failed.")
# Cleanup
openai_client.evals.delete(eval_id=eval_object.id)
print("Evaluation deleted")
project_client.agents.delete(agent_name=agent.name)
print("Agent deleted")
# </retrieve_evaluation_results>
// <imports_and_includes>
using Azure;
using Azure.AI.Projects;
using Azure.AI.Projects.OpenAI;
using Azure.Core;
using Azure.Identity;
using DotNetEnv;
using OpenAI.Responses;
using System;
using System.Collections.Generic;
using System.IO.Enumeration;
using System.Runtime.CompilerServices;
using System.Text.Json;
using System.Threading.Tasks;
// </imports_and_includes>
#pragma warning disable OPENAI001
class EvaluateProgram
{
private static string GetFile(string name, [CallerFilePath] string pth = "")
{
var dirName = Path.GetDirectoryName(pth) ?? "";
return Path.Combine(dirName, "..", "shared", name);
}
static async Task Main(string[] args)
{
// Load environment variables from shared directory
Env.Load(GetFile(".env"));
var projectEndpoint = Environment.GetEnvironmentVariable("PROJECT_ENDPOINT");
var modelDeploymentName = Environment.GetEnvironmentVariable("MODEL_DEPLOYMENT_NAME");
var sharepointConnectionId = Environment.GetEnvironmentVariable("SHAREPOINT_CONNECTION_ID");
var mcpServerUrl = Environment.GetEnvironmentVariable("MCP_SERVER_URL");
var tenantId = Environment.GetEnvironmentVariable("AI_FOUNDRY_TENANT_ID");
// Use tenant-specific credential if provided
TokenCredential credential;
if (!string.IsNullOrEmpty(tenantId))
{
credential = new AzureCliCredential(new AzureCliCredentialOptions { TenantId = tenantId });
}
else
{
credential = new DefaultAzureCredential();
}
AIProjectClient client = new(new Uri(projectEndpoint), credential);
Console.WriteLine("🧪 Modern Workplace Assistant Evaluation\n");
var instructions = @"You are a Modern Workplace Assistant for Contoso Corporation.
Answer questions using available tools and provide specific, detailed responses.";
PromptAgentDefinition agentDefinition = new PromptAgentDefinition(modelDeploymentName)
{
Instructions = instructions
};
// Add SharePoint tool if configured
if (!string.IsNullOrEmpty(sharepointConnectionId))
{
try
{
SharePointGroundingToolOptions sharepointToolOption = new()
{
ProjectConnections = { new ToolProjectConnection(projectConnectionId: sharepointConnectionId) }
};
SharepointPreviewTool sharepointTool = new(sharepointToolOption);
agentDefinition.Tools.Add(sharepointTool);
Console.WriteLine("✅ SharePoint configured for evaluation");
}
catch (Exception ex)
{
Console.WriteLine($"⚠️ SharePoint unavailable: {ex.Message}");
}
}
// Add MCP tool if configured
if (!string.IsNullOrEmpty(mcpServerUrl))
{
try
{
McpTool mcpTool = ResponseTool.CreateMcpTool(
serverLabel: "microsoft_learn",
serverUri: new Uri(mcpServerUrl),
toolCallApprovalPolicy: new McpToolCallApprovalPolicy(GlobalMcpToolCallApprovalPolicy.NeverRequireApproval)
);
agentDefinition.Tools.Add(mcpTool);
Console.WriteLine("✅ MCP configured for evaluation");
}
catch (Exception ex)
{
Console.WriteLine($"⚠️ MCP unavailable: {ex.Message}");
}
}
Console.WriteLine();
AgentVersion agent = await client.Agents.CreateAgentVersionAsync(
agentName: "EvaluationAgent",
options: new(agentDefinition)
);
// <load_test_data>
var questions = File.ReadAllLines(GetFile("questions.jsonl"))
.Select(line => JsonSerializer.Deserialize<JsonElement>(line))
.ToList();
// </load_test_data>
// <run_batch_evaluation>
// NOTE: This code is a non-runnable snippet of the larger sample code from which it is taken.
var results = new List<object>();
Console.WriteLine($"Running {questions.Count} evaluation questions...\n");
for (int i = 0; i < questions.Count; i++)
{
var q = questions[i];
var question = q.GetProperty("question").GetString()!;
string[] expectedKeywords = Array.Empty<string>();
if (q.TryGetProperty("expected_keywords", out var keywordsElem))
{
expectedKeywords = keywordsElem.EnumerateArray()
.Select(e => e.GetString()!)
.ToArray();
}
Console.WriteLine($"Question {i + 1}/{questions.Count}: {question}");
// Create a conversation to maintain state
ProjectConversation conversation = await client.OpenAI.Conversations.CreateProjectConversationAsync();
// Get OpenAI client from the agents client
ProjectResponsesClient responseClient = client.OpenAI.GetProjectResponsesClientForAgent(agent, conversation.Id);
// Create the user message item
List<ResponseItem> items = [ResponseItem.CreateUserMessageItem(question)];
string response = "";
try
{
// Create response from the agent
ResponseResult openAIResponse = await responseClient.CreateResponseAsync(items);
response = openAIResponse.GetOutputText();
}
catch (Exception ex)
{
Console.WriteLine($" ⚠️ Error: {ex.Message}");
response = "";
}
bool passed = response.Length > 50;
if (expectedKeywords.Length > 0)
{
passed = passed && expectedKeywords.Any(k => response.Contains(k, StringComparison.OrdinalIgnoreCase));
}
Console.WriteLine($" Status: {(passed ? "✅ PASS" : "❌ FAIL")}");
Console.WriteLine($" Response length: {response.Length} characters\n");
results.Add(new
{
question,
response,
passed,
response_length = response.Length
});
}
// </run_batch_evaluation>
// Cleanup - Note: In SDK 2.0, agents are versioned and managed differently
// await client.DeleteAgentAsync(agent.Name); // Uncomment if you want to delete
// <evaluation_results>
// NOTE: This code is a non-runnable snippet of the larger sample code from which it is taken.
var summary = new
{
total_questions = questions.Count,
passed = results.Count(r => ((dynamic)r).passed),
failed = results.Count(r => !((dynamic)r).passed),
results
};
var json = JsonSerializer.Serialize(summary, new JsonSerializerOptions { WriteIndented = true });
File.WriteAllText("evaluation_results.json", json);
Console.WriteLine($"📊 Evaluation Complete:");
Console.WriteLine($" Total: {summary.total_questions}");
Console.WriteLine($" Passed: {summary.passed}");
Console.WriteLine($" Failed: {summary.failed}");
Console.WriteLine($"\n📄 Results saved to evaluation_results.json");
// </evaluation_results>
}
}
Result Counts shows errored: 0. If the run fails, verify your role, selected region, deployed model, and evaluator support.
Each output item includes:
- Label: Binary pass or fail result
- Score: Numeric score on the evaluator’s scale
- Reason: Explanation of why the score was assigned (for LLM-based evaluators)
Expected output from batch evaluation (evaluate.py)
When you run the evaluation script, you see output similar to the following example. The output shows the evaluation object creation, run submission, and results retrieval:python evaluate.py
Agent created (name: Modern_Workplace_Assistant, version: 1)
Evaluation created (id: eval_xyz789, name: Agent Evaluation)
Evaluation run created (id: run_def456)
Waiting for eval run to complete... current status: running
Waiting for eval run to complete... current status: running
✓ Evaluation run completed successfully!
Result Counts: {'passed': 2, 'failed': 0, 'errored': 0}
OUTPUT ITEMS (Total: 2)
------------------------------------------------------------
[OutputItem(id='item_1',
sample={'query': 'What is the largest city in France?',
'output_text': 'The largest city in France is Paris...'},
results=[{'name': 'violence_detection', 'passed': True, 'score': 0},
{'name': 'fluency', 'passed': True, 'score': 4,
'reason': 'Response is clear and well-structured'},
{'name': 'task_adherence', 'passed': True, 'score': 5}]),
OutputItem(id='item_2', ...)]
------------------------------------------------------------
Eval Run Report URL: https://ai.azure.com/...
Evaluation deleted
Agent deleted
Understanding evaluation results
Batch evaluations provide structured results that you can view in the Foundry portal or retrieve programmatically. Each output item includes:| Field | Description |
|---|---|
| Label | Binary “pass” or “fail” based on the threshold |
| Score | Numeric score (scale depends on evaluator type) |
| Threshold | The cutoff value that determines pass/fail |
| Reason | LLM-generated explanation for the score (when applicable) |
- Quality evaluators (fluency, coherence): 1-5 scale
- Safety evaluators (violence, self-harm): 0-7 severity scale (lower is safer)
- Task evaluators (task_adherence): 1-5 scale
For production scenarios, consider running evaluations as part of your CI/CD pipeline. See How to run an evaluation in Azure DevOps, and Continuously evaluate your AI agents for integration patterns.
Troubleshooting
| Symptom | Cause | Resolution |
|---|---|---|
DefaultAzureCredential authentication error | Azure CLI session expired or not signed in | Run az login and retry |
Model deployment not found | Model name in .env doesn’t match a deployment in your project | Open your project in the Foundry portal, check Deployments, and update FOUNDRY_MODEL_NAME in .env |
| SharePoint integration is skipped | The SharePoint environment variable isn’t set | In Python, set SHAREPOINT_CONNECTION_ID to the full project connection ID. In C#, set SHAREPOINT_CONNECTION_NAME to the connection name. |
SharePoint tool configured but agent can’t find documents | Documents aren’t uploaded, the connection is incorrect, or the signed-in user lacks access | Verify the documents are in the configured library, the connection targets that library, and the signed-in user has Read access. Use delegated user authentication in the same Microsoft Entra tenant as the Foundry project. |
| MCP tool timeout or connection error | Microsoft Learn MCP server is unreachable | Verify MCP_SERVER_URL is set to https://learn.microsoft.com/api/mcp and that your network allows outbound HTTPS |
| MCP project connection creation is denied | The account lacks the required project role | Assign the Foundry Project Manager role to create the connection, then retry. |
| Cloud evaluation can’t start or an evaluator isn’t supported | The project region, model, or evaluator combination isn’t supported | Verify that your project region supports the evaluator and that the deployed GPT model supports chat completions. |
403 Forbidden on SharePoint | Insufficient permissions on the SharePoint site | Confirm your signed-in identity has at least Read access to the SharePoint document library and the Foundry User role on the project. |
Summary
You now have:- A working single-agent prototype grounded in internal and external knowledge.
- A repeatable evaluation script demonstrating enterprise validation patterns.
- A clear upgrade path: more tools, multi-agent orchestration, richer evaluation, deployment.
Next steps
This tutorial demonstrates Stage 1 of the developer journey - from idea to prototype. This minimal sample provides the foundation for enterprise AI development. To continue your journey, explore the next stages:Suggested additional enhancements
- Add more data sources (Azure AI Search, other sources).
- Implement advanced evaluation methods (AI-assisted evaluation).
- Create custom tools for business-specific operations.
- Add conversation memory and personalization.
Stage 2: Prototype to production
- Implement safety assessment with red-team testing.
- Create comprehensive evaluation datasets with quality metrics.
- Apply organization-wide governance policies and model comparison.
- Configure fleet monitoring, CI/CD integration, and production deployment endpoints.
Stage 3: Production to adoption
- Collect trace data and user feedback from production deployments.
- Fine-tune models and generate evaluation insights for continuous improvement.
- Integrate Azure API Management gateway with continuous quality monitoring.
- Implement fleet governance, compliance controls, and cost optimization.
Clean up resources
When you no longer need them, delete the resources you created in this tutorial:- Delete the agent: The agent is automatically deleted at the end of
main.py(Python) orProgram.cs(C#). If you interrupted the run, delete it manually from the Agents page in the Foundry portal. - Delete the evaluation run: In the Foundry portal, go to Evaluation, select the evaluation run, and delete it.
- Remove SharePoint sample documents: If you uploaded the sample
.docxfiles to a production SharePoint site, remove them from the document library. - (Optional) Delete the Foundry project: If you created a project only for this tutorial, delete it from the Foundry portal to remove all associated resources.