How to use video translation
Reference documentation | Samples In this article, you learn how to use video translation with Azure Speech in Foundry Tools in the Microsoft Foundry portal.Prerequisites
- An Azure subscription. If you don’t have an Azure subscription, create a free account before you begin.
- a Foundry resource for Speech in a supported region. If you don’t have a Speech resource, create one in the Azure portal.
- An Azure Blob Storage account.
- You need a video file in .mp4 format, less than 5 GB, and shorter than 4 hours. For testing purposes, you can use the sample video file provided by Microsoft at https://ai.azure.com/speechassetscache/ttsvoice/VideoTranslation/PublicDoc/SampleData/es-ES-TryOutOriginal.mp4.
- Make sure video translation supports your source and target language.
Try video translation
To try out the video translation demo, follow these steps:- Go to the model catalog in Microsoft Foundry portal.
- Enter and search for “Azure-AI-Speech” in the catalog search box.
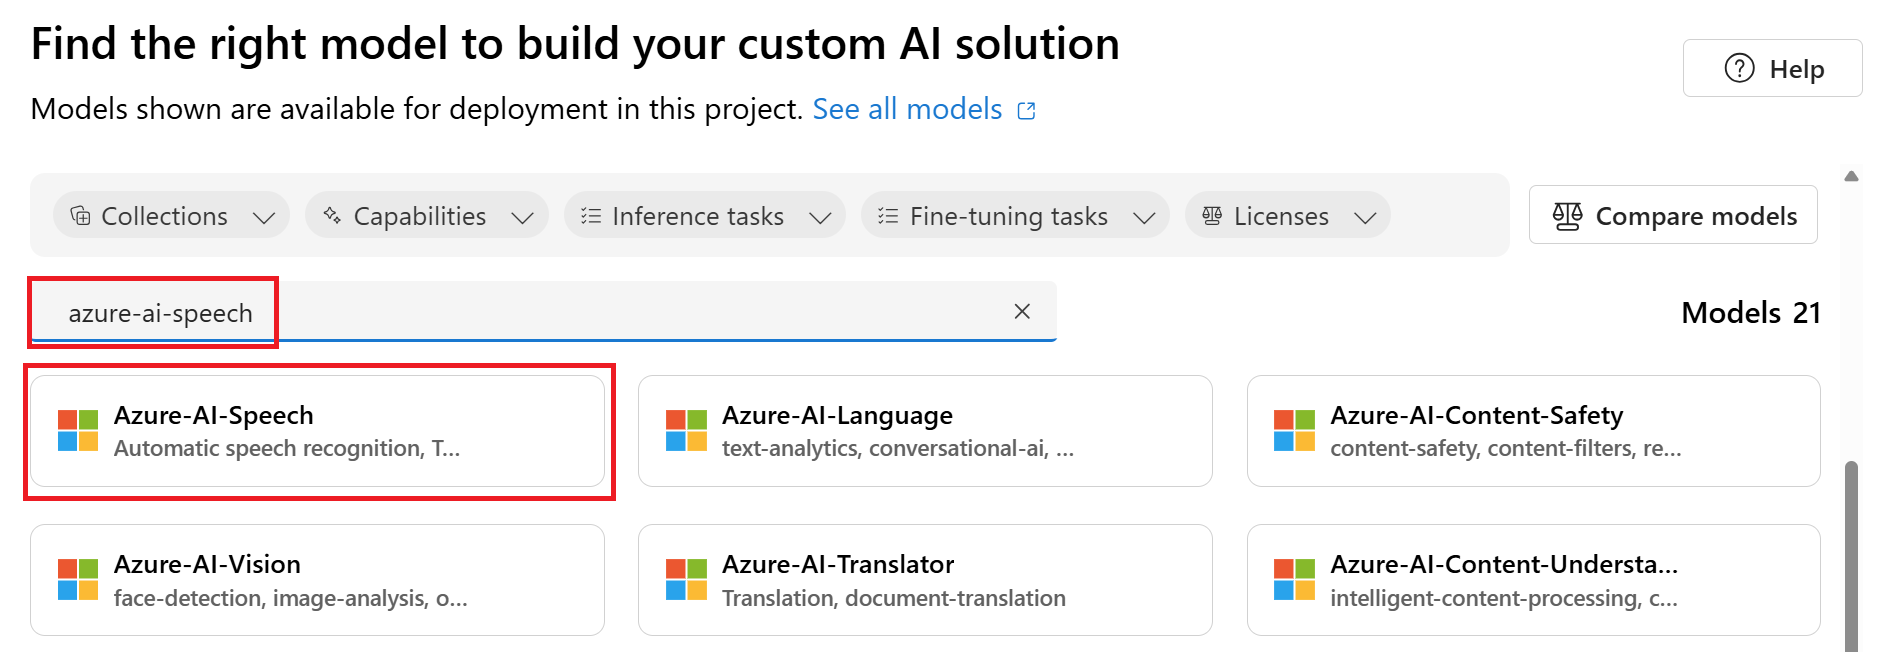
- Select Azure-AI-Speech and you’re taken to the Azure-AI-Speech try out page.
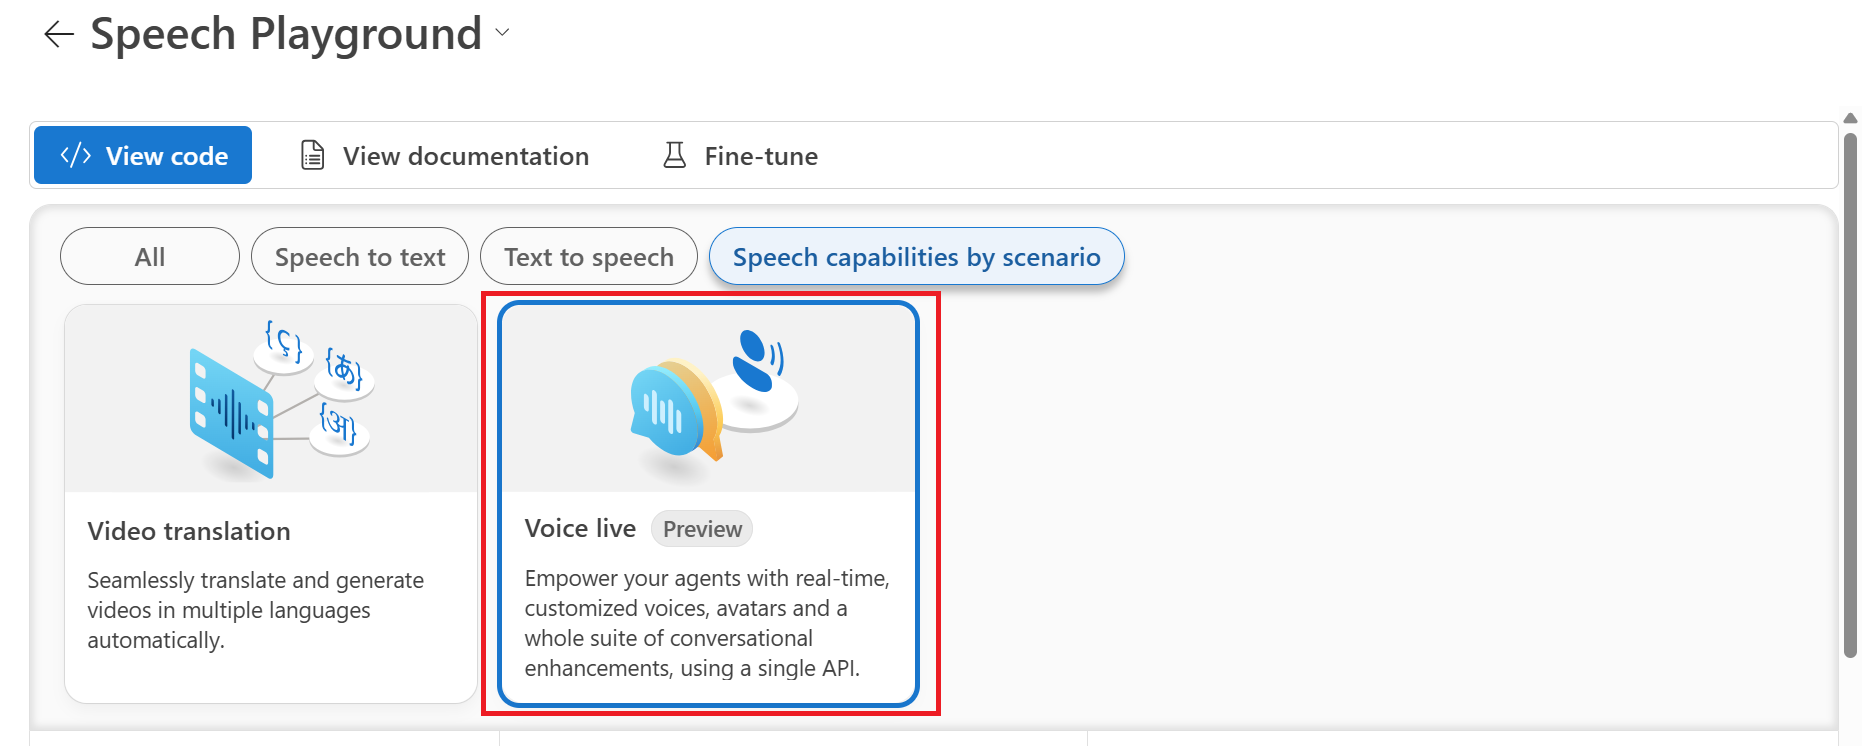
- Select Speech capabilities by scenario > Video translation.
- Under the Sample option to the right, select personal or standard voice.
- Select the Play button to hear the translated audio. Select the original video tab to play the original audio.
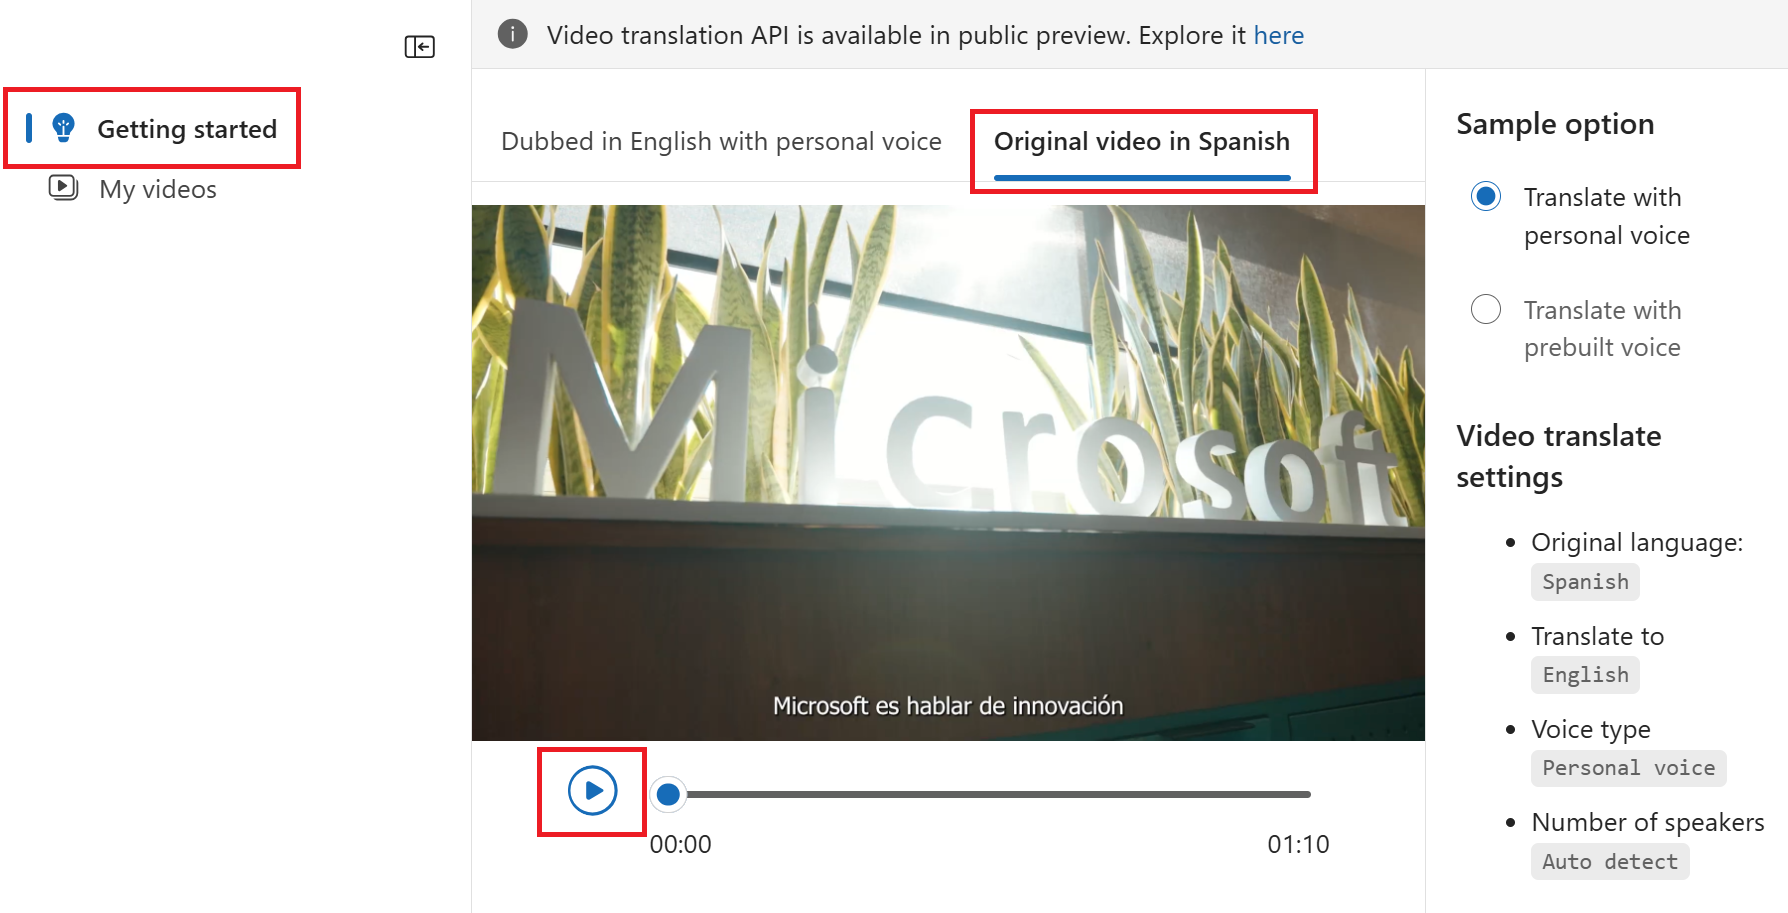
- Standard voice: The service automatically selects the most suitable standard voice by matching the speaker’s voice in the video with standard voices.
- Personal voice: Use the personal voice that matches the voice of the speakers in the video.
To use personal voice via the API, you need to apply for access.
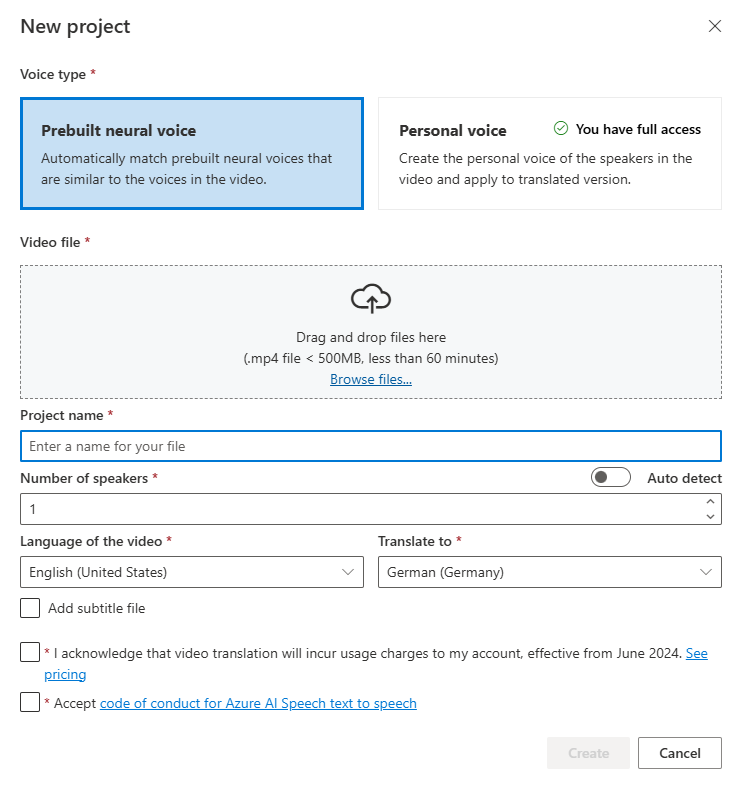
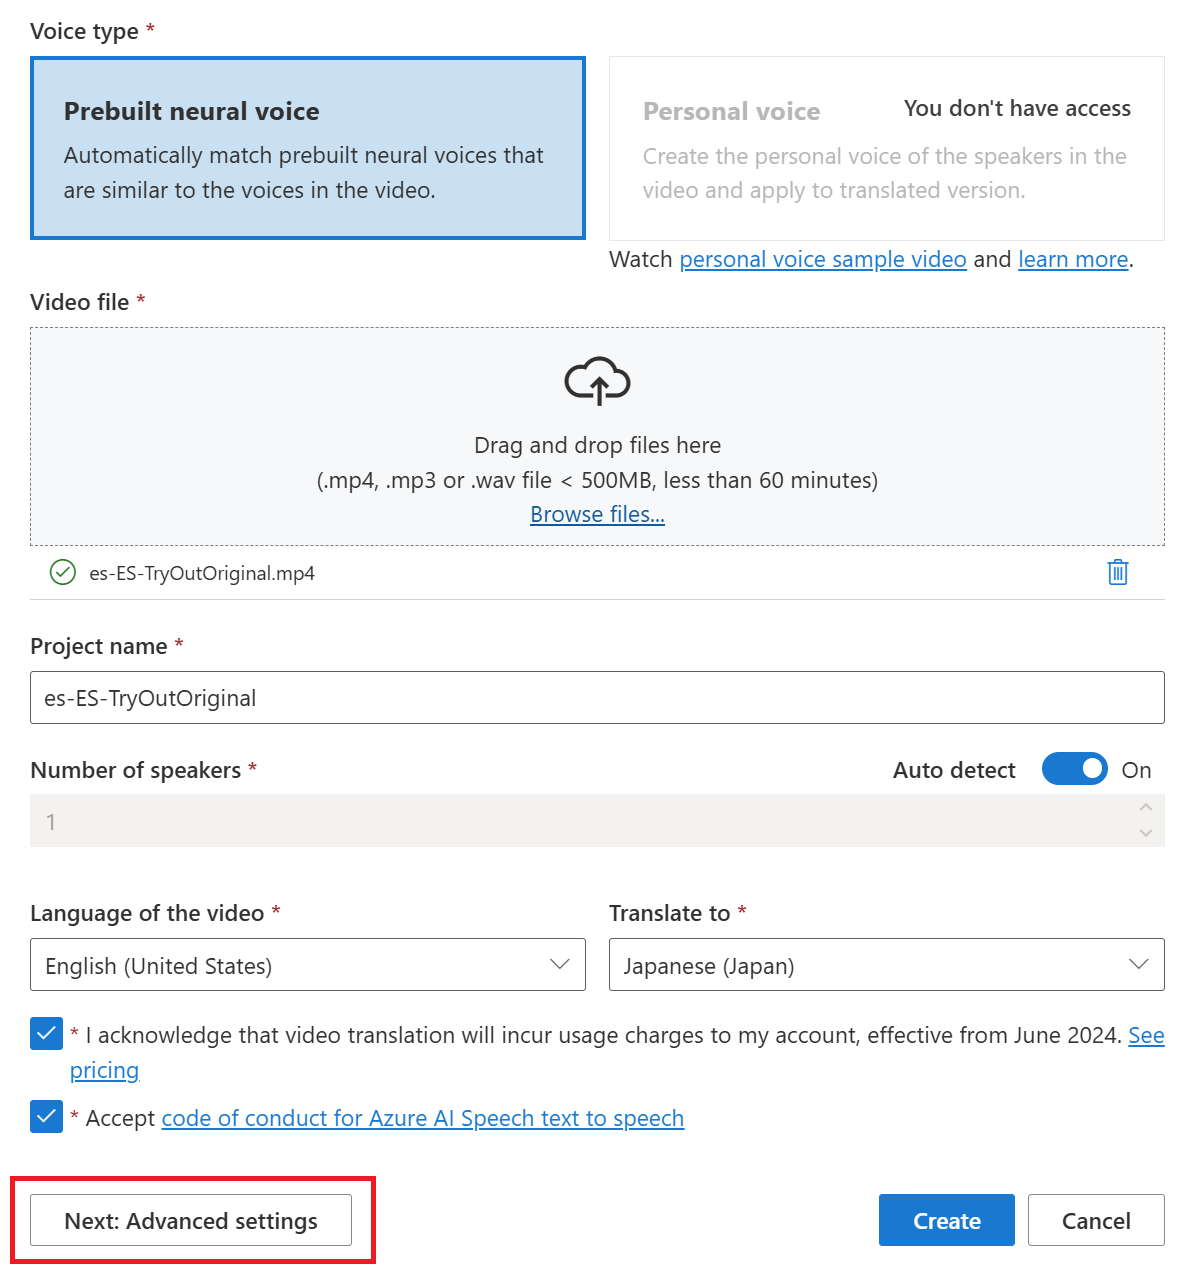
Create a video translation project
To create a video translation project, follow these steps:- Go to the model catalog in Microsoft Foundry portal.
- Enter and search for “Azure-AI-Speech” in the catalog search box.
- Select Azure-AI-Speech and you’re taken to the Azure-AI-Speech try out page.
- Select Speech capabilities by scenario > Video translation.
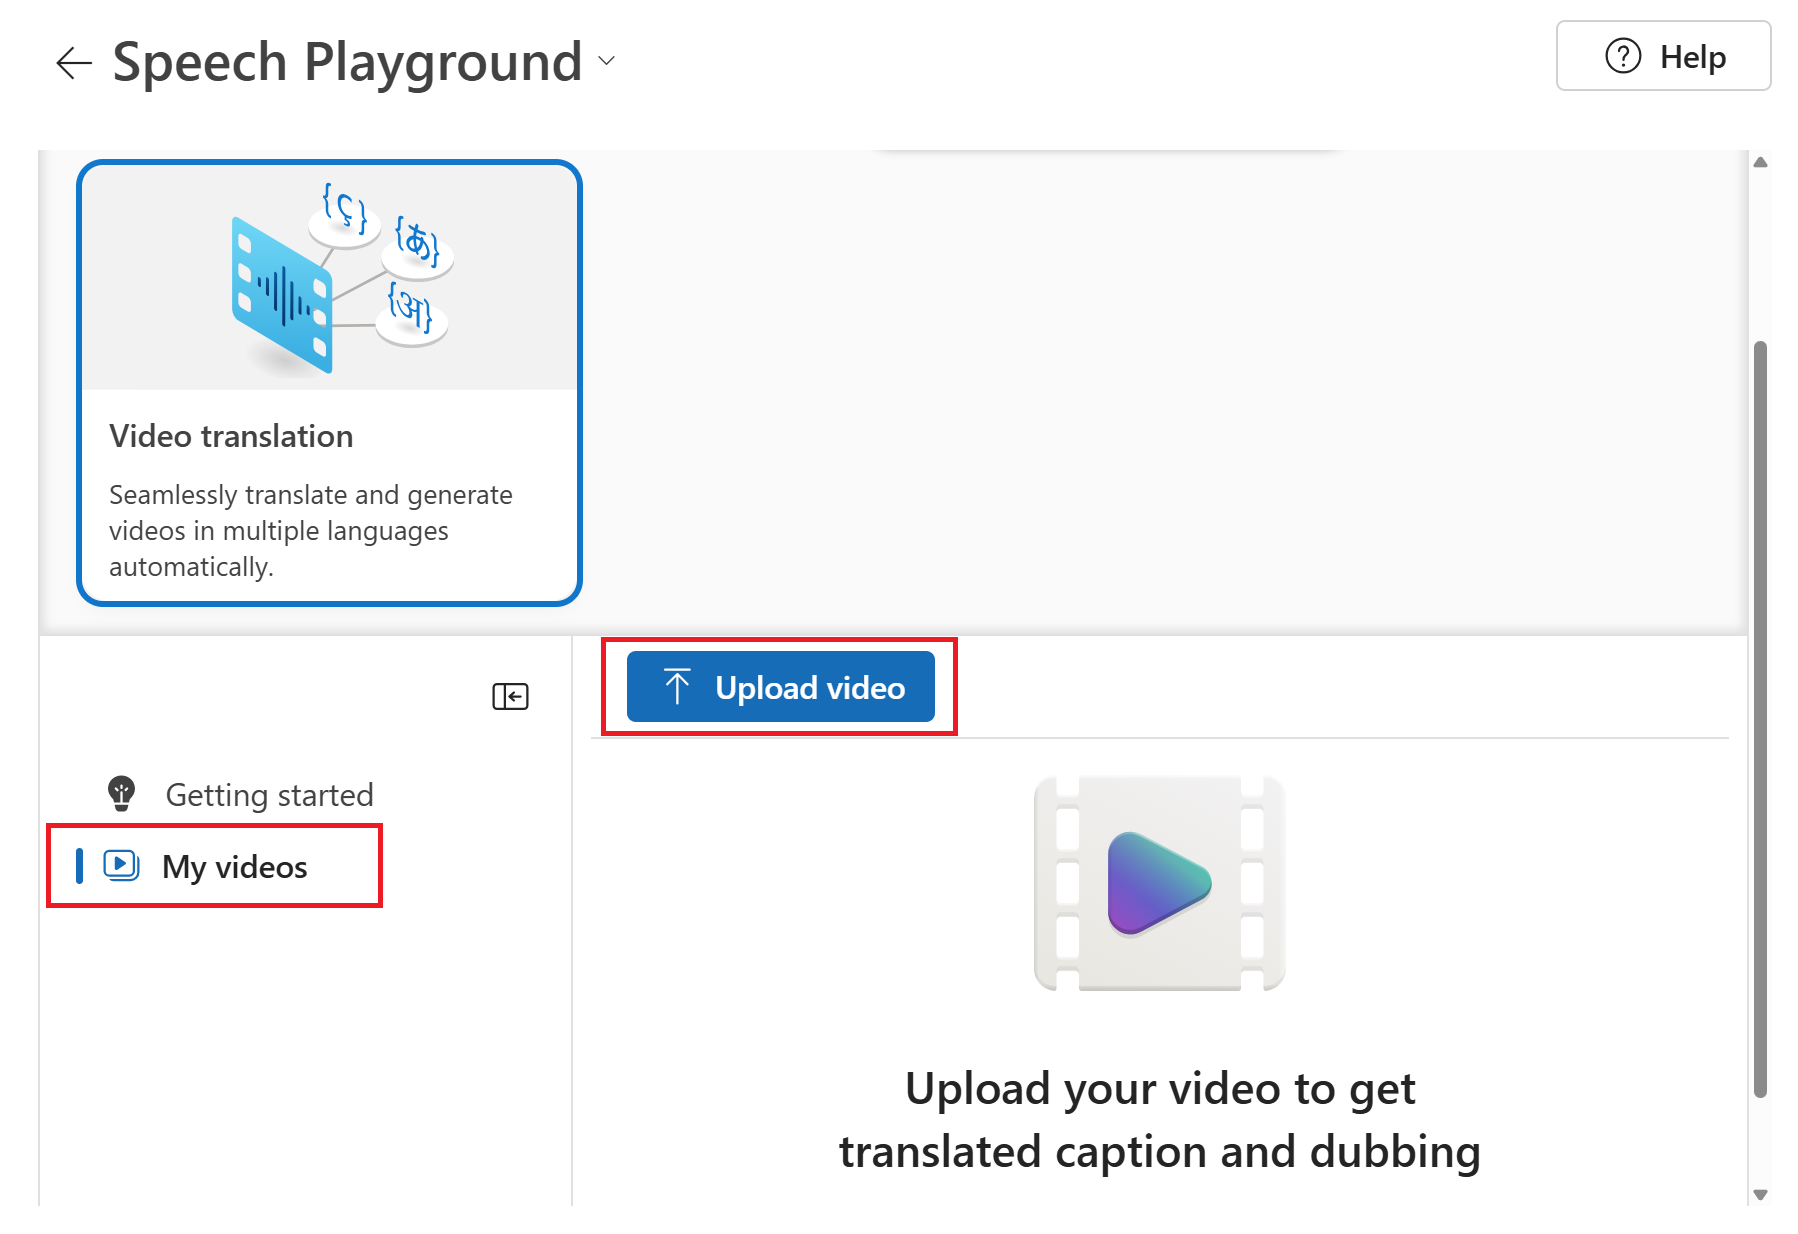
- Select Go to Speech playground.
- Select My videos > Upload video.
- On the Upload video page, select a Voice type.
- Standard voice: The service automatically selects the most suitable standard voice by matching the speaker’s voice in the video with standard voices.
- Personal voice: Use the personal voice that matches the voice of the speakers in the video.
To use personal voice, you need to apply for access.
- Upload your video file by dragging and dropping the video file or selecting the file manually. The video must be in .mp4 format, less than 5 GB, and shorter than 4 hours.
- Provide the Number of speakers, Language of the video, and Translate to language.
- Select the boxes to acknowledge the pricing information and code of conduct.
- Select Next: Advanced settings if you want to adjust the advanced settings.
-
Optionally, you can adjust the following settings:
- Lexicon file: This option allows you to add custom words or phrases that the system should recognize and pronounce correctly. You can create a lexicon file in the audio content creation tool in the Speech Studio and select it here.
- Burn subtitles: This option allows you to add subtitles to the video. The subtitle file can be in WebVTT or JSON format. You can download a sample WebVTT file for your reference by selecting Download sample VTT file.
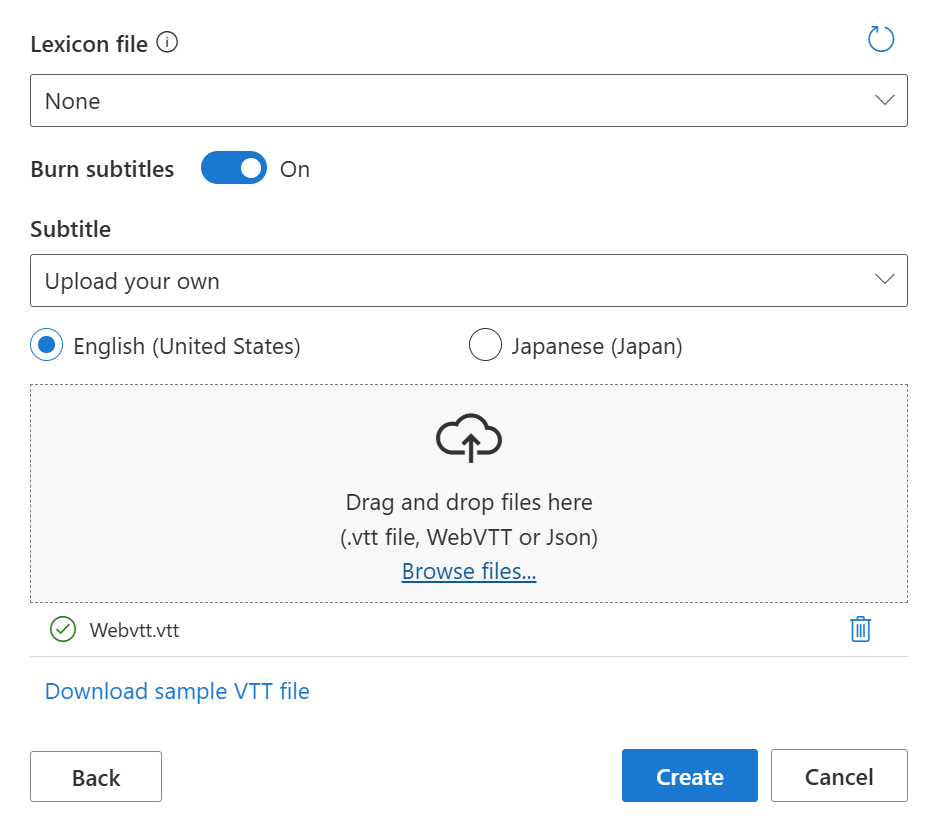
- Automatic subtitles: Results in both source and target language subtitles.
- Upload source language subtitles: Results in both source and target language subtitles.
- Upload target language subtitles: Results in only target language subtitles.
- Select Create.
Check and adjust voice settings
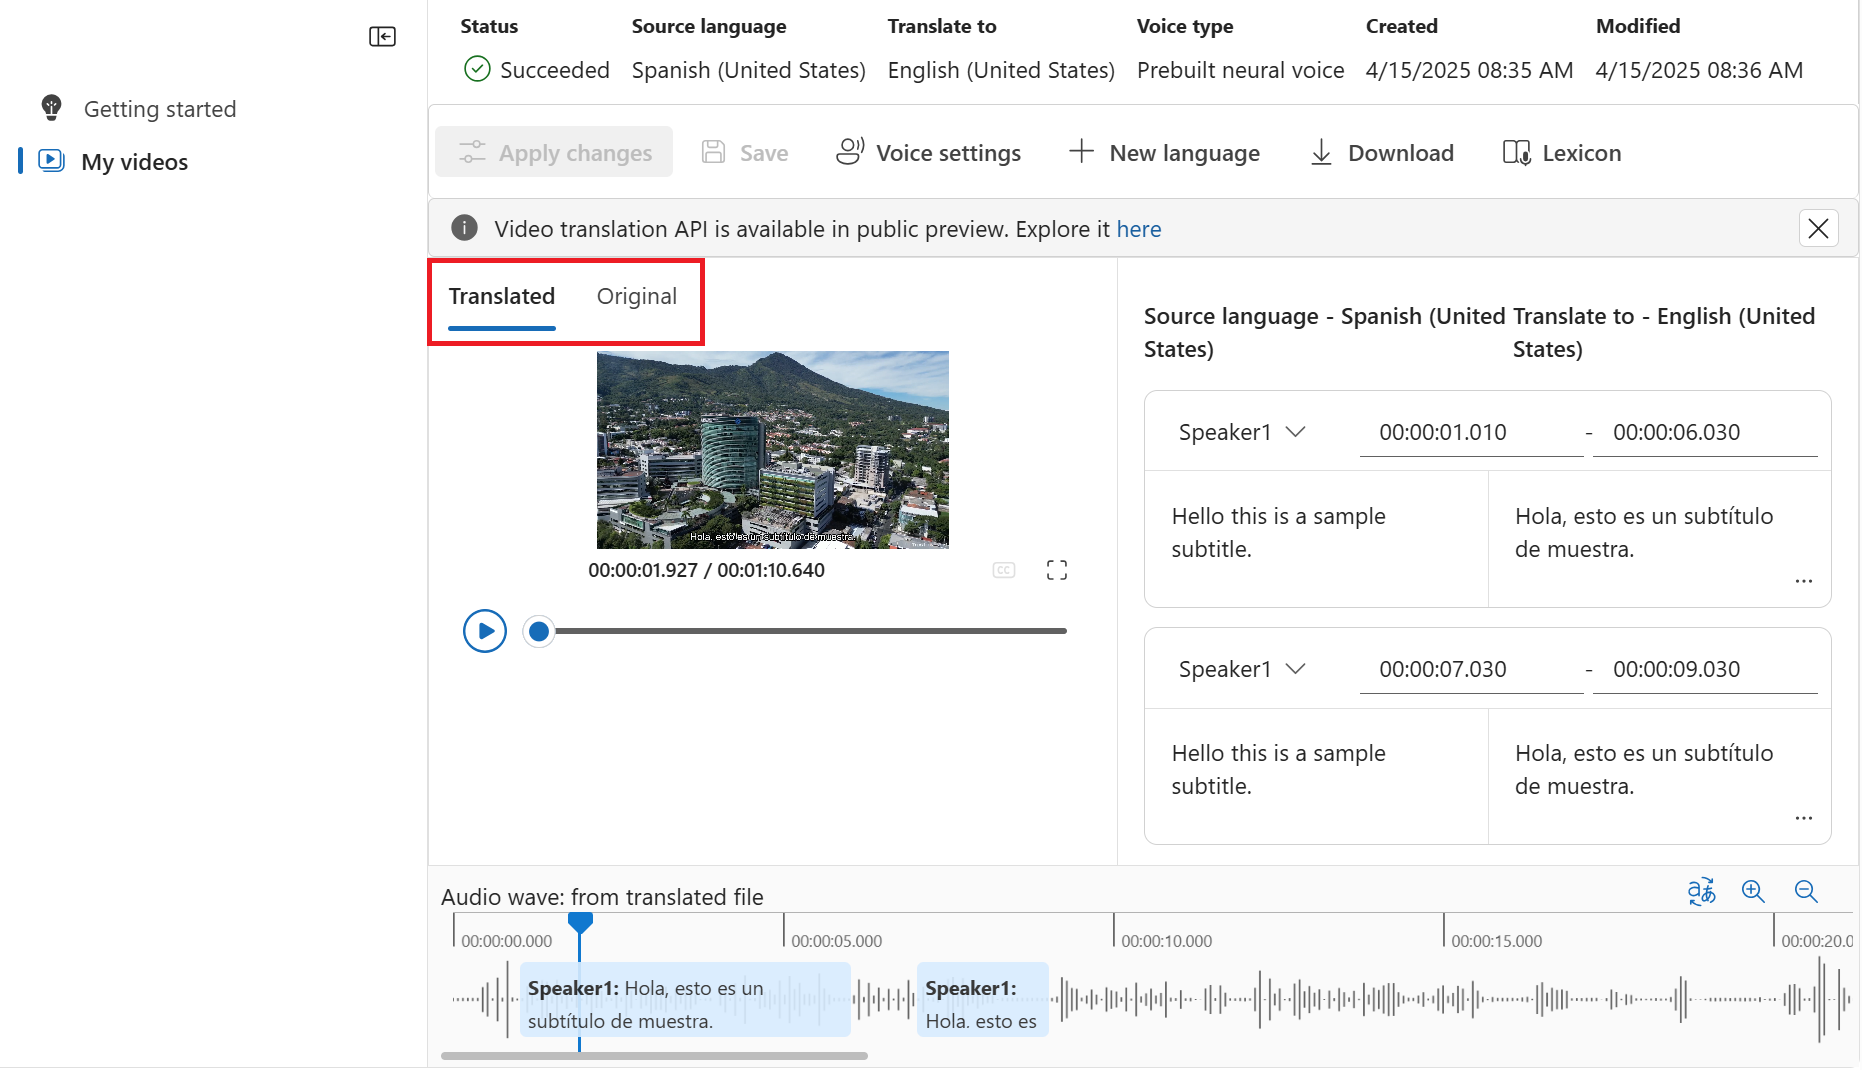
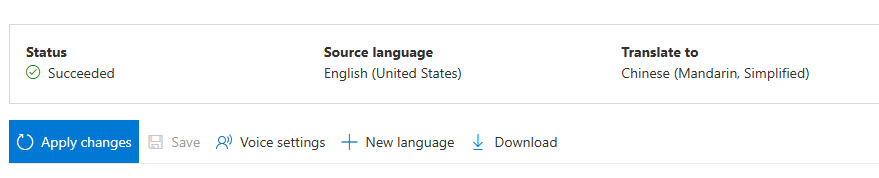
Select My videos and you should see a video labeled with Succeeded status.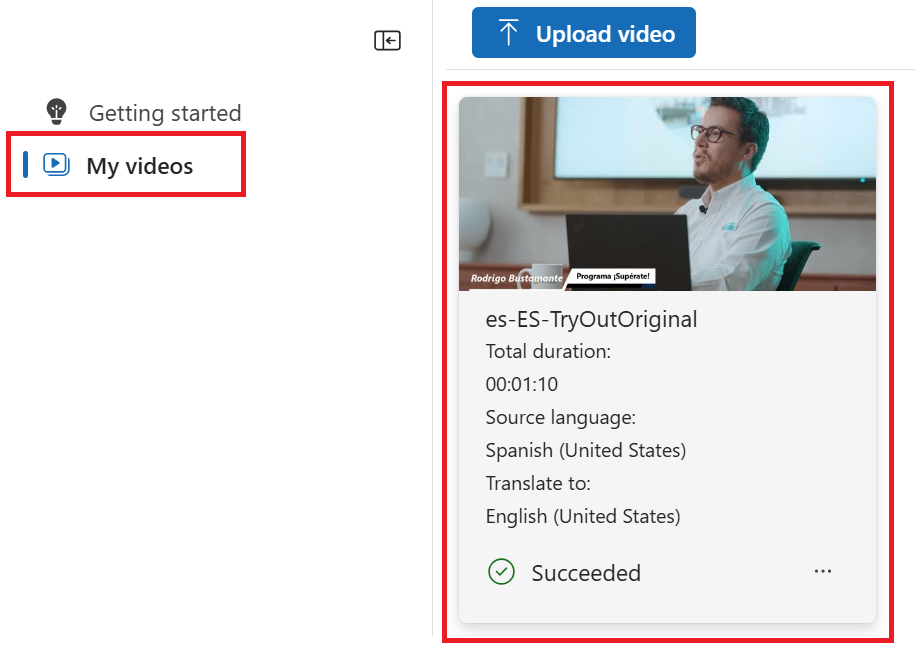

Translate to another language
You can keep the current translation project and translate the original video into another language.- Select My videos and then select the tile for your video translation.
- Select + New language.
- On the new Translate to new language page that appears, choose a new translation language and voice type. Once the video is translated, a new project is automatically created.
Related content
The video translation REST API facilitates seamless video translation integration into your applications. It supports uploading, managing, and refining video translations, with multiple iterations for continuous improvement. In this article, you learn how to utilize video translation through the REST API.Prerequisites
- An Azure subscription. If you don’t have an Azure subscription, create a free account before you begin.
- a Foundry resource for Speech in a supported region. If you don’t have a Speech resource, create one in the Azure portal.
- An Azure Blob Storage account.
- You need a video file in .mp4 format, less than 5 GB, and shorter than 4 hours. For testing purposes, you can use the sample video file provided by Microsoft at https://ai.azure.com/speechassetscache/ttsvoice/VideoTranslation/PublicDoc/SampleData/es-ES-TryOutOriginal.mp4.
- Make sure video translation supports your source and target language.
Workflow
Here are the steps to get a translated video using the REST API:- Create a translation object. Check the status of the operation periodically until it reaches
SucceededorFailed. - Create an iteration to start the translation process. Check the status of the iteration operation periodically until it reaches
SucceededorFailed. - Download the translated video and subtitles.
- Optionally, create additional iterations to improve the translation quality.
Step 1: Create a translation
Creating a translation as described in this section doesn’t initiate the translation process. You can start translating the video by creating an iteration. Translations and iterations created through the REST API aren’t synchronized to the portal, and vice versa.
- Specify
displayName: The display name of the translation. This is a user-friendly name that helps you identify the translation. - Specify
description: A brief description of the translation. This is optional but can be helpful for documentation purposes. - Specify the
sourceLocale: The language of the original video. This is the language spoken in the video file. - Specify the
targetLocale: The language you want to translate the video into. This is the target language for the translation. - Specify
voiceKind: The type of voice you want to use for the translation. You can choose betweenPlatformVoiceandPersonalVoice. ForPlatformVoice, the system automatically selects the most suitable standard voice by matching the speaker’s voice in the video with standard voices. ForPersonalVoice, the system offers a model that generates high-quality voice replication in a few seconds.
To use personal voice, you need to apply for access.
- Specify
speakerCount: The number of speakers in the video. This is an optional parameter, and you can set it to 1 if you’re unsure. - Specify
subtitleMaxCharCountPerSegment: The maximum number of characters allowed per subtitle segment. This is an optional parameter, and you can set it to 30 if you’re unsure. - Specify
exportSubtitleInVideo: A boolean value indicating whether to export subtitles in the video. This is an optional parameter, and you can set it totrueif you want to include subtitles in the video. - Specify the
videoFileUrl: The URL of the video file you want to translate. The video must be in .mp4 format, less than 5 GB, and shorter than 4 hours. You can upload the video to Azure Blob Storage and use the Blob URL. For testing purposes, you can use the sample video file provided by Microsoft at https://ai.azure.com/speechassetscache/ttsvoice/VideoTranslation/PublicDoc/SampleData/es-ES-TryOutOriginal.mp4.
- Set the
Operation-Idheader: TheOperation-Idmust be unique for each operation, such as creating each iteration. ReplaceYour-Operation-Idwith a unique ID for this operation. - Replace
Your-Translation-Idin the path. The translation ID must be unique among all translations for the Speech resource. ReplaceYour-Translation-Idwith a translation ID of your choice. You use this ID to refer to the translation in subsequent API calls. - Replace
YourSpeechResourceKeywith your Speech resource key and replaceYourSpeechResourceRegionwith your Speech resource region.
If you try to use an existing translation ID with different settings, the API will return an error. The translation ID must be unique for each translation. You can make changes to an existing translation by creating an iteration.
Succeeded or Failed. This operation allows you to monitor the progress of your creating the iteration process. The status property should progress from NotStarted to Running, and finally to Succeeded or Failed.
Step 2: Create an iteration
To start translating your video or update an iteration for an existing translation, you need to construct an HTTP PUT request path and body according to the following instructions:- Set the required input: Include details like
speakerCount,subtitleMaxCharCountPerSegment,exportSubtitleInVideo, orwebvttFile. No subtitles are embedded in the output video by default. When creating an iteration, if you already specified the optional parametersspeakerCount,subtitleMaxCharCountPerSegment, andexportSubtitleInVideoduring the creation of translation, you don’t need to specify them again. The values inherit from translation settings. Once these parameters are defined when creating an iteration, the new values override the original settings. - Optionally, you can specify a WebVTT file with subtitles for your original video. The
webvttFileinput parameter isn’t required when creating the first iteration. However, starting from the second iteration, you must specify thewebvttFileparameter in the iteration process.
- Set the
Operation-Idheader: TheOperation-Idmust be unique for each operation, such as creating each iteration. ReplaceYour-Operation-Idwith a unique ID for this operation. - Replace
Your-Translation-Idin the path. Use the same translation ID that you specified when you created the translation. The translation ID remains unchanged. - Specify a new
iterationIdin the path. The iteration ID must be unique for each operation. ReplaceYour-Iteration-Id-1with an iteration ID of your choice. - Replace
YourSpeechResourceKeywith your Speech resource key and replaceYourSpeechResourceRegionwith your Speech resource region.
Succeeded or Failed. This operation allows you to monitor the progress of your creating the iteration process. The status property should progress from NotStarted to Running, and finally to Succeeded or Failed.
Step 3: Download the translated video and subtitles
You can download the translated video and subtitles once the iteration status isSucceeded. The translated video and subtitles are available in the response body of the Get an iteration by iteration ID API.
To retrieve details of a specific iteration by its ID, use the HTTP GET request. Replace YourSpeechResourceKey with your Speech resource key, YourSpeechResourceRegion with your Speech resource region, Your-Translation-Id with the translation ID you want to check, and Your-Iteration-Id with the iteration ID you want to check.
Download from the result URLs
The response body contains the following URLs for downloading the translated video and subtitles:translatedVideoFileUrl: The URL of the translated video file. You can download the translated video from this URL.sourceLocaleSubtitleWebvttFileUrl: The URL of the WebVTT file for the source locale. You can download the WebVTT file from this URL.targetLocaleSubtitleWebvttFileUrl: The URL of the WebVTT file for the target locale. You can download the WebVTT file from this URL.metadataJsonWebvttFileUrl: The URL of the metadata JSON WebVTT file. You can download the metadata JSON WebVTT file from this URL.
- WebVTT for the source locale
- WebVTT for the target locale
- WebVTT with JSON Metadata
sourceLocaleSubtitleWebvttFileUrl
WebVTT with JSON properties
The WebVTT file with JSON properties contains metadata about the translation process. Each subtitle segment includes properties that provide additional information about the translation. Here’s a breakdown of the properties:globalMetadata: This section contains metadata about the speakers in the video. The “speakers” property is an object that contains information about each speaker. Each speaker is identified by a unique ID (e.g., “Speaker0”). The “defaultSsmlProperties” property contains the default SSML properties for the speaker’s voice.id: This is a unique identifier for each subtitle segment. It helps to identify the specific segment of text in the WebVTT file.speakerId: This property indicates the ID of the speaker for the corresponding subtitle segment. It should match the speaker ID defined in the “globalMetadata” section.ssmlProperties: This section contains properties related to the speaker’s voice. It can include properties like “voiceName” and “voiceKind”. The “voiceName” is the name of the voice used for synthesis, and the “voiceKind” indicates whether it’s a platform voice or a personal voice.sourceLocaleText: This property contains the original text in the source language. If you only make changes tosourceLocaleText, the system will translate the updatedsourceLocaleTextand use the new translation for synthesis. If you make changes to bothsourceLocaleTextandtranslatedText, the system will ignore the changes tosourceLocaleTextand use the updatedtranslatedTextfor synthesis.translatedText: This property contains the translated text in the target language. It represents the text that will be synthesized in the translated video. If you only make changes totranslatedText, the system will use the updated translatedText for synthesis.
Step 4: Create additional iterations (optional)
You can create additional iterations to improve the translation quality. The process is similar to creating the first iteration. ThewebvttFile parameter isn’t required when creating the first iteration. However, starting from the second iteration, you must specify the webvttFile parameter in the iteration process. You need to download the webvtt file, make necessary edits, and then upload it to your Azure Blob storage. You need to specify the Blob URL.
To start translating your video or update an iteration for an existing translation, you need to construct an HTTP PUT request path and body according to the following instructions:
- Specify the required
webvttFileinput parameter. ThewebvttFileparameter is required starting from the second iteration. You need to download the most recent webvtt file, make the desired edits, and then upload it to your Azure Blob storage. You need to specify the Blob URL. The subtitle file can be in WebVTT or JSON format. - Optionally, you can specify new settings for the new iteration, such as
speakerCount,subtitleMaxCharCountPerSegment, andexportSubtitleInVideo.
- Set the
Operation-Idheader: TheOperation-Idmust be unique for each operation, such as creating each iteration. ReplaceYour-Operation-Idwith a unique ID for this operation. - Replace
Your-Translation-Idin the path. Use the same translation ID that you specified when you created the translation. The translation ID remains unchanged. - Specify a new
iterationIdin the path. The iteration ID must be unique for each operation. ReplaceYour-Iteration-Id-2with an iteration ID of your choice. - Replace
YourSpeechResourceKeywith your Speech resource key and replaceYourSpeechResourceRegionwith your Speech resource region.
Succeeded or Failed. This operation allows you to monitor the progress of your creating the iteration process. The status property should progress from NotStarted to Running, and finally to Succeeded or Failed.
Get operation by operation ID
Check the status of an operation using its operation ID. The operation ID is unique for each operation, so you can track each operation separately. The operation ID is valid until the translation is deleted.- Specify the same
Operation-Idthat you used when creating the translation. In the example,Your-Operation-Id-1is used. ReplaceYour-Operation-Id-1with an operation ID of your choice. - Replace
YourSpeechResourceKeywith your Speech resource key and replaceYourSpeechResourceRegionwith your Speech resource region.
Delete a translation by translation ID
Remove a specific translation identified bytranslationId. This operation also removes all iterations associated with this translation.
Replace YourSpeechResourceKey with your Speech resource key, YourSpeechResourceRegion with your Speech resource region, and Your-Translation-Id with the translation ID you want to delete. If not deleted manually, the service retains the translation history for up to 31 days.
HTTP/1.1 204 No Content if the delete request was successful.
REST API operations
You can use the following REST API operations for video translation:| Operation | Method | REST API call |
|---|---|---|
| Create a translation | PUT | /translations/{translationId} |
| List translations | GET | /translations |
| Get a translation by translation ID | GET | /translations/{translationId} |
| Create an iteration | PUT | /translations/{translationId}/iterations/{iterationId} |
| List iterations | GET | /translations/{translationId}/iterations |
| Get an iteration by iteration ID | GET | /translations/{translationId}/iterations/{iterationId} |
| Get operation by operation ID | GET | /operations/{operationId} |
| Delete a translation by translation ID | DELETE | /translations/{translationId} |
List translations
To list all video translations that are uploaded and processed in your resource account, make an HTTP GET request as shown in the following example. ReplaceYourSpeechResourceKey with your Speech resource key and replace YourSpeechResourceRegion with your Speech resource region.
Get a translation by translation ID
This operation retrieves detailed information about a specific translation, identified by its uniquetranslationId. Replace YourSpeechResourceKey with your Speech resource key, YourSpeechResourceRegion with your Speech resource region, and Your-Translation-Id with the translation ID you want to check.
List iterations
List all iterations for a specific translation. This request lists all iterations without detailed information. ReplaceYourSpeechResourceKey with your Speech resource key, YourSpeechResourceRegion with your Speech resource region, and Your-Translation-Id with the translation ID you want to check.
HTTP status codes
The section details the HTTP response codes and messages from the video translation REST API.HTTP 200 OK
HTTP 200 OK indicates that the request was successful.HTTP 204 error
An HTTP 204 error indicates that the request was successful, but the resource doesn’t exist. For example:- You tried to get or delete a translation that doesn’t exist.
- You successfully deleted a translation.
HTTP 400 error
Here are examples that can result in the 400 error:- The source or target locale you specified isn’t among the supported locales.
- You tried to use a F0 Speech resource, but the region only supports the Standard Speech resource pricing tier.
HTTP 500 error
HTTP 500 Internal Server Error indicates that the request failed. The response body contains the error message.Related content
In this article, you learn how to use video translation with Azure Speech in Foundry Tools in the Speech Studio.Prerequisites
- An Azure subscription. If you don’t have an Azure subscription, create a free account before you begin.
- A Speech resource in a supported region. If you don’t have a Speech resource, create one in the Azure portal.
- An Azure Blob Storage account.
- You need a video file in .mp4 format, less than 5 GB, and shorter than 4 hours. For testing purposes, you can use the sample video file provided by Microsoft at https://ai.azure.com/speechassetscache/ttsvoice/VideoTranslation/PublicDoc/SampleData/es-ES-TryOutOriginal.mp4.
- Make sure video translation supports your source and target language.
Create a video translation project
To create a video translation project, follow these steps:- Sign in to the Speech Studio.
- Select the subscription and Speech resource to work with.
- Select Video translation.
- On the Create and Manage Projects page, select Create a project.
- On the New project page, select a Voice type.
- Standard voice: The service automatically selects the most suitable standard voice by matching the speaker’s voice in the video with standard voices.
- Personal voice: Use the personal voice that matches the voice of the speakers in the video.
To use personal voice, you need to apply for access.
- Upload your video file by dragging and dropping the video file or selecting the file manually. The video must be in .mp4 format, less than 5 GB, and shorter than 4 hours.
- Provide the Project name, Number of speakers, Language of the video, and Translate to language.
- Select the boxes to acknowledge the pricing information and code of conduct.
- Select Next: Advanced settings if you want to adjust the advanced settings.
-
Optionally, you can adjust the following settings:
- Lexicon file: This option allows you to add custom words or phrases that the system should recognize and pronounce correctly. You can create a lexicon file in the audio content creation tool in the Speech Studio and select it here.
- Burn subtitles: This option allows you to add subtitles to the video. The subtitle file can be in WebVTT or JSON format. You can download a sample WebVTT file for your reference by selecting Download sample VTT file.
- Automatic subtitles: Results in both source and target language subtitles.
- Upload source language subtitles: Results in both source and target language subtitles.
- Upload target language subtitles: Results in only target language subtitles.
- Select Create.
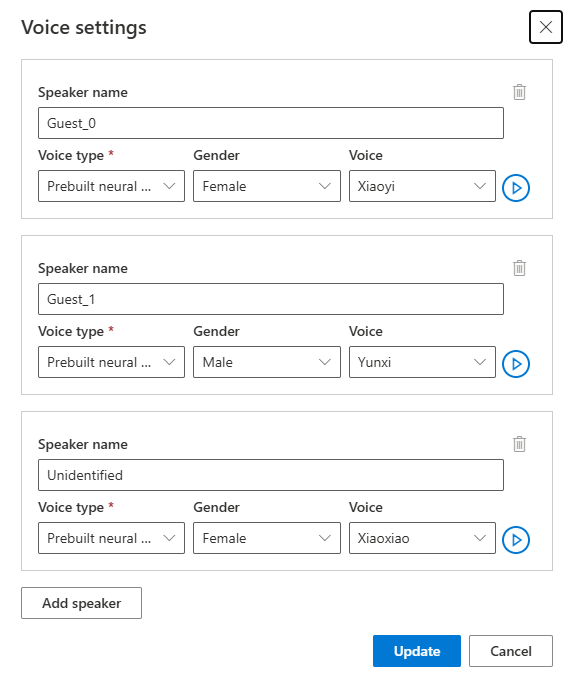
Check and adjust voice settings
On the project details page, you can see the Translated and Original tabs under Video. You can compare the original and translated videos by selecting the corresponding tab. The translated video is generated automatically, and you can play it to check the translation quality. To the right side of the video, you can view both the original script and the translated script. Hovering over each part of the original script triggers the video to automatically jump to the corresponding segment of the original video, while hovering over each part of the translated script triggers the video to jump to the corresponding translated segment. You can also add or remove segments as needed. When you want to add a segment, ensure that the new segment timestamp doesn’t overlap with the previous and next segment, and the segment end time should be larger than the start time. The correct format of timestamp should behh:mm:ss.ms. Otherwise, you can’t apply the changes.
You can adjust the time frame of the scripts directly using the audio waveform below the video. The adjustments will be applied after you select Apply changes.
If you encounter segments with an “unidentified” voice name, it might be because the system couldn’t accurately detect the voice, especially in situations where speaker voices overlap. In such cases, it’s advisable to manually change the voice name.
Translate to another language
You can keep the current translation project and translate the original video into another language.- Open your project.
- Select + New language.
- On the new Translate page that appears, choose a new translated language and voice type. Once the video is translated, a new project is automatically created.