- Choose an authentication method based on your security requirements
- Configure key-based, Microsoft Entra, or OAuth authentication
- Set up and validate your MCP server connection
If you don’t already have an account with the MCP server publisher, create one through the publisher’s website.
Prerequisites
Before you begin, you need:- Access to the Foundry portal and a project. If you don’t have one, see Create projects in Foundry.
- Permissions to create project connections and configure agents. For details, see Role-based access control in the Foundry portal.
- The remote MCP server endpoint URL you want to connect to.
- Credentials for your selected authentication method:
- Key-based authentication: an API key, personal access token (PAT), or other token.
- Microsoft Entra authentication: role assignments for the agent identity or project managed identity on the underlying service.
- OAuth identity passthrough: managed OAuth configuration or an OAuth app registration (custom OAuth).
Choose an authentication method
In general, two authentication scenarios exist:- Shared authentication: Every user of the agent uses the same identity to authenticate to the MCP server. User context doesn’t persist.
- Individual authentication: Each user authenticates with their own account so their user context persists.
| Your goal | Recommended method |
|---|---|
| Use one shared identity for all users | Key-based authentication or Microsoft Entra authentication |
| Preserve each user’s identity and permissions | OAuth identity passthrough |
| Avoid managing secrets when the underlying service supports Microsoft Entra | Microsoft Entra authentication |
| Connect to an MCP server that doesn’t require auth | Unauthenticated access |
Supported authentication methods
| Method | Description | User context persists |
|---|---|---|
| Key-based | Provide an API key or access token to authenticate with the MCP server. | No |
| Microsoft Entra - agent identity | Use the agent identity to authenticate with the MCP server. Assign the required roles on the underlying service. | No |
| Microsoft Entra - project managed identity | Use the project managed identity to authenticate with the MCP server. Assign the required roles on the underlying service. | No |
| OAuth identity passthrough | Prompt users interacting with your agent to sign in and authorize access to the MCP server. | Yes |
| Unauthenticated access | Use this method only when the MCP server doesn’t require authentication. | No |
Key-based authentication
Use key-based authentication when the MCP server requires an API key, personal access token, or similar credential, and you don’t need to preserve individual user context.People who have access to the project can access an API key stored in a project connection. Store only shared secrets in a project connection. For user-specific access, use OAuth identity passthrough.
- Credential name:
Authorization - Credential value:
Bearer <your-personal-access-token>
- Use least-privilege credentials where possible.
- Rotate tokens regularly.
- Restrict access to projects that contain shared secrets.
Microsoft Entra authentication
Use Microsoft Entra authentication when the MCP server (and its underlying service) supports Microsoft Entra tokens. This method eliminates the need to manage secrets and provides automatic token rotation.Use agent identity authentication
Use agent identity when you want authentication scoped to a specific agent. This approach is ideal when you have multiple agents that need different levels of access to the same MCP server. Use your agent identity to authenticate with MCP servers that support agent identity authentication. If you create your agent by using Agent Service, you automatically assign an agent identity to it. Before publishing, all agents in your Foundry project share the same agent identity. After you publish an agent, the agent gets a unique agent identity. Make sure the agent identity has the required role assignments on the underlying service that powers the MCP server. When the agent invokes the MCP server, Agent Service uses the available agent identity to request an authorization token and passes it to the MCP server.Use project managed identity authentication
Use project managed identity when you want all agents in a project to share the same access level, or when the MCP server requires a managed identity rather than an agent identity. Use your Foundry project’s managed identity to authenticate with MCP servers that support managed identity authentication. Make sure the project managed identity has the required role assignments on the underlying service that powers the MCP server. When the agent invokes the MCP server, Agent Service uses the project’s managed identity to request an authorization token and passes it to the MCP server.OAuth identity passthrough
To use OAuth identity passthrough, users interacting with your agent need at least the Azure AI User role on the project.
- With managed OAuth, Microsoft or the MCP server publisher manages the OAuth app.
- With custom OAuth, you bring your own OAuth app registration.
If you use custom OAuth, you receive a redirect URL after configuration. Add the redirect URL to your OAuth app so Agent Service can complete the flow.
- Client ID: required
- Client secret: optional (depends on your OAuth app)
- Auth URL: required
- Refresh URL: required (if you don’t have a separate refresh URL, you can use the token URL instead)
- Token URL: required
- Scopes: optional
Flow using OAuth identity passthrough
The scope of OAuth is per tool (connection) name per Foundry project. Each new user using a new tool (connection) in a Foundry project is prompted to provide consent.- When a user first tries to use a new tool in a Foundry project, the response output shares the consent link in
response.output_item. You can find the consent link in item typeoauth_consent_request, underconsent_link. Surface this consent link to the user.See an example:
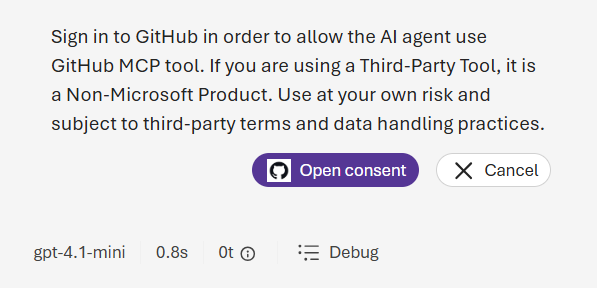
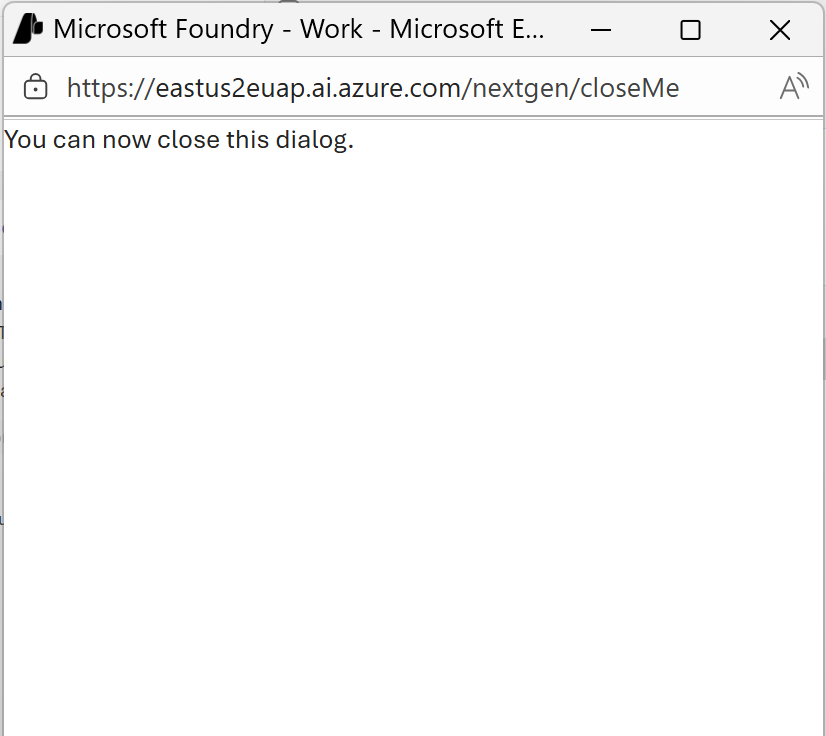
- The user is prompted to sign in and give consent after reviewing the access needed. After giving consent successfully, the user sees a dialog like this example:
-
After the user has closed the dialog, you need to submit another response with the previous response id
If the user declines consent, the MCP tool call fails and returns an error. Your application should handle this case gracefully and inform the user that the tool requires authorization to function.
Bring your own Microsoft Entra app registration
Agent 365 MCP servers are only available to Frontier tenants.
- Follow the app registration guide to create a Microsoft Entra app and get the client ID and client secret.
-
Grant scoped permissions to your Microsoft Entra app.
For Agent 365 MCP servers, go to Manage > API Permissions and search for Agent 365 Tools. If you can’t find it, search for
ea9ffc3e-8a23-4a7d-836d-234d7c7565c1. Assign the permissions you need and grant admin consent for your tenant. Here are the permissions for each MCP server:- Microsoft Outlook Mail MCP Server (Frontier):
McpServers.Mail.All - Microsoft Outlook Calendar MCP Server (Frontier):
McpServers.Calendar.All - Microsoft Teams MCP Server (Frontier):
McpServers.Teams.All - Microsoft 365 User Profile MCP Server (Frontier):
McpServers.Me.All - Microsoft SharePoint and OneDrive MCP Server (Frontier):
McpServers.OneDriveSharepoint.All - Microsoft SharePoint Lists MCP Server (Frontier):
McpServers.SharepointLists.All - Microsoft Word MCP Server (Frontier):
McpServers.Word.All - Microsoft 365 Copilot (Search) MCP Server (Frontier):
McpServers.CopilotMCP.All - Microsoft 365 Admin Center MCP Server (Frontier):
McpServers.M365Admin.All - Microsoft Dataverse MCP Server (Frontier):
McpServers.Dataverse.All
- Microsoft Outlook Mail MCP Server (Frontier):
-
Go back to Foundry portal and configure your MCP server. Connect a tool, go to Custom, and then select MCP. Provide a name and MCP server endpoint, and then select OAuth Identity Passthrough:
- client ID and client secret
- token URL:
https://login.microsoftonline.com/{tenantId}/oauth2/v2.0/token - auth URL:
https://login.microsoftonline.com/{tenantId}/oauth2/v2.0/authorize - refresh URL:
https://login.microsoftonline.com/{tenantId}/oauth2/v2.0/token - scopes:
ea9ffc3e-8a23-4a7d-836d-234d7c7565c1/{permission above}
- After you complete the configuration, you receive a redirect URL. Add it to your Microsoft Entra app.
Unauthenticated access
Use unauthenticated access only when the MCP server doesn’t require authentication. This method is appropriate for public MCP servers that provide open access to their tools.Even when authentication isn’t required, ensure you understand the MCP server’s terms of service and rate limits before connecting.
Set up authentication for an MCP server
- Identify the remote MCP server you want to connect to.
- Create or select a project connection that stores the MCP server endpoint, authentication type, and any required credentials. If you connect the MCP server in the Foundry portal, the portal creates the project connection for you.
-
Create or update an agent with an
mcptool with the following information:server_url: The URL of the MCP server. For example,https://api.githubcopilot.com/mcp/.server_label: A unique identifier of this MCP server to the agent. For example,github.require_approval: Optionally determine whether approval is required. Supported values are:always: A developer needs to provide approval for every call. If you don’t provide a value, this value is the default.never: No approval is required.{"never":[<tool_name_1>, <tool_name_2>]}: You provide a list of tools that don’t require approval.{"always":[<tool_name_1>, <tool_name_2>]}: You provide a list of tools that require approval.
project_connection_id: The connection name that stores the MCP server endpoint, authentication selection, and relevant information. If you provide different endpoints in the connection versusserver_url, the endpoint in the connection is used.
- Run the agent.
-
If the model tries to invoke a tool in your MCP server with approval required or the user needs to sign in for OAuth identity passthrough, review the response output:
- Consent link:
oauth_consent_request - Approval request:
mcp_approval_request
- Consent link:
Validate
After you configure authentication, verify the connection works correctly:- Trigger an MCP tool call from your agent by sending a prompt that causes the agent to use one of the MCP server’s tools.
- Confirm the tool call completes successfully. You should see the tool’s output in the agent’s response without authentication errors.
- If you’re using OAuth identity passthrough:
- Confirm a new user receives a consent link (
oauth_consent_requestin the response). - After the user consents, confirm subsequent tool calls succeed without prompting for consent again.
- Test with a different user to verify the per-user consent flow works correctly.
- Confirm a new user receives a consent link (
Troubleshooting
| Issue | Cause | Resolution |
|---|---|---|
You don’t get an oauth_consent_request when you expect one | The MCP tool isn’t configured for OAuth identity passthrough, or the tool call didn’t execute | Confirm the project connection is configured for OAuth identity passthrough, and make sure your prompt causes the agent to invoke the MCP tool. |
| Consent completes but tool calls still fail | Missing access in the underlying service | Confirm the user has access to the underlying service and has the Azure AI User role (or higher) on the project. |
| Key-based authentication fails | Invalid or expired key or token, or the MCP server expects a different header name or value format | Regenerate or rotate the credential and update the project connection. Confirm the required header name and value format in the MCP server documentation. |
| Microsoft Entra authentication fails | The identity doesn’t have required role assignments | Assign the required roles to the agent identity or project managed identity on the underlying service, and then try again. |
| Tool calls are blocked unexpectedly | require_approval is set to always (default), or the configuration requires approval for the tool you’re calling | Update require_approval to match your approval requirements. |
| MCP server returns “unauthorized” despite valid credentials | The credential header name or format doesn’t match what the MCP server expects | Check the MCP server’s documentation for the exact header name (for example, Authorization, X-API-Key, or Api-Key) and value format (for example, Bearer <token> vs. just <token>). |
| OAuth tokens expire and tool calls fail after some time | The refresh token is invalid or the refresh URL is incorrect | Verify the refresh URL is correct. If you used the token URL as the refresh URL, confirm the OAuth provider supports token refresh at that endpoint. The user might need to consent again if refresh tokens are revoked. |
Host a local MCP server
If you developed a custom MCP server or want to use an open-source MCP server that runs locally, you need to host it in the cloud before connecting it to Agent Service. The Agent Service runtime only accepts a remote MCP server endpoint. If you want to add tools from a local MCP server, you need to self-host it on Azure Container Apps or Azure Functions to get a remote MCP server endpoint. Consider the following points when attempting to host local MCP servers in the cloud:| Local MCP server setup | Hosting in Azure Container Apps | Hosting in Azure Functions |
|---|---|---|
| Transport | HTTP POST/GET endpoints required. | HTTP streamable required (responses must support chunked transfer encoding for SSE-style streaming). |
| Code changes | Container requires a rebuild. | Azure Functions-specific configuration files required in the root directory. |
| Authentication | Custom authentication implementation required. | Use built-in authentication or custom code. Azure Functions requires a key by default, but you can disable the key requirement in host.json. |
| Language stack | Any language that runs in Linux containers (Python, Node.js, .NET, TypeScript, Go). | Python, Node.js, TypeScript, Java, .NET only. |
| Container requirements | Linux (linux/amd64) only. Privileged containers aren’t supported. | Containerized servers aren’t supported. |
| Dependencies | All dependencies must be in the container image. | OS-level dependencies (such as Playwright) aren’t supported. |
| State | Stateless only. | Stateless only. |
| UVX/NPX | Supported. | Not supported. The npx start commands aren’t supported. |