Azure OpenAI provides multiple image generation models. This quickstart covers both model families:
Model
Availability
Key capabilities
DALL-E 3
Generally available
High-quality image generation with quality and style parameters. Best for production workloads.
GPT-image-1 series
Limited access preview
Image generation plus editing and variations. Best for advanced image manipulation workflows. Requires limited access registration.
Image generation typically takes 10-30 seconds depending on the model, size, and quality settings.
Use the tabs to select your preferred API approach and model.Use this guide to get started calling the Azure OpenAI in Microsoft Foundry Models image generation REST APIs by using Python.
To successfully call the Azure OpenAI APIs, you need the following information about your Azure OpenAI resource:
Variable
Name
Value
Endpoint
api_base
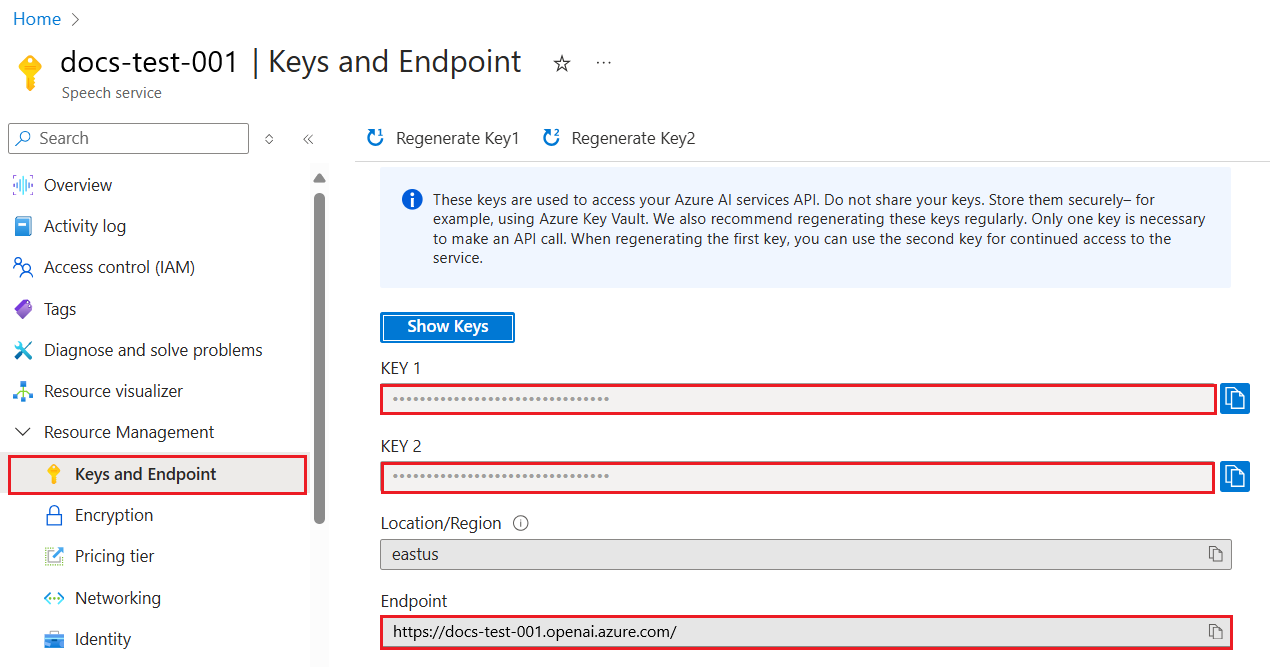
The endpoint value is located under Keys and Endpoint for your resource in the Azure portal. You can also find the endpoint via the Deployments page in Foundry portal. An example endpoint is: https://docs-test-001.openai.azure.com/.
Key
api_key
The key value is also located under Keys and Endpoint for your resource in the Azure portal. Azure generates two keys for your resource. You can use either value.
Go to your resource in the Azure portal. On the navigation pane, select Keys and Endpoint under Resource Management. Copy the Endpoint value and an access key value. You can use either the KEY 1 or KEY 2 value. Always having two keys allows you to securely rotate and regenerate keys without causing a service disruption.
Create a new Python file named quickstart.py. Open the new file in your preferred editor or IDE.
GPT-image-1 series
DALL-E
Replace the contents of quickstart.py with the following code. Change the value of prompt to your preferred text. Also set deployment to the deployment name you chose when you deployed the GPT-image-1 series model.
Copy
Ask AI
import osimport requestsimport base64from PIL import Imagefrom io import BytesIO# set environment variablesendpoint = os.getenv("AZURE_OPENAI_ENDPOINT")subscription_key = os.getenv("AZURE_OPENAI_API_KEY")deployment = "gpt-image-1.5" # the name of your GPT-image-1 series deploymentapi_version = "2025-04-01-preview" # or later versiondef decode_and_save_image(b64_data, output_filename): image = Image.open(BytesIO(base64.b64decode(b64_data))) image.show() image.save(output_filename)def save_all_images_from_response(response_data, filename_prefix): for idx, item in enumerate(response_data['data']): b64_img = item['b64_json'] filename = f"{filename_prefix}_{idx+1}.png" decode_and_save_image(b64_img, filename) print(f"Image saved to: '{filename}'")base_path = f'openai/deployments/{deployment}/images'params = f'?api-version={api_version}'generation_url = f"{endpoint}{base_path}/generations{params}"generation_body = { "prompt": "girl falling asleep", "n": 1, "size": "1024x1024", "quality": "medium", "output_format": "png"}generation_response = requests.post( generation_url, headers={ 'Api-Key': subscription_key, 'Content-Type': 'application/json', }, json=generation_body).json()save_all_images_from_response(generation_response, "generated_image")# In addition to generating images, you can edit them.edit_url = f"{endpoint}{base_path}/edits{params}"edit_body = { "prompt": "girl falling asleep", "n": 1, "size": "1024x1024", "quality": "medium"}files = { "image": ("generated_image_1.png", open("generated_image_1.png", "rb"), "image/png"), # You can use a mask to specify which parts of the image you want to edit. # The mask must be the same size as the input image. # "mask": ("mask.png", open("mask.png", "rb"), "image/png"),}edit_response = requests.post( edit_url, headers={'Api-Key': subscription_key}, data=edit_body, files=files).json()save_all_images_from_response(edit_response, "edited_image")
The script makes a synchronous image generation API call.
Remember to remove the key from your code when you’re done, and never post your key publicly. For production, use a secure way of storing and accessing your credentials. For more information, see Azure Key Vault.
Run the application with the python command:
Copy
Ask AI
python quickstart.py
Wait a few moments to get the response.
Replace the contents of quickstart.py with the following code. Change the value of prompt to your preferred text.You also need to replace <dalle3> in the URL with the deployment name you chose when you deployed the DALL-E 3 model. Entering the model name will result in an error unless you chose a deployment name that is identical to the underlying model name. If you encounter an error, double check to make sure that you don’t have a doubling of the / at the separation between your endpoint and /openai/deployments.
Copy
Ask AI
import requestsimport timeimport osapi_base = os.environ['AZURE_OPENAI_ENDPOINT'] # Enter your endpoint hereapi_key = os.environ['AZURE_OPENAI_API_KEY'] # Enter your API key hereapi_version = '2024-02-01'url = f"{api_base}/openai/deployments/<dalle3>/images/generations?api-version={api_version}"headers= { "api-key": api_key, "Content-Type": "application/json" }body = { # Enter your prompt text here "prompt": "A multi-colored umbrella on the beach, disposable camera", "size": "1024x1024", # supported values are “1792x1024”, “1024x1024” and “1024x1792” "n": 1, #The number of images to generate. Only n=1 is supported for DALL-E 3. "quality": "hd", # Options are “hd” and “standard”; defaults to standard "style": "vivid" # Options are “natural” and “vivid”; defaults to “vivid”}submission = requests.post(url, headers=headers, json=body)image_url = submission.json()['data'][0]['url']print(image_url)
The script makes a synchronous image generation API call.
Remember to remove the key from your code when you’re done, and never post your key publicly. For production, use a secure way of storing and accessing your credentials. For more information, see Azure Key Vault.
The output from a successful image generation API call looks like the following example. The url field contains a URL where you can download the generated image. The URL stays active for 24 hours.
The deployment name doesn’t exist or is misspelled
Verify the deployment name in the Azure portal or Foundry portal
401 Unauthorized
Invalid or missing API key
Check that your AZURE_OPENAI_API_KEY environment variable is set correctly
429 Too Many Requests
Rate limit exceeded
Implement retry logic with exponential backoff
content_policy_violation
Prompt or generated output blocked by content filter
Modify the prompt to comply with the content policy
InvalidPayload
Missing required parameters or invalid values
Check that prompt, size, and n are correctly specified
The Image APIs come with a content moderation filter. If the service recognizes your prompt as harmful content, it doesn’t generate an image. For more information, see Content filtering. For examples of error responses, see the Image generation how-to guide.The system returns an operation status of Failed and the error.code value in the message is set to contentFilter. Here’s an example:
Copy
Ask AI
{ "created": 1698435368, "error": { "code": "contentFilter", "message": "Your task failed as a result of our safety system." }}
It’s also possible that the generated image itself is filtered. In this case, the error message is set to Generated image was filtered as a result of our safety system.. Here’s an example:
Copy
Ask AI
{ "created": 1698435368, "error": { "code": "contentFilter", "message": "Generated image was filtered as a result of our safety system." }}
If you want to clean up and remove an Azure OpenAI resource, you can delete the resource or resource group. Deleting the resource group also deletes any other resources associated with it.
To successfully call the Azure OpenAI APIs, you need the following information about your Azure OpenAI resource:
Variable
Name
Value
Endpoint
api_base
The endpoint value is located under Keys and Endpoint for your resource in the Azure portal. You can also find the endpoint via the Deployments page in Microsoft Foundry portal. An example endpoint is: https://docs-test-001.openai.azure.com/.
Key
api_key
The key value is also located under Keys and Endpoint for your resource in the Azure portal. Azure generates two keys for your resource. You can use either value.
Go to your resource in the Azure portal. On the navigation pane, select Keys and Endpoint under Resource Management. Copy the Endpoint value and an access key value. You can use either the KEY 1 or KEY 2 value. Always having two keys allows you to securely rotate and regenerate keys without causing a service disruption.
Create a new python file, quickstart.py. Open it in your preferred editor or IDE.Replace the contents of quickstart.py with the following code.
Copy
Ask AI
from openai import AzureOpenAIimport osimport requestsfrom PIL import Imageimport jsonclient = AzureOpenAI( api_version="2024-02-01", api_key=os.environ["AZURE_OPENAI_API_KEY"], azure_endpoint=os.environ['AZURE_OPENAI_ENDPOINT'])result = client.images.generate( model="dalle3", # the name of your DALL-E 3 deployment prompt="a close-up of a bear walking through the forest", n=1)json_response = json.loads(result.model_dump_json())# Set the directory for the stored imageimage_dir = os.path.join(os.curdir, 'images')# If the directory doesn't exist, create itif not os.path.isdir(image_dir): os.mkdir(image_dir)# Initialize the image path (note the filetype should be png)image_path = os.path.join(image_dir, 'generated_image.png')# Retrieve the generated imageimage_url = json_response["data"][0]["url"] # extract image URL from responsegenerated_image = requests.get(image_url).content # download the imagewith open(image_path, "wb") as image_file: image_file.write(generated_image)# Display the image in the default image viewerimage = Image.open(image_path)image.show()
Make sure the AZURE_OPENAI_ENDPOINT and AZURE_OPENAI_API_KEY environment variables are set.
Change the value of prompt to your preferred text.
Change the value of model to the name of your deployed DALL-E 3 model.
Remember to remove the key from your code when you’re done, and never post your key publicly. For production, use a secure way of storing and accessing your credentials. For more information, see Azure Key Vault.
Azure OpenAI stores the output image in the generated_image.png file in your specified directory. The script also displays the image in your default image viewer.A successful response includes:
A created timestamp
A data array with at least one image object
Either a url (temporary link valid for 24 hours) or b64_json (base64-encoded image data)
The deployment name doesn’t exist or is misspelled
Verify the deployment name in the Azure portal or Foundry portal
AuthenticationError
Invalid or missing API key
Check that your AZURE_OPENAI_API_KEY environment variable is set correctly
RateLimitError
Rate limit exceeded
Implement retry logic with exponential backoff
content_policy_violation
Prompt or generated output blocked by content filter
Modify the prompt to comply with the content policy
The Image APIs come with a content moderation filter. If the service recognizes your prompt as harmful content, it doesn’t generate an image. For more information, see Content filtering.
If you want to clean up and remove an Azure OpenAI resource, you can delete the resource or resource group. Deleting the resource group also deletes any other resources associated with it.
For the recommended keyless authentication with Microsoft Entra ID, you need to:
Install the Azure CLI used for keyless authentication with Microsoft Entra ID.
Assign the Cognitive Services User role to your user account. You can assign roles in the Azure portal under Access control (IAM) > Add role assignment.
You need to retrieve the following information to authenticate your application with your Azure OpenAI resource:
Microsoft Entra ID
API key
Variable name
Value
AZURE_OPENAI_ENDPOINT
This value can be found in the Keys and Endpoint section when examining your resource from the Azure portal.
AZURE_OPENAI_DEPLOYMENT_NAME
This value will correspond to the custom name you chose for your deployment when you deployed a model. This value can be found under Resource Management > Model Deployments in the Azure portal.
This value can be found in the Keys and Endpoint section when examining your resource from the Azure portal.
AZURE_OPENAI_API_KEY
This value can be found in the Keys and Endpoint section when examining your resource from the Azure portal. You can use either KEY1 or KEY2.
AZURE_OPENAI_DEPLOYMENT_NAME
This value will correspond to the custom name you chose for your deployment when you deployed a model. This value can be found under Resource Management > Model Deployments in the Azure portal.
The sample code in this quickstart uses Microsoft Entra ID for the recommended keyless authentication. If you prefer to use an API key, you can replace the DefaultAzureCredential object with an AzureKeyCredential object.
Copy
Ask AI
AzureOpenAIClient openAIClient = new AzureOpenAIClient(new Uri(endpoint), new DefaultAzureCredential());
To run the quickstart, follow these steps:
Replace the contents of Program.cs with the following code and update the placeholder values with your own.
Copy
Ask AI
using Azure;using Azure.AI.OpenAI;using OpenAI.Images;using static System.Environment;string endpoint = Environment.GetEnvironmentVariable("AZURE_OPENAI_ENDPOINT") ?? "https://<your-resource-name>.openai.azure.com/";string key = Environment.GetEnvironmentVariable("AZURE_OPENAI_API_KEY") ?? "<your-key>";// Use the recommended keyless credential instead of the AzureKeyCredential credential.AzureOpenAIClient openAIClient = new AzureOpenAIClient(new Uri(endpoint), new DefaultAzureCredential()); //AzureOpenAIClient openAIClient = new AzureOpenAIClient(new Uri(endpoint), new AzureKeyCredential(key));// This must match the custom deployment name you chose for your modelImageClient chatClient = openAIClient.GetImageClient("dalle-3");var imageGeneration = await chatClient.GenerateImageAsync( "a happy monkey sitting in a tree, in watercolor", new ImageGenerationOptions() { Size = GeneratedImageSize.W1024xH1024 } );Console.WriteLine(imageGeneration.Value.ImageUri);
Run the application using the dotnet run command or the run button at the top of Visual Studio:
The URL of the generated image is printed to the console.
Copy
Ask AI
<SAS URL>
The Image APIs come with a content moderation filter. If the service recognizes your prompt as harmful content, it won’t return a generated image. For more information, see the content filter article.
If you want to clean up and remove an Azure OpenAI resource, you can delete the resource. Before deleting the resource, you must first delete any deployed models.
For the recommended keyless authentication with Microsoft Entra ID, you need to:
Install the Azure CLI used for keyless authentication with Microsoft Entra ID.
Assign the Cognitive Services User role to your user account. You can assign roles in the Azure portal under Access control (IAM) > Add role assignment.
You need to retrieve the following information to authenticate your application with your Azure OpenAI resource:
Microsoft Entra ID
API key
Variable name
Value
AZURE_OPENAI_ENDPOINT
This value can be found in the Keys and Endpoint section when examining your resource from the Azure portal.
AZURE_OPENAI_DEPLOYMENT_NAME
This value will correspond to the custom name you chose for your deployment when you deployed a model. This value can be found under Resource Management > Model Deployments in the Azure portal.
This value can be found in the Keys and Endpoint section when examining your resource from the Azure portal.
AZURE_OPENAI_API_KEY
This value can be found in the Keys and Endpoint section when examining your resource from the Azure portal. You can use either KEY1 or KEY2.
AZURE_OPENAI_DEPLOYMENT_NAME
This value will correspond to the custom name you chose for your deployment when you deployed a model. This value can be found under Resource Management > Model Deployments in the Azure portal.
The sample code in this quickstart uses Microsoft Entra ID for the recommended keyless authentication. If you prefer to use an API key, you can replace the DefaultAzureCredential object with an AzureKeyCredential object.
Copy
Ask AI
    OpenAIAsyncClient client = new OpenAIClientBuilder()
        .endpoint(endpoint)
        .credential(new DefaultAzureCredentialBuilder().build())
        .buildAsyncClient();
Microsoft Entra ID
API key
Follow these steps to create a console application for image generation.
Create a new file named Quickstart.java in the same project root directory.
Copy the following code into Quickstart.java:
Copy
Ask AI
import com.azure.ai.openai.OpenAIAsyncClient;import com.azure.ai.openai.OpenAIClientBuilder;import com.azure.ai.openai.models.ImageGenerationOptions;import com.azure.ai.openai.models.ImageLocation;import com.azure.core.credential.AzureKeyCredential;import com.azure.core.models.ResponseError;import java.util.concurrent.TimeUnit;public class Quickstart { public static void main(String[] args) throws InterruptedException { String endpoint = System.getenv("AZURE_OPENAI_ENDPOINT"); // Use the recommended keyless credential instead of the AzureKeyCredential credential. OpenAIAsyncClient client = new OpenAIClientBuilder() .endpoint(endpoint) .credential(new DefaultAzureCredentialBuilder().build()) .buildAsyncClient(); ImageGenerationOptions imageGenerationOptions = new ImageGenerationOptions( "A drawing of the Seattle skyline in the style of Van Gogh"); client.getImages(imageGenerationOptions).subscribe( images -> { for (ImageLocation imageLocation : images.getData()) { ResponseError error = imageLocation.getError(); if (error != null) { System.out.printf("Image generation operation failed. Error code: %s, error message: %s.%n", error.getCode(), error.getMessage()); } else { System.out.printf( "Image location URL that provides temporary access to download the generated image is %s.%n", imageLocation.getUrl()); } } }, error -> System.err.println("There was an error getting images." + error), () -> System.out.println("Completed getImages.")); // The .subscribe() creation and assignment isn't a blocking call. // The thread sleeps so the program does not end before the send operation is complete. // Use .block() instead of .subscribe() for a synchronous call. TimeUnit.SECONDS.sleep(10); }}
Run your new console application to generate an image:
Follow these steps to create a console application for image generation.
Create a new file named Quickstart.java in the same project root directory.
Copy the following code into Quickstart.java:
Copy
Ask AI
import com.azure.ai.openai.OpenAIAsyncClient;import com.azure.ai.openai.OpenAIClientBuilder;import com.azure.ai.openai.models.ImageGenerationOptions;import com.azure.ai.openai.models.ImageLocation;import com.azure.identity.DefaultAzureCredentialBuilder;import com.azure.core.models.ResponseError;import java.util.concurrent.TimeUnit;public class Quickstart { public static void main(String[] args) throws InterruptedException { String key = System.getenv("AZURE_OPENAI_API_KEY"); String endpoint = System.getenv("AZURE_OPENAI_ENDPOINT"); OpenAIAsyncClient client = new OpenAIClientBuilder() .endpoint(endpoint) .credential(new AzureKeyCredential(key)) .buildAsyncClient(); ImageGenerationOptions imageGenerationOptions = new ImageGenerationOptions( "A drawing of the Seattle skyline in the style of Van Gogh"); client.getImages(imageGenerationOptions).subscribe( images -> { for (ImageLocation imageLocation : images.getData()) { ResponseError error = imageLocation.getError(); if (error != null) { System.out.printf("Image generation operation failed. Error code: %s, error message: %s.%n", error.getCode(), error.getMessage()); } else { System.out.printf( "Image location URL that provides temporary access to download the generated image is %s.%n", imageLocation.getUrl()); } } }, error -> System.err.println("There was an error getting images." + error), () -> System.out.println("Completed getImages.")); // The .subscribe() creation and assignment isn't a blocking call. // The thread sleeps so the program does not end before the send operation is complete. // Use .block() instead of .subscribe() for a synchronous call. TimeUnit.SECONDS.sleep(10); }}
Run your new console application to generate an image:
The URL of the generated image is printed to the console.
Copy
Ask AI
Image location URL that provides temporary access to download the generated image is <SAS URL>.Completed getImages.
The Image APIs come with a content moderation filter. If the service recognizes your prompt as harmful content, it won’t return a generated image. For more information, see the content filter article.
If you want to clean up and remove an Azure OpenAI resource, you can delete the resource. Before deleting the resource, you must first delete any deployed models.
For the recommended keyless authentication with Microsoft Entra ID, you need to:
Install the Azure CLI used for keyless authentication with Microsoft Entra ID.
Assign the Cognitive Services User role to your user account. You can assign roles in the Azure portal under Access control (IAM) > Add role assignment.
You need to retrieve the following information to authenticate your application with your Azure OpenAI resource:
Microsoft Entra ID
API key
Variable name
Value
AZURE_OPENAI_ENDPOINT
This value can be found in the Keys and Endpoint section when examining your resource from the Azure portal.
AZURE_OPENAI_DEPLOYMENT_NAME
This value will correspond to the custom name you chose for your deployment when you deployed a model. This value can be found under Resource Management > Model Deployments in the Azure portal.
This value can be found in the Keys and Endpoint section when examining your resource from the Azure portal.
AZURE_OPENAI_API_KEY
This value can be found in the Keys and Endpoint section when examining your resource from the Azure portal. You can use either KEY1 or KEY2.
AZURE_OPENAI_DEPLOYMENT_NAME
This value will correspond to the custom name you chose for your deployment when you deployed a model. This value can be found under Resource Management > Model Deployments in the Azure portal.
The URL of the generated image is printed to the console.
Copy
Ask AI
== Batch Image Generation ==Image generation result URL: <SAS URL>Image generation result URL: <SAS URL>
The Image APIs come with a content moderation filter. If the service recognizes your prompt as harmful content, it won’t return a generated image. For more information, see the content filter article.
If you want to clean up and remove an Azure OpenAI resource, you can delete the resource. Before deleting the resource, you must first delete any deployed models.
For the recommended keyless authentication with Microsoft Entra ID, you need to:
Install the Azure CLI used for keyless authentication with Microsoft Entra ID.
Assign the Cognitive Services User role to your user account. You can assign roles in the Azure portal under Access control (IAM) > Add role assignment.
You need to retrieve the following information to authenticate your application with your Azure OpenAI resource:
Microsoft Entra ID
API key
Variable name
Value
AZURE_OPENAI_ENDPOINT
This value can be found in the Keys and Endpoint section when examining your resource from the Azure portal.
AZURE_OPENAI_DEPLOYMENT_NAME
This value will correspond to the custom name you chose for your deployment when you deployed a model. This value can be found under Resource Management > Model Deployments in the Azure portal.
This value can be found in the Keys and Endpoint section when examining your resource from the Azure portal.
AZURE_OPENAI_API_KEY
This value can be found in the Keys and Endpoint section when examining your resource from the Azure portal. You can use either KEY1 or KEY2.
AZURE_OPENAI_DEPLOYMENT_NAME
This value will correspond to the custom name you chose for your deployment when you deployed a model. This value can be found under Resource Management > Model Deployments in the Azure portal.
The sample code in this quickstart uses Microsoft Entra ID for the recommended keyless authentication. If you prefer to use an API key, you can replace the NewDefaultAzureCredential implementation with NewKeyCredential.
Create a new file named quickstart.go. Copy the following code into the quickstart.go file.
Copy
Ask AI
package mainimport ( "context" "fmt" "net/http" "os" "log" "github.com/Azure/azure-sdk-for-go/sdk/ai/azopenai" "github.com/Azure/azure-sdk-for-go/sdk/azcore/to" "github.com/Azure/azure-sdk-for-go/sdk/azidentity")func main() { azureOpenAIEndpoint := os.Getenv("AZURE_OPENAI_ENDPOINT") modelDeploymentID := "dall-e-3" credential, err := azidentity.NewDefaultAzureCredential(nil) if err != nil { log.Printf("ERROR: %s", err) return } client, err := azopenai.NewClient( azureOpenAIEndpoint, credential, nil) if err != nil { log.Printf("ERROR: %s", err) return } resp, err := client.GetImageGenerations(context.TODO(), azopenai.ImageGenerationOptions{ Prompt: to.Ptr("A painting of a cat in the style of Dali."), ResponseFormat: to.Ptr(azopenai.ImageGenerationResponseFormatURL), DeploymentName: to.Ptr(modelDeploymentID), }, nil) if err != nil { // Implement application specific error handling logic. log.Printf("ERROR: %s", err) return } for _, generatedImage := range resp.Data { // The underlying type for the generatedImage is determined by the value of // ImageGenerationOptions.ResponseFormat. // In this example we use `azopenai.ImageGenerationResponseFormatURL`, // so the underlying type will be ImageLocation. resp, err := http.Head(*generatedImage.URL) if err != nil { // Implement application specific error handling logic. log.Printf("ERROR: %s", err) return } fmt.Fprintf(os.Stderr, "Image generated, HEAD request on URL returned %d\nImage URL: %s\n", resp.StatusCode, *generatedImage.URL) }}
Run the following command to create a new Go module:
Copy
Ask AI
go mod init quickstart.go
Run go mod tidy to install the required dependencies:
Copy
Ask AI
go mod tidy
Run the following command to run the sample:
Copy
Ask AI
go run quickstart.go
To run the sample:
Create a new file named quickstart.go. Copy the following code into the quickstart.go file.
Copy
Ask AI
package mainimport ( "context" "fmt" "net/http" "os" "log" "github.com/Azure/azure-sdk-for-go/sdk/ai/azopenai" "github.com/Azure/azure-sdk-for-go/sdk/azcore" "github.com/Azure/azure-sdk-for-go/sdk/azcore/to")func main() { azureOpenAIEndpoint := os.Getenv("AZURE_OPENAI_ENDPOINT") modelDeploymentID := "dall-e-3" azureOpenAIKey := os.Getenv("AZURE_OPENAI_API_KEY") credential := azcore.NewKeyCredential(azureOpenAIKey) client, err := azopenai.NewClientWithKeyCredential( azureOpenAIEndpoint, credential, nil) if err != nil { log.Printf("ERROR: %s", err) return } resp, err := client.GetImageGenerations(context.TODO(), azopenai.ImageGenerationOptions{ Prompt: to.Ptr("A painting of a cat in the style of Dali."), ResponseFormat: to.Ptr(azopenai.ImageGenerationResponseFormatURL), DeploymentName: to.Ptr(modelDeploymentID), }, nil) if err != nil { // Implement application specific error handling logic. log.Printf("ERROR: %s", err) return } for _, generatedImage := range resp.Data { // The underlying type for the generatedImage is determined by the value of // ImageGenerationOptions.ResponseFormat. // In this example we use `azopenai.ImageGenerationResponseFormatURL`, // so the underlying type will be ImageLocation. resp, err := http.Head(*generatedImage.URL) if err != nil { // Implement application specific error handling logic. log.Printf("ERROR: %s", err) return } fmt.Fprintf(os.Stderr, "Image generated, HEAD request on URL returned %d\nImage URL: %s\n", resp.StatusCode, *generatedImage.URL) }}
Run the following command to create a new Go module:
Copy
Ask AI
go mod init quickstart.go
Run go mod tidy to install the required dependencies:
The URL of the generated image is printed to the console.
Copy
Ask AI
Image generated, HEAD request on URL returned 200Image URL: <SAS URL>
The Image APIs come with a content moderation filter. If the service recognizes your prompt as harmful content, it won’t return a generated image. For more information, see the content filter article.
If you want to clean up and remove an Azure OpenAI resource, you can delete the resource or resource group. Deleting the resource group also deletes any other resources associated with it.
For the recommended keyless authentication with Microsoft Entra ID, you need to:
Install the Azure CLI used for keyless authentication with Microsoft Entra ID.
Assign the Cognitive Services User role to your user account. You can assign roles in the Azure portal under Access control (IAM) > Add role assignment.
You need to retrieve the following information to authenticate your application with your Azure OpenAI resource:
Microsoft Entra ID
API key
Variable name
Value
AZURE_OPENAI_ENDPOINT
This value can be found in the Keys and Endpoint section when examining your resource from the Azure portal.
AZURE_OPENAI_DEPLOYMENT_NAME
This value will correspond to the custom name you chose for your deployment when you deployed a model. This value can be found under Resource Management > Model Deployments in the Azure portal.
This value can be found in the Keys and Endpoint section when examining your resource from the Azure portal.
AZURE_OPENAI_API_KEY
This value can be found in the Keys and Endpoint section when examining your resource from the Azure portal. You can use either KEY1 or KEY2.
AZURE_OPENAI_DEPLOYMENT_NAME
This value will correspond to the custom name you chose for your deployment when you deployed a model. This value can be found under Resource Management > Model Deployments in the Azure portal.
Create a new PowerShell file called quickstart.ps1. Then open it up in your preferred editor or IDE.
Replace the contents of quickstart.ps1 with the following code. Make sure AZURE_OPENAI_ENDPOINT is set, and change the value of prompt to your preferred text.To use API key authentication instead of keyless authentication, set AZURE_OPENAI_API_KEY and uncomment the 'api-key' line.
Copy
Ask AI
 # Azure OpenAI metadata variables
 $openai = @{
     api_base    = $Env:AZURE_OPENAI_ENDPOINT
     api_version = '2023-06-01-preview' # This can change in the future.
 }

 # Use the recommended keyless authentication via bearer token.
 $headers = [ordered]@{
     #'api-key' = $Env:AZURE_OPENAI_API_KEY
     'Authorization' = "Bearer $($Env:DEFAULT_AZURE_CREDENTIAL_TOKEN)"
 }

 # Text to describe image
 $prompt = 'A painting of a dog'

 # Adjust these values to fine-tune completions
 $body = [ordered]@{
     prompt = $prompt
     size   = '1024x1024'
     n      = 1
 } | ConvertTo-Json

 # Call the API to generate the image and retrieve the response
 $url = "$($openai.api_base)/openai/images/generations:submit?api-version=$($openai.api_version)"

 $submission = Invoke-RestMethod -Uri $url -Headers $headers -Body $body -Method Post -ContentType 'application/json' -ResponseHeadersVariable submissionHeaders

 $operation_location = $submissionHeaders['operation-location'][0]
 $status = ''
 while ($status -ne 'succeeded') {
     Start-Sleep -Seconds 1
     $response = Invoke-RestMethod -Uri $operation_location -Headers $headers
     $status   = $response.status
 }

 # Set the directory for the stored image
 $image_dir = Join-Path -Path $pwd -ChildPath 'images'

 # If the directory doesn't exist, create it
 if (-not(Resolve-Path $image_dir -ErrorAction Ignore)) {
     New-Item -Path $image_dir -ItemType Directory
 }

 # Initialize the image path (note the filetype should be png)
 $image_path = Join-Path -Path $image_dir -ChildPath 'generated_image.png'

 # Retrieve the generated image
 $image_url = $response.result.data[0].url  # extract image URL from response
 $generated_image = Invoke-WebRequest -Uri $image_url -OutFile $image_path  # download the image
 return $image_path
PowerShell requests the image from Azure OpenAI and stores the output image in the generated_image.png file in your specified directory. For convenience, the full path for the file is returned at the end of the script.The Image APIs come with a content moderation filter. If the service recognizes your prompt as harmful content, it doesn’t generate an image. For more information, see Content filtering.
If you want to clean up and remove an Azure OpenAI resource, you can delete the resource or resource group. Deleting the resource group also deletes any other resources associated with it.
Browse to Foundry and sign in with the credentials associated with your Azure OpenAI resource. During or after the sign-in workflow, select the appropriate directory, Azure subscription, and Azure OpenAI resource.From the Foundry landing page, create or select a new project. Navigate to the Models + endpoints page on the left nav. Select Deploy model and then choose one of the DALL-E models from the list. Complete the deployment process.On the model’s page, select Open in playground.
Start exploring Azure OpenAI capabilities with a no-code approach through the Images playground. Enter your image prompt into the text box and select Generate. When the AI-generated image is ready, it appears on the page.
The Image APIs come with a content moderation filter. If Azure OpenAI recognizes your prompt as harmful content, it doesn’t return a generated image. For more information, see Content filtering.
In the Images playground, you can also view Python and cURL code samples, which are prefilled according to your settings. Select View code near the top of the page. You can use this code to write an application that completes the same task.
If you want to clean up and remove an Azure OpenAI resource, you can delete the resource or resource group. Deleting the resource group also deletes any other resources associated with it.