anonymous, API key, and managed identity. For help choosing an authentication method, see Choose an authentication method.
Prerequisites
Before you begin, make sure you have:- An Azure subscription with the right permissions.
- Foundry User role on the Foundry project to create and run agents.
The Foundry RBAC roles were recently renamed. Foundry User, Foundry Owner, Foundry Account Owner, and Foundry Project Manager were previously named Azure AI User, Azure AI Owner, Azure AI Account Owner, and Azure AI Project Manager. You might still see the previous names in some places while the rename rolls out. The role IDs and core permissions are unchanged by the rename.
- Foundry Project Manager role on the Foundry project if you create a project connection for API key or token authentication.
- A Foundry project created with an endpoint configured.
- An AI model deployed in your project. Confirm that both the model and project region support OpenAPI tools in Tool support by region and model.
- A basic or standard agent environment.
- SDK installed for your preferred language:
- Python:
pip install azure-ai-projects jsonref - C#:
Azure.AI.Extensions.OpenAI - TypeScript/JavaScript:
@azure/ai-projects - Java:
com.azure:azure-ai-agents
- Python:
Environment variables
- OpenAPI 3.0 or 3.1 specification file that meets these requirements:
- Each function must have an
operationId(required for the OpenAPI tool). operationIdshould only contain letters,-, and_.- Use descriptive names to help models efficiently decide which function to use.
- Supported request body content types:
application/json,application/json-patch+json
- Each function must have an
- For managed identity authentication: the least-privileged target-service role that permits the required API operations, assigned to the Foundry project’s managed identity at the target resource scope.
- For API key/token authentication: a project connection configured with your API key or token. See Add a new connection to your project.
The
FOUNDRY_PROJECT_ENDPOINT value refers to your Microsoft Foundry project endpoint, not the external OpenAPI service endpoint. You can find this endpoint in the Microsoft Foundry portal under your project’s Overview page. This endpoint is required to authenticate the agent service and is separate from any OpenAPI endpoints defined in your specification file.Usage support
The following table shows SDK and setup support.For Java, use the
com.azure:azure-ai-agents package for OpenAPI agent tools. The com.azure:azure-ai-projects package doesn’t currently expose OpenAPI agent tool types.Run the anonymous first-success flow
Start with the anonymous weather API to verify that your agent can load an OpenAPI specification and call an operation. This path doesn’t require an external API credential or a Foundry project connection.- Install the SDK package for your selected language from Prerequisites.
- Download
weather_openapi.json, and save it to theassetspath used by the sample. - Set your Foundry project endpoint and model deployment values.
- Run the anonymous sample in your selected language section.
- Confirm that the response contains current weather for Seattle, and then delete the agent version created by the sample.
Understand limitations
- Your OpenAPI spec must include
operationIdfor each operation, andoperationIdcan include only letters,-, and_. - Supported request body content types:
application/json,application/json-patch+json. - For API key authentication, use one API key security scheme per OpenAPI tool. If you need multiple security schemes, create multiple OpenAPI tools.
- Rotate API keys and bearer tokens regularly and immediately after suspected exposure. Update the project connection when credentials change; don’t place credentials in the OpenAPI specification or source code.
Add OpenAPI tools to a toolbox
Use this pattern to expose any REST API described by an OpenAPI spec. Choose theauth.type that matches your API’s security model.
When you use managed identity auth, assign only the least-privileged RBAC role that permits the required API operations to your Foundry project’s managed identity on the target service. For example, assign Reader on the target Azure resource only when the API needs read-only Azure Resource Manager access. Without the required assignment, the agent receives a
401 Unauthorized response when calling the API. For full setup steps, see Authenticate by using managed identity.Create an OpenAPI toolbox with the Azure Developer CLI
OpenAPI tools embed the spec directly undertools:. Connection-based auth (connection_auth) references a project connection; anonymous OpenAPI tools need no connection.
Step 1. (Optional) Create the auth connection
Skip this step for anonymous OpenAPI tools.
--auth-type oauth2 connections. For the full set of azd ai connection create flags, see Toolbox MCP authentication and configuration.
Step 2. Define the toolbox
The OpenAPI spec is inline under tools[].openapi.spec.
auth: block with:
Before you run the code samples
- Download the maintained
tripadvisor_openapi.jsonspecification and save it to theassetspath used by your language sample.
- You need the latest SDK package. The .NET SDK is currently in preview. See the quickstart for details.
- If you use API key for authentication, your connection ID should be in the format of
/subscriptions/{{subscriptionID}}/resourceGroups/{{resourceGroupName}}/providers/Microsoft.CognitiveServices/accounts/{{foundryAccountName}}/projects/{{foundryProjectName}}/connections/{{foundryConnectionName}}.
For API key authentication to work, your OpenAPI specification file must include:
- A
securitySchemessection with your API key configuration, such as the header name and parameter name. - A
securitysection that references the security scheme. - A project connection configured with the matching key name and value.
Authorization and value set to Bearer <token> (replace <token> with your actual token). The word Bearer followed by a space must be included in the value. For details, see Set up a Bearer token connection.Security and data considerations
When you connect an agent to an OpenAPI tool, the agent can send request parameters derived from user input to the target API.- Use project connections for secrets (API keys and tokens). Avoid putting secrets in an OpenAPI spec file or source code.
- Review what data the API receives and what it returns before you use the tool in production.
- Use least-privilege access. For managed identity, assign only the roles the target service requires.
Authenticate with API key
Use this variant for an API that expects a key in a header or query parameter. You can use only one API key security scheme per OpenAPI tool. If the API requires multiple security schemes, create multiple OpenAPI tools.-
Update your OpenAPI spec security schemas. It has a
securitySchemessection and one scheme of typeapiKey. For example:You usually only need to update thenamefield, which corresponds to the name ofkeyin the connection. If the security schemes include multiple schemes, keep only one of them. -
Update your OpenAPI spec to include a
securitysection: - Remove any parameter in the OpenAPI spec that needs API key, because API key is stored and passed through a connection, as described later in this article.
- Create a connection to store your API key.
- Go to the Foundry portal and open your project.
- Create or select a connection that stores the secret. See Add a new connection to your project.
If you regenerate the API key at a later date, you need to update the connection with the new key.
- Enter the following information
-
key:
namefield of your security scheme. In this example, it should bex-api-key - value: YOUR_API_KEY
-
key:
- After you create a connection, you can use it through the SDK or REST API. Use the tabs at the top of this article to see code examples.
Set up a Bearer token connection
Use this variant for an API that expects a bearer token in theAuthorization header. It uses the same project_connection auth type as API-key authentication, but the OpenAPI security scheme and connection values differ.
Your OpenAPI spec will look like this:
-
Update your OpenAPI spec
securitySchemesto useAuthorizationas the header name: -
Add a
securitysection that references the scheme: -
Create a Custom keys connection in your Foundry project:
- Go to the Foundry portal and open your project.
- Create or select a connection that stores the secret. See Add a new connection to your project.
- Enter the following values:
- key:
Authorization(must match thenamefield in yoursecuritySchemes) - value:
Bearer <token>(replace<token>with your actual token)
- key:
The value must include the wordBearerfollowed by a space before the token. For example:Bearer eyJhbGciOiJSUzI1NiIs.... If you omit theBearerprefix and following space, the API receives a raw token without the required authorization scheme prefix, and the request fails.
- After you create the connection, use it with the
project_connectionauth type in your code, the same way you would for API key authentication. The connection ID uses the same format:/subscriptions/{{subscriptionID}}/resourceGroups/{{resourceGroupName}}/providers/Microsoft.CognitiveServices/accounts/{{foundryAccountName}}/projects/{{foundryProjectName}}/connections/{{foundryConnectionName}}.
Authenticate by using managed identity (Microsoft Entra ID)
Microsoft Entra ID is a cloud-based identity and access management service that your employees can use to access external resources. By using Microsoft Entra ID, you can add extra security to your APIs without needing to use API keys. When you set up managed identity authentication, the agent authenticates through the Foundry tool it uses.Managed identity authentication only works when the target service accepts Microsoft Entra ID tokens. If the target API uses a custom authentication scheme that doesn’t support Microsoft Entra ID, use API key or Bearer token authentication instead.
Understand the audience URI
The audience (sometimes called resource identifier or Application ID URI) tells Microsoft Entra ID which service or API the token is intended to access. The audience value must match what the target service expects, or authentication fails with a 401 error.The audience is not your Foundry project endpoint. It’s the resource identifier of the target service that your OpenAPI tool calls.
For more information about how agents authenticate with Microsoft Entra ID, see Agent identity and authentication.
Find and verify your audience
Use the following steps to determine and verify the correct audience value:- For Azure services: Check the service’s documentation for its Microsoft Entra ID resource identifier. Most Azure services list the audience URI in their authentication documentation.
- For APIs protected by a Microsoft Entra app registration: In the Azure portal, go to Microsoft Entra ID > App registrations > select your app > Expose an API. The Application ID URI at the top of the page is your audience value.
- To verify a token’s audience: Decode the access token at https://jwt.ms and check the
audclaim. Theaudvalue must match the audience your target service expects.
Set up managed identity authentication
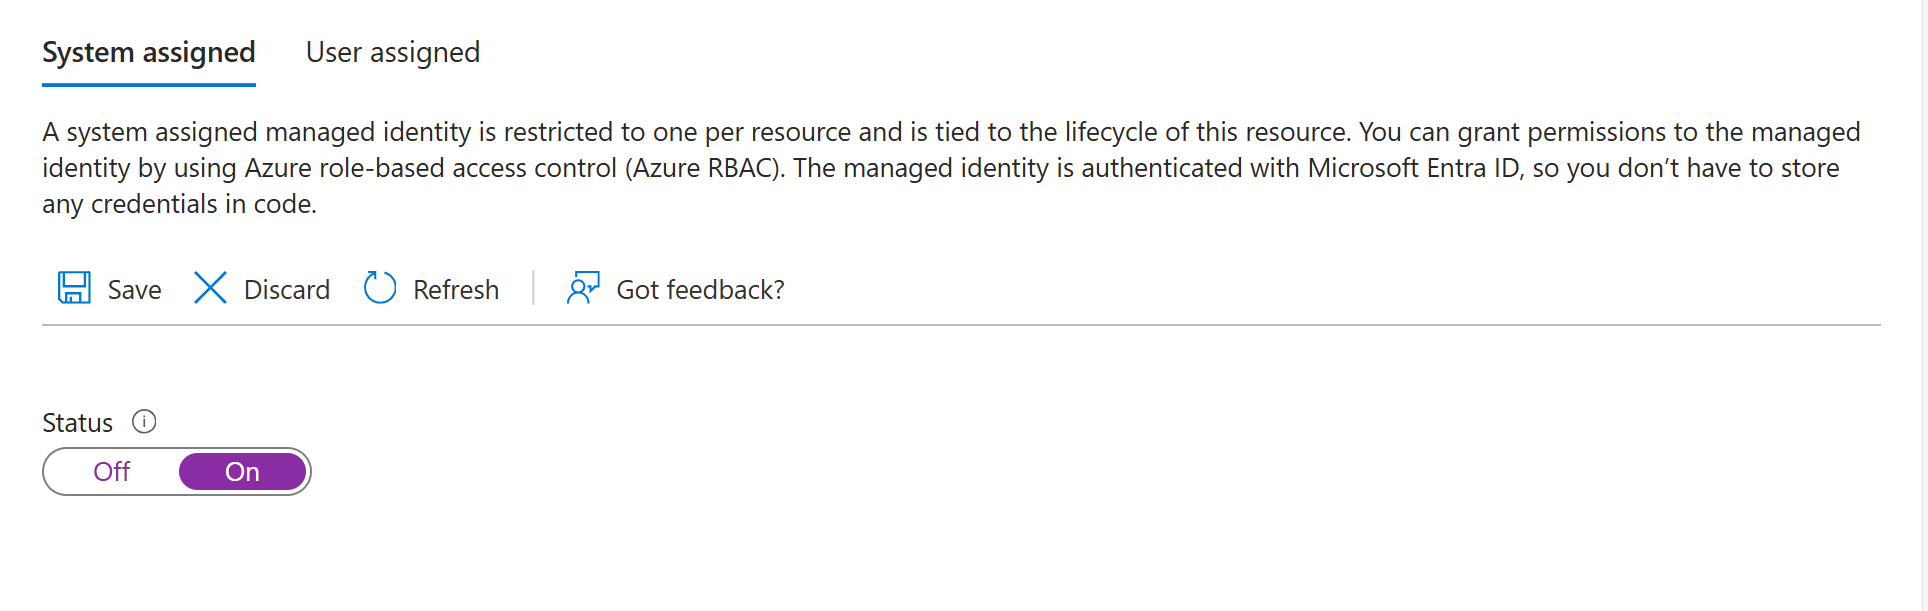
To set up authentication by using Managed Identity:- Make sure your Foundry resource has system assigned managed identity enabled.
- Create a resource for the service you want to connect to through OpenAPI spec.
- Assign proper access to the resource.
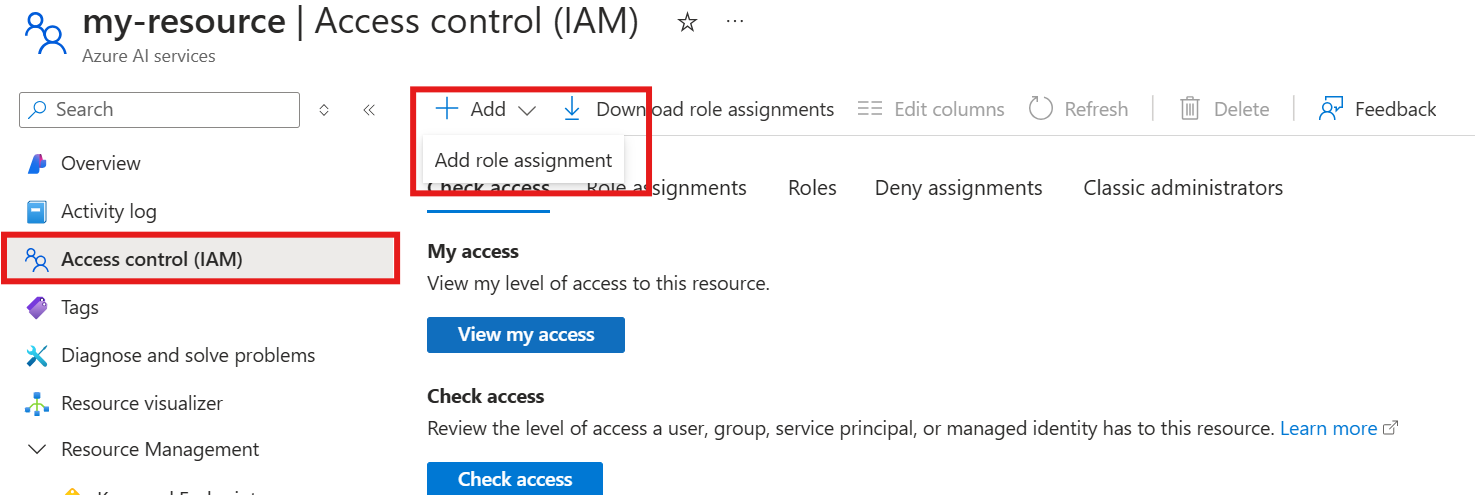
- Select Access Control for your resource.
- Select Add and then add role assignment at the top of the screen.
- Select the least-privileged data-plane or application role that grants the operations in your OpenAPI specification. Azure Resource Manager Reader access alone doesn’t grant data-plane access. Then select Next.
- Select Managed identity and then select select members.
- In the managed identity dropdown menu, search for Foundry Account and then select the Foundry account of your agent.
- Select Finish.
- When you finish the setup, you can continue by using the tool through the Foundry portal, SDK, or REST API. Use the tabs at the top of this article to see code samples.