- Connect to Foundry MCP Server with GitHub Copilot in Visual Studio Code
- Run prompts to test Foundry MCP Server tools and interact with Azure resources
This feature is currently in public preview. This preview is provided without a service-level agreement, and we don’t recommend it for production workloads. Certain features might not be supported or might have constrained capabilities. For more information, see Supplemental Terms of Use for Microsoft Azure Previews.
Prerequisites
- Azure account with an active subscription. If you don’t have one, create a free Azure account.
- A Foundry project. If you don’t have a project, create one with the Microsoft Foundry SDK Quickstart.
- Visual Studio Code (version 1.99 or later).
- A GitHub Copilot subscription (Individual, Business, or Enterprise).
- GitHub Copilot Visual Studio Code extension.
- Contributor or higher role on the Foundry project you want to access.
Install and start Foundry MCP Server
Select an option to install Foundry MCP Server in Visual Studio Code.- User profile
- Workspace install
Install Foundry MCP Server in your user profile so it’s available to all workspaces in Visual Studio Code.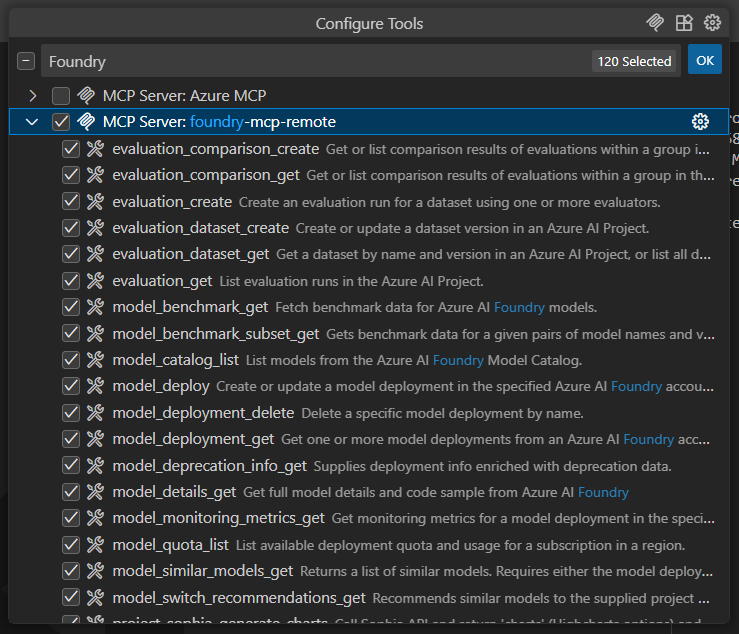
- Open the Command Palette (Ctrl+Shift+P).
- Search for MCP: Add Server.
- Select the HTTP (HTTP or Server-Sent Events) option.
-
Enter
https://mcp.ai.azure.comas the URL. -
Enter a friendly name such as foundry-mcp-remote, then press Enter. Visual Studio Code adds the following server entry under your user profile:
- Open the Command Palette (Ctrl+Shift+P).
- Search for and select MCP: List Servers.
- Select Foundry MCP Server you added and choose Start Server.
- A green indicator appears next to the server name in MCP: List Servers, confirming the connection is active.
- When prompted, sign in to Azure so the MCP server can interact with services in your subscription.
- Open GitHub Copilot and select Agent Mode.
- Select the tools icon, search for Foundry to filter the list, and confirm the server appears.
Use prompts to test Foundry MCP Server
- Open the GitHub Copilot chat panel and confirm Agent Mode is selected.
- Enter a prompt that uses Foundry MCP Server tools—for example Tell me about the latest models on Foundry.
-
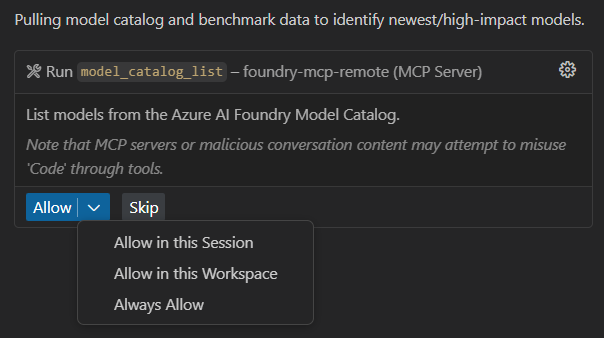
Copilot requests permission to run the required Foundry MCP Server operation. Select Continue or use the arrow to choose a more specific behavior:
- Current session always runs the operation in the current GitHub Copilot Agent Mode session.
- Current workspace always runs the command for the current Visual Studio Code workspace.
- Always allow sets the operation to always run for any GitHub Copilot Agent Mode session or any Visual Studio Code workspace.
-
Explore and test Foundry MCP Server operations with other prompts, such as:
Troubleshooting
If these steps don’t resolve a product or service issue, create an Azure support request. Select Technical for Issue type, Microsoft Foundry for Service, and Foundry MCP Server for Problem type. For documentation feedback, use the feedback controls on this page. For how-to questions, ask the community on Microsoft Q&A.
Clean up resources
To remove the server configuration:- User profile: Open the Command Palette, run MCP: List Servers, select the Foundry server, and choose Remove Server.
- Workspace: Delete the server entry from the
.vscode/mcp.jsonfile in your project folder.