Items marked preview in this article are currently in preview. This preview is provided without a service-level agreement, and Microsoft doesn’t recommend it for production workloads. Certain features might not be supported or might have constrained capabilities. For more information, see Supplemental Terms of Use for Microsoft Azure Previews.
Microsoft Foundry is retiring workflows on December 1, 2026.
If you’re looking to build new workflows, use Microsoft Agent Framework. To migrate existing workflows, see the Migration guide section of this article for all supported paths.
Prerequisites
- An Azure account with an active subscription. If you don’t have one, create a free Azure account, which includes a free trial subscription.
- A project in Microsoft Foundry. For more information, see Create projects.
- Access to create and run workflows in your Foundry project. For more information, see Azure role-based access control (RBAC) in Foundry.
Decide when to use workflows
Workflows are ideal for scenarios where you need to:- Orchestrate multiple agents in a repeatable process.
- Add branching logic (for example, if/else) and variable handling without writing code.
- Create human-in-the-loop steps (for example, approvals or clarifying questions).
Understand workflow patterns
Foundry provides templates for common orchestration patterns. Start with a blank workflow or select a template:
For more information, see Microsoft Agent Framework workflow orchestrations.
Create a workflow
This procedure shows how to create a sequential workflow. The same general steps apply to other workflow types.- Sign in to Microsoft Foundry. Make sure the New Foundry toggle is on. These steps refer to Foundry (new).

- On the upper-right menu, select Build.
- Select Create new workflow > Sequential.
- Assign an agent to the agent nodes by selecting each agent node in the workflow and either selecting the desired agent or creating a new one. For more information, see Add agents later in this article.
- Select Save in the visualizer to save the changes.
Foundry doesn’t save workflows automatically. Select Save after every change to preserve your work.
- Select Run Workflow.
- Interact with the workflow in the chat window.
- Optionally, add new nodes to your workflow. The next section in this article provides information about nodes.
Verify your workflow run
After you select Run Workflow, verify that:- Each node completes in the visualizer.
- You see the expected responses in the chat window.
- Any variables you save (for example, JSON output from an agent node) contain the values you expect.
Add nodes
Nodes are the building blocks of your workflow. Each node performs a specific action in sequence. Common node types include:- Agent: Invoke an agent.
- Logic: Use if/else, go to, or for each.
- Data transformation: Set a variable or parse a value.
- Basic chat: Send a message or ask a question to an agent.
Add agents
Add any Foundry agent from your project to the workflow. Agent nodes also let you create new agents with customized capabilities by configuring their model, prompt, and tools. For advanced agent creation options, go to the Foundry Agent tab in the Foundry portal.Hosted agents aren’t supported in the workflow designer. To coordinate tasks, call other agents, or orchestrate workflows within a Hosted agent, use Microsoft Agent Framework workflows or another agent framework that supports workflow capabilities from your Hosted agent code.
Add an existing agent
- In the workflow visualizer, select the plus sign.
- In the pop-up dropdown list, select Invoke agent.
- In the Create new agent window, select existing.
- Enter the agent name to search for existing agents in your Foundry project.
- Select the desired agent to add it into your workflow.
Create a new agent
- In the workflow visualizer, select the plus sign.
- In the pop-up dropdown list, select Invoke agent.
- Enter an agent name and description of what the agent does.
- Select Add.
- In the Invoke an agent window, configure the agent.
- Select Save.
Configure an output response format
To configure an agent to return structured JSON output:- In the Invoke agent configuration window, select Create a new agent.
-
Configure the agent to send output as a JSON schema:
- Select Details.
- Select the parameter icon.
- For Text format, select JSON Schema.
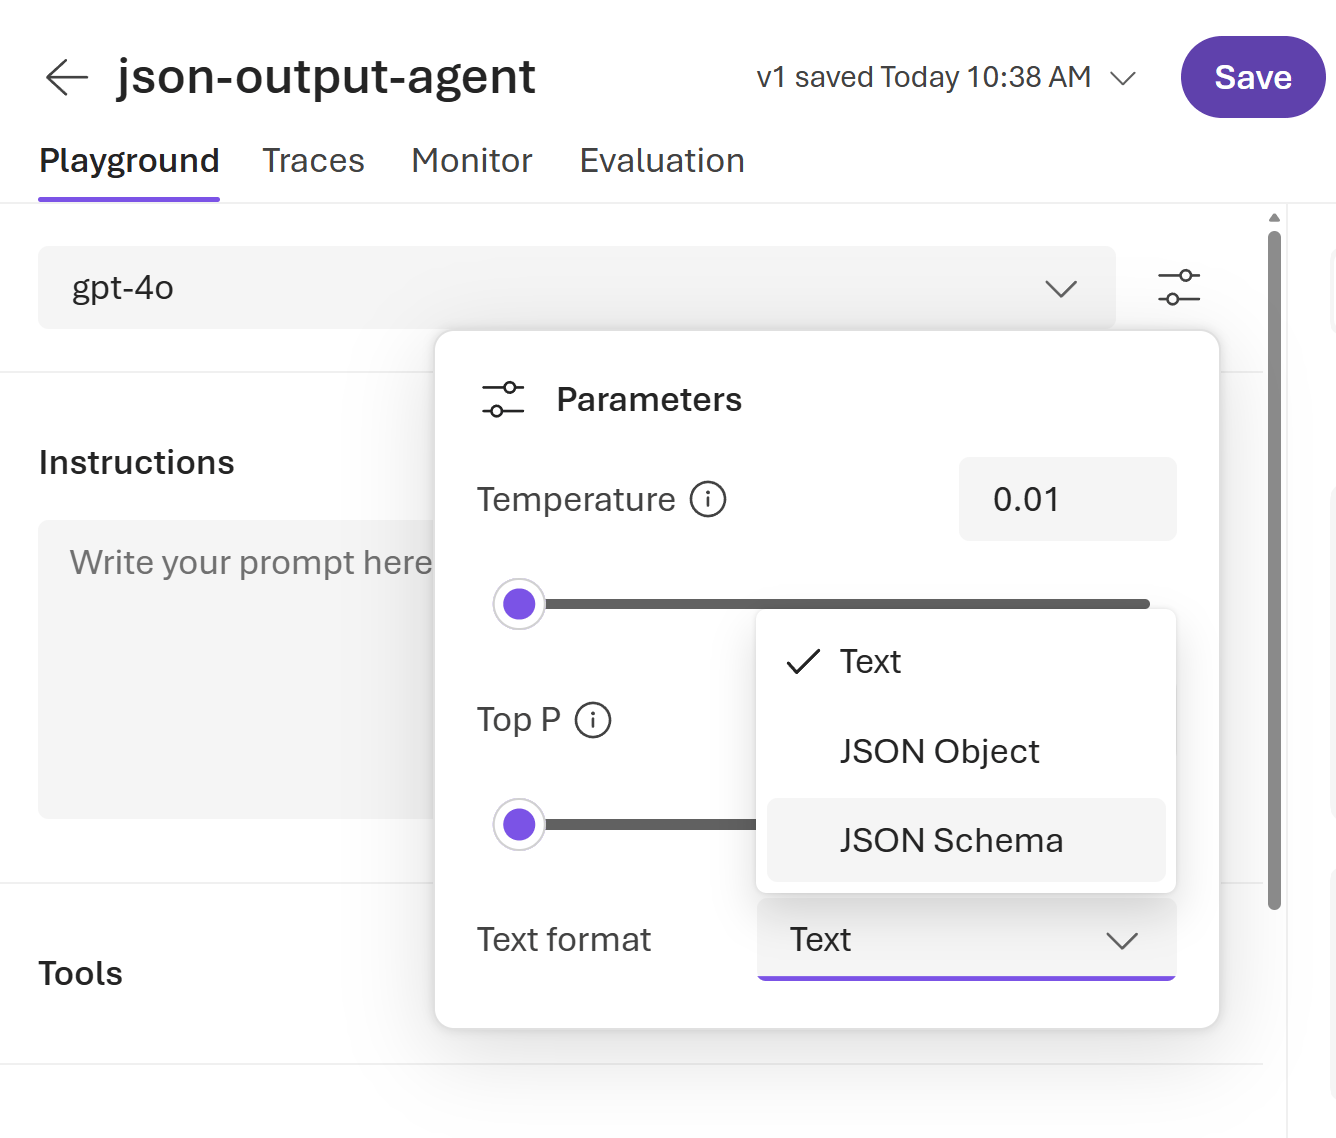
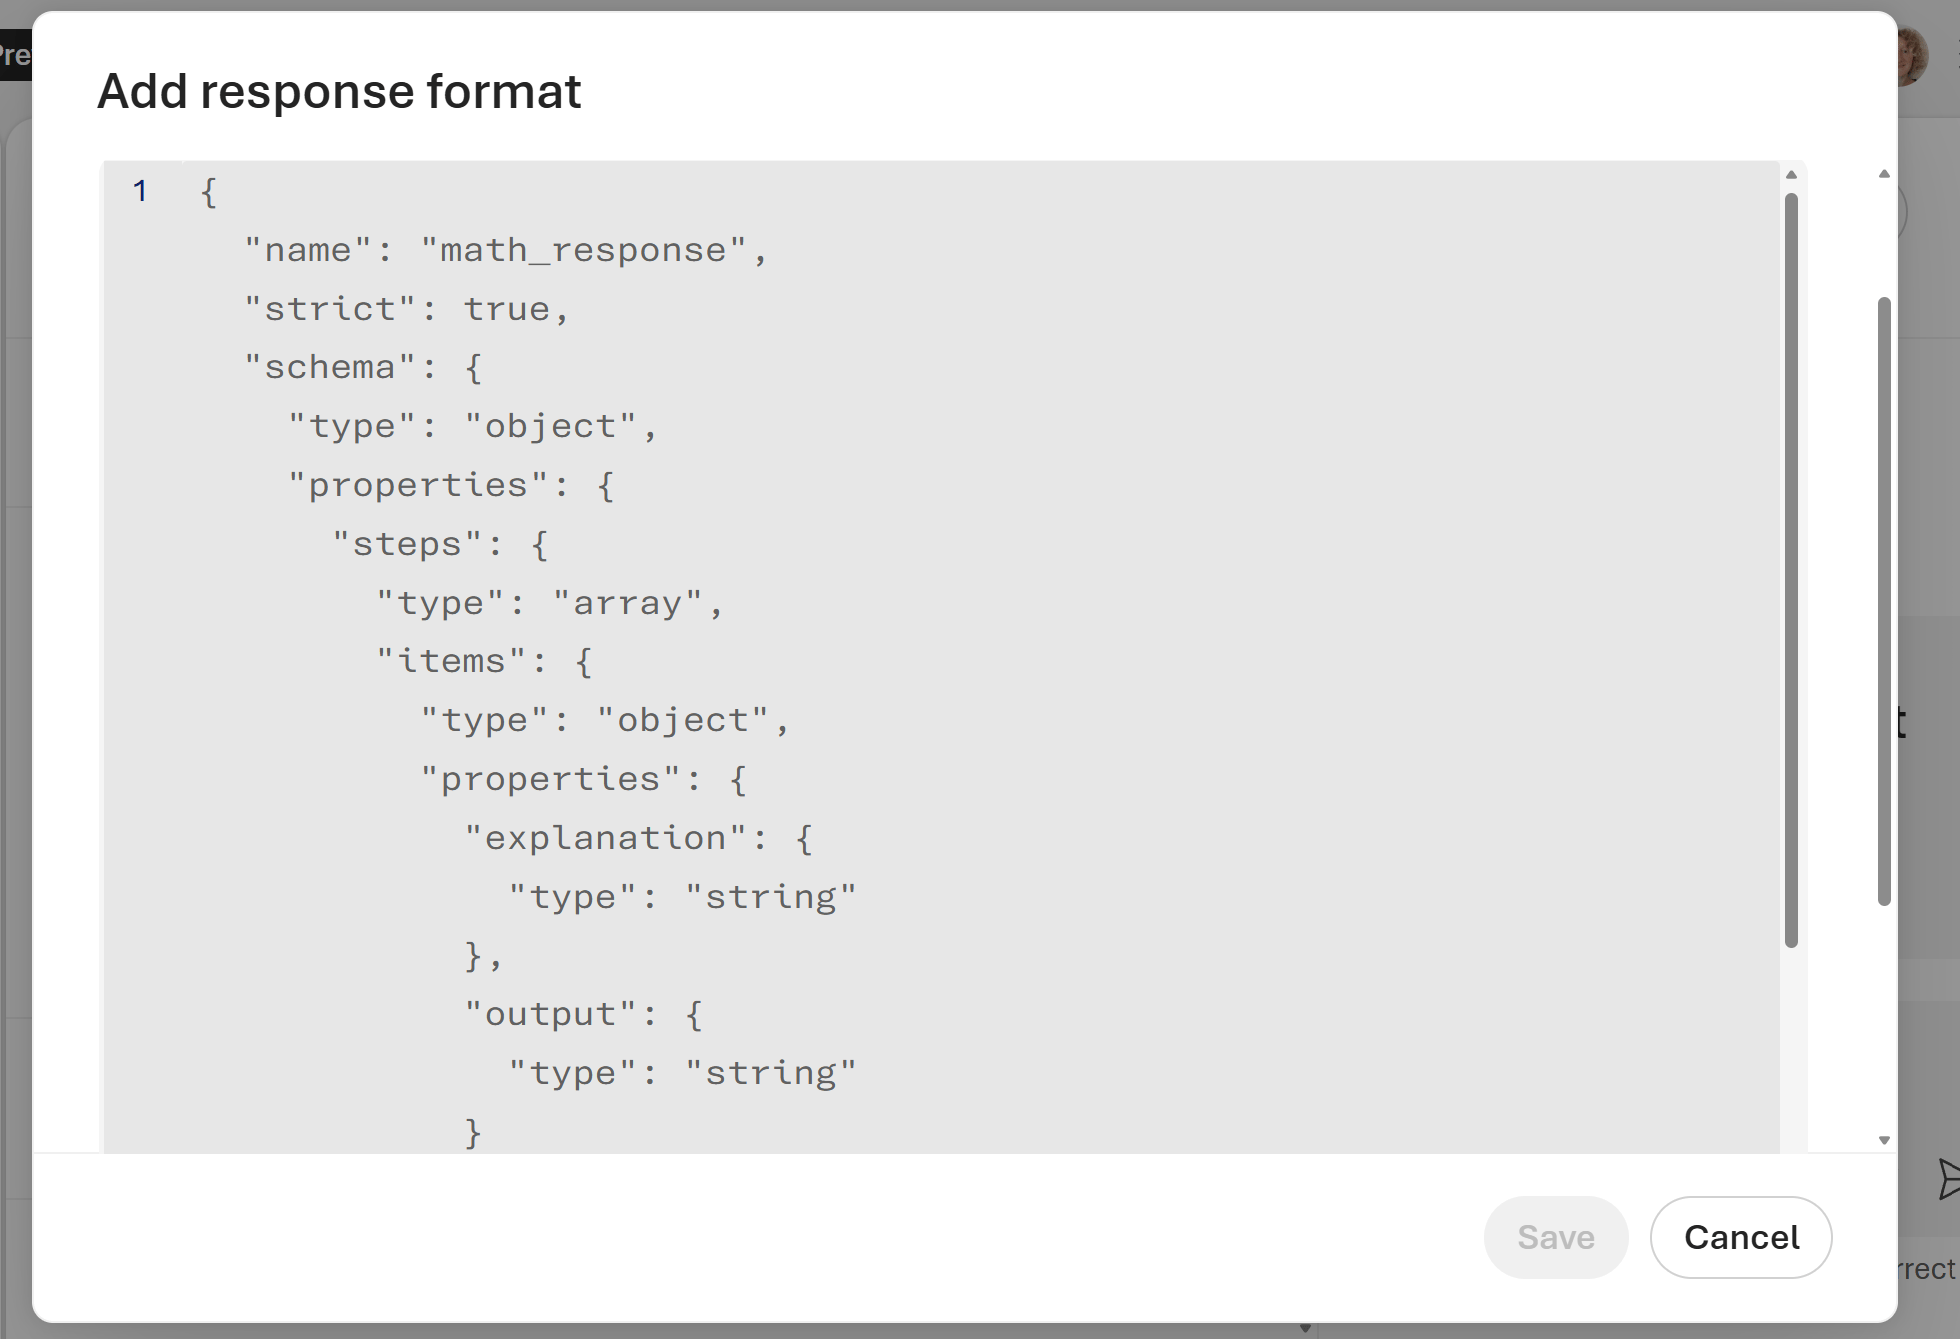
- Copy the desired JSON schema and paste it in the Add response format window. The following screenshot shows a math example. Select Save.
Don’t include secrets (passwords, keys, tokens) in JSON schemas, prompts, or saved workflow variables.
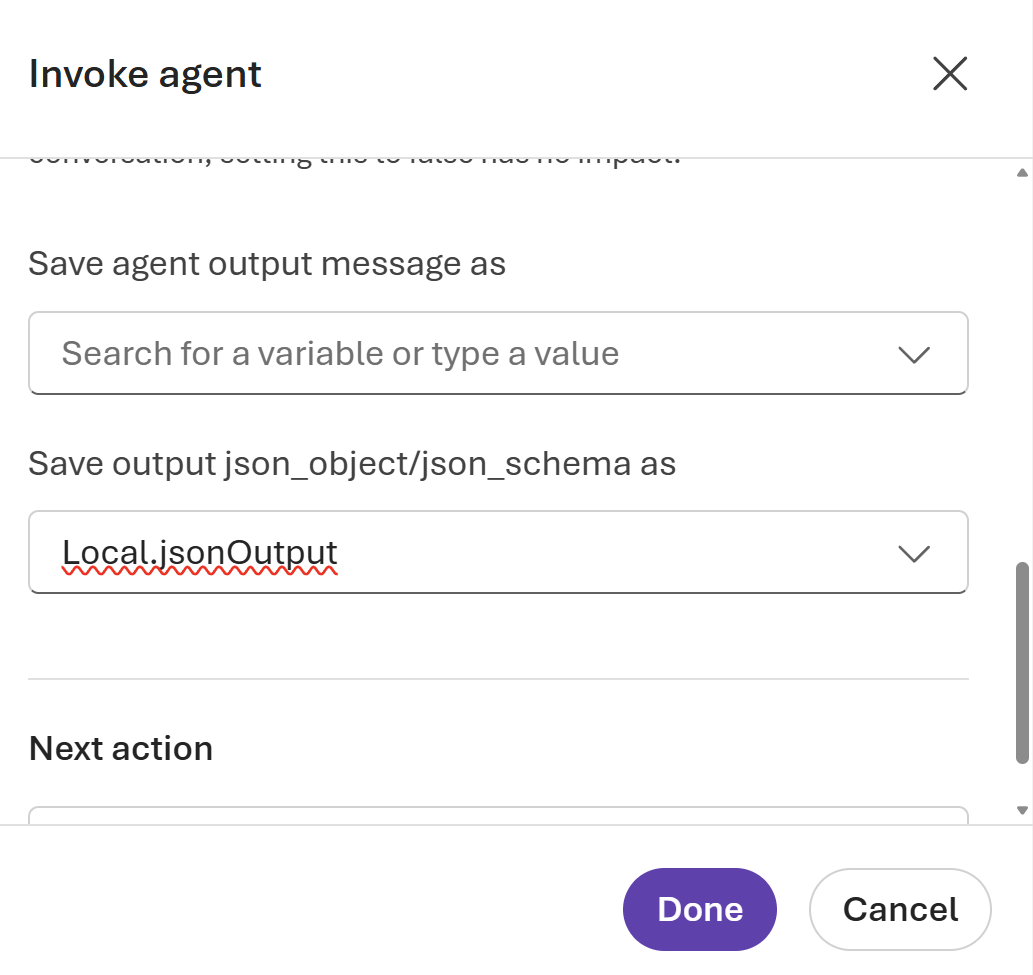
- Select Action settings. Then select Save output json_object/json_schema as.
- Select Create new variable. Choose a variable name, and then select Done.
Configure additional features
- YAML visualizer view: Set the YAML Visualizer View toggle to On to store the workflow as a YAML file. Edit in either the visualizer or the YAML view. Saving creates a new version with full version history. Both the visualizer and YAML are editable. Changes to the YAML file appear immediately in the visualizer.
- Versioning: Each save creates a new, unchangeable version. To view version history or delete older versions, open the Version dropdown list to the left of the Save button.
- Notes: Add notes to the workflow visualizer for extra context. In the upper-left corner of the visualizer, select Add note.
Create expressions with Power Fx
Power Fx is a low-code language that uses Excel-like formulas. Use Power Fx to create complex logic that lets your agents manipulate data. For example, a Power Fx formula can set a variable value, parse a string, or evaluate a condition. For more information, see the Power Fx overview and formula reference.Use variables in a formula
To use a variable in a Power Fx formula, you must add a prefix to its name to indicate the variable’s scope:- For system variables, use
System. - For local variables, use
Local.
Use literal values in a formula
In addition to using variables in a Power Fx formula, you can enter literal values. To use a literal value in a formula, you must enter it in the format that corresponds to its type. The following table lists the data types and the format of their corresponding literal values:Common Power Fx formulas
The following table lists the Power Fx formulas that you can use with each data type.Set a variable with Power Fx
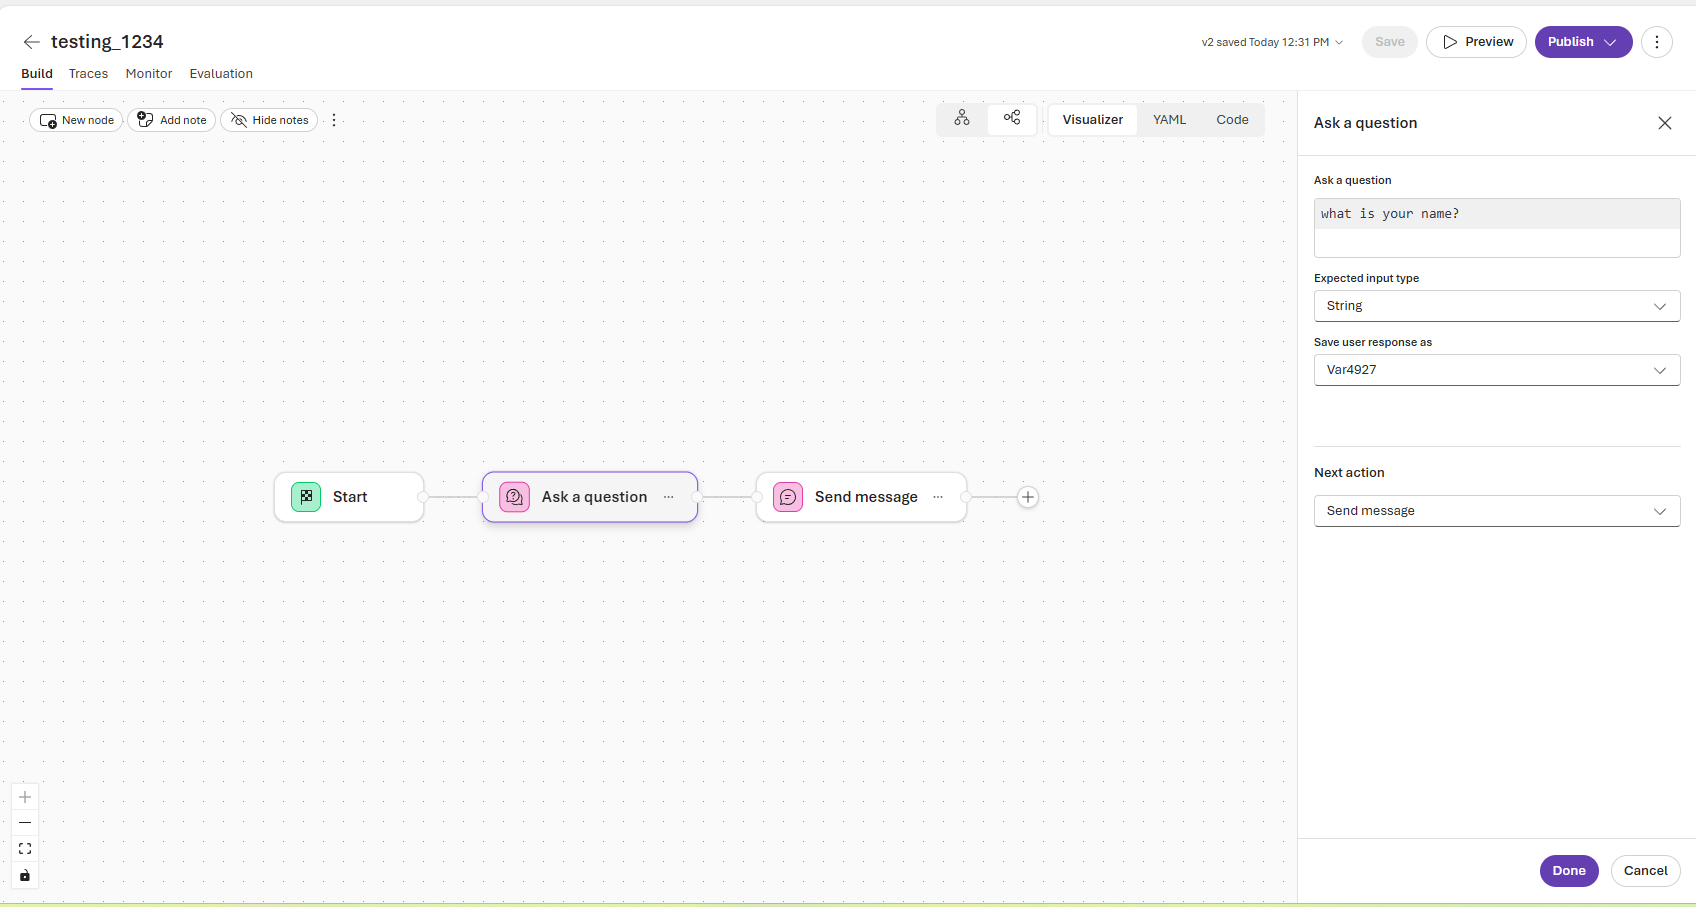
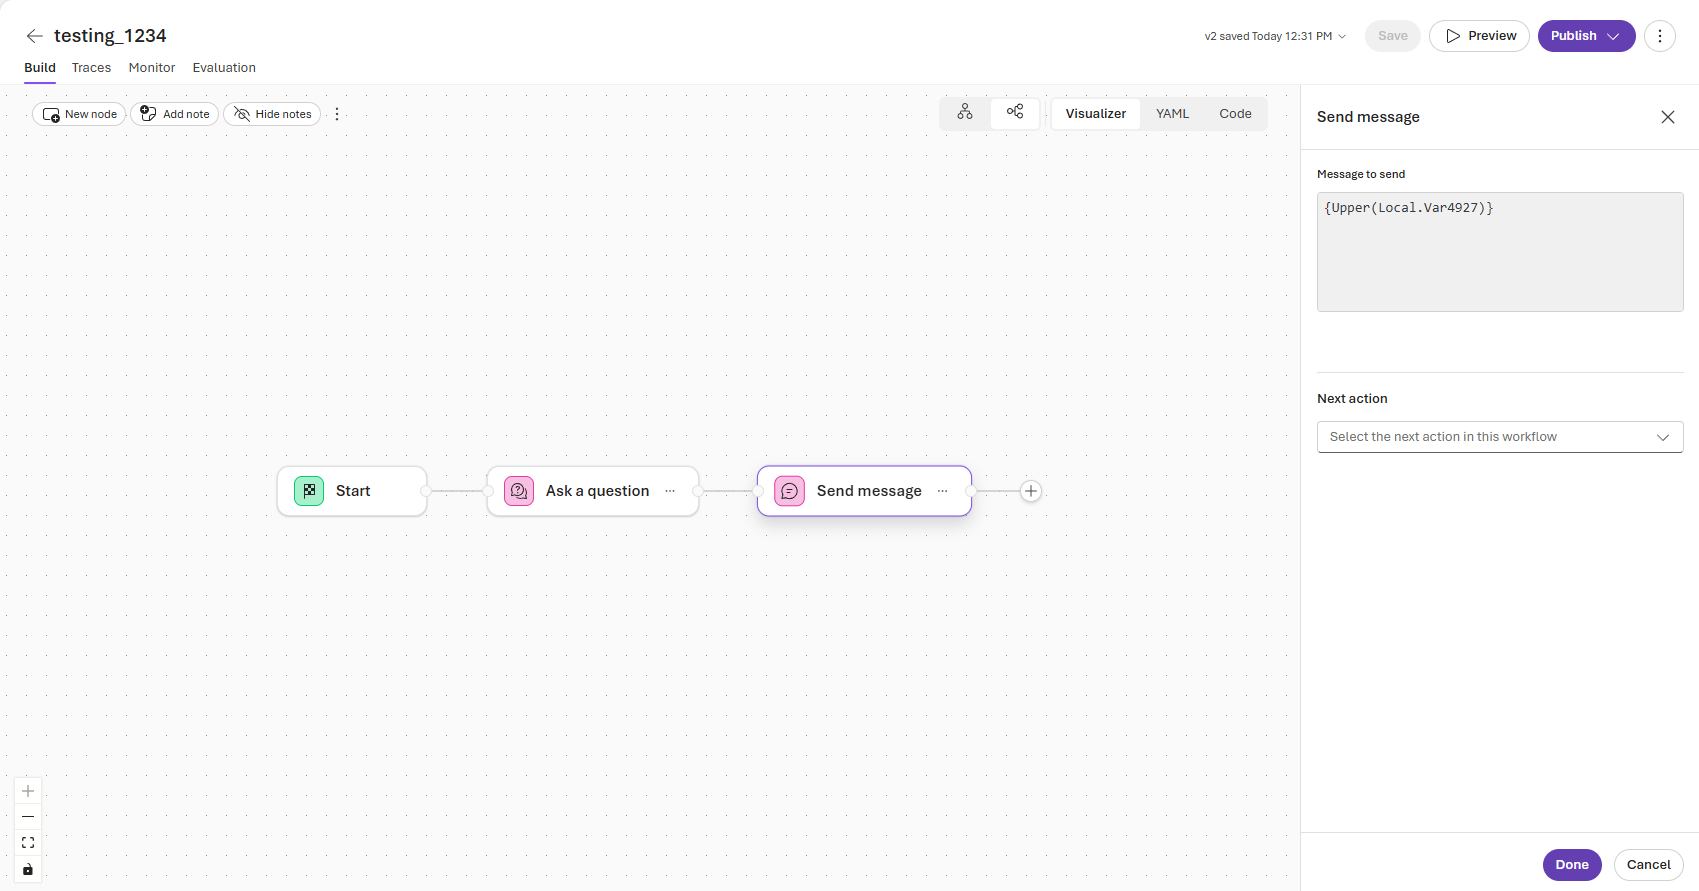
This example shows how to store and output a customer’s name in capital letters:- Create a workflow and add an Ask a question node.
-
On the pane that appears, in the Ask a question box, enter What is your name? or another message. In the Save user response as box, enter a variable name; for example,
Var01. Then select Done.
- Add a Send message action. On the pane that appears, in the Message to send area, enter
{Upper(Local.Var01)}. Then select Done.
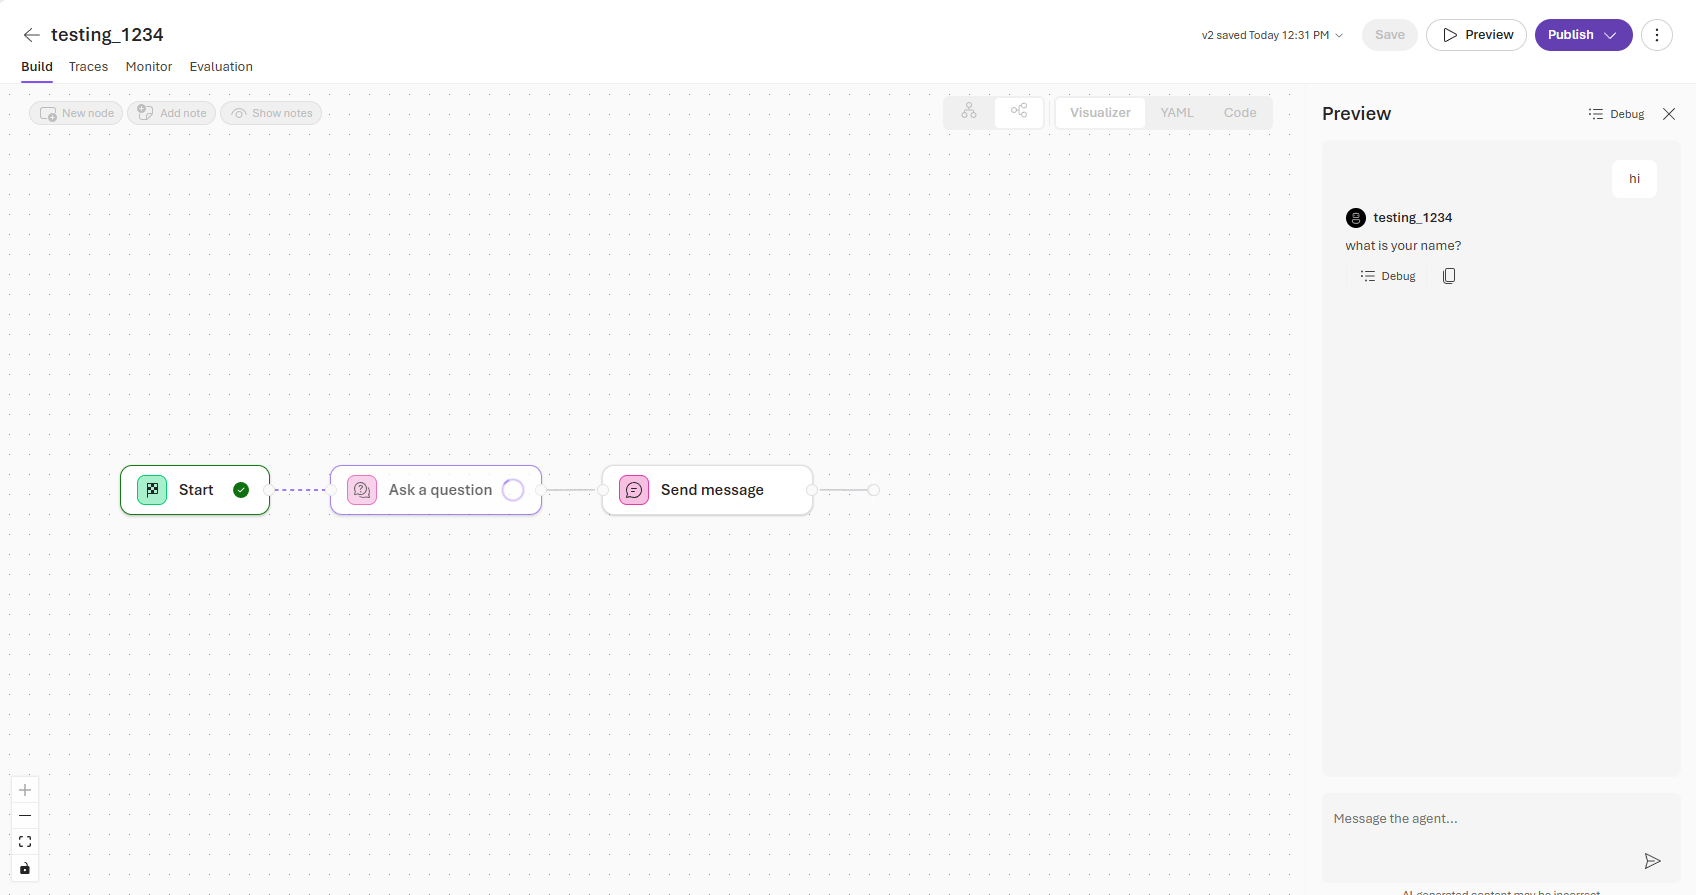
- Select Preview.
- On the preview pane, send a message to the agent to invoke the workflow.
Create if/else flows with Power Fx
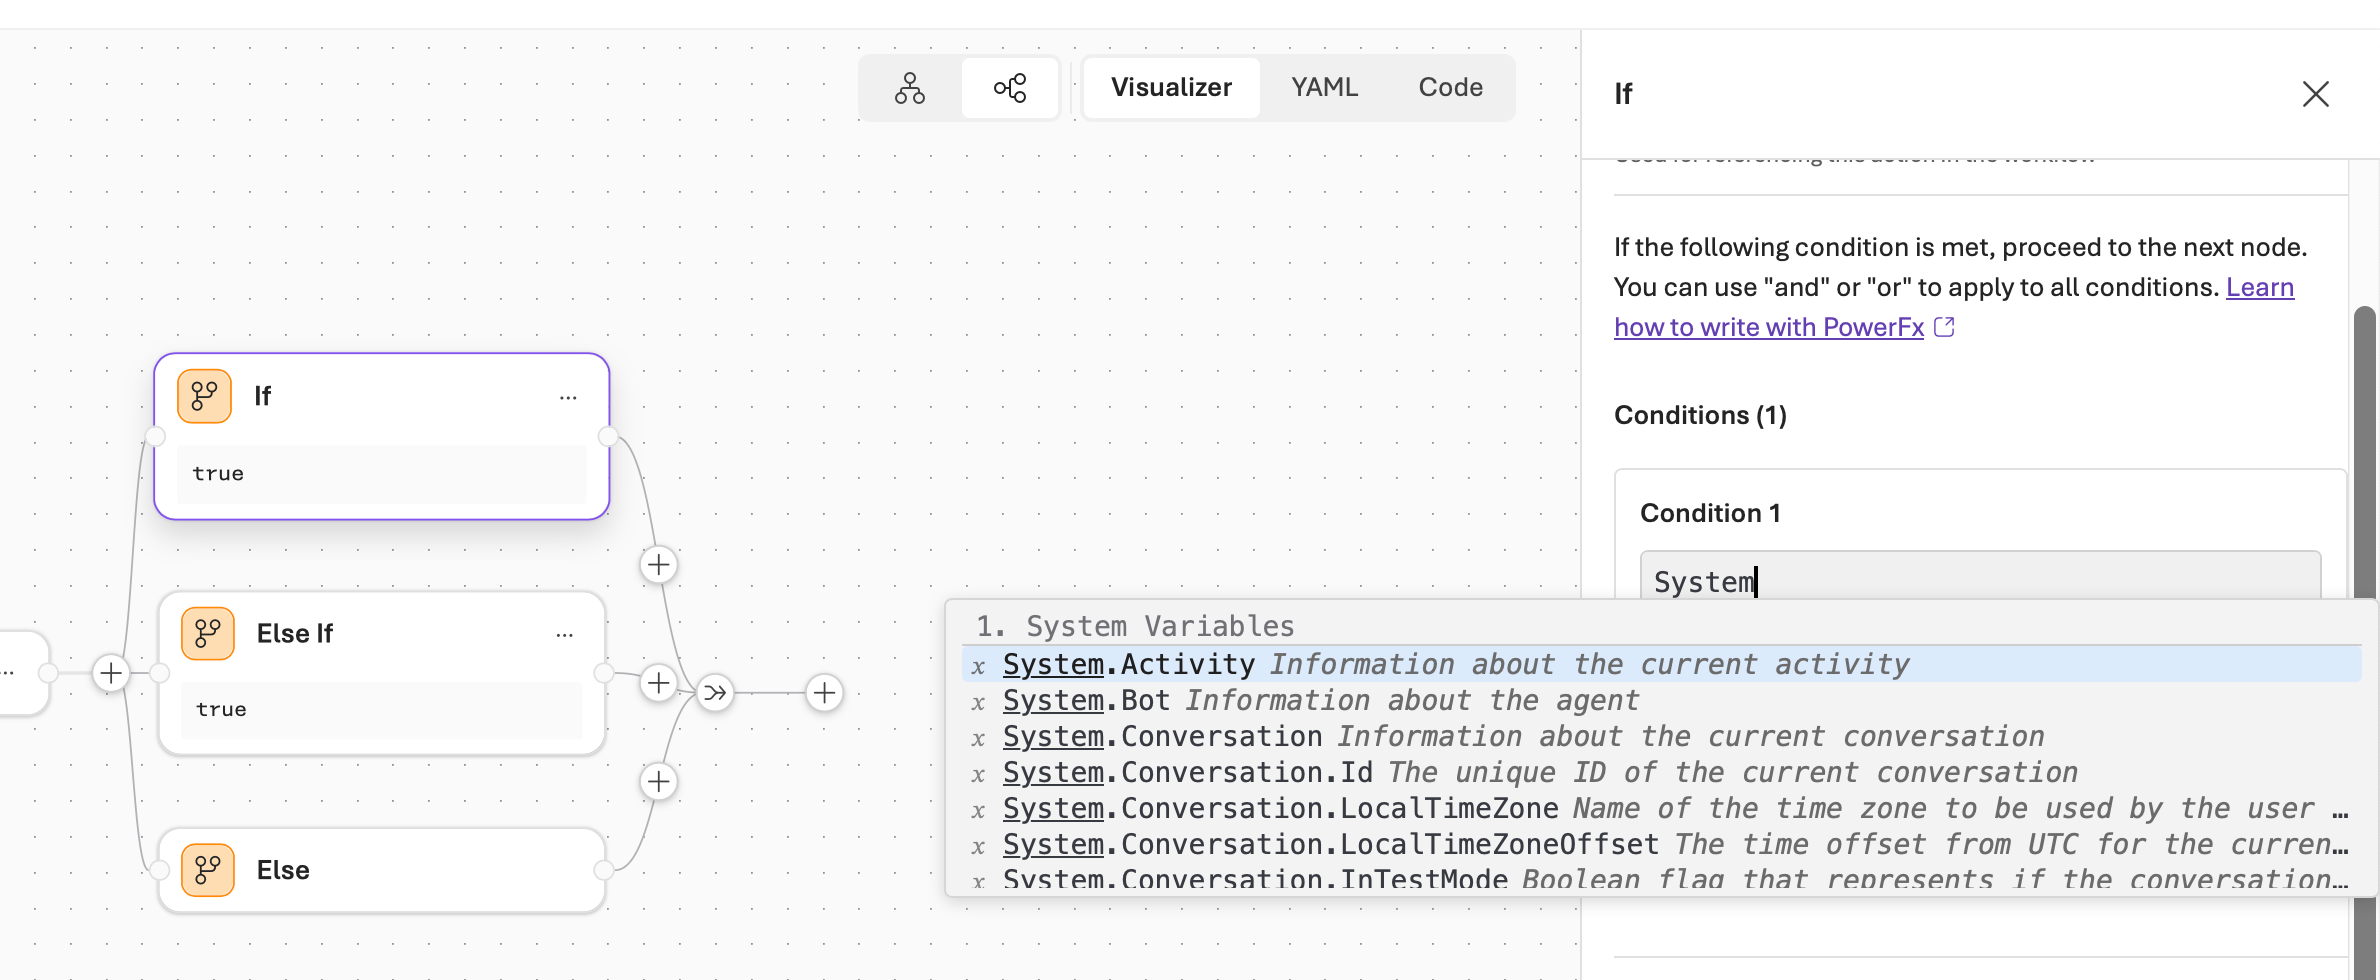
This example shows how to add an if/else flow and build a condition with system variables.- Create a workflow and add an Ask a question node.
- Select the + icon and add an if/else flow.
-
Type
System.in the Condition box to build a condition statement for each if/else branch.
- Select a Next Action for the next step in the workflow.
- Select Done. Select Save to save your workflow.
Troubleshooting
Clean up resources
To delete a workflow you no longer need:- Open the workflow in the Foundry portal.
- Select the Version dropdown list to the left of the Save button.
- Select Delete for the version you want to remove.
Migration guide
Foundry is moving workflow authoring to a code-first model. Visual workflows aren’t disappearing as a capability. The orchestration patterns you built visually (sequential and group-chat coordination, branching logic, and human-in-the-loop steps) are all expressible in code and configuration, so you keep them when you migrate. After December 1, 2026, the visual designer and in-portal workflow execution aren’t supported, but Foundry continues to run YAML-based workflow definitions when you deploy them as a hosted agent. Pick the path that matches how you want to build. Most teams should start with Microsoft Agent Framework.Before you migrate: export your workflow definition
Your workflow’s YAML definition is the portable artifact you carry to any of the paths below. Save it before the designer is retired:- Open your workflow in the Foundry workflow designer.
- Switch to the YAML view to see the full configuration.
- Copy or export the YAML file so you can reuse it in your new environment.
Option 1: Microsoft Agent Framework (recommended)
Use Microsoft Agent Framework for most workflows. The orchestration you build visually maps directly onto Agent Framework, which supports the same patterns through declarative YAML or code-first authoring. In many cases, you can bring your exported workflow YAML into an Agent Framework project and run it with minimal changes. Then, keep iterating in Visual Studio Code instead of the portal. Because workflows are no longer a separate agent type, you run the result by deploying it as a hosted agent—the same managed runtime that hosts your other code-based agents.- Build and run workflows: Microsoft Agent Framework workflows
- Reuse your exported YAML with declarative workflows: Declarative workflows overview
- Deploy to Foundry as a hosted agent: Foundry-hosted agents
Option 2: Azure Logic Apps
If a visual designer is the main reason you use workflows, Azure Logic Apps gives you a fully featured, low-code canvas for orchestration and can call Foundry agents as steps. Azure Logic Apps lets you combine deterministic steps, including prebuilt built-in actions, APIs, and MCP servers, with the probabilistic reasoning of Foundry agents in the same run. You can adopt agents incrementally and enrich processes you already have, rather than rebuild them from scratch.- Build automated workflows with the visual designer: Azure Logic Apps overview
- Call and orchestrate Foundry agents from a workflow: Automate Foundry agents with workflows in Azure Logic Apps