;
};
export const ZoneContent = ({group, value, options = [], values = [], defaultValue, children}) => {
const optionKey = options.map(option => `${option.id}:${option.title}`).join("|");
const [activePivot, setActivePivot] = useState(defaultValue || values[0]);
const slugify = value => value.toLowerCase().replace(/[^a-z0-9]+/g, "-").replace(/^-|-$/g, "");
const resolvePivot = () => {
if (typeof window === "undefined") return defaultValue || values[0];
const params = new URLSearchParams(window.location.search);
const requested = params.get("pivots");
if (requested) {
const requestedIds = requested.split(",").map(value => value.trim()).filter(Boolean);
const match = requestedIds.find(id => values.includes(id));
if (match) return match;
}
const hash = window.location.hash.replace(/^#/, "");
if (hash) {
const match = options.find(option => option.id === hash || slugify(option.title) === hash);
if (match) return match.id;
}
try {
const stored = window.localStorage.getItem(`foundry-zone-pivot:${group}`);
if (values.includes(stored)) return stored;
} catch {
return defaultValue || values[0];
}
return defaultValue || values[0];
};
useEffect(() => {
setActivePivot(resolvePivot());
}, [group, defaultValue, values.join("|"), optionKey]);
useEffect(() => {
const onPivotChange = event => {
if (event.detail?.group === group && values.includes(event.detail.value)) {
setActivePivot(event.detail.value);
}
};
window.addEventListener("foundry-zone-pivot-change", onPivotChange);
return () => window.removeEventListener("foundry-zone-pivot-change", onPivotChange);
}, [group, values.join("|")]);
if (activePivot !== value) return null;
return <>{children};
};
In this quickstart, you transcribe speech to text using the [Azure OpenAI Whisper model](../../../ai-services/speech-service/whisper-overview). The Whisper model can transcribe human speech in numerous languages and translate other languages into English.
This quickstart takes approximately 10-15 minutes to complete.
## Prerequisites
* An Azure subscription - [Create one for free](https://azure.microsoft.com/pricing/purchase-options/azure-account?cid=msft_learn).
* An Azure OpenAI resource with a speech to text model deployed in a [supported region](../../foundry-models/concepts/models-sold-directly-by-azure). For more information, see [Create a resource and deploy a model with Azure OpenAI](https://learn.microsoft.com/en-us/azure/foundry-classic/openai/how-to/create-resource).
* Be sure that you are assigned at least the [Cognitive Services Contributor](https://learn.microsoft.com/en-us/azure/foundry-classic/openai/how-to/role-based-access-control#cognitive-services-contributor) role for the Azure OpenAI resource.
* A sample audio file. You can get sample audio, such as *wikipediaOcelot.wav*, from the [Azure Speech in Foundry Tools SDK repository at GitHub](https://github.com/Azure-Samples/cognitive-services-speech-sdk/tree/master/sampledata/audiofiles).
## Setup
### Retrieve key and endpoint
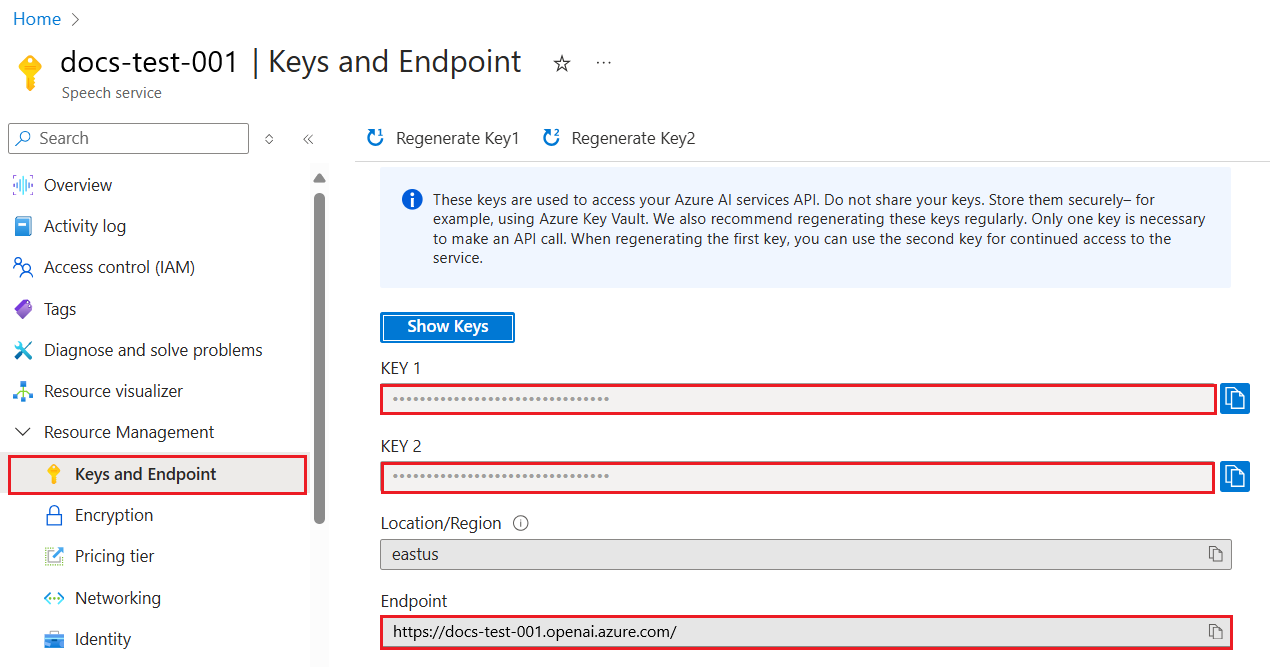
To successfully make a call against Azure OpenAI, you need an *endpoint* and a *key*.
| Variable name | Value |
| ----------------------- | ---------------------------------------------------------------------------------------------------------------------------------------------------------------------------------------------------------------------------------------------------------------------------------------------- |
| `AZURE_OPENAI_ENDPOINT` | The service endpoint can be found in the **Keys & Endpoint** section when examining your resource from the Azure portal. Alternatively, you can find the endpoint via the **Deployments** page in Microsoft Foundry portal. An example endpoint is: `https://docs-test-001.openai.azure.com/`. |
| `AZURE_OPENAI_API_KEY` | This value can be found in the **Keys & Endpoint** section when examining your resource from the Azure portal. You can use either `KEY1` or `KEY2`. |
Go to your resource in the Azure portal. The **Endpoint and Keys** can be found in the **Resource Management** section. Copy your endpoint and access key as you need both for authenticating your API calls. You can use either `KEY1` or `KEY2`. Always having two keys allows you to securely rotate and regenerate keys without causing a service disruption.
### Environment variables
Create and assign persistent environment variables for your key and endpoint.
```CMD Command Line theme={null}
setx AZURE_OPENAI_API_KEY "REPLACE_WITH_YOUR_KEY_VALUE_HERE"
```
```CMD Command Line theme={null}
setx AZURE_OPENAI_ENDPOINT "REPLACE_WITH_YOUR_ENDPOINT_HERE"
```
```powershell PowerShell theme={null}
[System.Environment]::SetEnvironmentVariable('AZURE_OPENAI_API_KEY', 'REPLACE_WITH_YOUR_KEY_VALUE_HERE', 'User')
```
```powershell PowerShell theme={null}
[System.Environment]::SetEnvironmentVariable('AZURE_OPENAI_ENDPOINT', 'REPLACE_WITH_YOUR_ENDPOINT_HERE', 'User')
```
```Bash Bash theme={null}
echo export AZURE_OPENAI_API_KEY="REPLACE_WITH_YOUR_KEY_VALUE_HERE" >> /etc/environment && source /etc/environment
```
```Bash Bash theme={null}
echo export AZURE_OPENAI_ENDPOINT="REPLACE_WITH_YOUR_ENDPOINT_HERE" >> /etc/environment && source /etc/environment
```
## Create a REST API request and response
In a bash shell, run the following command. You need to replace `YourDeploymentName` with the deployment name you chose when you deployed the Whisper model. The deployment name isn't necessarily the same as the model name. Entering the model name results in an error unless you chose a deployment name that's identical to the underlying model name.
```bash theme={null}
curl $AZURE_OPENAI_ENDPOINT/openai/deployments/YourDeploymentName/audio/transcriptions?api-version=2024-02-01 \
-H "api-key: $AZURE_OPENAI_API_KEY" \
-H "Content-Type: multipart/form-data" \
-F file="@./wikipediaOcelot.wav"
```
The first line of the preceding command with an example endpoint would appear as follows:
```bash theme={null}
curl https://aoai-docs.openai.azure.com/openai/deployments/{YourDeploymentName}/audio/transcriptions?api-version=2024-02-01 \
```
For production, store and access your credentials using a secure method, such as [Azure Key Vault](https://learn.microsoft.com/azure/key-vault/general/overview). For more information, see [credential security](../../../ai-services/security-features).
## Verify the output
The response contains a `text` field with the complete transcription of your audio file. You should see output similar to the example below. If you encounter errors:
* Verify your deployment name matches exactly
* Check that your audio file path is correct
* Ensure your API key and endpoint are valid
## Output
```bash theme={null}
{"text":"The ocelot, Lepardus paradalis, is a small wild cat native to the southwestern United States, Mexico, and Central and South America. This medium-sized cat is characterized by solid black spots and streaks on its coat, round ears, and white neck and undersides. It weighs between 8 and 15.5 kilograms, 18 and 34 pounds, and reaches 40 to 50 centimeters 16 to 20 inches at the shoulders. It was first described by Carl Linnaeus in 1758. Two subspecies are recognized, L. p. paradalis and L. p. mitis. Typically active during twilight and at night, the ocelot tends to be solitary and territorial. It is efficient at climbing, leaping, and swimming. It preys on small terrestrial mammals such as armadillo, opossum, and lagomorphs."}
```
## Prerequisites
* An Azure subscription. You can [create one for free](https://azure.microsoft.com/pricing/purchase-options/azure-account?cid=msft_learn).
* An Azure OpenAI resource with a speech to text model deployed in a [supported region](../../foundry-models/concepts/models-sold-directly-by-azure). For more information, see [Create a resource and deploy a model with Azure OpenAI](https://learn.microsoft.com/en-us/azure/foundry-classic/openai/how-to/create-resource).
* [Python 3.8 or later](https://www.python.org)
* The [Azure CLI](https://learn.microsoft.com/cli/azure/install-azure-cli).
* A sample audio file. You can get sample audio, such as *wikipediaOcelot.wav*, from the [Azure Speech in Foundry Tools SDK repository at GitHub](https://github.com/Azure-Samples/cognitive-services-speech-sdk/tree/master/sampledata/audiofiles).
## Setup
### Retrieve key and endpoint
To successfully make a call against Azure OpenAI, you need an *endpoint* and a *key*.
| Variable name | Value |
| ----------------------- | ---------------------------------------------------------------------------------------------------------------------------------------------------------------------------------------------------------------------------------------------------------------------------------------------- |
| `AZURE_OPENAI_ENDPOINT` | The service endpoint can be found in the **Keys & Endpoint** section when examining your resource from the Azure portal. Alternatively, you can find the endpoint via the **Deployments** page in Microsoft Foundry portal. An example endpoint is: `https://docs-test-001.openai.azure.com/`. |
| `AZURE_OPENAI_API_KEY` | This value can be found in the **Keys & Endpoint** section when examining your resource from the Azure portal. You can use either `KEY1` or `KEY2`. |
Go to your resource in the Azure portal. The **Endpoint and Keys** can be found in the **Resource Management** section. Copy your endpoint and access key as you'll need both for authenticating your API calls. You can use either `KEY1` or `KEY2`. Always having two keys allows you to securely rotate and regenerate keys without causing a service disruption.
### Environment variables
Create and assign persistent environment variables for your key and endpoint.
```CMD Command Line theme={null}
setx AZURE_OPENAI_API_KEY "REPLACE_WITH_YOUR_KEY_VALUE_HERE"
```
```CMD Command Line theme={null}
setx AZURE_OPENAI_ENDPOINT "REPLACE_WITH_YOUR_ENDPOINT_HERE"
```
```powershell PowerShell theme={null}
[System.Environment]::SetEnvironmentVariable('AZURE_OPENAI_API_KEY', 'REPLACE_WITH_YOUR_KEY_VALUE_HERE', 'User')
```
```powershell PowerShell theme={null}
[System.Environment]::SetEnvironmentVariable('AZURE_OPENAI_ENDPOINT', 'REPLACE_WITH_YOUR_ENDPOINT_HERE', 'User')
```
```Bash Bash theme={null}
echo export AZURE_OPENAI_API_KEY="REPLACE_WITH_YOUR_KEY_VALUE_HERE" >> /etc/environment && source /etc/environment
```
```Bash Bash theme={null}
echo export AZURE_OPENAI_ENDPOINT="REPLACE_WITH_YOUR_ENDPOINT_HERE" >> /etc/environment && source /etc/environment
```
**Passwordless authentication is recommended**
For passwordless authentication, you need to:
1. Use the `azure-identity` package (`pip install azure-identity`).
2. Assign the `Cognitive Services User` role to your user account. This can be done in the Azure portal under **Access control (IAM)** > **Add role assignment**.
3. Sign in with the Azure CLI such as `az login`.
## Create a Python environment
Create a new directory for your project and navigate to it from a terminal or command prompt.
```Bash theme={null}
mkdir whisper-quickstart; cd whisper-quickstart
```
Create and activate a virtual environment for this project.
```powershell Windows theme={null}
python -m venv .venv
.venv\Scripts\activate
```
```Bash macOS/Linux theme={null}
python3 -m venv .venv
source .venv/bin/activate
```
Install the OpenAI Python client library with:
```console theme={null}
pip install openai
```
The OpenAI Python library version `0.28.1` is deprecated. We recommend using `1.x`. Consult our [migration guide](https://learn.microsoft.com/en-us/azure/foundry-classic/openai/how-to/migration) for information on moving from `0.28.1` to `1.x`.
```console theme={null}
pip install openai==0.28.1
```
## Create the Python app
1. Create a new Python file called *quickstart.py*. Then open it up in your preferred editor or IDE.
2. Replace the contents of *quickstart.py* with the following code. Modify the code to add your deployment name:
```python OpenAI Python 1.x theme={null}
import os
from openai import AzureOpenAI
client = AzureOpenAI(
api_key=os.getenv("AZURE_OPENAI_API_KEY"),
api_version="2024-02-01",
azure_endpoint = os.getenv("AZURE_OPENAI_ENDPOINT")
)
deployment_id = "YOUR-DEPLOYMENT-NAME-HERE" #This will correspond to the custom name you chose for your deployment when you deployed a model."
audio_test_file = "./wikipediaOcelot.wav"
result = client.audio.transcriptions.create(
file=open(audio_test_file, "rb"),
model=deployment_id
)
print(result)
```
```python OpenAI Python 0.28.1 theme={null}
import openai
import time
import os
openai.api_key = os.getenv("AZURE_OPENAI_API_KEY")
openai.api_base = os.getenv("AZURE_OPENAI_ENDPOINT") # your endpoint should look like the following https://YOUR_RESOURCE_NAME.openai.azure.com/
openai.api_type = "azure"
openai.api_version = "2024-02-01"
model_name = "whisper"
deployment_id = "YOUR-DEPLOYMENT-NAME-HERE" #This will correspond to the custom name you chose for your deployment when you deployed a model."
audio_language="en"
audio_test_file = "./wikipediaOcelot.wav"
result = openai.Audio.transcribe(
file=open(audio_test_file, "rb"),
model=model_name,
deployment_id=deployment_id
)
print(result)
```
Run the application using the `python` command on your quickstart file:
```python theme={null}
python quickstart.py
```
For production, store and access your credentials using a secure method, such as [Azure Key Vault](https://learn.microsoft.com/azure/key-vault/general/overview). For more information, see [credential security](../../../ai-services/security-features).
## Verify the output
The response contains a `text` field with the complete transcription of your audio file. You should see output similar to the example below. If you encounter errors:
* Verify your deployment name matches exactly
* Check that your audio file path is correct
* Ensure your API key and endpoint are valid
## Output
```python theme={null}
{"text":"The ocelot, Lepardus paradalis, is a small wild cat native to the southwestern United States, Mexico, and Central and South America. This medium-sized cat is characterized by solid black spots and streaks on its coat, round ears, and white neck and undersides. It weighs between 8 and 15.5 kilograms, 18 and 34 pounds, and reaches 40 to 50 centimeters 16 to 20 inches at the shoulders. It was first described by Carl Linnaeus in 1758. Two subspecies are recognized, L. p. paradalis and L. p. mitis. Typically active during twilight and at night, the ocelot tends to be solitary and territorial. It is efficient at climbing, leaping, and swimming. It preys on small terrestrial mammals such as armadillo, opossum, and lagomorphs."}
```
## Prerequisites
* An Azure subscription. You can [create one for free](https://azure.microsoft.com/pricing/purchase-options/azure-account?cid=msft_learn).
* An Azure OpenAI resource with a speech to text model deployed in a [supported region](../../foundry-models/concepts/models-sold-directly-by-azure). For more information, see [Create a resource and deploy a model with Azure OpenAI](https://learn.microsoft.com/en-us/azure/foundry-classic/openai/how-to/create-resource).
* [The .NET 8.0 SDK](https://dotnet.microsoft.com/en-us/download)
### Microsoft Entra ID prerequisites
For the recommended keyless authentication with Microsoft Entra ID, you need to:
* Install the [Azure CLI](https://learn.microsoft.com/cli/azure/install-azure-cli) used for keyless authentication with Microsoft Entra ID.
* Assign the `Cognitive Services User` role to your user account. You can assign roles in the Azure portal under **Access control (IAM)** > **Add role assignment**.
## Setup
1. Create a new folder `whisper-quickstart` and go to the quickstart folder with the following command:
```shell theme={null}
mkdir whisper-quickstart && cd whisper-quickstart
```
2. Create a new console application with the following command:
```shell theme={null}
dotnet new console
```
3. Install the [OpenAI .NET client library](https://www.nuget.org/packages/Azure.AI.OpenAI/) with the [dotnet add package](https://learn.microsoft.com/dotnet/core/tools/dotnet-add-package) command:
```console theme={null}
dotnet add package Azure.AI.OpenAI
```
4. For the **recommended** keyless authentication with Microsoft Entra ID, install the [Azure.Identity](https://www.nuget.org/packages/Azure.Identity) package with:
```console theme={null}
dotnet add package Azure.Identity
```
5. For the **recommended** keyless authentication with Microsoft Entra ID, sign in to Azure with the following command:
```console theme={null}
az login
```
## Retrieve resource information
You need to retrieve the following information to authenticate your application with your Azure OpenAI resource:
| Variable name | Value |
| ------------------------------ | --------------------------------------------------------------------------------------------------------------------------------------------------------------------------------------------------------- |
| `AZURE_OPENAI_ENDPOINT` | This value can be found in the **Keys and Endpoint** section when examining your resource from the Azure portal. |
| `AZURE_OPENAI_DEPLOYMENT_NAME` | This value will correspond to the custom name you chose for your deployment when you deployed a model. This value can be found under **Resource Management** > **Model Deployments** in the Azure portal. |
Learn more about [keyless authentication](https://learn.microsoft.com/azure/ai-services/authentication) and [setting environment variables](https://learn.microsoft.com/azure/ai-services/cognitive-services-environment-variables).
| Variable name | Value |
| ------------------------------ | --------------------------------------------------------------------------------------------------------------------------------------------------------------------------------------------------------- |
| `AZURE_OPENAI_ENDPOINT` | This value can be found in the **Keys and Endpoint** section when examining your resource from the Azure portal. |
| `AZURE_OPENAI_API_KEY` | This value can be found in the **Keys and Endpoint** section when examining your resource from the Azure portal. You can use either `KEY1` or `KEY2`. |
| `AZURE_OPENAI_DEPLOYMENT_NAME` | This value will correspond to the custom name you chose for your deployment when you deployed a model. This value can be found under **Resource Management** > **Model Deployments** in the Azure portal. |
Learn more about [finding API keys](https://learn.microsoft.com/azure/ai-services/cognitive-services-environment-variables) and [setting environment variables](https://learn.microsoft.com/azure/ai-services/cognitive-services-environment-variables).
## Run the quickstart
The sample code in this quickstart uses Microsoft Entra ID for the recommended keyless authentication. If you prefer to use an API key, you can replace the `DefaultAzureCredential` object with an `AzureKeyCredential` object.
```csharp Microsoft Entra ID theme={null}
AzureOpenAIClient openAIClient = new AzureOpenAIClient(new Uri(endpoint), new DefaultAzureCredential());
```
```csharp API key theme={null}
AzureOpenAIClient openAIClient = new AzureOpenAIClient(new Uri(endpoint), new AzureKeyCredential(key));
```
You can get sample audio files, such as *wikipediaOcelot.wav*, from the [Azure Speech in Foundry Tools SDK repository at GitHub](https://github.com/Azure-Samples/cognitive-services-speech-sdk/tree/master/sampledata/audiofiles).
To run the quickstart, follow these steps:
1. Replace the contents of `Program.cs` with the following code and update the placeholder values with your own.
```csharp theme={null}
using Azure;
using Azure.AI.OpenAI;
using Azure.Identity; // Required for Passwordless auth
string deploymentName = "whisper";
string endpoint = Environment.GetEnvironmentVariable("AZURE_OPENAI_ENDPOINT") ?? "https://.openai.azure.com/";
string key = Environment.GetEnvironmentVariable("AZURE_OPENAI_API_KEY") ?? "";
// Use the recommended keyless credential instead of the AzureKeyCredential credential.
AzureOpenAIClient openAIClient = new AzureOpenAIClient(new Uri(endpoint), new DefaultAzureCredential());
//AzureOpenAIClient openAIClient = new AzureOpenAIClient(new Uri(endpoint), new AzureKeyCredential(key));
var audioFilePath = "
[Source code](https://github.com/openai/openai-node) | [Package (npm)](https://www.npmjs.com/package/openai) | [Samples](https://github.com/Azure/azure-sdk-for-js/tree/main/sdk/openai/openai/samples)
## Prerequisites
* An Azure subscription - [Create one for free](https://azure.microsoft.com/pricing/purchase-options/azure-account?cid=msft_learn)
* [LTS versions of Node.js](https://github.com/nodejs/release#release-schedule)
* [Azure CLI](https://learn.microsoft.com/cli/azure/install-azure-cli) used for passwordless authentication in a local development environment, create the necessary context by signing in with the Azure CLI.
* An Azure OpenAI resource with a speech to text model deployed in a [supported region](../../foundry-models/concepts/models-sold-directly-by-azure). For more information, see [Create a resource and deploy a model with Azure OpenAI](https://learn.microsoft.com/en-us/azure/foundry-classic/openai/how-to/create-resource).
### Microsoft Entra ID prerequisites
For the recommended keyless authentication with Microsoft Entra ID, you need to:
* Install the [Azure CLI](https://learn.microsoft.com/cli/azure/install-azure-cli) used for keyless authentication with Microsoft Entra ID.
* Assign the `Cognitive Services User` role to your user account. You can assign roles in the Azure portal under **Access control (IAM)** > **Add role assignment**.
## Setup
1. Create a new folder `synthesis-quickstart` and go to the quickstart folder with the following command:
```shell theme={null}
mkdir synthesis-quickstart && cd synthesis-quickstart
```
2. Create the `package.json` with the following command:
```shell theme={null}
npm init -y
```
3. Install the OpenAI client library for JavaScript with:
```console theme={null}
npm install openai
```
4. For the **recommended** passwordless authentication:
```console theme={null}
npm install @azure/identity
```
## Retrieve resource information
You need to retrieve the following information to authenticate your application with your Azure OpenAI resource:
| Variable name | Value |
| ------------------------------ | --------------------------------------------------------------------------------------------------------------------------------------------------------------------------------------------------------- |
| `AZURE_OPENAI_ENDPOINT` | This value can be found in the **Keys and Endpoint** section when examining your resource from the Azure portal. |
| `AZURE_OPENAI_DEPLOYMENT_NAME` | This value will correspond to the custom name you chose for your deployment when you deployed a model. This value can be found under **Resource Management** > **Model Deployments** in the Azure portal. |
Learn more about [keyless authentication](https://learn.microsoft.com/azure/ai-services/authentication) and [setting environment variables](https://learn.microsoft.com/azure/ai-services/cognitive-services-environment-variables).
| Variable name | Value |
| ------------------------------ | --------------------------------------------------------------------------------------------------------------------------------------------------------------------------------------------------------- |
| `AZURE_OPENAI_ENDPOINT` | This value can be found in the **Keys and Endpoint** section when examining your resource from the Azure portal. |
| `AZURE_OPENAI_API_KEY` | This value can be found in the **Keys and Endpoint** section when examining your resource from the Azure portal. You can use either `KEY1` or `KEY2`. |
| `AZURE_OPENAI_DEPLOYMENT_NAME` | This value will correspond to the custom name you chose for your deployment when you deployed a model. This value can be found under **Resource Management** > **Model Deployments** in the Azure portal. |
Learn more about [finding API keys](https://learn.microsoft.com/azure/ai-services/cognitive-services-environment-variables) and [setting environment variables](https://learn.microsoft.com/azure/ai-services/cognitive-services-environment-variables).
To use the recommended keyless authentication with the SDK, make sure that the `AZURE_OPENAI_API_KEY` environment variable isn't set.
## Create a sample application
1. Create the `index.js` file with the following code:
```javascript theme={null}
const { createReadStream } = require("fs");
const { AzureOpenAI } = require("openai");
const { DefaultAzureCredential, getBearerTokenProvider } = require("@azure/identity");
// You will need to set these environment variables or edit the following values
const audioFilePath = "
1. Create the `index.js` file with the following code:
```javascript theme={null}
import { createReadStream } from "fs";
import { AzureOpenAI } from "openai";
// You will need to set these environment variables or edit the following values
const audioFilePath = "
You can get sample audio files, such as *wikipediaOcelot.wav*, from the [Azure Speech in Foundry Tools SDK repository at GitHub](https://github.com/Azure-Samples/cognitive-services-speech-sdk/tree/master/sampledata/audiofiles).
## Output
```json theme={null}
{"text":"The ocelot, Lepardus paradalis, is a small wild cat native to the southwestern United States, Mexico, and Central and South America. This medium-sized cat is characterized by solid black spots and streaks on its coat, round ears, and white neck and undersides. It weighs between 8 and 15.5 kilograms, 18 and 34 pounds, and reaches 40 to 50 centimeters 16 to 20 inches at the shoulders. It was first described by Carl Linnaeus in 1758. Two subspecies are recognized, L. p. paradalis and L. p. mitis. Typically active during twilight and at night, the ocelot tends to be solitary and territorial. It is efficient at climbing, leaping, and swimming. It preys on small terrestrial mammals such as armadillo, opossum, and lagomorphs."}
```
[Source code](https://github.com/openai/openai-node) | [Package (npm)](https://www.npmjs.com/package/openai) | [Samples](https://github.com/Azure/azure-sdk-for-js/tree/main/sdk/openai/openai/samples)
## Prerequisites
* An Azure subscription - [Create one for free](https://azure.microsoft.com/pricing/purchase-options/azure-account?cid=msft_learn)
* [LTS versions of Node.js](https://github.com/nodejs/release#release-schedule)
* [TypeScript](https://www.typescriptlang.org/download/)
* [Azure CLI](https://learn.microsoft.com/cli/azure/install-azure-cli) used for passwordless authentication in a local development environment, create the necessary context by signing in with the Azure CLI.
* An Azure OpenAI resource with a speech to text model deployed in a [supported region](../../foundry-models/concepts/models-sold-directly-by-azure). For more information, see [Create a resource and deploy a model with Azure OpenAI](https://learn.microsoft.com/en-us/azure/foundry-classic/openai/how-to/create-resource).
### Microsoft Entra ID prerequisites
For the recommended keyless authentication with Microsoft Entra ID, you need to:
* Install the [Azure CLI](https://learn.microsoft.com/cli/azure/install-azure-cli) used for keyless authentication with Microsoft Entra ID.
* Assign the `Cognitive Services User` role to your user account. You can assign roles in the Azure portal under **Access control (IAM)** > **Add role assignment**.
## Set up
1. Create a new folder `whisper-quickstart` and go to the quickstart folder with the following command:
```shell theme={null}
mkdir whisper-quickstart && cd whisper-quickstart
```
2. Create the `package.json` with the following command:
```shell theme={null}
npm init -y
```
3. Update the `package.json` to ECMAScript with the following command:
```shell theme={null}
npm pkg set type=module
```
4. Install the OpenAI client library for JavaScript with:
```console theme={null}
npm install openai
```
5. For the **recommended** passwordless authentication:
```console theme={null}
npm install @azure/identity
```
## Retrieve resource information
You need to retrieve the following information to authenticate your application with your Azure OpenAI resource:
| Variable name | Value |
| ------------------------------ | --------------------------------------------------------------------------------------------------------------------------------------------------------------------------------------------------------- |
| `AZURE_OPENAI_ENDPOINT` | This value can be found in the **Keys and Endpoint** section when examining your resource from the Azure portal. |
| `AZURE_OPENAI_DEPLOYMENT_NAME` | This value will correspond to the custom name you chose for your deployment when you deployed a model. This value can be found under **Resource Management** > **Model Deployments** in the Azure portal. |
Learn more about [keyless authentication](https://learn.microsoft.com/azure/ai-services/authentication) and [setting environment variables](https://learn.microsoft.com/azure/ai-services/cognitive-services-environment-variables).
| Variable name | Value |
| ------------------------------ | --------------------------------------------------------------------------------------------------------------------------------------------------------------------------------------------------------- |
| `AZURE_OPENAI_ENDPOINT` | This value can be found in the **Keys and Endpoint** section when examining your resource from the Azure portal. |
| `AZURE_OPENAI_API_KEY` | This value can be found in the **Keys and Endpoint** section when examining your resource from the Azure portal. You can use either `KEY1` or `KEY2`. |
| `AZURE_OPENAI_DEPLOYMENT_NAME` | This value will correspond to the custom name you chose for your deployment when you deployed a model. This value can be found under **Resource Management** > **Model Deployments** in the Azure portal. |
Learn more about [finding API keys](https://learn.microsoft.com/azure/ai-services/cognitive-services-environment-variables) and [setting environment variables](https://learn.microsoft.com/azure/ai-services/cognitive-services-environment-variables).
To use the recommended keyless authentication with the SDK, make sure that the `AZURE_OPENAI_API_KEY` environment variable isn't set.
## Create a sample application
1. Create the `index.ts` file with the following code:
```typescript theme={null}
import { createReadStream } from "fs";
import { AzureOpenAI } from "openai";
import { DefaultAzureCredential, getBearerTokenProvider } from "@azure/identity";
// You will need to set these environment variables or edit the following values
const audioFilePath = "
1. Create the `index.ts` file with the following code:
```typescript theme={null}
import { createReadStream } from "fs";
import { AzureOpenAI } from "openai";
// You will need to set these environment variables or edit the following values
const audioFilePath = "
You can get sample audio files, such as *wikipediaOcelot.wav*, from the [Azure Speech in Foundry Tools SDK repository at GitHub](https://github.com/Azure-Samples/cognitive-services-speech-sdk/tree/master/sampledata/audiofiles).
## Output
```json theme={null}
{"text":"The ocelot, Lepardus paradalis, is a small wild cat native to the southwestern United States, Mexico, and Central and South America. This medium-sized cat is characterized by solid black spots and streaks on its coat, round ears, and white neck and undersides. It weighs between 8 and 15.5 kilograms, 18 and 34 pounds, and reaches 40 to 50 centimeters 16 to 20 inches at the shoulders. It was first described by Carl Linnaeus in 1758. Two subspecies are recognized, L. p. paradalis and L. p. mitis. Typically active during twilight and at night, the ocelot tends to be solitary and territorial. It is efficient at climbing, leaping, and swimming. It preys on small terrestrial mammals such as armadillo, opossum, and lagomorphs."}
```
## Prerequisites
* An Azure subscription - [Create one for free](https://azure.microsoft.com/pricing/purchase-options/azure-account?cid=msft_learn)
* You can use either the latest version, PowerShell 7, or Windows PowerShell 5.1.
* An Azure OpenAI resource with a speech to text model deployed in a [supported region](../../foundry-models/concepts/models-sold-directly-by-azure). For more information, see [Create a resource and deploy a model with Azure OpenAI](https://learn.microsoft.com/en-us/azure/foundry-classic/openai/how-to/create-resource).
## Set up
### Retrieve key and endpoint
To successfully make a call against Azure OpenAI, you need an *endpoint* and a *key*.
| Variable name | Value |
| ----------------------- | ---------------------------------------------------------------------------------------------------------------------------------------------------------------------------------------------------------------------------------------------------------------------------------------------- |
| `AZURE_OPENAI_ENDPOINT` | The service endpoint can be found in the **Keys & Endpoint** section when examining your resource from the Azure portal. Alternatively, you can find the endpoint via the **Deployments** page in Microsoft Foundry portal. An example endpoint is: `https://docs-test-001.openai.azure.com/`. |
| `AZURE_OPENAI_API_KEY` | This value can be found in the **Keys & Endpoint** section when examining your resource from the Azure portal. You can use either `KEY1` or `KEY2`. |
Go to your resource in the Azure portal. The **Endpoint and Keys** can be found in the **Resource Management** section. Copy your endpoint and access key as you'll need both for authenticating your API calls. You can use either `KEY1` or `KEY2`. Always having two keys allows you to securely rotate and regenerate keys without causing a service disruption.
### Environment variables
Create and assign persistent environment variables for your key and endpoint.
```CMD Command Line theme={null}
setx AZURE_OPENAI_API_KEY "REPLACE_WITH_YOUR_KEY_VALUE_HERE"
```
```CMD Command Line theme={null}
setx AZURE_OPENAI_ENDPOINT "REPLACE_WITH_YOUR_ENDPOINT_HERE"
```
```powershell PowerShell theme={null}
[System.Environment]::SetEnvironmentVariable('AZURE_OPENAI_API_KEY', 'REPLACE_WITH_YOUR_KEY_VALUE_HERE', 'User')
```
```powershell PowerShell theme={null}
[System.Environment]::SetEnvironmentVariable('AZURE_OPENAI_ENDPOINT', 'REPLACE_WITH_YOUR_ENDPOINT_HERE', 'User')
```
```Bash Bash theme={null}
echo export AZURE_OPENAI_API_KEY="REPLACE_WITH_YOUR_KEY_VALUE_HERE" >> /etc/environment && source /etc/environment
```
```Bash Bash theme={null}
echo export AZURE_OPENAI_ENDPOINT="REPLACE_WITH_YOUR_ENDPOINT_HERE" >> /etc/environment && source /etc/environment
```
## Create a PowerShell app
Run the following command. You need to replace `YourDeploymentName` with the deployment name you chose when you deployed the Whisper model. The deployment name isn't necessarily the same as the model name. Entering the model name results in an error unless you chose a deployment name that is identical to the underlying model name.
```powershell-interactive theme={null}
# Azure OpenAI metadata variables
$openai = @{
api_key = $Env:AZURE_OPENAI_API_KEY
api_base = $Env:AZURE_OPENAI_ENDPOINT # your endpoint should look like the following https://YOUR_RESOURCE_NAME.openai.azure.com/
api_version = '2024-02-01' # this may change in the future
name = 'YourDeploymentName' #This will correspond to the custom name you chose for your deployment when you deployed a model.
}
# Header for authentication
$headers = [ordered]@{
'api-key' = $openai.api_key
}
$form = @{ file = get-item -path './wikipediaOcelot.wav' }
# Send a completion call to generate an answer
$url = "$($openai.api_base)/openai/deployments/$($openai.name)/audio/transcriptions?api-version=$($openai.api_version)"
$response = Invoke-RestMethod -Uri $url -Headers $headers -Form $form -Method Post -ContentType 'multipart/form-data'
return $response.text
```
You can get sample audio files, such as *wikipediaOcelot.wav*, from the [Azure Speech in Foundry Tools SDK repository at GitHub](https://github.com/Azure-Samples/cognitive-services-speech-sdk/tree/master/sampledata/audiofiles).
For production, store and access your credentials using a secure method, such as [The PowerShell Secret Management with Azure Key Vault](/powershell/utility-modules/secretmanagement/how-to/using-azure-keyvault). For more information, see [credential security](../../../ai-services/security-features).
## Output
```text theme={null}
The ocelot, Lepardus paradalis, is a small wild cat native to the southwestern United States, Mexico, and Central and South America. This medium-sized cat is characterized by solid black spots and streaks on its coat, round ears, and white neck and undersides. It weighs between 8 and 15.5 kilograms, 18 and 34 pounds, and reaches 40 to 50 centimeters 16 to 20 inches at the shoulders. It was first described by Carl Linnaeus in 1758. Two subspecies are recognized, L. p. paradalis and L. p. mitis. Typically active during twilight and at night, the ocelot tends to be solitary and territorial. It is efficient at climbing, leaping, and swimming. It preys on small terrestrial mammals such as armadillo, opossum, and lagomorphs.
```
For information about other audio models that you can use with Azure OpenAI, see [Audio models](../../foundry-models/concepts/models-sold-directly-by-azure).
The file size limit for the Whisper model is 25 MB. If you need to transcribe a file larger than 25 MB, you can use the Azure Speech in Foundry Tools [batch transcription](../../../ai-services/speech-service/batch-transcription-create#use-a-whisper-model) API.
## Troubleshooting
### Authentication errors
If you receive 401 Unauthorized errors, verify:
* Your API key is correctly set in environment variables
* Your Azure OpenAI resource is active
* Your account has the Cognitive Services Contributor role
### File format errors
The Whisper model supports mp3, mp4, mpeg, mpga, m4a, wav, and webm formats. Other formats return an error.
### File size limit
Audio files must be 25 MB or smaller. For larger files, use the [Azure Speech batch transcription API](../../../ai-services/speech-service/batch-transcription-create#use-a-whisper-model).
### Deployment not found
Verify your deployment name matches exactly what you created in Azure OpenAI Studio. Deployment names are case-sensitive.
## Clean up resources
If you want to clean up and remove an Azure OpenAI resource, you can delete the resource. Before deleting the resource, you must first delete any deployed models.
* [Azure portal](../../../ai-services/multi-service-resource)
* [Azure CLI](../../../ai-services/multi-service-resource)
## Next steps
* To learn how to convert audio data to text in batches, see [Create a batch transcription](../../../ai-services/speech-service/batch-transcription-create).
* For more examples, check out the [Azure OpenAI Samples GitHub repository](https://github.com/Azure-Samples/openai).
 ### Environment variables
Create and assign persistent environment variables for your key and endpoint.
### Environment variables
Create and assign persistent environment variables for your key and endpoint.