;
};
export const ZoneContent = ({group, value, options = [], values = [], defaultValue, children}) => {
const optionKey = options.map(option => `${option.id}:${option.title}`).join("|");
const [activePivot, setActivePivot] = useState(defaultValue || values[0]);
const slugify = value => value.toLowerCase().replace(/[^a-z0-9]+/g, "-").replace(/^-|-$/g, "");
const resolvePivot = () => {
if (typeof window === "undefined") return defaultValue || values[0];
const params = new URLSearchParams(window.location.search);
const requested = params.get("pivots");
if (requested) {
const requestedIds = requested.split(",").map(value => value.trim()).filter(Boolean);
const match = requestedIds.find(id => values.includes(id));
if (match) return match;
}
const hash = window.location.hash.replace(/^#/, "");
if (hash) {
const match = options.find(option => option.id === hash || slugify(option.title) === hash);
if (match) return match.id;
}
try {
const stored = window.localStorage.getItem(`foundry-zone-pivot:${group}`);
if (values.includes(stored)) return stored;
} catch {
return defaultValue || values[0];
}
return defaultValue || values[0];
};
useEffect(() => {
setActivePivot(resolvePivot());
}, [group, defaultValue, values.join("|"), optionKey]);
useEffect(() => {
const onPivotChange = event => {
if (event.detail?.group === group && values.includes(event.detail.value)) {
setActivePivot(event.detail.value);
}
};
window.addEventListener("foundry-zone-pivot-change", onPivotChange);
return () => window.removeEventListener("foundry-zone-pivot-change", onPivotChange);
}, [group, values.join("|")]);
if (activePivot !== value) return null;
return <>{children};
};
Vision-enabled chat models are large multimodal models (LMM) developed by OpenAI that can analyze images and provide textual responses to questions about them. They incorporate both natural language processing and visual understanding. The current vision-enabled models are the [o-series reasoning models](/models/reasoning), GPT-5 series, GPT-4.1 series, GPT-4.5, GPT-4o series.
The vision-enabled models can answer general questions about what's present in the images you upload.
To use vision-enabled models, you call the Chat Completion API on a supported model that you have deployed. If you're not familiar with the Chat Completion API, see the [Vision-enabled chat how-to guide](https://learn.microsoft.com/azure/ai-foundry/openai/how-to/chatgpt).
## Quickstart
Get started using images in your chats with Azure OpenAI in Microsoft Foundry Models.
Use this article to get started using [Microsoft Foundry](https://ai.azure.com/?cid=learnDocs) to deploy and test a chat completion model with image understanding.
## Prerequisites
* An Azure subscription. [Create one for free](https://azure.microsoft.com/pricing/purchase-options/azure-account?cid=msft_learn).
* Once you have your Azure subscription, create an Azure OpenAI resource .
For more information about resource creation, see the [resource deployment guide](https://learn.microsoft.com/azure/ai-foundry/openai/how-to/create-resource).
* A [Foundry project](https://learn.microsoft.com/azure/ai-foundry/how-to/create-projects) with your Azure OpenAI resource added as a connection.
## Prepare your media
You need an image to complete this quickstart. You can use this sample image or any other image you have available.
## Go to Foundry
If you already have a vision-capable model deployed, skip to [Start a chat session to analyze images](#start-a-chat-session-to-analyze-images).
1. Browse to [Foundry](https://ai.azure.com/?cid=learnDocs) and sign in with the credentials associated with your Azure OpenAI resource. During or after the sign-in workflow, select the appropriate directory, Azure subscription, and Azure OpenAI resource.
2. Select the project you'd like to work in.
3. On the left nav menu, select **Models + endpoints** and select **+ Deploy model**.
4. Choose an image-capable deployment by selecting model name: **gpt-4o** or **gpt-4o-mini**. In the window that appears, select a name and deployment type. Make sure your Azure OpenAI resource is connected. For more information about model deployment, see the [resource deployment guide](https://learn.microsoft.com/azure/ai-foundry/openai/how-to/create-resource).
5. Select **Deploy**.
6. Next, select your new model and select **Open in playground**. In the chat playground, the deployment you created should be selected in the **Deployment** dropdown.
## Playground
In this chat session, you instruct the assistant to aid you in understanding images that you input.
For general help with assistant setup, chat sessions, settings, and panels, refer to the [Chat quickstart](https://learn.microsoft.com/azure/ai-foundry/openai/chatgpt-quickstart).
## Start a chat session to analyze images
In this chat session, you're instructing the assistant to aid in understanding images that you input.
1. To start, make sure your image-capable deployment is selected in the **Deployment** dropdown.
2. In the context text box on the **Setup** panel, provide this prompt to guide the assistant: `"You're an AI assistant that helps people find information."` Or, you can tailor the prompt to your image or scenario.
> We recommend you update the System Message to be specific to the task in order to avoid unhelpful responses from the model.
1. Select **Apply changes** to save your changes.
2. In the chat session pane, select the attachment button and then **Upload image**. Choose your image.
3. Add the following prompt in the chat field: `Describe this image`, and then select the send icon to submit it.
4. The send icon is replaced by a stop button. If you select it, the assistant stops processing your request. For this quickstart, let the assistant finish its reply.
5. The assistant replies with a description of the image.
6. Ask a follow-up question related to the analysis of your image. You could enter, `"What should I highlight about this image to my insurance company?"`.
7. You should receive a relevant response similar to what's shown here:
```
When reporting the incident to your insurance company, you should highlight the following key points from the image:
1. **Location of Damage**: Clearly state that the front end of the car, particularly the driver's side, is damaged. Mention the crumpled hood, broken front bumper, and the damaged left headlight.
2. **Point of Impact**: Indicate that the car has collided with a guardrail, which may suggest that no other vehicles were involved in the accident.
3. **Condition of the Car**: Note that the damage seems to be concentrated on the front end, and there is no visible damage to the windshield or rear of the car from this perspective.
4. **License Plate Visibility**: Mention that the license plate is intact and can be used for identification purposes.
5. **Environment**: Report that the accident occurred near a roadside with a guardrail, possibly in a rural or semi-rural area, which might help in establishing the accident location and context.
6. **Other Observations**: If there were any other circumstances or details not visible in the image that may have contributed to the accident, such as weather conditions, road conditions, or any other relevant information, be sure to include those as well.
Remember to be factual and descriptive, avoiding speculation about the cause of the accident, as the insurance company will conduct its own investigation.
```
## View and export code
At any point in the chat session, you can enable the **Show raw JSON** switch at the top of the chat window to see the conversation formatted as JSON. Heres' what it looks like at the beginning of the quickstart chat session:
```json theme={null}
[
{
"role": "system",
"content": [
"You are an AI assistant that helps people find information."
]
},
]
```
## Clean up resources
If you want to clean up and remove an Azure OpenAI resource, you can delete the resource or resource group. Deleting the resource group also deletes any other resources associated with it.
* [Azure portal](../../../ai-services/multi-service-resource)
* [Azure CLI](../../../ai-services/multi-service-resource)
Use this article to get started using the Azure OpenAI REST APIs to deploy and use vision-enabled chat models.
## Prerequisites
* An Azure subscription. [Create one for free](https://azure.microsoft.com/pricing/purchase-options/azure-account?cid=msft_learn).
* Python 3.8 or later version.
* The following Python libraries: `requests`, `json`.
* An Azure OpenAI in Microsoft Foundry Models resource with a vision-enabled model deployed. See [Model availability](/models/models-sold-directly-by-azure) for available regions. For more information about resource creation, see the [resource deployment guide](https://learn.microsoft.com/azure/ai-foundry/openai/how-to/create-resource).
It is currently not supported to turn off content filtering for the GPT-4 Turbo with Vision model.
## Retrieve key and endpoint
To successfully call the Azure OpenAI APIs, you need the following information about your Azure OpenAI resource:
| Variable | Name | Value |
| ------------ | ---------- | -------------------------------------------------------------------------------------------------------------------------------------------------------------------------------------------------------------------------------------------------- |
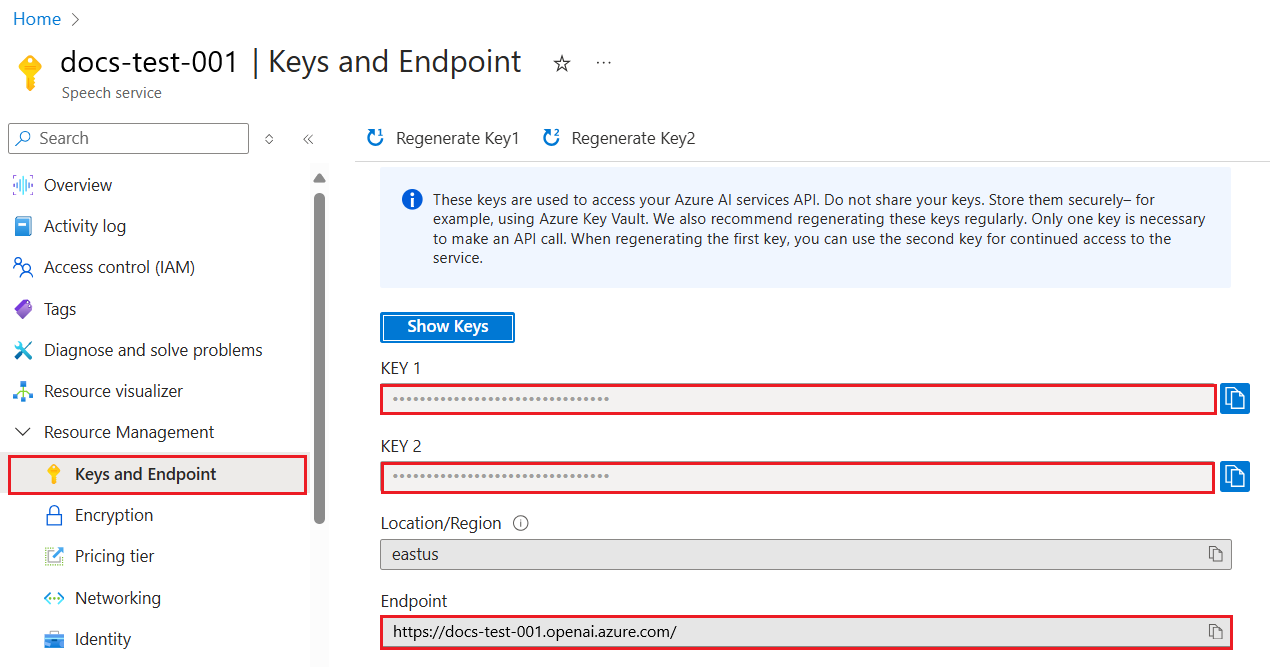
| **Endpoint** | `api_base` | The endpoint value is located under **Keys and Endpoint** for your resource in the Azure portal. You can also find the endpoint via the **Deployments** page in Foundry portal. An example endpoint is: `https://docs-test-001.openai.azure.com/`. |
| **Key** | `api_key` | The key value is also located under **Keys and Endpoint** for your resource in the Azure portal. Azure generates two keys for your resource. You can use either value. |
Go to your resource in the Azure portal. On the navigation pane, select **Keys and Endpoint** under **Resource Management**. Copy the **Endpoint** value and an access key value. You can use either the **KEY 1** or **KEY 2** value. Having two keys allows you to securely rotate and regenerate keys without causing a service disruption.
## Create a new Python application
Create a new Python file named *quickstart.py*. Open the new file in your preferred editor or IDE.
1. Replace the contents of *quickstart.py* with the following code.
```python theme={null}
# Packages required:
import requests
import json
api_base = ''
deployment_name = ''
API_KEY = ''
base_url = f"{api_base}openai/deployments/{deployment_name}"
headers = {
"Content-Type": "application/json",
"api-key": API_KEY
}
# Prepare endpoint, headers, and request body
endpoint = f"{base_url}/chat/completions?api-version=2023-12-01-preview"
data = {
"messages": [
{ "role": "system", "content": "You are a helpful assistant." },
{ "role": "user", "content": [
{
"type": "text",
"text": "Describe this picture:"
},
{
"type": "image_url",
"image_url": {
"url": ""
}
}
] }
],
"max_tokens": 2000
}
# Make the API call
response = requests.post(endpoint, headers=headers, data=json.dumps(data))
print(f"Status Code: {response.status_code}")
print(response.text)
```
2. Make the following changes:
1. Enter your endpoint URL and key in the appropriate fields.
2. Enter your model deployment name in the appropriate field.
3. Change the value of the `"image"` field to the publicly accessible URL of your image.
You can also use a base 64 encoded image data instead of a URL. For more information, see the [Vision chats how-to guide](/models/gpt-with-vision#use-a-local-image).
1. Run the application with the `python` command:
```console theme={null}
python quickstart.py
```
## Clean up resources
If you want to clean up and remove an Azure OpenAI resource, you can delete the resource or resource group. Deleting the resource group also deletes any other resources associated with it.
* [Azure portal](../../../ai-services/multi-service-resource)
* [Azure CLI](../../../ai-services/multi-service-resource)
Use this article to get started using the Azure OpenAI Python SDK to deploy and use a vision-enabled chat model.
[Library source code](https://github.com/openai/openai-python?azure-portal=true) | [Package (PyPi)](https://pypi.org/project/openai?azure-portal=true) |
## Prerequisites
* An Azure subscription. [Create one for free](https://azure.microsoft.com/pricing/purchase-options/azure-account?cid=msft_learn).
* Python 3.8 or later version.
* An Azure OpenAI in Microsoft Foundry Models resource with a vision-enabled chat model deployed. See [Model availability](/models/models-sold-directly-by-azure) for available regions. For more information about resource creation, see the [resource deployment guide](https://learn.microsoft.com/azure/ai-foundry/openai/how-to/create-resource).
### Microsoft Entra ID prerequisites
For the recommended keyless authentication with Microsoft Entra ID, you need to:
* Install the [Azure CLI](https://learn.microsoft.com/cli/azure/install-azure-cli) used for keyless authentication with Microsoft Entra ID.
* Assign the `Cognitive Services User` role to your user account. You can assign roles in the Azure portal under **Access control (IAM)** > **Add role assignment**.
## Set up
Install the OpenAI Python client library with:
```console theme={null}
pip install openai
```
This library is maintained by OpenAI. Refer to the [release history](https://github.com/openai/openai-python/releases) to track the latest updates to the library.
### Retrieve key and endpoint
To successfully make a call against Azure OpenAI, you need an **endpoint** and a **key**.
| Variable name | Value |
| ------------- | ---------------------------------------------------------------------------------------------------------------------------------------------------------------------------------------------------------------------------------------------------------------------------------------------- |
| `ENDPOINT` | The service endpoint can be found in the **Keys & Endpoint** section when examining your resource from the Azure portal. Alternatively, you can find the endpoint via the **Deployments** page in Microsoft Foundry portal. An example endpoint is: `https://docs-test-001.openai.azure.com/`. |
| `API-KEY` | This value can be found in the **Keys & Endpoint** section when examining your resource from the Azure portal. You can use either `KEY1` or `KEY2`. |
Go to your resource in the Azure portal. The **Keys & Endpoint** section can be found in the **Resource Management** section. Copy your endpoint and access key as you'll need both for authenticating your API calls. You can use either `KEY1` or `KEY2`. Always having two keys allows you to securely rotate and regenerate keys without causing a service disruption.
### Environment variables
Create and assign persistent environment variables for your key and endpoint.
```cmd Command Line theme={null}
setx AZURE_OPENAI_API_KEY "REPLACE_WITH_YOUR_KEY_VALUE_HERE"
setx AZURE_OPENAI_ENDPOINT "REPLACE_WITH_YOUR_ENDPOINT_HERE"
```
```powershell PowerShell theme={null}
[System.Environment]::SetEnvironmentVariable('AZURE_OPENAI_API_KEY', 'REPLACE_WITH_YOUR_KEY_VALUE_HERE', 'User')
[System.Environment]::SetEnvironmentVariable('AZURE_OPENAI_ENDPOINT', 'REPLACE_WITH_YOUR_ENDPOINT_HERE', 'User')
```
```bash Bash theme={null}
export AZURE_OPENAI_API_KEY="REPLACE_WITH_YOUR_KEY_VALUE_HERE"
export AZURE_OPENAI_ENDPOINT="REPLACE_WITH_YOUR_ENDPOINT_HERE"
```
## Create a new Python application
Create a new Python file named *quickstart.py*. Open the new file in your preferred editor or IDE.
1. Replace the contents of *quickstart.py* with the following code.
```python theme={null}
import os
from openai import AzureOpenAI
api_base = os.getenv("AZURE_OPENAI_ENDPOINT")
api_key= os.getenv("AZURE_OPENAI_API_KEY")
deployment_name = ''
api_version = '2023-12-01-preview' # this might change in the future
client = AzureOpenAI(
api_key=api_key,
api_version=api_version,
base_url=f"{api_base}/openai/deployments/{deployment_name}"
)
response = client.chat.completions.create(
model=deployment_name,
messages=[
{ "role": "system", "content": "You are a helpful assistant." },
{ "role": "user", "content": [
{
"type": "text",
"text": "Describe this picture:"
},
{
"type": "image_url",
"image_url": {
"url": ""
}
}
] }
],
max_tokens=2000
)
print(response)
```
2. Make the following changes:
1. Make sure the `AZURE_OPENAI_ENDPOINT` and `AZURE_OPENAI_API_KEY` environment variables are set.
2. Enter the name of your model deployment in the `deployment_name` variable.
3. Change the value of the `"url"` field to the publicly accessible URL of your image.
You can also use a base 64 encoded image data instead of a URL. For more information, see the [Vision chats how-to guide](/models/gpt-with-vision#use-a-local-image).
1. Run the application with the `python` command:
```console theme={null}
python quickstart.py
```
## Clean up resources
If you want to clean up and remove an Azure OpenAI resource, you can delete the resource or resource group. Deleting the resource group also deletes any other resources associated with it.
* [Azure portal](../../../ai-services/multi-service-resource)
* [Azure CLI](../../../ai-services/multi-service-resource)
Use this article to get started using the OpenAI JavaScript SDK to deploy and use a vision-enabled chat model.
This SDK is provided by OpenAI with Azure specific types provided by Azure.
[Reference documentation](https://developers.openai.com/api/reference/resources/responses) | [Library source code](https://github.com/openai/openai-node?azure-portal=true) | [Package (npm)](https://www.npmjs.com/package/openai) | [Samples](https://github.com/Azure/azure-sdk-for-js/tree/main/sdk/openai/openai/samples)
## Prerequisites
* An Azure subscription - [Create one for free](https://azure.microsoft.com/pricing/purchase-options/azure-account?cid=msft_learn)
* [LTS versions of Node.js](https://github.com/nodejs/release#release-schedule)
* [Azure CLI](https://learn.microsoft.com/cli/azure/install-azure-cli) used for passwordless authentication in a local development environment, create the necessary context by signing in with the Azure CLI.
* An Azure OpenAI resource created in a supported region (see [Region availability](https://learn.microsoft.com/azure/ai-foundry/openai/concepts/models#model-summary-table-and-region-availability)). For more information, see [Create a resource and deploy a model with Azure OpenAI](https://learn.microsoft.com/en-us/azure/foundry-classic/openai/how-to/create-resource).
This library is maintained by OpenAI. Refer to the [release history](https://github.com/openai/openai-node/releases) to track the latest updates to the library.
### Microsoft Entra ID prerequisites
For the recommended keyless authentication with Microsoft Entra ID, you need to:
* Install the [Azure CLI](https://learn.microsoft.com/cli/azure/install-azure-cli) used for keyless authentication with Microsoft Entra ID.
* Assign the `Cognitive Services User` role to your user account. You can assign roles in the Azure portal under **Access control (IAM)** > **Add role assignment**.
## Set up
1. Create a new folder `vision-quickstart` and go to the quickstart folder with the following command:
```shell theme={null}
mkdir vision-quickstart && cd vision-quickstart
```
2. Create the `package.json` with the following command:
```shell theme={null}
npm init -y
```
3. Install the OpenAI client library for JavaScript with:
```console theme={null}
npm install openai
```
4. For the **recommended** passwordless authentication:
```console theme={null}
npm install @azure/identity
```
## Retrieve resource information
You need to retrieve the following information to authenticate your application with your Azure OpenAI resource:
| Variable name | Value |
| ------------------------------ | --------------------------------------------------------------------------------------------------------------------------------------------------------------------------------------------------------- |
| `AZURE_OPENAI_ENDPOINT` | This value can be found in the **Keys and Endpoint** section when examining your resource from the Azure portal. |
| `AZURE_OPENAI_DEPLOYMENT_NAME` | This value will correspond to the custom name you chose for your deployment when you deployed a model. This value can be found under **Resource Management** > **Model Deployments** in the Azure portal. |
Learn more about [keyless authentication](https://learn.microsoft.com/azure/ai-services/authentication) and [setting environment variables](https://learn.microsoft.com/azure/ai-services/cognitive-services-environment-variables).
| Variable name | Value |
| ------------------------------ | --------------------------------------------------------------------------------------------------------------------------------------------------------------------------------------------------------- |
| `AZURE_OPENAI_ENDPOINT` | This value can be found in the **Keys and Endpoint** section when examining your resource from the Azure portal. |
| `AZURE_OPENAI_API_KEY` | This value can be found in the **Keys and Endpoint** section when examining your resource from the Azure portal. You can use either `KEY1` or `KEY2`. |
| `AZURE_OPENAI_DEPLOYMENT_NAME` | This value will correspond to the custom name you chose for your deployment when you deployed a model. This value can be found under **Resource Management** > **Model Deployments** in the Azure portal. |
Learn more about [finding API keys](https://learn.microsoft.com/azure/ai-services/cognitive-services-environment-variables) and [setting environment variables](https://learn.microsoft.com/azure/ai-services/cognitive-services-environment-variables).
To use the recommended keyless authentication with the SDK, make sure that the `AZURE_OPENAI_API_KEY` environment variable isn't set.
## Create a new JavaScript application for image prompts
Select an image from the [azure-samples/cognitive-services-sample-data-files](https://github.com/Azure-Samples/cognitive-services-sample-data-files/tree/master/ComputerVision/Images). Enter your publicly accessible image URL in the code below or set the `IMAGE_URL` environment variable to it.
If you use a SAS URL to an image stored in Azure blob storage, you need to enable Managed Identity and assign the **Storage Blob Reader** role to your Azure OpenAI resource (do this in the Azure portal). This allows the model to access the image in blob storage.
You can also use a base 64 encoded image data instead of a URL. For more information, see the [Vision chats how-to guide](/models/gpt-with-vision#use-a-local-image).
1. Create the `index.js` file with the following code:
```javascript theme={null}
const AzureOpenAI = require('openai').AzureOpenAI;
const {
DefaultAzureCredential,
getBearerTokenProvider
} = require('@azure/identity');
// You will need to set these environment variables or edit the following values
const endpoint = process.env.AZURE_OPENAI_ENDPOINT || "Your endpoint";
const imageUrl = process.env.IMAGE_URL || "";
// Required Azure OpenAI deployment name and API version
const apiVersion = process.env.OPENAI_API_VERSION || "2024-07-01-preview";
const deploymentName = process.env.AZURE_OPENAI_DEPLOYMENT_NAME || "gpt-4-with-turbo";
// keyless authentication
const credential = new DefaultAzureCredential();
const scope = "https://ai.azure.com/.default";
const azureADTokenProvider = getBearerTokenProvider(credential, scope);
function getClient(): AzureOpenAI {
return new AzureOpenAI({
endpoint,
azureADTokenProvider,
apiVersion,
deployment: deploymentName,
});
}
function createMessages() {
return {
messages: [
{ role: "system", content: "You are a helpful assistant." },
{
role: "user",
content: [
{
type: "text",
text: "Describe this picture:",
},
{
type: "image_url",
image_url: {
url: imageUrl,
},
},
],
},
],
model: "",
max_tokens: 2000,
};
}
async function printChoices(completion) {
for (const choice of completion.choices) {
console.log(choice.message);
}
}
export async function main() {
console.log("== Get Vision chats Sample ==");
const client = getClient();
const messages = createMessages();
const completion = await client.chat.completions.create(messages);
await printChoices(completion);
}
main().catch((err) => {
console.error("Error occurred:", err);
});
```
2. Sign in to Azure with the following command:
```shell theme={null}
az login
```
3. Run the JavaScript file.
```shell theme={null}
node index.js
```
1. Create the `index.js` file with the following code:
```javascript theme={null}
const { AzureOpenAI } = require("openai");
// You will need to set these environment variables or edit the following values
const endpoint = process.env.AZURE_OPENAI_ENDPOINT || "Your endpoint";
const apiKey = process.env.AZURE_OPENAI_API_KEY || "Your API key";
const imageUrl = process.env.IMAGE_URL || "";
// Required Azure OpenAI deployment name and API version
const apiVersion = process.env.OPENAI_API_VERSION || "2024-07-01-preview";
const deploymentName = process.env.AZURE_OPENAI_DEPLOYMENT_NAME || "gpt-4-with-turbo";
function getClient() {
return new AzureOpenAI({
endpoint,
apiKey,
apiVersion,
deployment: deploymentName,
});
}
function createMessages() {
return {
messages: [
{ role: "system", content: "You are a helpful assistant." },
{
role: "user",
content: [
{
type: "text",
text: "Describe this picture:",
},
{
type: "image_url",
image_url: {
url: imageUrl,
},
},
],
},
],
model: "",
max_tokens: 2000,
};
}
async function printChoices(completion) {
for (const choice of completion.choices) {
console.log(choice.message);
}
}
export async function main() {
console.log("== Get Vision chats Sample ==");
const client = getClient();
const messages = createMessages();
const completion = await client.chat.completions.create(messages);
await printChoices(completion);
}
main().catch((err) => {
console.error("Error occurred:", err);
});
```
2. Run the JavaScript file.
```shell theme={null}
node index.js
```
## Clean up resources
If you want to clean up and remove an Azure OpenAI resource, you can delete the resource or resource group. Deleting the resource group also deletes any other resources associated with it.
* [Azure portal](../../../ai-services/multi-service-resource)
* [Azure CLI](../../../ai-services/multi-service-resource)
Use this article to get started using the OpenAI JavaScript SDK to deploy and use a vision-enabled chat model.
This SDK is provided by OpenAI with Azure specific types provided by Azure.
[Reference documentation](https://platform.openai.com/docs/api-reference/chat) | [Library source code](https://github.com/openai/openai-node?azure-portal=true) | [Package (npm)](https://www.npmjs.com/package/openai) | [Samples](https://github.com/Azure/azure-sdk-for-js/tree/main/sdk/openai/openai/samples)
## Prerequisites
* An Azure subscription - [Create one for free](https://azure.microsoft.com/pricing/purchase-options/azure-account?cid=msft_learn)
* [LTS versions of Node.js](https://github.com/nodejs/release#release-schedule)
* [TypeScript](https://www.typescriptlang.org/download/)
* [Azure CLI](https://learn.microsoft.com/cli/azure/install-azure-cli) used for passwordless authentication in a local development environment, create the necessary context by signing in with the Azure CLI.
* An Azure OpenAI resource created in a supported region (see [Region availability](https://learn.microsoft.com/azure/ai-foundry/openai/concepts/models#model-summary-table-and-region-availability)). For more information, see [Create a resource and deploy a model with Azure OpenAI](https://learn.microsoft.com/en-us/azure/foundry-classic/openai/how-to/create-resource).
This library is maintained by OpenAI. Refer to the [release history](https://github.com/openai/openai-node/releases) to track the latest updates to the library.
### Microsoft Entra ID prerequisites
For the recommended keyless authentication with Microsoft Entra ID, you need to:
* Install the [Azure CLI](https://learn.microsoft.com/cli/azure/install-azure-cli) used for keyless authentication with Microsoft Entra ID.
* Assign the `Cognitive Services User` role to your user account. You can assign roles in the Azure portal under **Access control (IAM)** > **Add role assignment**.
## Set up
1. Create a new folder `vision-quickstart` and go to the quickstart folder with the following command:
```shell theme={null}
mkdir vision-quickstart && cd vision-quickstart
```
2. Create the `package.json` with the following command:
```shell theme={null}
npm init -y
```
3. Update the `package.json` to ECMAScript with the following command:
```shell theme={null}
npm pkg set type=module
```
4. Install the OpenAI client library for JavaScript with:
```console theme={null}
npm install openai
```
5. For the **recommended** passwordless authentication:
```console theme={null}
npm install @azure/identity
```
## Retrieve resource information
You need to retrieve the following information to authenticate your application with your Azure OpenAI resource:
| Variable name | Value |
| ------------------------------ | --------------------------------------------------------------------------------------------------------------------------------------------------------------------------------------------------------- |
| `AZURE_OPENAI_ENDPOINT` | This value can be found in the **Keys and Endpoint** section when examining your resource from the Azure portal. |
| `AZURE_OPENAI_DEPLOYMENT_NAME` | This value will correspond to the custom name you chose for your deployment when you deployed a model. This value can be found under **Resource Management** > **Model Deployments** in the Azure portal. |
Learn more about [keyless authentication](https://learn.microsoft.com/azure/ai-services/authentication) and [setting environment variables](https://learn.microsoft.com/azure/ai-services/cognitive-services-environment-variables).
| Variable name | Value |
| ------------------------------ | --------------------------------------------------------------------------------------------------------------------------------------------------------------------------------------------------------- |
| `AZURE_OPENAI_ENDPOINT` | This value can be found in the **Keys and Endpoint** section when examining your resource from the Azure portal. |
| `AZURE_OPENAI_API_KEY` | This value can be found in the **Keys and Endpoint** section when examining your resource from the Azure portal. You can use either `KEY1` or `KEY2`. |
| `AZURE_OPENAI_DEPLOYMENT_NAME` | This value will correspond to the custom name you chose for your deployment when you deployed a model. This value can be found under **Resource Management** > **Model Deployments** in the Azure portal. |
Learn more about [finding API keys](https://learn.microsoft.com/azure/ai-services/cognitive-services-environment-variables) and [setting environment variables](https://learn.microsoft.com/azure/ai-services/cognitive-services-environment-variables).
To use the recommended keyless authentication with the SDK, make sure that the `AZURE_OPENAI_API_KEY` environment variable isn't set.
## Create a new JavaScript application for image prompts
Select an image from the [azure-samples/cognitive-services-sample-data-files](https://github.com/Azure-Samples/cognitive-services-sample-data-files/tree/master/ComputerVision/Images). Use the image URL in the code below or set the `IMAGE_URL` environment variable to the image URL.
You can also use a base 64 encoded image data instead of a URL. For more information, see the [Vision chats how-to guide](/models/gpt-with-vision#use-a-local-image).
1. Create the `index.ts` file with the following code:
```typescript theme={null}
import { AzureOpenAI } from "openai";
import {
DefaultAzureCredential,
getBearerTokenProvider
} from "@azure/identity";
import type {
ChatCompletion,
ChatCompletionCreateParamsNonStreaming,
} from "openai/resources/index";
// You will need to set these environment variables or edit the following values
const endpoint = process.env.AZURE_OPENAI_ENDPOINT || "Your endpoint";
const imageUrl = process.env["IMAGE_URL"] || "";
// Required Azure OpenAI deployment name and API version
const apiVersion = process.env.OPENAI_API_VERSION || "2024-07-01-preview";
const deploymentName = process.env.AZURE_OPENAI_DEPLOYMENT_NAME || "gpt-4-with-turbo";
// keyless authentication
const credential = new DefaultAzureCredential();
const scope = "https://ai.azure.com/.default";
const azureADTokenProvider = getBearerTokenProvider(credential, scope);
function getClient(): AzureOpenAI {
return new AzureOpenAI({
endpoint,
azureADTokenProvider,
apiVersion,
deployment: deploymentName,
});
}
function createMessages(): ChatCompletionCreateParamsNonStreaming {
return {
messages: [
{ role: "system", content: "You are a helpful assistant." },
{
role: "user",
content: [
{
type: "text",
text: "Describe this picture:",
},
{
type: "image_url",
image_url: {
url: imageUrl,
},
},
],
},
],
model: "",
max_tokens: 2000,
};
}
async function printChoices(completion: ChatCompletion): Promise {
for (const choice of completion.choices) {
console.log(choice.message);
}
}
export async function main() {
console.log("== Get Vision chat Sample ==");
const client = getClient();
const messages = createMessages();
const completion = await client.chat.completions.create(messages);
await printChoices(completion);
}
main().catch((err) => {
console.error("Error occurred:", err);
});
```
2. Create the `tsconfig.json` file to transpile the TypeScript code and copy the following code for ECMAScript.
```json theme={null}
{
"compilerOptions": {
"module": "NodeNext",
"target": "ES2022", // Supports top-level await
"moduleResolution": "NodeNext",
"skipLibCheck": true, // Avoid type errors from node_modules
"strict": true // Enable strict type-checking options
},
"include": ["*.ts"]
}
```
3. Transpile from TypeScript to JavaScript.
```shell theme={null}
tsc
```
4. Sign in to Azure with the following command:
```shell theme={null}
az login
```
5. Run the code with the following command:
```shell theme={null}
node index.js
```
1. Create the `index.ts` file with the following code:
```typescript theme={null}
import { AzureOpenAI } from "openai";
import type {
ChatCompletion,
ChatCompletionCreateParamsNonStreaming,
} from "openai/resources/index";
// You will need to set these environment variables or edit the following values
const endpoint = process.env.AZURE_OPENAI_ENDPOINT || "Your endpoint";
const apiKey = process.env.AZURE_OPENAI_API_KEY || "Your API key";
const imageUrl = process.env["IMAGE_URL"] || "";
// Required Azure OpenAI deployment name and API version
const apiVersion = process.env.OPENAI_API_VERSION || "2024-07-01-preview";
const deploymentName = process.env.AZURE_OPENAI_DEPLOYMENT_NAME || "gpt-4-with-turbo";
function getClient(): AzureOpenAI {
return new AzureOpenAI({
endpoint,
apiKey,
apiVersion,
deployment: deploymentName,
});
}
function createMessages(): ChatCompletionCreateParamsNonStreaming {
return {
messages: [
{ role: "system", content: "You are a helpful assistant." },
{
role: "user",
content: [
{
type: "text",
text: "Describe this picture:",
},
{
type: "image_url",
image_url: {
url: imageUrl,
},
},
],
},
],
model: "",
max_tokens: 2000,
};
}
async function printChoices(completion: ChatCompletion): Promise {
for (const choice of completion.choices) {
console.log(choice.message);
}
}
export async function main() {
console.log("== Get Vision chat Sample ==");
const client = getClient();
const messages = createMessages();
const completion = await client.chat.completions.create(messages);
await printChoices(completion);
}
main().catch((err) => {
console.error("Error occurred:", err);
});
```
2. Create the `tsconfig.json` file to transpile the TypeScript code and copy the following code for ECMAScript.
```json theme={null}
{
"compilerOptions": {
"module": "NodeNext",
"target": "ES2022", // Supports top-level await
"moduleResolution": "NodeNext",
"skipLibCheck": true, // Avoid type errors from node_modules
"strict": true // Enable strict type-checking options
},
"include": ["*.ts"]
}
```
3. Transpile from TypeScript to JavaScript.
```shell theme={null}
tsc
```
4. Run the code with the following command:
```shell theme={null}
node index.js
```
## Clean up resources
If you want to clean up and remove an Azure OpenAI resource, you can delete the resource or resource group. Deleting the resource group also deletes any other resources associated with it.
* [Azure portal](../../../ai-services/multi-service-resource)
* [Azure CLI](../../../ai-services/multi-service-resource)
Use this article to get started using the Azure OpenAI .NET SDK to deploy and use a vision-enabled chat model.
## Prerequisites
* An Azure subscription. You can [create one for free](https://azure.microsoft.com/pricing/purchase-options/azure-account?cid=msft_learn).
* [The .NET 8.0 SDK](https://dotnet.microsoft.com/download)
* An Azure OpenAI in Microsoft Foundry Models resource with a vision-enabled chat model deployed. See [Model availability](/models/models-sold-directly-by-azure) for available regions. For more information about resource creation, see the [resource deployment guide](https://learn.microsoft.com/azure/ai-foundry/openai/how-to/create-resource).
### Microsoft Entra ID prerequisites
For the recommended keyless authentication with Microsoft Entra ID, you need to:
* Install the [Azure CLI](https://learn.microsoft.com/cli/azure/install-azure-cli) used for keyless authentication with Microsoft Entra ID.
* Assign the `Cognitive Services User` role to your user account. You can assign roles in the Azure portal under **Access control (IAM)** > **Add role assignment**.
## Set up
1. Create a new folder `vision-quickstart` and go to the quickstart folder with the following command:
```shell theme={null}
mkdir vision-quickstart && cd vision-quickstart
```
2. Create a new console application with the following command:
```shell theme={null}
dotnet new console
```
3. Install the [OpenAI .NET client library](https://www.nuget.org/packages/Azure.AI.OpenAI/) with the [dotnet add package](https://learn.microsoft.com/dotnet/core/tools/dotnet-add-package) command:
```console theme={null}
dotnet add package Azure.AI.OpenAI
```
4. For the **recommended** keyless authentication with Microsoft Entra ID, install the [Azure.Identity](https://www.nuget.org/packages/Azure.Identity) package with:
```console theme={null}
dotnet add package Azure.Identity
```
5. For the **recommended** keyless authentication with Microsoft Entra ID, sign in to Azure with the following command:
```console theme={null}
az login
```
## Retrieve resource information
You need to retrieve the following information to authenticate your application with your Azure OpenAI resource:
| Variable name | Value |
| ------------------------------ | --------------------------------------------------------------------------------------------------------------------------------------------------------------------------------------------------------- |
| `AZURE_OPENAI_ENDPOINT` | This value can be found in the **Keys and Endpoint** section when examining your resource from the Azure portal. |
| `AZURE_OPENAI_DEPLOYMENT_NAME` | This value will correspond to the custom name you chose for your deployment when you deployed a model. This value can be found under **Resource Management** > **Model Deployments** in the Azure portal. |
Learn more about [keyless authentication](https://learn.microsoft.com/azure/ai-services/authentication) and [setting environment variables](https://learn.microsoft.com/azure/ai-services/cognitive-services-environment-variables).
| Variable name | Value |
| ------------------------------ | --------------------------------------------------------------------------------------------------------------------------------------------------------------------------------------------------------- |
| `AZURE_OPENAI_ENDPOINT` | This value can be found in the **Keys and Endpoint** section when examining your resource from the Azure portal. |
| `AZURE_OPENAI_API_KEY` | This value can be found in the **Keys and Endpoint** section when examining your resource from the Azure portal. You can use either `KEY1` or `KEY2`. |
| `AZURE_OPENAI_DEPLOYMENT_NAME` | This value will correspond to the custom name you chose for your deployment when you deployed a model. This value can be found under **Resource Management** > **Model Deployments** in the Azure portal. |
Learn more about [finding API keys](https://learn.microsoft.com/azure/ai-services/cognitive-services-environment-variables) and [setting environment variables](https://learn.microsoft.com/azure/ai-services/cognitive-services-environment-variables).
## Run the quickstart
The sample code in this quickstart uses Microsoft Entra ID for the recommended keyless authentication. If you prefer to use an API key, you can replace the `DefaultAzureCredential` object with an `AzureKeyCredential` object.
```csharp Microsoft Entra ID theme={null}
AzureOpenAIClient openAIClient = new AzureOpenAIClient(new Uri(endpoint), new DefaultAzureCredential());
```
```csharp API key theme={null}
AzureOpenAIClient openAIClient = new AzureOpenAIClient(new Uri(endpoint), new AzureKeyCredential(key));
```
To run the quickstart, follow these steps:
1. Replace the contents of `Program.cs` with the following code and update the placeholder values with your own.
```csharp theme={null}
using Azure;
using Azure.AI.OpenAI;
using Azure.Identity;
using OpenAI.Chat; // Required for Passwordless auth
string deploymentName = "gpt-4";
string endpoint = Environment.GetEnvironmentVariable("AZURE_OPENAI_ENDPOINT") ?? "https://.openai.azure.com/";
string key = Environment.GetEnvironmentVariable("AZURE_OPENAI_API_KEY") ?? "";
// Use the recommended keyless credential instead of the AzureKeyCredential credential.
AzureOpenAIClient openAIClient = new AzureOpenAIClient(new Uri(endpoint), new DefaultAzureCredential());
//AzureOpenAIClient openAIClient = new AzureOpenAIClient(new Uri(endpoint), new AzureKeyCredential(key));
var chatClient = openAIClient.GetChatClient(deploymentName);
var imageUrl = "YOUR_IMAGE_URL";
var textPart = ChatMessageContentPart.CreateTextPart("Describe this picture:");
var imgPart = ChatMessageContentPart.CreateImagePart(imageUrl);
var chatMessages = new List
{
new SystemChatMessage("You are a helpful assistant."),
new UserChatMessage(textPart, imgPart)
};
ChatCompletion chatCompletion = await chatClient.CompleteChatAsync(chatMessages);
Console.WriteLine($"[ASSISTANT]:");
Console.WriteLine($"{chatCompletion.Content[0].Text}");
```
2. Replace `YOUR_IMAGE_URL` with the publicly accessible of the image you want to upload.
3. Run the application using the `dotnet run` command or the run button at the top of Visual Studio:
```dotnetcli theme={null}
dotnet run
```
## Output
The output of the application will be a description of the image you provided in the `imageUri` variable. The assistant will analyze the image and provide a detailed description based on its content.
## Clean up resources
If you want to clean up and remove an Azure OpenAI resource, you can delete the resource or resource group. Deleting the resource group also deletes any other resources associated with it.
* [Azure portal](../../../ai-services/multi-service-resource)
* [Azure CLI](../../../ai-services/multi-service-resource)
## API details
The following commands show how to call the Chat Completion API with vision-enabled models. For more information, see the [API reference](https://aka.ms/gpt-v-api-ref).
Send a POST request to `https://{RESOURCE_NAME}.openai.azure.com/openai/v1/chat/completions` where
* RESOURCE\_NAME is the name of your Azure OpenAI resource
**Required headers**:
* `Content-Type`: application/json
* `api-key`: \{API\_KEY}
**Body**:
The following is a sample request body. The format is the same as the chat completions API for GPT-4o, except that the message content can be an array containing text and images (either a valid publicly accessible HTTP or HTTPS URL to an image, or a base-64-encoded image).
Remember to set a `"max_tokens"` or `max_completion_tokens` value, or the return output will be cut off. For o-series reasoning models, use `max_completion_tokens` instead of `max_tokens`.
When uploading images, there's a limit of 10 images per chat request.
Supported image formats include JPEG, PNG, GIF (first frame only), and WEBP. Image URLs must be publicly accessible: private endpoints, VNet-restricted, and firewall-restricted URLs are not supported even if they are on a storage account within same or peered VNet. The Vision service fetches images from Microsoft's managed infrastructure, not from within VNet, so the request will be unaware of the Private Endpoint present in VNET.
```json theme={null}
{
"model": "MODEL-DEPLOYMENT-NAME",
"messages": [
{
"role": "system",
"content": "You are a helpful assistant."
},
{
"role": "user",
"content": [
{
"type": "text",
"text": "Describe this picture:"
},
{
"type": "image_url",
"image_url": {
"url": ""
}
}
]
}
],
"max_tokens": 100,
"stream": false
}
```
1. Define your Azure OpenAI `base_url` and `api-key`.
2. Create a client object using those values.
```python theme={null}
import os
from openai import OpenAI
client = OpenAI(
api_key=os.getenv("AZURE_OPENAI_API_KEY"),
base_url="https://YOUR-RESOURCE-NAME.openai.azure.com/openai/v1/",
)
```
3. Then call the client's **create** method. The following code shows a sample request body. The format is the same as the chat completions API for GPT-4o, except that the message content can be an array containing text and images (either a valid HTTP or HTTPS URL to an image, or a base-64-encoded image).
Remember to set a `"max_tokens"` or `max_completion_tokens` value, or the return output will be cut off. For o-series reasoning models, use `max_completion_tokens` instead of `max_tokens`.
```python theme={null}
response = client.chat.completions.create(
model="MODEL-DEPLOYMENT-NAME",
messages=[
{ "role": "system", "content": "You are a helpful assistant." },
{ "role": "user", "content": [
{
"type": "text",
"text": "Describe this picture:"
},
{
"type": "image_url",
"image_url": {
"url": ""
}
}
] }
],
max_tokens=2000
)
print(response)
```
### Use a local image
If you want to use a local image, you can use the following Python code to convert it to base64 so it can be passed to the API. Alternative file conversion tools are available online.
```python theme={null}
import base64
from mimetypes import guess_type
# Function to encode a local image into data URL
def local_image_to_data_url(image_path):
# Guess the MIME type of the image based on the file extension
mime_type, _ = guess_type(image_path)
if mime_type is None:
mime_type = 'application/octet-stream' # Default MIME type if none is found
# Read and encode the image file
with open(image_path, "rb") as image_file:
base64_encoded_data = base64.b64encode(image_file.read()).decode('utf-8')
# Construct the data URL
return f"data:{mime_type};base64,{base64_encoded_data}"
# Example usage
image_path = ''
data_url = local_image_to_data_url(image_path)
print("Data URL:", data_url)
```
When your base64 image data is ready, you can pass it to the API in the request body like this:
```json theme={null}
...
"type": "image_url",
"image_url": {
"url": "data:image/jpeg;base64,"
}
...
```
### Configure image detail level
You can optionally define a `"detail"` parameter in the `"image_url"` field. Choose one of three values, `low`, `high`, or `auto`, to adjust the way the model interprets and processes images.
* `auto` setting: The default setting. The model decides between low or high based on the size of the image input.
* `low` setting: the model doesn't activate the "high res" mode, instead processes a lower resolution 512x512 version, resulting in quicker responses and reduced token consumption for scenarios where fine detail isn't crucial.
* `high` setting: the model activates "high res" mode. Here, the model initially views the low-resolution image and then generates detailed 512x512 segments from the input image. Each segment uses double the token budget, allowing for a more detailed interpretation of the image.
You set the value using the format shown in this example:
```json theme={null}
{
"type": "image_url",
"image_url": {
"url": "",
"detail": "high"
}
}
```
### Output
When you send an image to a vision-enabled model, the API returns a chat completion response with the model's analysis. The response includes content filter results specific to Azure OpenAI.
```json theme={null}
{
"id": "chatcmpl-8VAVx58veW9RCm5K1ttmxU6Cm4XDX",
"object": "chat.completion",
"created": 1702439277,
"model": "gpt-4o",
"prompt_filter_results": [
{
"prompt_index": 0,
"content_filter_results": {
"hate": {
"filtered": false,
"severity": "safe"
},
"self_harm": {
"filtered": false,
"severity": "safe"
},
"sexual": {
"filtered": false,
"severity": "safe"
},
"violence": {
"filtered": false,
"severity": "safe"
}
}
}
],
"choices": [
{
"finish_reason":"stop",
"index": 0,
"message": {
"role": "assistant",
"content": "The picture shows an individual dressed in formal attire, which includes a black tuxedo with a black bow tie. There is an American flag on the left lapel of the individual's jacket. The background is predominantly blue with white text that reads \"THE KENNEDY PROFILE IN COURAGE AWARD\" and there are also visible elements of the flag of the United States placed behind the individual."
},
"content_filter_results": {
"hate": {
"filtered": false,
"severity": "safe"
},
"self_harm": {
"filtered": false,
"severity": "safe"
},
"sexual": {
"filtered": false,
"severity": "safe"
},
"violence": {
"filtered": false,
"severity": "safe"
}
}
}
],
"usage": {
"prompt_tokens": 1156,
"completion_tokens": 80,
"total_tokens": 1236
}
}
```
Every response includes a `"finish_reason"` field. It has the following possible values:
* `stop`: API returned complete model output.
* `length`: Incomplete model output due to the `max_tokens` input parameter or model's token limit.
* `content_filter`: Omitted content due to a flag from our content filters.
## Input limitations
This section describes the limitations of vision-enabled chat models.
### Image support
* **Maximum input image size**: The maximum size for input images is restricted to 20 MB.
* **Low resolution accuracy**: When images are analyzed using the "low resolution" setting, it allows for faster responses and uses fewer input tokens for certain use cases. However, this could impact the accuracy of object and text recognition within the image.
* **Image chat restriction**: When you upload images in [Microsoft Foundry portal](https://ai.azure.com/?cid=learnDocs) or the API, you're limited to 10 images per chat call.
## Special pricing information
The following content is an example only, and prices are subject to change in the future.
Vision-enabled models accrue charges like other Azure OpenAI chat models. You pay a per-token rate for the prompts and completions, detailed on the [Pricing page](https://azure.microsoft.com/pricing/details/cognitive-services/openai-service/). The base charges and other features are outlined here:
Base Pricing for GPT-4 Turbo with Vision is:
* Input: \$0.01 per 1,000 tokens
* Output: \$0.03 per 1,000 tokens
See the [Tokens section of the overview](https://learn.microsoft.com/azure/ai-foundry/openai/overview#tokens) for information on how text and images translate to tokens.
### Example image price calculation
For a typical use case, take an image with both visible objects and text and a 100-token prompt input. When the service processes the prompt, it generates 100 tokens of output. In the image, both text and objects can be detected. The price of this transaction would be:
| Item | Detail | Cost |
| ------------------------------------------------------------------------------------------------------------------------------------------- | --------------------------- | ------------- |
| Text prompt input | 100 text tokens | \$0.001 |
| Example image input (see [Image tokens](https://learn.microsoft.com/azure/ai-foundry/openai/overview#image-tokens-gpt-4-turbo-with-vision)) | 170 + 85 image tokens | \$0.00255 |
| Enhanced add-on features for OCR | \$1.50 / 1,000 transactions | \$0.0015 |
| Enhanced add-on features for Object Grounding | \$1.50 / 1,000 transactions | \$0.0015 |
| Output Tokens | 100 tokens (assumed) | \$0.003 |
| **Total** | | **\$0.00955** |
## Troubleshooting
| Issue | Resolution |
| ------------------- | --------------------------------------------------------------- |
| Output truncated | Increase `max_tokens` or `max_completion_tokens` value |
| Image not processed | Verify URL is publicly accessible or base64 encoding is correct |
| Rate limit exceeded | Implement retry logic with exponential backoff |
## Related content
* [Learn more about Azure OpenAI](/models/models-sold-directly-by-azure).
* [Chat completions API reference](https://aka.ms/gpt-v-api-ref)
 ## Go to Foundry
 ## Create a new Python application
Create a new Python file named *quickstart.py*. Open the new file in your preferred editor or IDE.
1. Replace the contents of *quickstart.py* with the following code.
```python theme={null}
# Packages required:
import requests
import json
api_base = '
## Create a new Python application
Create a new Python file named *quickstart.py*. Open the new file in your preferred editor or IDE.
1. Replace the contents of *quickstart.py* with the following code.
```python theme={null}
# Packages required:
import requests
import json
api_base = '