;
};
export const ZoneContent = ({group, value, options = [], values = [], defaultValue, children}) => {
const optionKey = options.map(option => `${option.id}:${option.title}`).join("|");
const [activePivot, setActivePivot] = useState(defaultValue || values[0]);
const slugify = value => value.toLowerCase().replace(/[^a-z0-9]+/g, "-").replace(/^-|-$/g, "");
const resolvePivot = () => {
if (typeof window === "undefined") return defaultValue || values[0];
const params = new URLSearchParams(window.location.search);
const requested = params.get("pivots");
if (requested) {
const requestedIds = requested.split(",").map(value => value.trim()).filter(Boolean);
const match = requestedIds.find(id => values.includes(id));
if (match) return match;
}
const hash = window.location.hash.replace(/^#/, "");
if (hash) {
const match = options.find(option => option.id === hash || slugify(option.title) === hash);
if (match) return match.id;
}
try {
const stored = window.localStorage.getItem(`foundry-zone-pivot:${group}`);
if (values.includes(stored)) return stored;
} catch {
return defaultValue || values[0];
}
return defaultValue || values[0];
};
useEffect(() => {
setActivePivot(resolvePivot());
}, [group, defaultValue, values.join("|"), optionKey]);
useEffect(() => {
const onPivotChange = event => {
if (event.detail?.group === group && values.includes(event.detail.value)) {
setActivePivot(event.detail.value);
}
};
window.addEventListener("foundry-zone-pivot-change", onPivotChange);
return () => window.removeEventListener("foundry-zone-pivot-change", onPivotChange);
}, [group, values.join("|")]);
if (activePivot !== value) return null;
return <>{children};
};
The DALL-E image generation model `dall-e-3` was retired on March 4, 2026, and is no longer available for new deployments. Existing deployments are non-functional. Use a `gpt-image-` series model for image generation instead. See the [image generation how-to guide](https://learn.microsoft.com/azure/ai-foundry/openai/how-to/dall-e) for updated instructions.
OpenAI's image generation models create images from user-provided text prompts and optional images. This article explains how to use these models, configure options, and benefit from advanced image generation capabilities in Azure.
You can do image generation via [image generation API](https://learn.microsoft.com/azure/ai-foundry/openai/dall-e-quickstart) or [responses API](https://learn.microsoft.com/azure/ai-foundry/openai/how-to/responses). Or you can experiment with image generation in the [Foundry portal](https://ai.azure.com)
To select your preferred API approach and model, use the tabs at the start of this page.
## Models and capabilities
Use this table to learn the differences between the different image generation models, and to help you choose the best model for your image generation needs.
| Aspect | GPT-Image-2 | GPT-Image-1.5 | GPT-Image-1 | GPT-Image-1-Mini |
| -------------------------------------- | -------------------------------------------------------------------------------------------------------------------------------------------------- | ----------------------------------------------------------------------------------------------- | ------------------------------------------------------------------------------------------- | ------------------------------------------------------------------------------------------- |
| **Availability** | Generally Available | Limited access preview ([Apply for GPT-image-1.5 access](https://aka.ms/oai/gptimage1.5access)) | Limited access preview ([Apply for GPT-image-1 access](https://aka.ms/oai/gptimage1access)) | Limited access preview ([Apply for GPT-image-1 access](https://aka.ms/oai/gptimage1access)) |
| **Strengths** | Best for high-resolution and 4K generation, improved image editing, and broad aspect-ratio support | Best for realism, instruction-following, multimodal context, and improved speed/cost | Best for realism, instruction-following, and multimodal context | Best for fast prototyping, bulk generation, or cost-sensitive use cases |
| **Input / Output Modalities & Format** | Accepts **text + image** inputs; outputs images only in **base64** (no URL option). | Accepts **text + image** inputs; outputs images only in **base64** (no URL option). | Accepts **text + image** inputs; outputs images only in **base64** (no URL option). | Accepts **text + image** inputs; outputs images only in **base64** (no URL option). |
| **Image Sizes / Resolutions** | Arbitrary resolutions: both edges must be multiples of 16 px; long edge up to 3,840 px (4K); aspect ratio up to 3:1; pixel count 655,360–8,294,400 | 1024×1024, 1024×1536, 1536×1024 | 1024×1024, 1024×1536, 1536×1024 | 1024×1024, 1024×1536, 1536×1024 |
| **Quality Options** | Reworked quality controls: `low`, `medium`, `high`; `low` is optimized for latency-sensitive use cases | `low`, `medium`, `high` (default = high) | `low`, `medium`, `high` (default = high) | `low`, `medium`, `high` (default = medium) |
| **Number of Images per Request** | 1–10 images per request (`n` parameter) | 1–10 images per request (`n` parameter) | 1–10 images per request (`n` parameter) | 1–10 images per request (`n` parameter) |
| **Editing (inpainting / variations)** | ✅ Improved editing performance with inpainting and variations | ✅ Supports inpainting and variations with mask + prompt | ✅ Supports inpainting and variations with mask + prompt | ✅ Supports inpainting and variations with mask + prompt |
| **Face Preservation** | ✅ Advanced **face preservation** for realistic, consistent results | ✅ Advanced **face preservation** for realistic, consistent results | ✅ Advanced **face preservation** for realistic, consistent results | ❌ No dedicated face preservation; better for **non-portrait/general creative** imagery |
| **Performance & Cost** | High-fidelity, **realism-optimized** model; higher latency and cost | High-fidelity, **realism-optimized** model; improved efficiency and latency over GPT-Image-1 | High-fidelity, **realism-optimized** model; higher latency and cost | **Cost-efficient** and **faster** for large-scale or iterative generation |
## Quickstart
Use this guide to get started calling the Azure OpenAI in Microsoft Foundry Models image generation REST APIs by using Python.
### Prerequisites
* An Azure subscription. [Create one for free](https://azure.microsoft.com/pricing/purchase-options/azure-account?cid=msft_learn).
* Python 3.8 or later version.
* The following Python libraries installed: `os`, `requests`, `json`.
* An Azure OpenAI resource created in a supported region. See [Region availability](https://learn.microsoft.com/azure/ai-foundry/openai/concepts/models#model-summary-table-and-region-availability).
* Then, you need to deploy a gpt-image series model with your Azure resource. For more information, see [Create a resource and deploy a model with Azure OpenAI](https://learn.microsoft.com/en-us/azure/foundry-classic/openai/how-to/create-resource).
### Setup
#### Retrieve key and endpoint
To successfully call the Azure OpenAI APIs, you need the following information about your Azure OpenAI resource:
| Variable | Name | Value |
| ------------ | ---------- | -------------------------------------------------------------------------------------------------------------------------------------------------------------------------------------------------------------------------------------------------- |
| **Endpoint** | `api_base` | The endpoint value is located under **Keys and Endpoint** for your resource in the Azure portal. You can also find the endpoint via the **Deployments** page in Foundry portal. An example endpoint is: `https://docs-test-001.openai.azure.com/`. |
| **Key** | `api_key` | The key value is also located under **Keys and Endpoint** for your resource in the Azure portal. Azure generates two keys for your resource. You can use either value. |
Go to your resource in the Azure portal. On the navigation pane, select **Keys and Endpoint** under **Resource Management**. Copy the **Endpoint** value and an access key value. You can use either the **KEY 1** or **KEY 2** value. Always having two keys allows you to securely rotate and regenerate keys without causing a service disruption.
### Environment variables
Create and assign persistent environment variables for your key and endpoint.
```cmd Command Line theme={null}
setx AZURE_OPENAI_API_KEY "REPLACE_WITH_YOUR_KEY_VALUE_HERE"
setx AZURE_OPENAI_ENDPOINT "REPLACE_WITH_YOUR_ENDPOINT_HERE"
```
```powershell PowerShell theme={null}
[System.Environment]::SetEnvironmentVariable('AZURE_OPENAI_API_KEY', 'REPLACE_WITH_YOUR_KEY_VALUE_HERE', 'User')
[System.Environment]::SetEnvironmentVariable('AZURE_OPENAI_ENDPOINT', 'REPLACE_WITH_YOUR_ENDPOINT_HERE', 'User')
```
```bash Bash theme={null}
export AZURE_OPENAI_API_KEY="REPLACE_WITH_YOUR_KEY_VALUE_HERE"
export AZURE_OPENAI_ENDPOINT="REPLACE_WITH_YOUR_ENDPOINT_HERE"
```
### Create a new Python application
Create a new Python file named *quickstart.py*. Open the new file in your preferred editor or IDE.
1. Replace the contents of *quickstart.py* with the following code. Change the value of `prompt` to your preferred text. Also set `deployment` to the deployment name you chose when you deployed the image generation model.
```python theme={null}
import os
import requests
import base64
from PIL import Image
from io import BytesIO
# set environment variables
endpoint = os.getenv("AZURE_OPENAI_ENDPOINT")
subscription_key = os.getenv("AZURE_OPENAI_API_KEY")
deployment = "gpt-image-1.5" # the name of your GPT-image series deployment
api_version = "2025-04-01-preview" # or later version
def decode_and_save_image(b64_data, output_filename):
image = Image.open(BytesIO(base64.b64decode(b64_data)))
image.show()
image.save(output_filename)
def save_all_images_from_response(response_data, filename_prefix):
for idx, item in enumerate(response_data['data']):
b64_img = item['b64_json']
filename = f"{filename_prefix}_{idx+1}.png"
decode_and_save_image(b64_img, filename)
print(f"Image saved to: '{filename}'")
base_path = f'openai/deployments/{deployment}/images'
params = f'?api-version={api_version}'
generation_url = f"{endpoint}{base_path}/generations{params}"
generation_body = {
"prompt": "girl falling asleep",
"n": 1,
"size": "1024x1024",
"quality": "medium",
"output_format": "png",
# "background": "transparent", # "auto" or "transparent" (GPT-image-1 only; requires PNG output)
# "output_compression": 100, # 0-100 compression level (JPEG output only)
}
generation_response = requests.post(
generation_url,
headers={
'Api-Key': subscription_key,
'Content-Type': 'application/json',
},
json=generation_body
).json()
save_all_images_from_response(generation_response, "generated_image")
# In addition to generating images, you can edit them.
edit_url = f"{endpoint}{base_path}/edits{params}"
edit_body = {
"prompt": "girl falling asleep",
"n": 1,
"size": "1024x1024",
"quality": "medium"
}
files = {
"image": ("generated_image_1.png", open("generated_image_1.png", "rb"), "image/png"),
# You can use a mask to specify which parts of the image you want to edit.
# The mask must be the same size as the input image.
# "mask": ("mask.png", open("mask.png", "rb"), "image/png"),
}
edit_response = requests.post(
edit_url,
headers={'Api-Key': subscription_key},
data=edit_body,
files=files
).json()
save_all_images_from_response(edit_response, "edited_image")
```
The script makes a synchronous image generation API call.
Remember to remove the key from your code when you're done, and never post your key publicly. For production, use a secure way of storing and accessing your credentials. For more information, see [Azure Key Vault](https://learn.microsoft.com/azure/key-vault/general/overview).
1. Run the application with the `python` command:
```console theme={null}
python quickstart.py
```
Wait a few moments to get the response.
### Output
The output from a successful image generation API call looks like the following example. The `b64_json` field contains the base64-encoded output image data.
```json theme={null}
{
"created": 1698116662,
"data": [
{
"b64_json": ""
}
]
}
```
A successful response includes:
* A `created` timestamp (Unix epoch time)
* A `data` array with at least one image object- Either a `b64_json` (base64-encoded image data) value for each generated image
#### Common errors
| Error | Cause | Resolution |
| -------------------------- | ---------------------------------------------------- | ---------------------------------------------------------------------------- |
| `DeploymentNotFound` | The deployment name doesn't exist or is misspelled | Verify the deployment name in the Azure portal or Foundry portal |
| `401 Unauthorized` | Invalid or missing API key | Check that your `AZURE_OPENAI_API_KEY` environment variable is set correctly |
| `429 Too Many Requests` | Rate limit exceeded | Implement retry logic with exponential backoff |
| `content_policy_violation` | Prompt or generated output blocked by content filter | Modify the prompt to comply with the content policy |
| `InvalidPayload` | Missing required parameters or invalid values | Check that `prompt`, `size`, and `n` are correctly specified |
The Image APIs come with a content moderation filter. If the service recognizes your prompt as harmful content, it doesn't generate an image. For more information, see [Content filtering](https://learn.microsoft.com/en-us/azure/foundry-classic/foundry-models/concepts/content-filter). For examples of error responses, see the [Image generation how-to guide](/models/dall-e).
The system returns an operation status of `Failed` and the `error.code` value in the message is set to `contentFilter`. Here's an example:
```json theme={null}
{
"created": 1698435368,
"error":
{
"code": "contentFilter",
"message": "Your task failed as a result of our safety system."
}
}
```
It's also possible that the generated image itself is filtered. In this case, the error message is set to `Generated image was filtered as a result of our safety system.`. Here's an example:
```json theme={null}
{
"created": 1698435368,
"error":
{
"code": "contentFilter",
"message": "Generated image was filtered as a result of our safety system."
}
}
```
### Clean up resources
If you want to clean up and remove an Azure OpenAI resource, you can delete the resource or resource group. Deleting the resource group also deletes any other resources associated with it.
* [Azure portal](../../../ai-services/multi-service-resource)
* [Azure CLI](../../../ai-services/multi-service-resource)
Use this guide to get started generating images with the Azure OpenAI SDK for Python.
[Library source code](https://github.com/openai/openai-python/tree/main/src/openai) | [Package](https://github.com/openai/openai-python) | [Samples](https://github.com/openai/openai-python/tree/main/examples)
### Prerequisites
* An Azure subscription. [Create one for free](https://azure.microsoft.com/pricing/purchase-options/azure-account?cid=msft_learn).
* Python 3.8 or later version.
* An Azure OpenAI resource created in a compatible region. See [Region availability](https://learn.microsoft.com/azure/ai-foundry/openai/concepts/models#model-summary-table-and-region-availability).
* Access the Azure OpenAI resource endpoint and keys in the Azure portal.
* A deployed image generation model:
* **GPT-image-1 series**: Deploy a `gpt-image-1`-series model. Requires [limited access registration](https://aka.ms/oai/access).
For more information, see [Create a resource and deploy a model with Azure OpenAI](https://learn.microsoft.com/en-us/azure/foundry-classic/openai/how-to/create-resource).
### Setup
#### Retrieve key and endpoint
To successfully call the Azure OpenAI APIs, you need the following information about your Azure OpenAI resource:
| Variable | Name | Value |
| ------------ | ---------- | ------------------------------------------------------------------------------------------------------------------------------------------------------------------------------------------------------------------------------------------------------------ |
| **Endpoint** | `api_base` | The endpoint value is located under **Keys and Endpoint** for your resource in the Azure portal. You can also find the endpoint via the **Deployments** page in Microsoft Foundry portal. An example endpoint is: `https://docs-test-001.openai.azure.com/`. |
| **Key** | `api_key` | The key value is also located under **Keys and Endpoint** for your resource in the Azure portal. Azure generates two keys for your resource. You can use either value. |
Go to your resource in the Azure portal. On the navigation pane, select **Keys and Endpoint** under **Resource Management**. Copy the **Endpoint** value and an access key value. You can use either the **KEY 1** or **KEY 2** value. Always having two keys allows you to securely rotate and regenerate keys without causing a service disruption.
### Environment variables
Create and assign persistent environment variables for your key and endpoint.
```cmd Command Line theme={null}
setx AZURE_OPENAI_API_KEY "REPLACE_WITH_YOUR_KEY_VALUE_HERE"
setx AZURE_OPENAI_ENDPOINT "REPLACE_WITH_YOUR_ENDPOINT_HERE"
```
```powershell PowerShell theme={null}
[System.Environment]::SetEnvironmentVariable('AZURE_OPENAI_API_KEY', 'REPLACE_WITH_YOUR_KEY_VALUE_HERE', 'User')
[System.Environment]::SetEnvironmentVariable('AZURE_OPENAI_ENDPOINT', 'REPLACE_WITH_YOUR_ENDPOINT_HERE', 'User')
```
```bash Bash theme={null}
export AZURE_OPENAI_API_KEY="REPLACE_WITH_YOUR_KEY_VALUE_HERE"
export AZURE_OPENAI_ENDPOINT="REPLACE_WITH_YOUR_ENDPOINT_HERE"
```
### Install the Python SDK
Open a command prompt and browse to your project folder. Install the OpenAI Python SDK by using the following command:
```bash theme={null}
pip install openai
```
Install the following libraries as well:
```bash theme={null}
pip install requests
pip install pillow
```
### Generate images
Create a new python file, *quickstart.py*. Open it in your preferred editor or IDE.
Replace the contents of *quickstart.py* with the following code.
```python theme={null}
from openai import AzureOpenAI
import os
import base64
from PIL import Image
client = AzureOpenAI(
api_version="2025-04-01-preview",
api_key=os.environ["AZURE_OPENAI_API_KEY"],
azure_endpoint=os.environ['AZURE_OPENAI_ENDPOINT']
)
result = client.images.generate(
model="gpt-image-1", # the name of your GPT-image series deployment
prompt="a close-up of a bear walking through the forest",
n=1,
size="1024x1024",
quality="high",
output_format="png",
# background="transparent", # Set to "transparent" for transparent backgrounds (GPT-image-1 only; requires PNG)
# output_compression=100, # 0-100 compression level (JPEG output only)
)
# Set the directory for the stored image
image_dir = os.path.join(os.curdir, 'images')
# If the directory doesn't exist, create it
if not os.path.isdir(image_dir):
os.mkdir(image_dir)
# Initialize the image path (note the filetype should be png)
image_path = os.path.join(image_dir, 'generated_image.png')
# GPT-image-1 models always return base64-encoded image data
image_base64 = result.data[0].b64_json
generated_image = base64.b64decode(image_base64)
with open(image_path, "wb") as image_file:
image_file.write(generated_image)
# Display the image in the default image viewer
image = Image.open(image_path)
image.show()
```
1. Make sure the `AZURE_OPENAI_ENDPOINT` and `AZURE_OPENAI_API_KEY` environment variables are set.
2. Change the value of `prompt` to your preferred text.
3. Change the value of `model` to the name of your deployed GPT-image series model.
Remember to remove the key from your code when you're done, and never post your key publicly. For production, use a secure way of storing and accessing your credentials. For more information, see [Azure Key Vault](https://learn.microsoft.com/azure/key-vault/general/overview).
Run the application with the `python` command:
```console theme={null}
python quickstart.py
```
Wait a few moments to get the response.
### Output
Azure OpenAI stores the output image in the *generated\_image.png* file in your specified directory. The script also displays the image in your default image viewer.
A successful response includes:
* A `created` timestamp
* A `data` array with at least one image object
* A `b64_json` field with base64-encoded image data (GPT-image-1 models always return base64)
#### Common errors
| Error | Cause | Resolution |
| -------------------------- | ---------------------------------------------------- | ---------------------------------------------------------------------------- |
| `DeploymentNotFound` | The deployment name doesn't exist or is misspelled | Verify the deployment name in the Azure portal or Foundry portal |
| `AuthenticationError` | Invalid or missing API key | Check that your `AZURE_OPENAI_API_KEY` environment variable is set correctly |
| `RateLimitError` | Rate limit exceeded | Implement retry logic with exponential backoff |
| `content_policy_violation` | Prompt or generated output blocked by content filter | Modify the prompt to comply with the content policy |
The Image APIs come with a content moderation filter. If the service recognizes your prompt as harmful content, it doesn't generate an image. For more information, see [Content filtering](https://learn.microsoft.com/en-us/azure/foundry-classic/foundry-models/concepts/content-filter).
### Clean up resources
If you want to clean up and remove an Azure OpenAI resource, you can delete the resource or resource group. Deleting the resource group also deletes any other resources associated with it.
* [Azure portal](../../../ai-services/multi-service-resource)
* [Azure CLI](../../../ai-services/multi-service-resource)
Use this guide to get started generating images with the Azure OpenAI SDK for C#.
[Library source code](https://github.com/Azure/azure-sdk-for-net/tree/main/sdk/openai/Azure.AI.OpenAI) | [Package (NuGet)](https://www.nuget.org/packages/Azure.AI.OpenAI/) | [Samples](https://github.com/Azure/azure-sdk-for-net/tree/main/sdk/openai/Azure.AI.OpenAI/tests/Samples)
### Prerequisites
* An Azure subscription - [Create one for free](https://azure.microsoft.com/pricing/purchase-options/azure-account?cid=msft_learn)
* The [.NET 7 SDK](https://dotnet.microsoft.com/download/dotnet/7.0)
* An Azure OpenAI resource created in a supported region (see [Region availability](https://learn.microsoft.com/azure/ai-foundry/openai/concepts/models#model-summary-table-and-region-availability)). For more information, see [Create a resource and deploy a model with Azure OpenAI](https://learn.microsoft.com/en-us/azure/foundry-classic/openai/how-to/create-resource).
#### Microsoft Entra ID prerequisites
For the recommended keyless authentication with Microsoft Entra ID, you need to:
* Install the [Azure CLI](https://learn.microsoft.com/cli/azure/install-azure-cli) used for keyless authentication with Microsoft Entra ID.
* Assign the `Cognitive Services User` role to your user account. You can assign roles in the Azure portal under **Access control (IAM)** > **Add role assignment**.
### Set up
1. Create a new folder `image-quickstart` and go to the quickstart folder with the following command:
```shell theme={null}
mkdir image-quickstart && cd image-quickstart
```
2. Create a new console application with the following command:
```shell theme={null}
dotnet new console
```
3. Install the [OpenAI .NET client library](https://www.nuget.org/packages/Azure.AI.OpenAI/) with the [dotnet add package](https://learn.microsoft.com/dotnet/core/tools/dotnet-add-package) command:
```console theme={null}
dotnet add package Azure.AI.OpenAI --version 1.0.0-beta.6
```
4. For the **recommended** keyless authentication with Microsoft Entra ID, install the [Azure.Identity](https://www.nuget.org/packages/Azure.Identity) package with:
```console theme={null}
dotnet add package Azure.Identity
```
5. For the **recommended** keyless authentication with Microsoft Entra ID, sign in to Azure with the following command:
```console theme={null}
az login
```
### Retrieve resource information
You need to retrieve the following information to authenticate your application with your Azure OpenAI resource:
| Variable name | Value |
| ------------------------------ | --------------------------------------------------------------------------------------------------------------------------------------------------------------------------------------------------------- |
| `AZURE_OPENAI_ENDPOINT` | This value can be found in the **Keys and Endpoint** section when examining your resource from the Azure portal. |
| `AZURE_OPENAI_DEPLOYMENT_NAME` | This value will correspond to the custom name you chose for your deployment when you deployed a model. This value can be found under **Resource Management** > **Model Deployments** in the Azure portal. |
Learn more about [keyless authentication](https://learn.microsoft.com/azure/ai-services/authentication) and [setting environment variables](https://learn.microsoft.com/azure/ai-services/cognitive-services-environment-variables).
| Variable name | Value |
| ------------------------------ | --------------------------------------------------------------------------------------------------------------------------------------------------------------------------------------------------------- |
| `AZURE_OPENAI_ENDPOINT` | This value can be found in the **Keys and Endpoint** section when examining your resource from the Azure portal. |
| `AZURE_OPENAI_API_KEY` | This value can be found in the **Keys and Endpoint** section when examining your resource from the Azure portal. You can use either `KEY1` or `KEY2`. |
| `AZURE_OPENAI_DEPLOYMENT_NAME` | This value will correspond to the custom name you chose for your deployment when you deployed a model. This value can be found under **Resource Management** > **Model Deployments** in the Azure portal. |
Learn more about [finding API keys](https://learn.microsoft.com/azure/ai-services/cognitive-services-environment-variables) and [setting environment variables](https://learn.microsoft.com/azure/ai-services/cognitive-services-environment-variables).
### Run the quickstart
The sample code in this quickstart uses Microsoft Entra ID for the recommended keyless authentication. If you prefer to use an API key, you can replace the `DefaultAzureCredential` object with an `AzureKeyCredential` object.
```csharp Microsoft Entra ID theme={null}
AzureOpenAIClient openAIClient = new AzureOpenAIClient(new Uri(endpoint), new DefaultAzureCredential());
```
```csharp API key theme={null}
AzureOpenAIClient openAIClient = new AzureOpenAIClient(new Uri(endpoint), new AzureKeyCredential(key));
```
To run the quickstart, follow these steps:
1. Replace the contents of `Program.cs` with the following code and update the placeholder values with your own.
```csharp theme={null}
using Azure;
using Azure.AI.OpenAI;
using OpenAI.Images;
using static System.Environment;
string endpoint = Environment.GetEnvironmentVariable("AZURE_OPENAI_ENDPOINT") ?? "https://.openai.azure.com/";
string key = Environment.GetEnvironmentVariable("AZURE_OPENAI_API_KEY") ?? "";
// Use the recommended keyless credential instead of the AzureKeyCredential credential.
AzureOpenAIClient openAIClient = new AzureOpenAIClient(new Uri(endpoint), new DefaultAzureCredential());
//AzureOpenAIClient openAIClient = new AzureOpenAIClient(new Uri(endpoint), new AzureKeyCredential(key));
// This must match the custom deployment name you chose for your model
ImageClient chatClient = openAIClient.GetImageClient("gpt-image-1");
var imageGeneration = await chatClient.GenerateImageAsync(
"a happy monkey sitting in a tree, in watercolor",
new ImageGenerationOptions()
{
Size = GeneratedImageSize.W1024xH1024
}
);
Console.WriteLine(imageGeneration.Value.ImageUri);
```
2. Run the application using the `dotnet run` command or the run button at the top of Visual Studio:
```dotnetcli theme={null}
dotnet run
```
### Output
The base64-encoded image data is printed to the console.
GPT-image-1 and GPT-image-2 also support additional parameters such as `quality` (`low`, `medium`, `high`), `output_format` (`png`, `jpeg`), `background` (`auto`, `transparent`), and `output_compression` (0-100, JPEG only). For details, see [API options](https://learn.microsoft.com/azure/ai-foundry/openai/how-to/dall-e#specify-api-options).
The Image APIs come with a content moderation filter. If the service recognizes your prompt as harmful content, it won't return a generated image. For more information, see the [content filter](https://learn.microsoft.com/en-us/azure/foundry-classic/foundry-models/concepts/content-filter) article.
### Clean up resources
If you want to clean up and remove an Azure OpenAI resource, you can delete the resource. Before deleting the resource, you must first delete any deployed models.
* [Azure portal](../../../ai-services/multi-service-resource)
* [Azure CLI](../../../ai-services/multi-service-resource)
Use this guide to get started generating images with the Azure OpenAI SDK for Java.
[Library source code](https://github.com/Azure/azure-sdk-for-java/tree/main/sdk/openai/azure-ai-openai) | [Artifact (Maven)](https://central.sonatype.com/artifact/com.azure/azure-ai-openai/1.0.0-beta.3) | [Samples](https://github.com/Azure/azure-sdk-for-java/tree/main/sdk/openai/azure-ai-openai/src/samples)
### Prerequisites
* An Azure subscription - [Create one for free](https://azure.microsoft.com/pricing/purchase-options/azure-account?cid=msft_learn)
* The current version of the [Java Development Kit (JDK)](https://www.microsoft.com/openjdk)
* Install [Apache Maven](https://maven.apache.org/install.html).
* An Azure OpenAI resource created in a supported region (see [Region availability](https://learn.microsoft.com/azure/ai-foundry/openai/concepts/models#model-summary-table-and-region-availability)). For more information, see [Create a resource and deploy a model with Azure OpenAI](https://learn.microsoft.com/en-us/azure/foundry-classic/openai/how-to/create-resource).
#### Microsoft Entra ID prerequisites
For the recommended keyless authentication with Microsoft Entra ID, you need to:
* Install the [Azure CLI](https://learn.microsoft.com/cli/azure/install-azure-cli) used for keyless authentication with Microsoft Entra ID.
* Assign the `Cognitive Services User` role to your user account. You can assign roles in the Azure portal under **Access control (IAM)** > **Add role assignment**.
### Set up
1. Create a new folder `image-quickstart` and go to the quickstart folder with the following command:
```shell theme={null}
mkdir image-quickstart && cd image-quickstart
```
2. Install [Apache Maven](https://maven.apache.org/install.html). Then run `mvn -v` to confirm successful installation.
3. Create a new `pom.xml` file in the root of your project, and copy the following code into it:
```xml theme={null}
4.0.0com.azure.samplesquickstart-image-generation1.0.0-SNAPSHOTsrcmaven-compiler-plugin3.7.01.81.8com.azureazure-ai-openai1.0.0-beta.3com.azureazure-core1.53.0com.azureazure-identity1.15.1org.slf4jslf4j-simple1.7.9
```
4. Install the Azure OpenAI SDK and dependencies.
```console theme={null}
mvn clean dependency:copy-dependencies
```
5. For the **recommended** keyless authentication with Microsoft Entra ID, sign in to Azure with the following command:
```console theme={null}
az login
```
### Retrieve resource information
You need to retrieve the following information to authenticate your application with your Azure OpenAI resource:
| Variable name | Value |
| ------------------------------ | --------------------------------------------------------------------------------------------------------------------------------------------------------------------------------------------------------- |
| `AZURE_OPENAI_ENDPOINT` | This value can be found in the **Keys and Endpoint** section when examining your resource from the Azure portal. |
| `AZURE_OPENAI_DEPLOYMENT_NAME` | This value will correspond to the custom name you chose for your deployment when you deployed a model. This value can be found under **Resource Management** > **Model Deployments** in the Azure portal. |
Learn more about [keyless authentication](https://learn.microsoft.com/azure/ai-services/authentication) and [setting environment variables](https://learn.microsoft.com/azure/ai-services/cognitive-services-environment-variables).
| Variable name | Value |
| ------------------------------ | --------------------------------------------------------------------------------------------------------------------------------------------------------------------------------------------------------- |
| `AZURE_OPENAI_ENDPOINT` | This value can be found in the **Keys and Endpoint** section when examining your resource from the Azure portal. |
| `AZURE_OPENAI_API_KEY` | This value can be found in the **Keys and Endpoint** section when examining your resource from the Azure portal. You can use either `KEY1` or `KEY2`. |
| `AZURE_OPENAI_DEPLOYMENT_NAME` | This value will correspond to the custom name you chose for your deployment when you deployed a model. This value can be found under **Resource Management** > **Model Deployments** in the Azure portal. |
Learn more about [finding API keys](https://learn.microsoft.com/azure/ai-services/cognitive-services-environment-variables) and [setting environment variables](https://learn.microsoft.com/azure/ai-services/cognitive-services-environment-variables).
### Run the app
The sample code in this quickstart uses Microsoft Entra ID for the recommended keyless authentication. If you prefer to use an API key, you can replace the `DefaultAzureCredential` object with an `AzureKeyCredential` object.
```java Microsoft Entra ID theme={null}
OpenAIAsyncClient client = new OpenAIClientBuilder()
.endpoint(endpoint)
.credential(new DefaultAzureCredentialBuilder().build())
.buildAsyncClient();
```
```java API key theme={null}
OpenAIAsyncClient client = new OpenAIClientBuilder()
.endpoint(endpoint)
.credential(new AzureKeyCredential(key))
.buildAsyncClient();
```
Follow these steps to create a console application for image generation.
1. Create a new file named *Quickstart.java* in the same project root directory.
2. Copy the following code into *Quickstart.java*:
```java theme={null}
import com.azure.ai.openai.OpenAIAsyncClient;
import com.azure.ai.openai.OpenAIClientBuilder;
import com.azure.ai.openai.models.ImageGenerationOptions;
import com.azure.ai.openai.models.ImageLocation;
import com.azure.core.credential.AzureKeyCredential;
import com.azure.core.models.ResponseError;
import java.util.concurrent.TimeUnit;
public class Quickstart {
public static void main(String[] args) throws InterruptedException {
String endpoint = System.getenv("AZURE_OPENAI_ENDPOINT");
// Use the recommended keyless credential instead of the AzureKeyCredential credential.
OpenAIAsyncClient client = new OpenAIClientBuilder()
.endpoint(endpoint)
.credential(new DefaultAzureCredentialBuilder().build())
.buildAsyncClient();
ImageGenerationOptions imageGenerationOptions = new ImageGenerationOptions(
"A drawing of the Seattle skyline in the style of Van Gogh");
client.getImages(imageGenerationOptions).subscribe(
images -> {
for (ImageLocation imageLocation : images.getData()) {
ResponseError error = imageLocation.getError();
if (error != null) {
System.out.printf("Image generation operation failed. Error code: %s, error message: %s.%n",
error.getCode(), error.getMessage());
} else {
System.out.printf(
"Image location URL that provides temporary access to download the generated image is %s.%n",
imageLocation.getUrl());
}
}
},
error -> System.err.println("There was an error getting images." + error),
() -> System.out.println("Completed getImages."));
// The .subscribe() creation and assignment isn't a blocking call.
// The thread sleeps so the program does not end before the send operation is complete.
// Use .block() instead of .subscribe() for a synchronous call.
TimeUnit.SECONDS.sleep(10);
}
}
```
3. Run your new console application to generate an image:
```console theme={null}
javac Quickstart.java -cp ".;target\dependency\*"
java -cp ".;target\dependency\*" Quickstart
```
Follow these steps to create a console application for image generation.
1. Create a new file named *Quickstart.java* in the same project root directory.
2. Copy the following code into *Quickstart.java*:
```java theme={null}
import com.azure.ai.openai.OpenAIAsyncClient;
import com.azure.ai.openai.OpenAIClientBuilder;
import com.azure.ai.openai.models.ImageGenerationOptions;
import com.azure.ai.openai.models.ImageLocation;
import com.azure.identity.DefaultAzureCredentialBuilder;
import com.azure.core.models.ResponseError;
import java.util.concurrent.TimeUnit;
public class Quickstart {
public static void main(String[] args) throws InterruptedException {
String key = System.getenv("AZURE_OPENAI_API_KEY");
String endpoint = System.getenv("AZURE_OPENAI_ENDPOINT");
OpenAIAsyncClient client = new OpenAIClientBuilder()
.endpoint(endpoint)
.credential(new AzureKeyCredential(key))
.buildAsyncClient();
ImageGenerationOptions imageGenerationOptions = new ImageGenerationOptions(
"A drawing of the Seattle skyline in the style of Van Gogh");
client.getImages(imageGenerationOptions).subscribe(
images -> {
for (ImageLocation imageLocation : images.getData()) {
ResponseError error = imageLocation.getError();
if (error != null) {
System.out.printf("Image generation operation failed. Error code: %s, error message: %s.%n",
error.getCode(), error.getMessage());
} else {
System.out.printf(
"Image location URL that provides temporary access to download the generated image is %s.%n",
imageLocation.getUrl());
}
}
},
error -> System.err.println("There was an error getting images." + error),
() -> System.out.println("Completed getImages."));
// The .subscribe() creation and assignment isn't a blocking call.
// The thread sleeps so the program does not end before the send operation is complete.
// Use .block() instead of .subscribe() for a synchronous call.
TimeUnit.SECONDS.sleep(10);
}
}
```
3. Run your new console application to generate an image:
```console theme={null}
javac Quickstart.java -cp ".;target\dependency\*"
java -cp ".;target\dependency\*" Quickstart
```
### Output
The URL of the generated image is printed to the console.
```console theme={null}
Image location URL that provides temporary access to download the generated image is .
Completed getImages.
```
GPT-image-1 also supports additional parameters such as `quality` (`low`, `medium`, `high`), `output_format` (`png`, `jpeg`), `background` (`auto`, `transparent`), and `output_compression` (0-100, JPEG only). For details, see [API options](https://learn.microsoft.com/azure/ai-foundry/openai/how-to/dall-e#specify-api-options).
The Image APIs come with a content moderation filter. If the service recognizes your prompt as harmful content, it won't return a generated image. For more information, see the [content filter](https://learn.microsoft.com/en-us/azure/foundry-classic/foundry-models/concepts/content-filter) article.
### Clean up resources
If you want to clean up and remove an Azure OpenAI resource, you can delete the resource. Before deleting the resource, you must first delete any deployed models.
* [Azure portal](../../../ai-services/multi-service-resource)
* [Azure CLI](../../../ai-services/multi-service-resource)
Use this guide to get started generating images with the Azure OpenAI SDK for JavaScript.
[Reference documentation](https://developers.openai.com/api/docs/guides/images-vision) | [Source code](https://github.com/openai/openai-node) | [Package (npm)](https://www.npmjs.com/package/openai) | [Samples](https://github.com/Azure/azure-sdk-for-js/tree/main/sdk/openai/openai/samples)
### Prerequisites
* An Azure subscription - [Create one for free](https://azure.microsoft.com/pricing/purchase-options/azure-account?cid=msft_learn)
* [LTS versions of Node.js](https://github.com/nodejs/release#release-schedule)
* [Azure CLI](https://learn.microsoft.com/cli/azure/install-azure-cli) used for passwordless authentication in a local development environment, create the necessary context by signing in with the Azure CLI.
* An Azure OpenAI resource created in a supported region (see [Region availability](https://learn.microsoft.com/azure/ai-foundry/openai/concepts/models#model-summary-table-and-region-availability)). For more information, see [Create a resource and deploy a model with Azure OpenAI](https://learn.microsoft.com/en-us/azure/foundry-classic/openai/how-to/create-resource).
#### Microsoft Entra ID prerequisites
For the recommended keyless authentication with Microsoft Entra ID, you need to:
* Install the [Azure CLI](https://learn.microsoft.com/cli/azure/install-azure-cli) used for keyless authentication with Microsoft Entra ID.
* Assign the `Cognitive Services User` role to your user account. You can assign roles in the Azure portal under **Access control (IAM)** > **Add role assignment**.
### Setup
1. Create a new folder `image-quickstart` and go to the quickstart folder with the following command:
```shell theme={null}
mkdir image-quickstart && cd image-quickstart
```
2. Create the `package.json` with the following command:
```shell theme={null}
npm init -y
```
3. Install the OpenAI client library for JavaScript with:
```console theme={null}
npm install openai
```
4. For the **recommended** passwordless authentication:
```console theme={null}
npm install @azure/identity
```
### Retrieve resource information
You need to retrieve the following information to authenticate your application with your Azure OpenAI resource:
| Variable name | Value |
| ------------------------------ | --------------------------------------------------------------------------------------------------------------------------------------------------------------------------------------------------------- |
| `AZURE_OPENAI_ENDPOINT` | This value can be found in the **Keys and Endpoint** section when examining your resource from the Azure portal. |
| `AZURE_OPENAI_DEPLOYMENT_NAME` | This value will correspond to the custom name you chose for your deployment when you deployed a model. This value can be found under **Resource Management** > **Model Deployments** in the Azure portal. |
Learn more about [keyless authentication](https://learn.microsoft.com/azure/ai-services/authentication) and [setting environment variables](https://learn.microsoft.com/azure/ai-services/cognitive-services-environment-variables).
| Variable name | Value |
| ------------------------------ | --------------------------------------------------------------------------------------------------------------------------------------------------------------------------------------------------------- |
| `AZURE_OPENAI_ENDPOINT` | This value can be found in the **Keys and Endpoint** section when examining your resource from the Azure portal. |
| `AZURE_OPENAI_API_KEY` | This value can be found in the **Keys and Endpoint** section when examining your resource from the Azure portal. You can use either `KEY1` or `KEY2`. |
| `AZURE_OPENAI_DEPLOYMENT_NAME` | This value will correspond to the custom name you chose for your deployment when you deployed a model. This value can be found under **Resource Management** > **Model Deployments** in the Azure portal. |
Learn more about [finding API keys](https://learn.microsoft.com/azure/ai-services/cognitive-services-environment-variables) and [setting environment variables](https://learn.microsoft.com/azure/ai-services/cognitive-services-environment-variables).
To use the recommended keyless authentication with the SDK, make sure that the `AZURE_OPENAI_API_KEY` environment variable isn't set.
### Generate images
1. Create the `index.js` file with the following code:
```javascript theme={null}
const { AzureOpenAI } = require("openai");
const {
DefaultAzureCredential,
getBearerTokenProvider
} = require("@azure/identity");
const fs = require("fs");
// You will need to set these environment variables or edit the following values
const endpoint = process.env.AZURE_OPENAI_ENDPOINT || "Your endpoint";
// Required Azure OpenAI deployment name and API version
const apiVersion = process.env.OPENAI_API_VERSION || "2025-04-01-preview";
const deploymentName = process.env.AZURE_OPENAI_DEPLOYMENT_NAME || "gpt-image-1";
// The prompt to generate images from
const prompt = "a monkey eating a banana";
const numberOfImagesToGenerate = 1;
// keyless authentication
const credential = new DefaultAzureCredential();
const scope = "https://ai.azure.com/.default";
const azureADTokenProvider = getBearerTokenProvider(credential, scope);
function getClient() {
return new AzureOpenAI({
endpoint,
azureADTokenProvider,
apiVersion,
deployment: deploymentName,
});
}
async function main() {
console.log("== Image Generation ==");
const client = getClient();
const results = await client.images.generate({
prompt,
size: "1024x1024",
n: numberOfImagesToGenerate,
model: "",
quality: "high",
// output_format: "png", // "png" or "jpeg" (GPT-image-1 only)
// background: "transparent", // "auto" or "transparent" (GPT-image-1 only, requires PNG)
});
// GPT-image-1 models always return base64-encoded images
for (const image of results.data) {
const imageBuffer = Buffer.from(image.b64_json, "base64");
fs.writeFileSync("generated_image.png", imageBuffer);
console.log("Image saved to generated_image.png");
}
}
main().catch((err) => {
console.error("The sample encountered an error:", err);
});
```
2. Sign in to Azure with the following command:
```shell theme={null}
az login
```
3. Run the JavaScript file.
```shell theme={null}
node index.js
```
1. Create the `index.js` file with the following code:
```javascript theme={null}
const { AzureOpenAI } = require("openai");
const fs = require("fs");
// You will need to set these environment variables or edit the following values
const endpoint = process.env.AZURE_OPENAI_ENDPOINT || "Your endpoint";
const apiKey = process.env.AZURE_OPENAI_API_KEY || "Your API key";
// Required Azure OpenAI deployment name and API version
const apiVersion = process.env.OPENAI_API_VERSION || "2025-04-01-preview";
const deploymentName = process.env.AZURE_OPENAI_DEPLOYMENT_NAME || "gpt-image-1";
// The prompt to generate images from
const prompt = "a monkey eating a banana";
const numberOfImagesToGenerate = 1;
function getClient() {
return new AzureOpenAI({
endpoint,
apiKey,
apiVersion,
deployment: deploymentName,
});
}
async function main() {
console.log("== Image Generation ==");
const client = getClient();
const results = await client.images.generate({
prompt,
size: "1024x1024",
n: numberOfImagesToGenerate,
model: "",
quality: "high",
// output_format: "png", // "png" or "jpeg" (GPT-image-1 only)
// background: "transparent", // "auto" or "transparent" (GPT-image-1 only, requires PNG)
});
// GPT-image-1 models always return base64-encoded images
for (const image of results.data) {
const imageBuffer = Buffer.from(image.b64_json, "base64");
fs.writeFileSync("generated_image.png", imageBuffer);
console.log("Image saved to generated_image.png");
}
}
main().catch((err) => {
console.error("The sample encountered an error:", err);
});
```
2. Run the JavaScript file.
```shell theme={null}
node index.js
```
### Output
The generated image is saved to `generated_image.png` in the current directory.
```console theme={null}
== Image Generation ==
Image saved to generated_image.png
```
The Image APIs come with a content moderation filter. If the service recognizes your prompt as harmful content, it won't return a generated image. For more information, see the [content filter](https://learn.microsoft.com/en-us/azure/foundry-classic/foundry-models/concepts/content-filter) article.
### Clean up resources
If you want to clean up and remove an Azure OpenAI resource, you can delete the resource. Before deleting the resource, you must first delete any deployed models.
* [Azure portal](../../../ai-services/multi-service-resource)
* [Azure CLI](../../../ai-services/multi-service-resource)
Use this guide to get started generating images with the Azure OpenAI SDK for JavaScript.
[Reference documentation](https://platform.openai.com/docs/api-reference/images/create) | [Source code](https://github.com/openai/openai-node) | [Package (npm)](https://www.npmjs.com/package/openai) | [Samples](https://github.com/Azure/azure-sdk-for-js/tree/main/sdk/openai/openai/samples)
### Prerequisites
* An Azure subscription - [Create one for free](https://azure.microsoft.com/pricing/purchase-options/azure-account?cid=msft_learn)
* [LTS versions of Node.js](https://github.com/nodejs/release#release-schedule)
* [TypeScript](https://www.typescriptlang.org/download/)
* [Azure CLI](https://learn.microsoft.com/cli/azure/install-azure-cli) used for passwordless authentication in a local development environment, create the necessary context by signing in with the Azure CLI.
* An Azure OpenAI resource created in a supported region (see [Region availability](https://learn.microsoft.com/azure/ai-foundry/openai/concepts/models#model-summary-table-and-region-availability)). For more information, see [Create a resource and deploy a model with Azure OpenAI](https://learn.microsoft.com/en-us/azure/foundry-classic/openai/how-to/create-resource).
#### Microsoft Entra ID prerequisites
For the recommended keyless authentication with Microsoft Entra ID, you need to:
* Install the [Azure CLI](https://learn.microsoft.com/cli/azure/install-azure-cli) used for keyless authentication with Microsoft Entra ID.
* Assign the `Cognitive Services User` role to your user account. You can assign roles in the Azure portal under **Access control (IAM)** > **Add role assignment**.
### Setup
1. Create a new folder `image-quickstart` and go to the quickstart folder with the following command:
```shell theme={null}
mkdir image-quickstart && cd image-quickstart
```
2. Create the `package.json` with the following command:
```shell theme={null}
npm init -y
```
3. Update the `package.json` to ECMAScript with the following command:
```shell theme={null}
npm pkg set type=module
```
4. Install the OpenAI client library for JavaScript with:
```console theme={null}
npm install openai
```
5. For the **recommended** passwordless authentication:
```console theme={null}
npm install @azure/identity
```
### Retrieve resource information
You need to retrieve the following information to authenticate your application with your Azure OpenAI resource:
| Variable name | Value |
| ------------------------------ | --------------------------------------------------------------------------------------------------------------------------------------------------------------------------------------------------------- |
| `AZURE_OPENAI_ENDPOINT` | This value can be found in the **Keys and Endpoint** section when examining your resource from the Azure portal. |
| `AZURE_OPENAI_DEPLOYMENT_NAME` | This value will correspond to the custom name you chose for your deployment when you deployed a model. This value can be found under **Resource Management** > **Model Deployments** in the Azure portal. |
Learn more about [keyless authentication](https://learn.microsoft.com/azure/ai-services/authentication) and [setting environment variables](https://learn.microsoft.com/azure/ai-services/cognitive-services-environment-variables).
| Variable name | Value |
| ------------------------------ | --------------------------------------------------------------------------------------------------------------------------------------------------------------------------------------------------------- |
| `AZURE_OPENAI_ENDPOINT` | This value can be found in the **Keys and Endpoint** section when examining your resource from the Azure portal. |
| `AZURE_OPENAI_API_KEY` | This value can be found in the **Keys and Endpoint** section when examining your resource from the Azure portal. You can use either `KEY1` or `KEY2`. |
| `AZURE_OPENAI_DEPLOYMENT_NAME` | This value will correspond to the custom name you chose for your deployment when you deployed a model. This value can be found under **Resource Management** > **Model Deployments** in the Azure portal. |
Learn more about [finding API keys](https://learn.microsoft.com/azure/ai-services/cognitive-services-environment-variables) and [setting environment variables](https://learn.microsoft.com/azure/ai-services/cognitive-services-environment-variables).
To use the recommended keyless authentication with the SDK, make sure that the `AZURE_OPENAI_API_KEY` environment variable isn't set.
### Generate images
1. Create the `index.ts` file with the following code:
```typescript theme={null}
import { AzureOpenAI } from "openai";
import {
DefaultAzureCredential,
getBearerTokenProvider
} from "@azure/identity";
import * as fs from "fs";
// You will need to set these environment variables or edit the following values
const endpoint = process.env.AZURE_OPENAI_ENDPOINT || "Your endpoint";
// Required Azure OpenAI deployment name and API version
const apiVersion = process.env.OPENAI_API_VERSION || "2025-04-01-preview";
const deploymentName = process.env.AZURE_OPENAI_DEPLOYMENT_NAME || "gpt-image-1";
// keyless authentication
const credential = new DefaultAzureCredential();
const scope = "https://ai.azure.com/.default";
const azureADTokenProvider = getBearerTokenProvider(credential, scope);
function getClient(): AzureOpenAI {
return new AzureOpenAI({
endpoint,
azureADTokenProvider,
apiVersion,
deployment: deploymentName,
});
}
async function main() {
console.log("== Image Generation ==");
const client = getClient();
const results = await client.images.generate({
prompt,
size: "1024x1024",
n: numberOfImagesToGenerate,
model: "",
quality: "high",
// output_format: "png", // "png" or "jpeg" (GPT-image-1 only)
// background: "transparent", // "auto" or "transparent" (GPT-image-1 only, requires PNG)
});
// GPT-image-1 models always return base64-encoded images
for (const image of results.data) {
const imageBuffer = Buffer.from(image.b64_json!, "base64");
fs.writeFileSync("generated_image.png", imageBuffer);
console.log("Image saved to generated_image.png");
}
}
main().catch((err) => {
console.error("The sample encountered an error:", err);
});
```
2. Create the `tsconfig.json` file to transpile the TypeScript code and copy the following code for ECMAScript.
```json theme={null}
{
"compilerOptions": {
"module": "NodeNext",
"target": "ES2022", // Supports top-level await
"moduleResolution": "NodeNext",
"skipLibCheck": true, // Avoid type errors from node_modules
"strict": true // Enable strict type-checking options
},
"include": ["*.ts"]
}
```
3. Transpile from TypeScript to JavaScript.
```shell theme={null}
tsc
```
4. Sign in to Azure with the following command:
```shell theme={null}
az login
```
5. Run the code with the following command:
```shell theme={null}
node index.js
```
1. Create the `index.ts` file with the following code:
```typescript theme={null}
import { AzureOpenAI } from "openai";
import * as fs from "fs";
// You will need to set these environment variables or edit the following values
const endpoint = process.env.AZURE_OPENAI_ENDPOINT || "Your endpoint";
const apiKey = process.env.AZURE_OPENAI_API_KEY || "Your API key";
// Required Azure OpenAI deployment name and API version
const apiVersion = process.env.OPENAI_API_VERSION || "2025-04-01-preview";
const deploymentName = process.env.AZURE_OPENAI_DEPLOYMENT_NAME || "gpt-image-1";
// The prompt to generate images from
const prompt = "a monkey eating a banana";
const numberOfImagesToGenerate = 1;
function getClient(): AzureOpenAI {
return new AzureOpenAI({
endpoint,
apiKey,
apiVersion,
deployment: deploymentName,
});
}
async function main() {
console.log("== Image Generation ==");
const client = getClient();
const results = await client.images.generate({
prompt,
size: "1024x1024",
n: numberOfImagesToGenerate,
model: "",
quality: "high",
// output_format: "png", // "png" or "jpeg" (GPT-image-1 only)
// background: "transparent", // "auto" or "transparent" (GPT-image-1 only, requires PNG)
});
// GPT-image-1 models always return base64-encoded images
for (const image of results.data) {
const imageBuffer = Buffer.from(image.b64_json!, "base64");
fs.writeFileSync("generated_image.png", imageBuffer);
console.log("Image saved to generated_image.png");
}
}
main().catch((err) => {
console.error("The sample encountered an error:", err);
});
```
2. Create the `tsconfig.json` file to transpile the TypeScript code and copy the following code for ECMAScript.
```json theme={null}
{
"compilerOptions": {
"module": "NodeNext",
"target": "ES2022", // Supports top-level await
"moduleResolution": "NodeNext",
"skipLibCheck": true, // Avoid type errors from node_modules
"strict": true // Enable strict type-checking options
},
"include": ["*.ts"]
}
```
3. Transpile from TypeScript to JavaScript.
```shell theme={null}
tsc
```
4. Run the code with the following command:
```shell theme={null}
node index.js
```
### Output
The generated image is saved to `generated_image.png` in the current directory.
```console theme={null}
== Image Generation ==
Image saved to generated_image.png
```
The Image APIs come with a content moderation filter. If the service recognizes your prompt as harmful content, it won't return a generated image. For more information, see the [content filter](https://learn.microsoft.com/en-us/azure/foundry-classic/foundry-models/concepts/content-filter) article.
### Clean up resources
If you want to clean up and remove an Azure OpenAI resource, you can delete the resource. Before deleting the resource, you must first delete any deployed models.
* [Azure portal](../../../ai-services/multi-service-resource)
* [Azure CLI](../../../ai-services/multi-service-resource)
Use this guide to get started generating images with the Azure OpenAI SDK for Go.
[Library source code](https://github.com/Azure/azure-sdk-for-go/tree/main/sdk/ai/azopenai) | [Package](https://pkg.go.dev/github.com/Azure/azure-sdk-for-go/sdk/ai/azopenai) | [Samples](https://github.com/Azure/azure-sdk-for-go/tree/main/sdk/ai/azopenai)
### Prerequisites
* An Azure subscription - [Create one for free](https://azure.microsoft.com/pricing/purchase-options/azure-account?cid=msft_learn)
* [Go 1.8+](https://go.dev/doc/install)
* An Azure OpenAI resource created in a supported region (see [Region availability](https://learn.microsoft.com/azure/ai-foundry/openai/concepts/models#model-summary-table-and-region-availability)). For more information, see [Create a resource and deploy a model with Azure OpenAI](https://learn.microsoft.com/en-us/azure/foundry-classic/openai/how-to/create-resource).
#### Microsoft Entra ID prerequisites
For the recommended keyless authentication with Microsoft Entra ID, you need to:
* Install the [Azure CLI](https://learn.microsoft.com/cli/azure/install-azure-cli) used for keyless authentication with Microsoft Entra ID.
* Assign the `Cognitive Services User` role to your user account. You can assign roles in the Azure portal under **Access control (IAM)** > **Add role assignment**.
### Setup
1. Create a new folder `dall-e-quickstart` and go to the quickstart folder with the following command:
```shell theme={null}
mkdir dall-e-quickstart && cd dall-e-quickstart
```
2. For the **recommended** keyless authentication with Microsoft Entra ID, sign in to Azure with the following command:
```console theme={null}
az login
```
### Retrieve resource information
You need to retrieve the following information to authenticate your application with your Azure OpenAI resource:
| Variable name | Value |
| ------------------------------ | --------------------------------------------------------------------------------------------------------------------------------------------------------------------------------------------------------- |
| `AZURE_OPENAI_ENDPOINT` | This value can be found in the **Keys and Endpoint** section when examining your resource from the Azure portal. |
| `AZURE_OPENAI_DEPLOYMENT_NAME` | This value will correspond to the custom name you chose for your deployment when you deployed a model. This value can be found under **Resource Management** > **Model Deployments** in the Azure portal. |
Learn more about [keyless authentication](https://learn.microsoft.com/azure/ai-services/authentication) and [setting environment variables](https://learn.microsoft.com/azure/ai-services/cognitive-services-environment-variables).
| Variable name | Value |
| ------------------------------ | --------------------------------------------------------------------------------------------------------------------------------------------------------------------------------------------------------- |
| `AZURE_OPENAI_ENDPOINT` | This value can be found in the **Keys and Endpoint** section when examining your resource from the Azure portal. |
| `AZURE_OPENAI_API_KEY` | This value can be found in the **Keys and Endpoint** section when examining your resource from the Azure portal. You can use either `KEY1` or `KEY2`. |
| `AZURE_OPENAI_DEPLOYMENT_NAME` | This value will correspond to the custom name you chose for your deployment when you deployed a model. This value can be found under **Resource Management** > **Model Deployments** in the Azure portal. |
Learn more about [finding API keys](https://learn.microsoft.com/azure/ai-services/cognitive-services-environment-variables) and [setting environment variables](https://learn.microsoft.com/azure/ai-services/cognitive-services-environment-variables).
### Run the quickstart
The sample code in this quickstart uses Microsoft Entra ID for the recommended keyless authentication. If you prefer to use an API key, you can replace the `NewDefaultAzureCredential` implementation with `NewKeyCredential`.
```go Microsoft Entra ID theme={null}
azureOpenAIEndpoint := os.Getenv("AZURE_OPENAI_ENDPOINT")
credential, err := azidentity.NewDefaultAzureCredential(nil)
client, err := azopenai.NewClient(azureOpenAIEndpoint, credential, nil)
```
```go API key theme={null}
azureOpenAIEndpoint := os.Getenv("AZURE_OPENAI_ENDPOINT")
azureOpenAIKey := os.Getenv("AZURE_OPENAI_API_KEY")
credential := azcore.NewKeyCredential(azureOpenAIKey)
client, err := azopenai.NewClientWithKeyCredential(azureOpenAIEndpoint, credential, nil)
```
To run the sample:
1. Create a new file named *quickstart.go*. Copy the following code into the *quickstart.go* file.
```go theme={null}
package main
import (
"context"
"fmt"
"net/http"
"os"
"log"
"github.com/Azure/azure-sdk-for-go/sdk/ai/azopenai"
"github.com/Azure/azure-sdk-for-go/sdk/azcore/to"
"github.com/Azure/azure-sdk-for-go/sdk/azidentity"
)
func main() {
azureOpenAIEndpoint := os.Getenv("AZURE_OPENAI_ENDPOINT")
modelDeploymentID := "gpt-image-1"
credential, err := azidentity.NewDefaultAzureCredential(nil)
if err != nil {
log.Printf("ERROR: %s", err)
return
}
client, err := azopenai.NewClient(
azureOpenAIEndpoint, credential, nil)
if err != nil {
log.Printf("ERROR: %s", err)
return
}
resp, err := client.GetImageGenerations(context.TODO(), azopenai.ImageGenerationOptions{
Prompt: to.Ptr("A painting of a cat in the style of Dali."),
ResponseFormat: to.Ptr(azopenai.ImageGenerationResponseFormatURL),
DeploymentName: to.Ptr(modelDeploymentID),
}, nil)
if err != nil {
// Implement application specific error handling logic.
log.Printf("ERROR: %s", err)
return
}
for _, generatedImage := range resp.Data {
// The underlying type for the generatedImage is determined by the value of
// ImageGenerationOptions.ResponseFormat.
// In this example we use `azopenai.ImageGenerationResponseFormatURL`,
// so the underlying type will be ImageLocation.
resp, err := http.Head(*generatedImage.URL)
if err != nil {
// Implement application specific error handling logic.
log.Printf("ERROR: %s", err)
return
}
fmt.Fprintf(os.Stderr, "Image generated, HEAD request on URL returned %d\nImage URL: %s\n", resp.StatusCode, *generatedImage.URL)
}
}
```
2. Run the following command to create a new Go module:
```shell theme={null}
go mod init quickstart.go
```
3. Run `go mod tidy` to install the required dependencies:
```cmd theme={null}
go mod tidy
```
4. Run the following command to run the sample:
```shell theme={null}
go run quickstart.go
```
To run the sample:
1. Create a new file named *quickstart.go*. Copy the following code into the *quickstart.go* file.
```go theme={null}
package main
import (
"context"
"fmt"
"net/http"
"os"
"log"
"github.com/Azure/azure-sdk-for-go/sdk/ai/azopenai"
"github.com/Azure/azure-sdk-for-go/sdk/azcore"
"github.com/Azure/azure-sdk-for-go/sdk/azcore/to"
)
func main() {
azureOpenAIEndpoint := os.Getenv("AZURE_OPENAI_ENDPOINT")
modelDeploymentID := "gpt-image-1"
azureOpenAIKey := os.Getenv("AZURE_OPENAI_API_KEY")
credential := azcore.NewKeyCredential(azureOpenAIKey)
client, err := azopenai.NewClientWithKeyCredential(
azureOpenAIEndpoint, credential, nil)
if err != nil {
log.Printf("ERROR: %s", err)
return
}
resp, err := client.GetImageGenerations(context.TODO(), azopenai.ImageGenerationOptions{
Prompt: to.Ptr("A painting of a cat in the style of Dali."),
ResponseFormat: to.Ptr(azopenai.ImageGenerationResponseFormatURL),
DeploymentName: to.Ptr(modelDeploymentID),
}, nil)
if err != nil {
// Implement application specific error handling logic.
log.Printf("ERROR: %s", err)
return
}
for _, generatedImage := range resp.Data {
// The underlying type for the generatedImage is determined by the value of
// ImageGenerationOptions.ResponseFormat.
// In this example we use `azopenai.ImageGenerationResponseFormatURL`,
// so the underlying type will be ImageLocation.
resp, err := http.Head(*generatedImage.URL)
if err != nil {
// Implement application specific error handling logic.
log.Printf("ERROR: %s", err)
return
}
fmt.Fprintf(os.Stderr, "Image generated, HEAD request on URL returned %d\nImage URL: %s\n", resp.StatusCode, *generatedImage.URL)
}
}
```
2. Run the following command to create a new Go module:
```shell theme={null}
go mod init quickstart.go
```
3. Run `go mod tidy` to install the required dependencies:
```cmd theme={null}
go mod tidy
```
4. Run the following command to run the sample:
```shell theme={null}
go run quickstart.go
```
### Output
The URL of the generated image is printed to the console.
```console theme={null}
Image generated, HEAD request on URL returned 200
Image URL:
```
GPT-image-1 models always return base64-encoded image data instead of URLs. If your SDK version returns a URL for DALL-E models, you need to handle the base64 response for GPT-image-1 deployments. GPT-image-1 also supports additional parameters such as `quality` (`low`, `medium`, `high`), `output_format` (`png`, `jpeg`), `background` (`auto`, `transparent`), and `output_compression` (0-100, JPEG only). For details, see [API options](https://learn.microsoft.com/azure/ai-foundry/openai/how-to/dall-e#specify-api-options).
The Image APIs come with a content moderation filter. If the service recognizes your prompt as harmful content, it won't return a generated image. For more information, see the [content filter](https://learn.microsoft.com/en-us/azure/foundry-classic/foundry-models/concepts/content-filter) article.
### Clean up resources
If you want to clean up and remove an Azure OpenAI resource, you can delete the resource or resource group. Deleting the resource group also deletes any other resources associated with it.
* [Azure portal](../../../ai-services/multi-service-resource)
* [Azure CLI](../../../ai-services/multi-service-resource)
Use this guide to get started calling the Azure OpenAI in Microsoft Foundry Models image generation APIs with PowerShell.
### Prerequisites
* An Azure subscription. [Create one for free](https://azure.microsoft.com/pricing/purchase-options/azure-account?cid=msft_learn).
* For this task, the latest version of PowerShell 7 is recommended because the examples use new features not available in Windows PowerShell 5.1.
* An Azure OpenAI resource created in a supported region (see [Region availability](https://learn.microsoft.com/azure/ai-foundry/openai/concepts/models#model-summary-table-and-region-availability)). For more information, see [Create a resource and deploy a model with Azure OpenAI](https://learn.microsoft.com/en-us/azure/foundry-classic/openai/how-to/create-resource).
#### Microsoft Entra ID prerequisites
For the recommended keyless authentication with Microsoft Entra ID, you need to:
* Install the [Azure CLI](https://learn.microsoft.com/cli/azure/install-azure-cli) used for keyless authentication with Microsoft Entra ID.
* Assign the `Cognitive Services User` role to your user account. You can assign roles in the Azure portal under **Access control (IAM)** > **Add role assignment**.
### Retrieve resource information
You need to retrieve the following information to authenticate your application with your Azure OpenAI resource:
| Variable name | Value |
| ------------------------------ | --------------------------------------------------------------------------------------------------------------------------------------------------------------------------------------------------------- |
| `AZURE_OPENAI_ENDPOINT` | This value can be found in the **Keys and Endpoint** section when examining your resource from the Azure portal. |
| `AZURE_OPENAI_DEPLOYMENT_NAME` | This value will correspond to the custom name you chose for your deployment when you deployed a model. This value can be found under **Resource Management** > **Model Deployments** in the Azure portal. |
Learn more about [keyless authentication](https://learn.microsoft.com/azure/ai-services/authentication) and [setting environment variables](https://learn.microsoft.com/azure/ai-services/cognitive-services-environment-variables).
| Variable name | Value |
| ------------------------------ | --------------------------------------------------------------------------------------------------------------------------------------------------------------------------------------------------------- |
| `AZURE_OPENAI_ENDPOINT` | This value can be found in the **Keys and Endpoint** section when examining your resource from the Azure portal. |
| `AZURE_OPENAI_API_KEY` | This value can be found in the **Keys and Endpoint** section when examining your resource from the Azure portal. You can use either `KEY1` or `KEY2`. |
| `AZURE_OPENAI_DEPLOYMENT_NAME` | This value will correspond to the custom name you chose for your deployment when you deployed a model. This value can be found under **Resource Management** > **Model Deployments** in the Azure portal. |
Learn more about [finding API keys](https://learn.microsoft.com/azure/ai-services/cognitive-services-environment-variables) and [setting environment variables](https://learn.microsoft.com/azure/ai-services/cognitive-services-environment-variables).
### Generate images
1. For the **recommended** keyless authentication with Microsoft Entra ID, sign in to Azure with the following command:
```powershell theme={null}
az login
```
2. Get an Azure OpenAI auth token and set it as an environment variable for the current PowerShell session:
```powershell theme={null}
$Env:DEFAULT_AZURE_CREDENTIAL_TOKEN = az account get-access-token --resource https://cognitiveservices.azure.com --query accessToken -o tsv
```
3. Create a new PowerShell file called *quickstart.ps1*. Then open it up in your preferred editor or IDE.
4. Replace the contents of *quickstart.ps1* with the following code. Make sure `AZURE_OPENAI_ENDPOINT` is set, and change the value of `prompt` to your preferred text.
To use API key authentication instead of keyless authentication, set `AZURE_OPENAI_API_KEY` and uncomment the `'api-key'` line.
```powershell theme={null}
# Azure OpenAI metadata variables
$openai = @{
api_base = $Env:AZURE_OPENAI_ENDPOINT
deployment = 'gpt-image-1' # set to the name of your model deployment
}
# Use the recommended keyless authentication via bearer token.
$headers = [ordered]@{
#'api-key' = $Env:AZURE_OPENAI_API_KEY
'Authorization' = "Bearer $($Env:DEFAULT_AZURE_CREDENTIAL_TOKEN)"
}
# Text to describe image
$prompt = 'A painting of a dog'
# Adjust these values to fine-tune completions
$body = [ordered]@{
model = $openai.deployment # required: the name of your model deployment
prompt = $prompt
size = '1024x1024'
n = 1
quality = 'high'
output_format = 'png'
# background = 'transparent' # 'auto' or 'transparent' (GPT-image-1 only; requires PNG output)
# output_compression = 100 # 0-100 compression level (JPEG output only)
} | ConvertTo-Json
# Call the API to generate the image and retrieve the response
$url = "$($openai.api_base)/openai/v1/images/generations?api-version=preview"
$response = Invoke-RestMethod -Uri $url -Headers $headers -Body $body -Method Post -ContentType 'application/json'
# Set the directory for the stored image
$image_dir = Join-Path -Path $pwd -ChildPath 'images'
# If the directory doesn't exist, create it
if (-not(Resolve-Path $image_dir -ErrorAction Ignore)) {
New-Item -Path $image_dir -ItemType Directory
}
# Initialize the image path (note the filetype should be png)
$image_path = Join-Path -Path $image_dir -ChildPath 'generated_image.png'
# Decode the base64 image and save to file
$image_bytes = [Convert]::FromBase64String($response.data[0].b64_json)
[IO.File]::WriteAllBytes($image_path, $image_bytes)
return $image_path
```
For production, use a secure way of storing and accessing your credentials like [The PowerShell Secret Management with Azure Key Vault](/powershell/utility-modules/secretmanagement/how-to/using-azure-keyvault). For more information about credential security, see this [security](../../../ai-services/security-features) article.
1. Run the script using PowerShell:
```powershell theme={null}
./quickstart.ps1
```
The script generates the image and saves it.
### Output
PowerShell requests the image from Azure OpenAI and stores the output image in the *generated\_image.png* file in your specified directory. For convenience, the full path for the file is returned at the end of the script.
The Image APIs come with a content moderation filter. If the service recognizes your prompt as harmful content, it doesn't generate an image. For more information, see [Content filtering](https://learn.microsoft.com/en-us/azure/foundry-classic/foundry-models/concepts/content-filter).
### Clean up resources
If you want to clean up and remove an Azure OpenAI resource, you can delete the resource or resource group. Deleting the resource group also deletes any other resources associated with it.
* [Azure portal](../../../ai-services/multi-service-resource)
* [Azure PowerShell](../../../ai-services/multi-service-resource)
Use this guide to get started generating images with Azure OpenAI in your browser with Microsoft Foundry.
### Prerequisites
* An Azure subscription. [Create one for free](https://azure.microsoft.com/pricing/purchase-options/azure-account?cid=msft_learn).
* An Azure OpenAI resource created in a supported region. See [Region availability](https://learn.microsoft.com/azure/ai-foundry/openai/concepts/models#model-summary-table-and-region-availability). For more information, see [Create a resource and deploy a model with Azure OpenAI](https://learn.microsoft.com/en-us/azure/foundry-classic/openai/how-to/create-resource).
### Go to Foundry
Browse to [Foundry](https://ai.azure.com/?cid=learnDocs) and sign in with the credentials associated with your Azure OpenAI resource. During or after the sign-in workflow, select the appropriate directory, Azure subscription, and Azure OpenAI resource.
From the Foundry landing page, create or select a new project. Navigate to the **Models + endpoints** page on the left nav. Select **Deploy model** and then choose one of the image generation models from the list. Complete the deployment process.
On the model's page, select **Open in playground**.
### Try out image generation
Start exploring Azure OpenAI capabilities with a no-code approach through the **Images playground**. Enter your image prompt into the text box and select **Generate**. When the AI-generated image is ready, it appears on the page.
The Image APIs come with a content moderation filter. If Azure OpenAI recognizes your prompt as harmful content, it doesn't return a generated image. For more information, see [Content filtering](https://learn.microsoft.com/en-us/azure/foundry-classic/foundry-models/concepts/content-filter).
In the **Images playground**, you can also view Python and cURL code samples, which are prefilled according to your settings. Select **View code** near the top of the page. You can use this code to write an application that completes the same task.
### Clean up resources
If you want to clean up and remove an Azure OpenAI resource, you can delete the resource or resource group. Deleting the resource group also deletes any other resources associated with it.
* [Azure portal](../../../ai-services/multi-service-resource)
* [Azure CLI](../../../ai-services/multi-service-resource)
## Quotas and limits
Image generation has default rate limits per deployment:
| Model | Default quota (images/min) |
| ------------------ | -------------------------- |
| GPT-image-1 series | 5 |
| GPT-image-2 | 5 |
To view your current quota or request an increase, see [Manage Azure OpenAI quotas](https://learn.microsoft.com/azure/ai-foundry/openai/how-to/quota).
## Call the image generation API
The following command shows the most basic way to use an image model with code. If this is your first time using these models programmatically, start with the [quickstart](https://learn.microsoft.com/azure/ai-foundry/openai/dall-e-quickstart).
Image generation typically takes 10-30 seconds depending on the model, size, and quality settings.
### Prerequisites
* An Azure subscription. You can [create one for free](https://azure.microsoft.com/pricing/purchase-options/azure-account?cid=msft_learn).
* An Azure OpenAI resource created in a supported region. See [Region availability](https://learn.microsoft.com/azure/ai-foundry/openai/concepts/models#model-summary-table-and-region-availability).
* Deploy a `gpt-image-1`-series or `gpt-image-2` model with your Azure OpenAI resource. For more information on deployments, see [Create a resource and deploy a model with Azure OpenAI](https://learn.microsoft.com/azure/ai-foundry/openai/how-to/create-resource).
* GPT-image-1 series models are available in limited access: [Apply for GPT-image-1 access](https://aka.ms/oai/gptimage1access); [Apply for GPT-image-1.5 access](https://aka.ms/oai/gptimage1.5access).
* GPT-image-2 is generally available (GA).
* Python 3.8 or later.
* Install the required packages: `pip install openai azure-identity`
Send a POST request to:
```
https://.openai.azure.com/openai/v1/images/generations?api-version=preview
```
**URL**:
Replace `` with the name of your Azure OpenAI resource.
**Required headers**:
* `Content-Type`: `application/json`
* `api-key`: ``
**Body**:
The following is a sample request body. You specify a number of options, defined in later sections.
Set the `model` parameter to the name of your model deployment (for example, `gpt-image-1.5`).
```json theme={null}
{
"prompt": "A multi-colored umbrella on the beach, disposable camera",
"model": "gpt-image-1.5",
"size": "1024x1024",
"n": 1,
"quality": "high"
}
```
For image generation token costs, see [Image tokens](/models/models-sold-directly-by-azure).
### Output
The response from a successful image generation API call looks like the following example. The `b64_json` field contains the output image data.
```json theme={null}
{
"created": 1698116662,
"data": [
{
"b64_json": ""
}
]
}
```
The `response_format` parameter isn't supported for GPT-image-1 series models, which always return base64-encoded images.
### Streaming
Streaming lets you receive partial images as they're generated, providing faster visual feedback for your users. This is useful for applications where you want to show generation progress. The `partial_images` parameter (1-3) controls how many intermediate images are returned before the final result.
You can stream image generation requests to `gpt-image-1`-series and `gpt-image-2` models by setting the `stream` parameter to `true`, and setting the `partial_images` parameter to a value between 0 and 3.
```python theme={null}
import base64
from openai import OpenAI
from azure.identity import DefaultAzureCredential, get_bearer_token_provider
token_provider = get_bearer_token_provider(
DefaultAzureCredential(), "https://ai.azure.com/.default"
)
client = OpenAI(
base_url = "https://RESOURCE-NAME-HERE/openai/v1/",
api_key=token_provider,
)
stream = client.images.generate(
model="gpt-image-1.5",
prompt="A cute baby sea otter",
n=1,
size="1024x1024",
stream=True,
partial_images = 2
)
for event in stream:
if event.type == "image_generation.partial_image":
idx = event.partial_image_index
image_base64 = event.b64_json
image_bytes = base64.b64decode(image_base64)
with open(f"river{idx}.png", "wb") as f:
f.write(image_bytes)
```
### Specify API options
The following API body parameters are available for image generation models.
#### Size
For GPT-image-1 series models, specify the size of the generated images as one of `1024x1024`, `1024x1536`, or `1536x1024`. Square images are faster to generate.
For `gpt-image-2`, arbitrary resolutions are supported with the following constraints:
* Both edges must be a multiple of 16 pixels.
* Long edge up to 3840 px (4K support).
* Aspect ratio up to 3:1.
* Total pixel count between 655,360 and 8,294,400.
The sizing constraints only apply when you specify a size. If `size=auto`, the generated image might have dimensions that don't satisfy these constraints (for example, an edge might not be a multiple of 16 pixels).
#### Quality
There are three options for image quality: `low`, `medium`, and `high`. Lower quality images can be generated faster.
The default value is `high`.
#### Number
You can generate between one and 10 images in a single API call. The default value is `1`.
#### User ID
Use the *user* parameter to specify a unique identifier for the user making the request. This identifier is useful for tracking and monitoring usage patterns. The value can be any string, such as a user ID or email address.
#### Output format
Use the *output\_format* parameter to specify the format of the generated image. Supported formats are `PNG` and `JPEG`. The default is `PNG`.
WEBP images aren't supported in the Azure OpenAI in Microsoft Foundry Models.
#### Compression
Use the *output\_compression* parameter to specify the compression level for the generated image. Input an integer between `0` and `100`, where `0` is no compression and `100` is maximum compression. The default is `100`.
#### Streaming
Use the *stream* parameter to enable streaming responses. When set to `true`, the API returns partial images as they're generated. This feature provides faster visual feedback for users and improves perceived latency. Set the *partial\_images* parameter to control how many partial images are generated (1-3).
#### Transparency
Set the *background* parameter to `transparent` and *output\_format* to `PNG` on an image generate request to get an image with a transparent background.
## Call the image edit API
The Image Edit API enables you to modify existing images based on text prompts you provide. The image editing endpoint is generally available and supported for production use. The API call is similar to the image generation API call, but you also need to provide an input image.
The input image must be less than 50 MB in size and must be a PNG or JPG file.
Send a POST request to:
```
https://.openai.azure.com/openai/deployments//images/edits?api-version=
```
**URL**:
Replace the following values:
* `` is the name of your Azure OpenAI resource.
* `` is the name of your GPT-image series model deployment.
* `` is the version of the API you want to use. For example, `2025-04-01`.
**Required headers**:
* `Content-Type`: `multipart/form-data`
* `api-key`: ``
**Body**:
The following is a sample request body. You specify a number of options, defined in later sections.
The Image Edit API takes multipart/form data, not JSON data. The example below shows sample form data that would be attached to a cURL request.
```
-F "image[]=@beach.png" \
-F 'prompt=Add a beach ball in the center' \
-F "model=gpt-image-1" \
-F "size=1024x1024" \
-F "n=1" \
-F "quality=high"
```
### API response output
The response from a successful image editing API call looks like the following example. The `b64_json` field contains the output image data.
```json theme={null}
{
"created": 1698116662,
"data": [
{
"b64_json": ""
}
]
}
```
### Specify image edit API options
The following API body parameters are available for image editing models, in addition to the ones available for image generation models.
#### Image
The *image* value indicates the image file you want to edit.
#### Input fidelity
The *input\_fidelity* parameter controls how much effort the model puts into matching the style and features, especially facial features, of input images.
This parameter lets you make subtle edits to an image without changing unrelated areas. When you use high input fidelity, faces are preserved more accurately than in standard mode.
Input fidelity is not supported by the `gpt-image-1-mini` model.
#### Mask
The *mask* parameter uses the same type as the main *image* input parameter. It defines the area of the image that you want the model to edit, using fully transparent pixels (alpha of zero) in those areas. The mask must be a PNG file and have the same dimensions as the input image.
#### Streaming
Use the *stream* parameter to enable streaming responses. When set to `true`, the API returns partial images as they're generated. This feature provides faster visual feedback for users and improves perceived latency. Set the *partial\_images* parameter to control how many partial images are generated (1-3).
#### Transparency
GPT-image-1 only: set the *background* parameter to `transparent` and *output\_format* to `PNG` on an image generate request to get an image with a transparent background.
## Write effective text-to-image prompts
Your prompts should describe the content you want to see in the image and the visual style of the image.
When you write prompts, consider that the Image APIs come with a content moderation filter. If the service recognizes your prompt as harmful content, it doesn't generate an image. For more information, see [Content filtering](https://learn.microsoft.com/en-us/azure/foundry-classic/foundry-models/concepts/content-filter).
For a thorough look at how you can tweak your text prompts to generate different kinds of images, see the [Image prompt engineering guide](https://learn.microsoft.com/azure/ai-foundry/openai/concepts/gpt-4-v-prompt-engineering).
## Responsible AI and Image Generation
Azure OpenAI's image generation models include built-in Responsible AI (RAI) protections to help ensure safe and compliant use.
In addition, Azure provides input and output moderation across all image generation models, along with Azure-specific safeguards such as content filtering and abuse monitoring. These systems help detect and prevent the generation or misuse of harmful, unsafe, or policy-violating content.
Customers can learn more about these safeguards and how to customize them here:
* Learn more: Explore [content filtering](https://learn.microsoft.com/azure/ai-foundry/openai/concepts/content-filter)
* Request customization: Apply to [opt out of content filtering](https://customervoice.microsoft.com/Pages/ResponsePage.aspx?id=v4j5cvGGr0GRqy180BHbR7en2Ais5pxKtso_Pz4b1_xUMlBQNkZMR0lFRldORTdVQzQ0TEI5Q1ExOSQlQCN0PWcu)
### Special considerations for generating images of minors
Photorealistic images of minors are blocked by default. Customers can [request access](https://customervoice.microsoft.com/Pages/ResponsePage.aspx?id=v4j5cvGGr0GRqy180BHbR7en2Ais5pxKtso_Pz4b1_xUQVFQRDhQRjVPNllLMVZCSVNYVUs4MzhNMyQlQCN0PWcu) to this model capability. Enterprise-tier customers are automatically approved.
## Troubleshooting
### API call rejection
Prompts and images are filtered based on our content policy. The API returns an error when a prompt or image is flagged.
If your prompt is flagged, the `error.code` value in the message is set to `contentFilter`. Here's an example:
```json theme={null}
{
"created": 1698435368,
"error":
{
"code": "contentFilter",
"message": "Your task failed as a result of our safety system."
}
}
```
It's also possible that the generated image itself is filtered. In this case, the error message is set to *Generated image was filtered as a result of our safety system*. Here's an example:
```json theme={null}
{
"created": 1698435368,
"error":
{
"code": "contentFilter",
"message": "Generated image was filtered as a result of our safety system."
}
}
```
### Rate limit errors
If you receive a 429 error, you've exceeded your rate limit. Wait before retrying or request a quota increase in the Azure portal.
### Authentication errors
If you receive a 401 error:
* **API key auth**: Verify your API key is correct and not expired.
* **Managed identity**: Ensure your identity has the **Cognitive Services OpenAI User** role on the resource.
### Timeout errors
Image generation can take up to 60 seconds for complex prompts. If you experience timeouts:
* Use streaming to get partial results sooner.
* Simplify your prompt.
* Try a smaller image size.
## Related content
* [What is Azure OpenAI?](/models/models-sold-directly-by-azure)
* [Image API reference](https://learn.microsoft.com/azure/ai-foundry/openai/reference#image-generation)
* [Image API (preview) reference](https://learn.microsoft.com/azure/ai-foundry/openai/reference-preview)
- Learn about [image generation tokens](https://learn.microsoft.com/azure/ai-foundry/foundry-models/concepts/models-sold-directly-by-azure#image-generation-models)
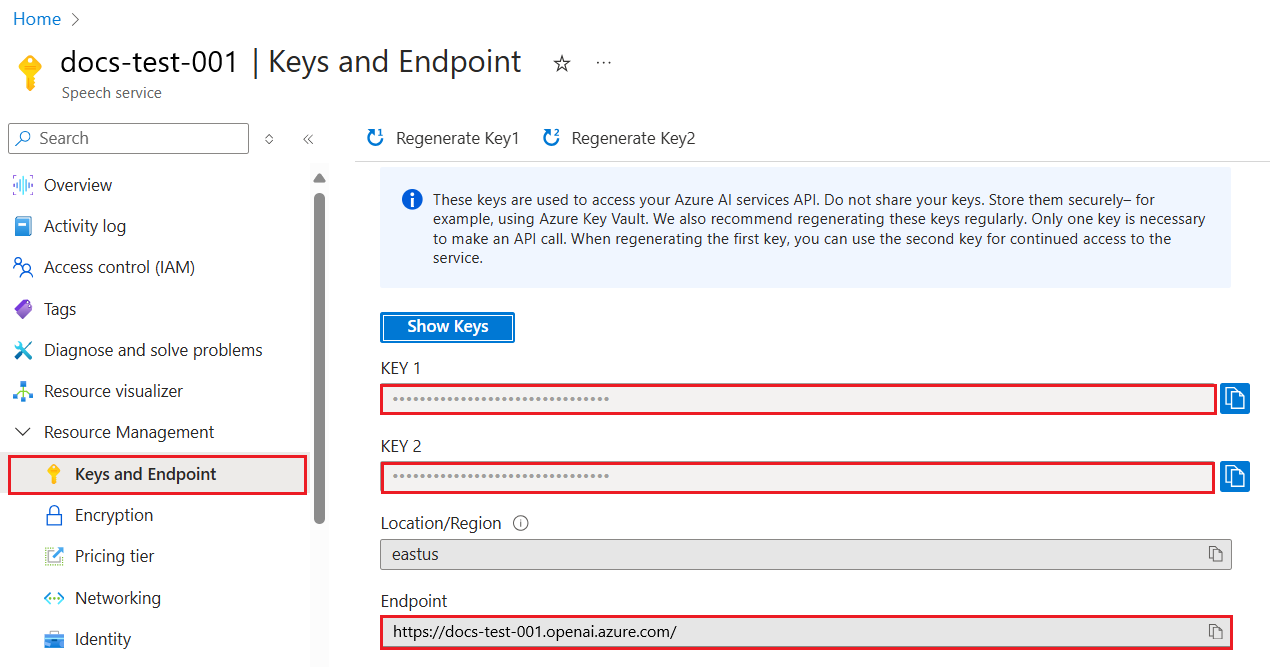 ### Environment variables
Create and assign persistent environment variables for your key and endpoint.
### Environment variables
Create and assign persistent environment variables for your key and endpoint.