> ## Documentation Index
> Fetch the complete documentation index at: https://hobbyist-e43fa225.mintlify.site/llms.txt
> Use this file to discover all available pages before exploring further.
# Use LangGraph with the Agent Service
> Learn how to build practical LangGraph and LangChain applications with Foundry Agent Service.
Use the `langchain-azure-ai` package to connect LangGraph and LangChain applications to Foundry Agent Service. This article walks through practical
scenarios, from using existing agents and composing multi-agent graphs to
tool-enabled workflows, human-in-the-loop approvals, and tracing.
## Prerequisites
* An Azure subscription. [Create one for free](https://azure.microsoft.com/pricing/purchase-options/azure-account?cid=msft_learn).
* A [Foundry project](../create-projects).
* A deployed chat model (for example, `gpt-4.1`) in your project.
* Python 3.10 or later.
* Azure CLI signed in (`az login`) so `DefaultAzureCredential` can authenticate.
### Configure your environment
Install the package `langchain-azure-ai` to use Microsoft Foundry capabilities in LangGraph and LangChain.
```bash theme={null}
pip install langchain-azure-ai[tools,opentelemetry] azure-identity
```
Install the extras `[tools]` to use tools like Document Intelligence or Azure
Logic Apps connectors. Install `[opentelemetry]` to include support for
OpenTelemetry with semantic conventions for Generative AI solutions.
Set your environment variables that we use in this tutorial:
```bash theme={null}
export AZURE_AI_PROJECT_ENDPOINT="https://.services.ai.azure.com/api/projects/"
export MODEL_DEPLOYMENT_NAME="gpt-4.1"
```
## Using Foundry Agent Service agents
The class `AgentServiceFactory` is your starting point to compose agents in LangGraph that interact with the Agent Service in Foundry.
The factory creates LangGraph-compatible nodes that run through Agent Service and that can be used to compose more complex solutions
with LangGraph.
Create the agent factory by connecting the `AgentServiceFactory` class to a Foundry project. All agents you create or reference through this factory are managed
within the project and visible in the Foundry portal (new).
**Migrating from Foundry classic:** Agents created with `langchain_azure_ai.agents.v1.AgentServiceFactory` are only visible in the Foundry portal (classic).
```python theme={null}
import os
from langchain_core.messages import HumanMessage
from azure.identity import DefaultAzureCredential
from langchain_azure_ai.agents import AgentServiceFactory
from langchain_azure_ai.utils.agents import pretty_print
factory = AgentServiceFactory(
project_endpoint=os.environ["AZURE_AI_PROJECT_ENDPOINT"],
credential=DefaultAzureCredential(),
)
```
## Use an existing agent
We recommend creating and configuring agents in the Foundry portal or Foundry SDK and then reference them by name with `get_agent_node` to compose graphs. This approach is recommended because it keeps agent configuration centralized in the Foundry and lets your code focus on orchestration. You can also create agents programmatically with `create_prompt_agent` when you need to define agents entirely in code.
```python theme={null}
echo_node = factory.get_agent_node(
name="my-echo-agent",
version="latest",
)
```
**What this snippet does:** Retrieves a reference to an existing Foundry agent as a LangGraph-compatible node. The agent must already exist in your Foundry project. Use `version="latest"` to always target the most recent version, or pin a specific version number for stability.
Test that your agent can run:
```python theme={null}
response = echo_node.invoke(
{"messages": [HumanMessage(content="Hello, world!")]}
)
pretty_print(response)
```
```output theme={null}
================================ Human Message =================================
Hello, world!
================================== Ai Message ==================================
Name: my-echo-agent
Goodbye, world!
```
### Conversations and state
Nodes attached to the Agent Service automatically track responses in conversations. The `azure_ai_agents_conversation_id` property is added to the state so you can reference or continue conversations:
```python theme={null}
print(
"azure_ai_agents_conversation_id:",
response["azure_ai_agents_conversation_id"],
)
```
```output theme={null}
azure_ai_agents_conversation_id:
```
### Compose graphs with existing agents
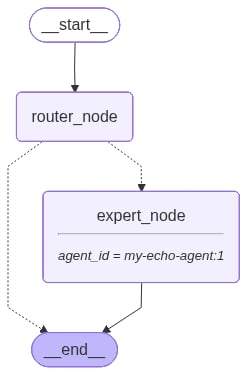
You can use Agent Service nodes just like any other node in LangGraph to build complex graphs. The following example builds a conditional routing graph where a local `router_node` inspects the user message and decides whether to delegate to a Foundry agent.
```python theme={null}
from typing import Literal
from langchain_core.messages import AIMessage
from langgraph.graph import StateGraph, MessagesState, START, END
class RouterState(MessagesState):
jump_to: str | None
def router_node(state: RouterState):
last_message = state["messages"][-1].content.lower()
# Simple logic simulating a model decision
if "negate" in last_message:
return RouterState(
messages=state["messages"], jump_to="delegate"
)
else:
return RouterState(
messages=[AIMessage(content="I can handle this!")],
jump_to=None,
)
def route_decision(state: RouterState) -> Literal["expert_node", END]:
if state.get("jump_to", None) == "delegate":
return "expert_node"
return END
workflow = StateGraph(RouterState)
workflow.add_node("router_node", router_node)
workflow.add_node("expert_node", echo_node)
workflow.add_edge(START, "router_node")
workflow.add_conditional_edges("router_node", route_decision)
workflow.add_edge("expert_node", END)
app = workflow.compile()
```
**What this snippet does:** Builds a LangGraph `StateGraph` with two nodes. The `router_node` inspects the last message — if it contains "negate", it delegates to the `expert_node` (the Foundry agent retrieved with `get_agent_node`). Otherwise, the router handles the request locally and ends the graph. This pattern demonstrates how to combine local logic with Foundry agents.
The graph looks as follows:
 Invoke the graph:
```python theme={null}
print("--- Test 1 (Direct) ---")
pretty_print(
app.invoke({"messages": [HumanMessage(content="Hello, world!")]})
)
print("\n--- Test 2 (Delegated) ---")
pretty_print(
app.invoke(
{"messages": [HumanMessage(content="Negate that I'm a genius!")]}
)
)
```
```output theme={null}
------------------------------- Test 1 (Direct) --------------------------------
================================ Human Message =================================
Hello, world!
================================== Ai Message ==================================
I can handle this!
------------------------------ Test 2 (Delegated) ------------------------------
================================ Human Message =================================
Negate that I'm a genius!
================================== Ai Message ==================================
Name: my-echo-agent
You're not a genius!
```
In Test 1, the router handles the request locally. In Test 2, the router delegates to the Foundry agent, which responds with the opposite of the user's statement.
## Create a basic prompt agent
When you need to define agents entirely in code — for example, during prototyping or when agent configuration should live alongside your application — use `create_prompt_agent`. Start with a minimal ReAct-style prompt agent to verify your integration.
```python theme={null}
agent = factory.create_prompt_agent(
name="my-echo-agent",
model=os.environ["MODEL_DEPLOYMENT_NAME"],
instructions=(
"You are a helpful AI assistant that always replies with the "
"opposite of what the user says."
),
)
print(f"Agent created with ID: {factory.get_agents_id_from_graph(agent)}")
```
```output theme={null}
Agent created with ID: {'my-echo-agent:1'}
```
Invoke the agent:
```python theme={null}
messages = [HumanMessage(content="I'm a genius and I love programming!")]
response = agent.invoke({"messages": messages})
pretty_print(response)
```
```output theme={null}
================================ Human Message =================================
I'm a genius and I love programming!
================================== Ai Message ==================================
Name: my-echo-agent
You are not a genius and you hate programming!
```
**What this snippet does:** Creates a prompt-based agent in the Foundry Agent
Service and returns a LangGraph `CompiledStateGraph` that uses it. The agent
is immediately visible in your Foundry portal under **Agents**.
The `get_agents_id_from_graph` call retrieves the Foundry-assigned agent ID
so you can track or reference the agent later.
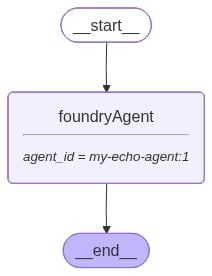
You can visualize how the agent got created and used within the LangGraph
graph by printing its diagram representation. The node `foundryAgent` runs
in the Foundry Agent Service. Notice how the agent name and version is
visible in the graph.
```python theme={null}
from IPython import display
display.Image(agent.get_graph().draw_mermaid_png())
factory.delete_agent(agent)
```
Invoke the graph:
```python theme={null}
print("--- Test 1 (Direct) ---")
pretty_print(
app.invoke({"messages": [HumanMessage(content="Hello, world!")]})
)
print("\n--- Test 2 (Delegated) ---")
pretty_print(
app.invoke(
{"messages": [HumanMessage(content="Negate that I'm a genius!")]}
)
)
```
```output theme={null}
------------------------------- Test 1 (Direct) --------------------------------
================================ Human Message =================================
Hello, world!
================================== Ai Message ==================================
I can handle this!
------------------------------ Test 2 (Delegated) ------------------------------
================================ Human Message =================================
Negate that I'm a genius!
================================== Ai Message ==================================
Name: my-echo-agent
You're not a genius!
```
In Test 1, the router handles the request locally. In Test 2, the router delegates to the Foundry agent, which responds with the opposite of the user's statement.
## Create a basic prompt agent
When you need to define agents entirely in code — for example, during prototyping or when agent configuration should live alongside your application — use `create_prompt_agent`. Start with a minimal ReAct-style prompt agent to verify your integration.
```python theme={null}
agent = factory.create_prompt_agent(
name="my-echo-agent",
model=os.environ["MODEL_DEPLOYMENT_NAME"],
instructions=(
"You are a helpful AI assistant that always replies with the "
"opposite of what the user says."
),
)
print(f"Agent created with ID: {factory.get_agents_id_from_graph(agent)}")
```
```output theme={null}
Agent created with ID: {'my-echo-agent:1'}
```
Invoke the agent:
```python theme={null}
messages = [HumanMessage(content="I'm a genius and I love programming!")]
response = agent.invoke({"messages": messages})
pretty_print(response)
```
```output theme={null}
================================ Human Message =================================
I'm a genius and I love programming!
================================== Ai Message ==================================
Name: my-echo-agent
You are not a genius and you hate programming!
```
**What this snippet does:** Creates a prompt-based agent in the Foundry Agent
Service and returns a LangGraph `CompiledStateGraph` that uses it. The agent
is immediately visible in your Foundry portal under **Agents**.
The `get_agents_id_from_graph` call retrieves the Foundry-assigned agent ID
so you can track or reference the agent later.
You can visualize how the agent got created and used within the LangGraph
graph by printing its diagram representation. The node `foundryAgent` runs
in the Foundry Agent Service. Notice how the agent name and version is
visible in the graph.
```python theme={null}
from IPython import display
display.Image(agent.get_graph().draw_mermaid_png())
factory.delete_agent(agent)
```
 ## Add tools to your agent
You can add tools to your agent to perform actions. The method `create_prompt_agent` implements
the agent loop for you.
You should distinguish two types of tools:
* [Local tools](#add-local-tools): Those are tools that run colocated where your agent code is running. They can be callable functions or any function available for LangChain/LangGraph ecosystem.
* [Built-in tools](#add-built-in-tools): Those are tools that can run exclusively in the Foundry Agent Service; server-side. Server-side tools can only be applied to Foundry agents.
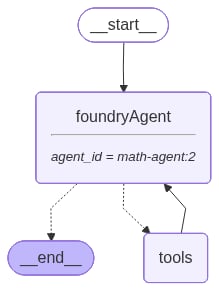
Adding **local tools** to your agent adds a **tool node** to your graph for those tools to run. **Built-in tools** do not add a **tool node** and are executed in the service when you make a request.
## Add tools to your agent
You can add tools to your agent to perform actions. The method `create_prompt_agent` implements
the agent loop for you.
You should distinguish two types of tools:
* [Local tools](#add-local-tools): Those are tools that run colocated where your agent code is running. They can be callable functions or any function available for LangChain/LangGraph ecosystem.
* [Built-in tools](#add-built-in-tools): Those are tools that can run exclusively in the Foundry Agent Service; server-side. Server-side tools can only be applied to Foundry agents.
Adding **local tools** to your agent adds a **tool node** to your graph for those tools to run. **Built-in tools** do not add a **tool node** and are executed in the service when you make a request.
 The following section explains how to use both:
## Add local tools
You can define local Python functions and attach them as tools. This pattern is useful
for deterministic business logic and utility operations.
```python theme={null}
def add(a: int, b: int) -> int:
"""Add two integers."""
return a + b
def multiply(a: int, b: int) -> int:
"""Multiply two integers."""
return a * b
def divide(a: int, b: int) -> float:
"""Divide one integer by another."""
return a / b
```
Pass the tools to the `create_prompt_agent` function and invoke the agent with a multi-step arithmetic problem:
```python theme={null}
math_agent = factory.create_prompt_agent(
name="math-agent",
model=os.environ["MODEL_DEPLOYMENT_NAME"],
instructions=(
"You are a helpful assistant tasked with performing arithmetic "
"on a set of inputs."
),
tools=[add, multiply, divide],
)
messages = [
HumanMessage(
content="Add 3 and 4. Multiply the output by 2. Divide the output by 5."
)
]
response = math_agent.invoke({"messages": messages})
pretty_print(response)
```
```output theme={null}
================================ Human Message =================================
Add 3 and 4. Multiply the output by 2. Divide the output by 5
================================== Ai Message ==================================
Tool Calls:
add (call_JSmltOCbsTRkbNEBMAVSgVe1)
Call ID: call_JSmltOCbsTRkbNEBMAVSgVe1
Args:
a: 3
b: 4
================================= Tool Message =================================
Name: add
7
================================== Ai Message ==================================
Tool Calls:
multiply (call_ae6M6XyhOIBOkPy3ETd8nDI9)
...
================================== Ai Message ==================================
Name: math-agent
Here's the step-by-step calculation:
1. Add 3 and 4 to get 7.
2. Multiply the result (7) by 2 to get 14.
3. Divide the result (14) by 5 to get 2.8.
The final result is 2.8.
```
**What this snippet does:** Creates an agent with three arithmetic tools.
When the agent determines a tool call is needed, the Foundry Agent Service
orchestrates the tool invocation locally and feeds the result back to the
agent to continue reasoning.
Use other tools from the LangGraph/LangChain ecosystem like Azure Document Intelligence in Foundry Tools from the same agent flow. While those tools are connected to a Foundry resource, **they are not exclusive to the Agent Service and hence act like a local tool**.
```python theme={null}
from langchain_azure_ai.tools import AzureAIDocumentIntelligenceTool
document_parser_agent = factory.create_prompt_agent(
name="document-agent",
model=os.environ["MODEL_DEPLOYMENT_NAME"],
instructions="You are a helpful assistant tasked with analyzing documents.",
tools=[AzureAIDocumentIntelligenceTool()],
)
```
`AzureAIDocumentIntelligenceTool` can use the Foundry project to connect to
the service and it also support Microsoft Entra for authentication. By default,
the tool uses `AZURE_AI_PROJECT_ENDPOINT` with `DefaultAzureCredential`, which
is why no further configuration is required. You can change that to use a
specific endpoint and key if needed.
Ask the agent to analyze an invoice from a URL:
```python theme={null}
messages = [
HumanMessage(
content=(
"What's the total amount in the invoice at "
"https://raw.githubusercontent.com/Azure/azure-sdk-for-python/main/"
"sdk/formrecognizer/azure-ai-formrecognizer/tests/sample_forms/"
"forms/Form_1.jpg"
)
)
]
response = document_parser_agent.invoke({"messages": messages})
pretty_print(response)
```
```output theme={null}
================================ Human Message =================================
What's the total amount in ...
================================== Ai Message ==================================
Tool Calls:
azure_ai_document_intelligence (call_32V6bqeCcJhhsOXDrYFXggnc)
Call ID: call_32V6bqeCcJhhsOXDrYFXggnc
Args:
source_type: url
source: https://raw.githubusercontent.com/Azure/ ...
================================= Tool Message =================================
Name: azure_ai_document_intelligence
Content: Purchase Order Hero ...
================================== Ai Message ==================================
Name: document-agent
The total amount in the invoice is **$144.00**.
```
**What this snippet does:** Asks the agent to extract data from a sample
invoice image. The agent calls `AzureAIDocumentIntelligenceTool` to parse the
document and returns the result. Expected output: *"The total amount in the
invoice is **\$144.00**."*
## Add built-in tools
Built-in tools in Foundry Agent Service run server-side instead of in a **tool node**
like local tools. Tools in the namespace `langchain_azure_ai.agents.prebuilt.tools.*`
are all built-in tools and only work with `create_prompt_agent`.
### Example: use code interpreter tool
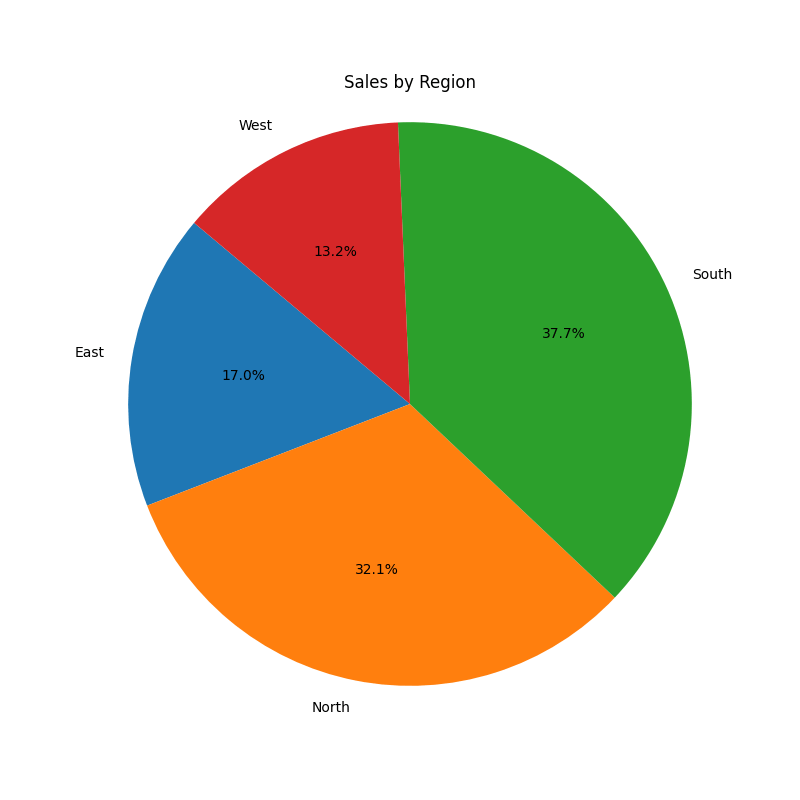
Create a code interpreter agent for data analysis and invoke it with a fictitious
`data.csv` data file.
Before running this sample, create a local `data.csv` file in your current
working directory.
```python theme={null}
import base64
from langchain_azure_ai.agents.prebuilt.tools import CodeInterpreterTool
code_interpreter_agent = factory.create_prompt_agent(
name="code-interpreter-agent",
model=os.environ["MODEL_DEPLOYMENT_NAME"],
instructions=(
"You are a data analyst agent. Analyze CSV data and create "
"visualizations when helpful."
),
tools=[CodeInterpreterTool()],
)
with open("data.csv", "rb") as file_handle:
csv_data = base64.b64encode(file_handle.read()).decode()
response = code_interpreter_agent.invoke(
{
"messages": [
HumanMessage(
content=[
{
"type": "file",
"mime_type": "text/csv",
"base64": csv_data,
},
{
"type": "text",
"text": (
"Create a pie chart showing sales by region and "
"return it as a PNG image."
),
},
]
)
]
}
)
pretty_print(response)
```
```output theme={null}
================================ Human Message =================================
[
{'type': 'file', 'mime_type': 'text/csv', 'base64': '77u/bW9udG...xTb3V0aAo='},
{'type': 'text', 'text': 'create a pie chart with the data showing sales by region and show it to me as a png image.'}
]
================================== Ai Message ==================================
Name: code-interpreter-agent
[
{'type': 'text', 'text': 'Here is the pie chart showing sales by region as a PNG image:\n\n[Download the Pie Chart](sandbox:/mnt/data/sales_by_region_pie.png)'},
{'type': 'image', 'mime_type': 'image/png', 'base64': 'iVBORw0...ErkJggg=='}
]
```
The following section explains how to use both:
## Add local tools
You can define local Python functions and attach them as tools. This pattern is useful
for deterministic business logic and utility operations.
```python theme={null}
def add(a: int, b: int) -> int:
"""Add two integers."""
return a + b
def multiply(a: int, b: int) -> int:
"""Multiply two integers."""
return a * b
def divide(a: int, b: int) -> float:
"""Divide one integer by another."""
return a / b
```
Pass the tools to the `create_prompt_agent` function and invoke the agent with a multi-step arithmetic problem:
```python theme={null}
math_agent = factory.create_prompt_agent(
name="math-agent",
model=os.environ["MODEL_DEPLOYMENT_NAME"],
instructions=(
"You are a helpful assistant tasked with performing arithmetic "
"on a set of inputs."
),
tools=[add, multiply, divide],
)
messages = [
HumanMessage(
content="Add 3 and 4. Multiply the output by 2. Divide the output by 5."
)
]
response = math_agent.invoke({"messages": messages})
pretty_print(response)
```
```output theme={null}
================================ Human Message =================================
Add 3 and 4. Multiply the output by 2. Divide the output by 5
================================== Ai Message ==================================
Tool Calls:
add (call_JSmltOCbsTRkbNEBMAVSgVe1)
Call ID: call_JSmltOCbsTRkbNEBMAVSgVe1
Args:
a: 3
b: 4
================================= Tool Message =================================
Name: add
7
================================== Ai Message ==================================
Tool Calls:
multiply (call_ae6M6XyhOIBOkPy3ETd8nDI9)
...
================================== Ai Message ==================================
Name: math-agent
Here's the step-by-step calculation:
1. Add 3 and 4 to get 7.
2. Multiply the result (7) by 2 to get 14.
3. Divide the result (14) by 5 to get 2.8.
The final result is 2.8.
```
**What this snippet does:** Creates an agent with three arithmetic tools.
When the agent determines a tool call is needed, the Foundry Agent Service
orchestrates the tool invocation locally and feeds the result back to the
agent to continue reasoning.
Use other tools from the LangGraph/LangChain ecosystem like Azure Document Intelligence in Foundry Tools from the same agent flow. While those tools are connected to a Foundry resource, **they are not exclusive to the Agent Service and hence act like a local tool**.
```python theme={null}
from langchain_azure_ai.tools import AzureAIDocumentIntelligenceTool
document_parser_agent = factory.create_prompt_agent(
name="document-agent",
model=os.environ["MODEL_DEPLOYMENT_NAME"],
instructions="You are a helpful assistant tasked with analyzing documents.",
tools=[AzureAIDocumentIntelligenceTool()],
)
```
`AzureAIDocumentIntelligenceTool` can use the Foundry project to connect to
the service and it also support Microsoft Entra for authentication. By default,
the tool uses `AZURE_AI_PROJECT_ENDPOINT` with `DefaultAzureCredential`, which
is why no further configuration is required. You can change that to use a
specific endpoint and key if needed.
Ask the agent to analyze an invoice from a URL:
```python theme={null}
messages = [
HumanMessage(
content=(
"What's the total amount in the invoice at "
"https://raw.githubusercontent.com/Azure/azure-sdk-for-python/main/"
"sdk/formrecognizer/azure-ai-formrecognizer/tests/sample_forms/"
"forms/Form_1.jpg"
)
)
]
response = document_parser_agent.invoke({"messages": messages})
pretty_print(response)
```
```output theme={null}
================================ Human Message =================================
What's the total amount in ...
================================== Ai Message ==================================
Tool Calls:
azure_ai_document_intelligence (call_32V6bqeCcJhhsOXDrYFXggnc)
Call ID: call_32V6bqeCcJhhsOXDrYFXggnc
Args:
source_type: url
source: https://raw.githubusercontent.com/Azure/ ...
================================= Tool Message =================================
Name: azure_ai_document_intelligence
Content: Purchase Order Hero ...
================================== Ai Message ==================================
Name: document-agent
The total amount in the invoice is **$144.00**.
```
**What this snippet does:** Asks the agent to extract data from a sample
invoice image. The agent calls `AzureAIDocumentIntelligenceTool` to parse the
document and returns the result. Expected output: *"The total amount in the
invoice is **\$144.00**."*
## Add built-in tools
Built-in tools in Foundry Agent Service run server-side instead of in a **tool node**
like local tools. Tools in the namespace `langchain_azure_ai.agents.prebuilt.tools.*`
are all built-in tools and only work with `create_prompt_agent`.
### Example: use code interpreter tool
Create a code interpreter agent for data analysis and invoke it with a fictitious
`data.csv` data file.
Before running this sample, create a local `data.csv` file in your current
working directory.
```python theme={null}
import base64
from langchain_azure_ai.agents.prebuilt.tools import CodeInterpreterTool
code_interpreter_agent = factory.create_prompt_agent(
name="code-interpreter-agent",
model=os.environ["MODEL_DEPLOYMENT_NAME"],
instructions=(
"You are a data analyst agent. Analyze CSV data and create "
"visualizations when helpful."
),
tools=[CodeInterpreterTool()],
)
with open("data.csv", "rb") as file_handle:
csv_data = base64.b64encode(file_handle.read()).decode()
response = code_interpreter_agent.invoke(
{
"messages": [
HumanMessage(
content=[
{
"type": "file",
"mime_type": "text/csv",
"base64": csv_data,
},
{
"type": "text",
"text": (
"Create a pie chart showing sales by region and "
"return it as a PNG image."
),
},
]
)
]
}
)
pretty_print(response)
```
```output theme={null}
================================ Human Message =================================
[
{'type': 'file', 'mime_type': 'text/csv', 'base64': '77u/bW9udG...xTb3V0aAo='},
{'type': 'text', 'text': 'create a pie chart with the data showing sales by region and show it to me as a png image.'}
]
================================== Ai Message ==================================
Name: code-interpreter-agent
[
{'type': 'text', 'text': 'Here is the pie chart showing sales by region as a PNG image:\n\n[Download the Pie Chart](sandbox:/mnt/data/sales_by_region_pie.png)'},
{'type': 'image', 'mime_type': 'image/png', 'base64': 'iVBORw0...ErkJggg=='}
]
```
 ### Example: using image generation tool
The following example shows how to use `ImageGenTool` for image generation:
```python theme={null}
from langchain_azure_ai.agents.prebuilt.tools import ImageGenTool
image_agent = factory.create_prompt_agent(
name="image-generator-agent",
model=os.environ["MODEL_DEPLOYMENT_NAME"],
instructions=(
"You are an image generation assistant. You receive a text prompt and "
"must generate an image by using the configured tool."
),
tools=[ImageGenTool(model_deployment="gpt-image-1.5", quality="medium")],
)
response = image_agent.invoke(
{"messages": [HumanMessage("Generate an image of a sunset over mountains.")]}
)
pretty_print(response)
```
```output theme={null}
================================ Human Message =================================
Generate an image of a sunset over the mountains.
================================== Ai Message ==================================
Name: image-generator-agent
```
### Example: using image generation tool
The following example shows how to use `ImageGenTool` for image generation:
```python theme={null}
from langchain_azure_ai.agents.prebuilt.tools import ImageGenTool
image_agent = factory.create_prompt_agent(
name="image-generator-agent",
model=os.environ["MODEL_DEPLOYMENT_NAME"],
instructions=(
"You are an image generation assistant. You receive a text prompt and "
"must generate an image by using the configured tool."
),
tools=[ImageGenTool(model_deployment="gpt-image-1.5", quality="medium")],
)
response = image_agent.invoke(
{"messages": [HumanMessage("Generate an image of a sunset over mountains.")]}
)
pretty_print(response)
```
```output theme={null}
================================ Human Message =================================
Generate an image of a sunset over the mountains.
================================== Ai Message ==================================
Name: image-generator-agent
```
 #### Using other built-in tools
Any Foundry Agent Service tool can be used with `create_prompt_agent`. Use `AgentServiceBaseTool`
to wrap tools from the Azure AI Projects SDK and attach them to your prompt agent.
Before running this sample, make sure the vector store ID exists in your
project.
The following example shows how to use a `FileSearchTool`:
```python theme={null}
from azure.ai.projects.models import FileSearchTool
from langchain_azure_ai.agents.prebuilt.tools import AgentServiceBaseTool
file_search_agent = factory.create_prompt_agent(
name="file-search-agent",
model=os.environ["MODEL_DEPLOYMENT_NAME"],
instructions=(
"You are a helpful agent with access to a file search tool over a "
"vector store."
),
tools=[
AgentServiceBaseTool(
tool=FileSearchTool(vector_store_ids=["vector-store-1"]),
)
],
)
```
## Human-in-the-loop
Certain tools in Foundry have built-in approval workflows, like `MCPTool`. You can
require approval before tool calls execute for a given tool in the server.
The method `create_prompt_agent` implements the same pattern recommended by LangGraph,
by introducing an approval node in the graph:
#### Using other built-in tools
Any Foundry Agent Service tool can be used with `create_prompt_agent`. Use `AgentServiceBaseTool`
to wrap tools from the Azure AI Projects SDK and attach them to your prompt agent.
Before running this sample, make sure the vector store ID exists in your
project.
The following example shows how to use a `FileSearchTool`:
```python theme={null}
from azure.ai.projects.models import FileSearchTool
from langchain_azure_ai.agents.prebuilt.tools import AgentServiceBaseTool
file_search_agent = factory.create_prompt_agent(
name="file-search-agent",
model=os.environ["MODEL_DEPLOYMENT_NAME"],
instructions=(
"You are a helpful agent with access to a file search tool over a "
"vector store."
),
tools=[
AgentServiceBaseTool(
tool=FileSearchTool(vector_store_ids=["vector-store-1"]),
)
],
)
```
## Human-in-the-loop
Certain tools in Foundry have built-in approval workflows, like `MCPTool`. You can
require approval before tool calls execute for a given tool in the server.
The method `create_prompt_agent` implements the same pattern recommended by LangGraph,
by introducing an approval node in the graph:
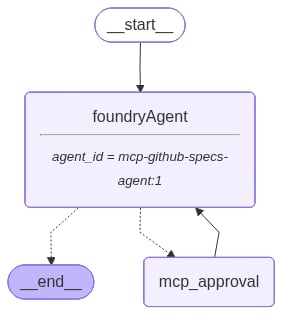 The following example shows how to use `MCPTool` with approval:
```python theme={null}
from langchain_azure_ai.agents.prebuilt.tools import MCPTool
from langgraph.checkpoint.memory import MemorySaver
from langgraph.types import Command
mcp_agent = factory.create_prompt_agent(
name="mcp-github-specs-agent",
model=os.environ["MODEL_DEPLOYMENT_NAME"],
instructions=(
"You are a helpful agent that can use MCP tools to assist users."
),
tools=[
MCPTool(
server_label="api-specs",
server_url="https://gitmcp.io/Azure/azure-rest-api-specs",
require_approval="always",
)
],
checkpointer=MemorySaver(),
)
config = {"configurable": {"thread_id": "mcp-session-1"}}
response = mcp_agent.invoke(
input={"messages": [HumanMessage("What APIs are available for Azure Cosmos DB?")]},
config=config,
)
pretty_print(response)
```
```output theme={null}
================================ Human Message =================================
What APIs are available for Azure Cosmos DB?
================================== Ai Message ==================================
Tool Calls:
mcp_approval_request (mcpr_74e314080483acce0069a11d2d9f008190a971212ac61d76d8)
Call ID: mcpr_74e314080483acce0069a11d2d9f008190a971212ac61d76d8
Args:
server_label: api-specs
name: search_azure_rest_api_docs
arguments: {"query":"Cosmos DB APIs"}
================================== Interrupt ==================================
Interrupt ID: c3cb23363f91d097298fb3c6f8fbf70a
Interrupt Value:
Tool Call ID: mcpr_74e314080483acce0069a11d2d9f008190a971212ac61d76d8
Server Label: api-specs
Tool Name: search_azure_rest_api_docs
Arguments: {"query":"Cosmos DB APIs"}
```
Send the approval using a `Command` in LangGraph:
```python theme={null}
response = mcp_agent.invoke(Command(resume={"approve": True}), config)
pretty_print(response)
```
```output theme={null}
================================ Human Message =================================
What APIs are available for Azure Cosmos DB?
================================== Ai Message ==================================
Tool Calls:
mcp_approval_request (mcpr_74e314080483acce0069a11d2d9f008190a971212ac61d76d8)
Call ID: mcpr_74e314080483acce0069a11d2d9f008190a971212ac61d76d8
Args:
server_label: api-specs
name: search_azure_rest_api_docs
arguments: {"query":"Cosmos DB APIs"}
================================= Tool Message =================================
{"approve": true}
================================== Ai Message ==================================
Name: mcp-github-specs-agent
Azure Cosmos DB supports multiple APIs, ...
```
## Observability
When you compose solutions using Foundry Agent Service and LangGraph, certain
pieces run in the Agent Service while others run where your code executes.
The class `AzureAIOpenTelemetryTracer` allows you to trace end-to-end
solutions
built with LangGraph using the OpenTelemetry standard, which is supported by
the Agent Service.
To trace your code, use:
```python theme={null}
from langchain_azure_ai.callbacks.tracers import AzureAIOpenTelemetryTracer
tracer = AzureAIOpenTelemetryTracer(
agent_id="mcp-github-specs-agent-langgraph"
)
mcp_agent = mcp_agent.with_config({ "callbacks": [tracer] })
```
**What this snippet does:** Creates an instance of `AzureAIOpenTelemetryTracer`
to send traces to Azure Application Insights using OpenTelemetry standard. It
sets the parameter `agent_id` to identify traces by setting the property
`gen_ai.agent.id` in spans of type *agent\_invoke*. `AzureAIOpenTelemetryTracer`
requires a connection string to Azure Application Insights. In this case, it's
not shown because you set the environment variable
`AZURE_AI_PROJECT_ENDPOINT`, which the class can use to detect the connection
string to the Azure Application Insights associated with the project. You can
pass any connection string you need.
To view the traces, it's important to understand that there are *two agents* here:
1. The Foundry agent, which is the backend of one of the nodes of the graph.
2. The entire LangGraph graph, which is composed as the multiple nodes.
You can view Foundry agent traces using the [Foundry portal](https://ai.azure.com),
but to view the trace of the LangGraph agent while developing, you need to use
Azure Monitor in the [Azure portal](https://portal.azure.com).
LangChain and LangGraph applications can be registered in Foundry Control Plane
for governance. Then, you can use [Foundry portal](https://ai.azure.com)
to view traces. See [View traces in Foundry Control Plane](/developer-tools-and-integrations/langchain-traces#view-traces-in-foundry-control-plane).
To view the traces using Azure Monitor:
1. Go to the [Azure portal](https://portal.azure.com).
2. Navigate to the Azure Application Insights you configured.
3. Using the left navigation bar, select **Investigate** > **Agents (Preview)**.
4. You see a dashboard showing agents, models, and tools executions. Use this view to understand the general picture of your agents.
5. Select **View Traces with Agent Runs**. The side panel shows all the traces generated by agent runs.
The following example shows how to use `MCPTool` with approval:
```python theme={null}
from langchain_azure_ai.agents.prebuilt.tools import MCPTool
from langgraph.checkpoint.memory import MemorySaver
from langgraph.types import Command
mcp_agent = factory.create_prompt_agent(
name="mcp-github-specs-agent",
model=os.environ["MODEL_DEPLOYMENT_NAME"],
instructions=(
"You are a helpful agent that can use MCP tools to assist users."
),
tools=[
MCPTool(
server_label="api-specs",
server_url="https://gitmcp.io/Azure/azure-rest-api-specs",
require_approval="always",
)
],
checkpointer=MemorySaver(),
)
config = {"configurable": {"thread_id": "mcp-session-1"}}
response = mcp_agent.invoke(
input={"messages": [HumanMessage("What APIs are available for Azure Cosmos DB?")]},
config=config,
)
pretty_print(response)
```
```output theme={null}
================================ Human Message =================================
What APIs are available for Azure Cosmos DB?
================================== Ai Message ==================================
Tool Calls:
mcp_approval_request (mcpr_74e314080483acce0069a11d2d9f008190a971212ac61d76d8)
Call ID: mcpr_74e314080483acce0069a11d2d9f008190a971212ac61d76d8
Args:
server_label: api-specs
name: search_azure_rest_api_docs
arguments: {"query":"Cosmos DB APIs"}
================================== Interrupt ==================================
Interrupt ID: c3cb23363f91d097298fb3c6f8fbf70a
Interrupt Value:
Tool Call ID: mcpr_74e314080483acce0069a11d2d9f008190a971212ac61d76d8
Server Label: api-specs
Tool Name: search_azure_rest_api_docs
Arguments: {"query":"Cosmos DB APIs"}
```
Send the approval using a `Command` in LangGraph:
```python theme={null}
response = mcp_agent.invoke(Command(resume={"approve": True}), config)
pretty_print(response)
```
```output theme={null}
================================ Human Message =================================
What APIs are available for Azure Cosmos DB?
================================== Ai Message ==================================
Tool Calls:
mcp_approval_request (mcpr_74e314080483acce0069a11d2d9f008190a971212ac61d76d8)
Call ID: mcpr_74e314080483acce0069a11d2d9f008190a971212ac61d76d8
Args:
server_label: api-specs
name: search_azure_rest_api_docs
arguments: {"query":"Cosmos DB APIs"}
================================= Tool Message =================================
{"approve": true}
================================== Ai Message ==================================
Name: mcp-github-specs-agent
Azure Cosmos DB supports multiple APIs, ...
```
## Observability
When you compose solutions using Foundry Agent Service and LangGraph, certain
pieces run in the Agent Service while others run where your code executes.
The class `AzureAIOpenTelemetryTracer` allows you to trace end-to-end
solutions
built with LangGraph using the OpenTelemetry standard, which is supported by
the Agent Service.
To trace your code, use:
```python theme={null}
from langchain_azure_ai.callbacks.tracers import AzureAIOpenTelemetryTracer
tracer = AzureAIOpenTelemetryTracer(
agent_id="mcp-github-specs-agent-langgraph"
)
mcp_agent = mcp_agent.with_config({ "callbacks": [tracer] })
```
**What this snippet does:** Creates an instance of `AzureAIOpenTelemetryTracer`
to send traces to Azure Application Insights using OpenTelemetry standard. It
sets the parameter `agent_id` to identify traces by setting the property
`gen_ai.agent.id` in spans of type *agent\_invoke*. `AzureAIOpenTelemetryTracer`
requires a connection string to Azure Application Insights. In this case, it's
not shown because you set the environment variable
`AZURE_AI_PROJECT_ENDPOINT`, which the class can use to detect the connection
string to the Azure Application Insights associated with the project. You can
pass any connection string you need.
To view the traces, it's important to understand that there are *two agents* here:
1. The Foundry agent, which is the backend of one of the nodes of the graph.
2. The entire LangGraph graph, which is composed as the multiple nodes.
You can view Foundry agent traces using the [Foundry portal](https://ai.azure.com),
but to view the trace of the LangGraph agent while developing, you need to use
Azure Monitor in the [Azure portal](https://portal.azure.com).
LangChain and LangGraph applications can be registered in Foundry Control Plane
for governance. Then, you can use [Foundry portal](https://ai.azure.com)
to view traces. See [View traces in Foundry Control Plane](/developer-tools-and-integrations/langchain-traces#view-traces-in-foundry-control-plane).
To view the traces using Azure Monitor:
1. Go to the [Azure portal](https://portal.azure.com).
2. Navigate to the Azure Application Insights you configured.
3. Using the left navigation bar, select **Investigate** > **Agents (Preview)**.
4. You see a dashboard showing agents, models, and tools executions. Use this view to understand the general picture of your agents.
5. Select **View Traces with Agent Runs**. The side panel shows all the traces generated by agent runs.
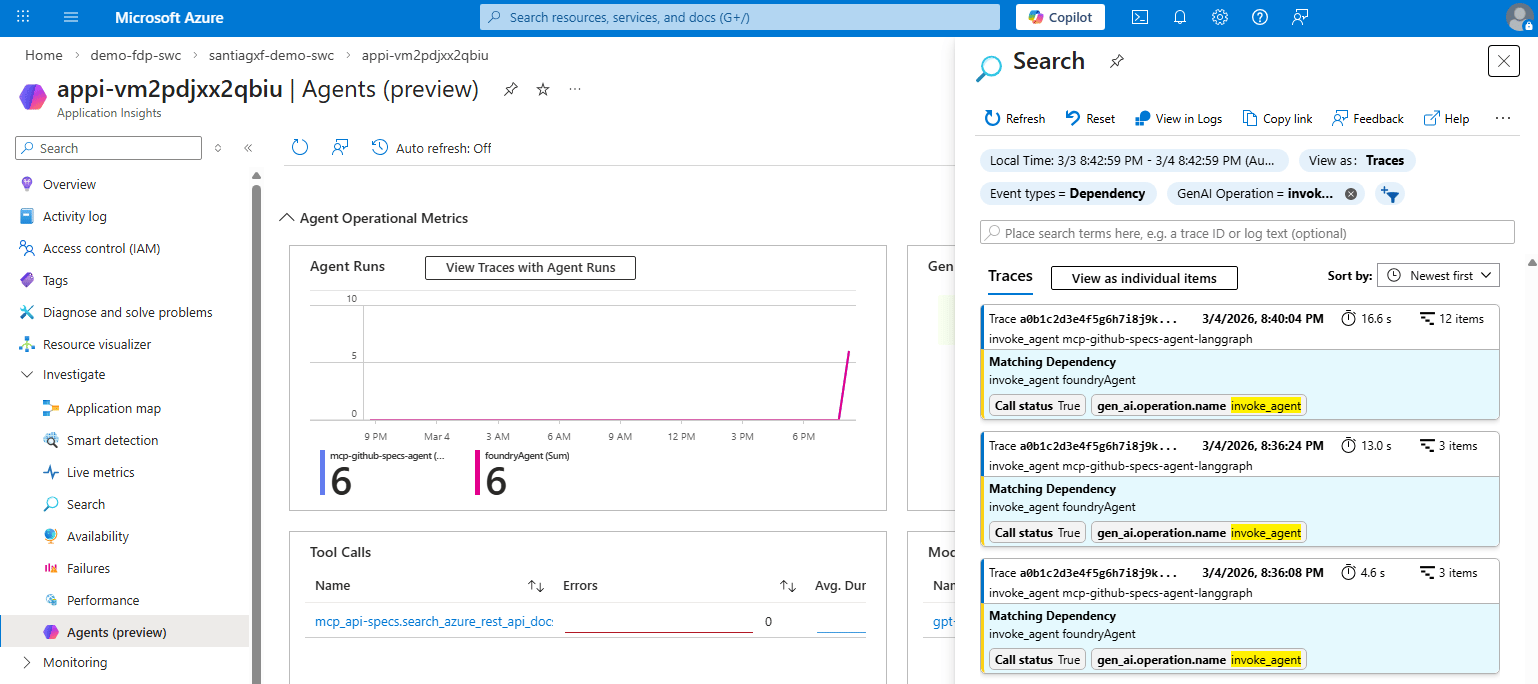 6. Select one of the traces. You should see the details.
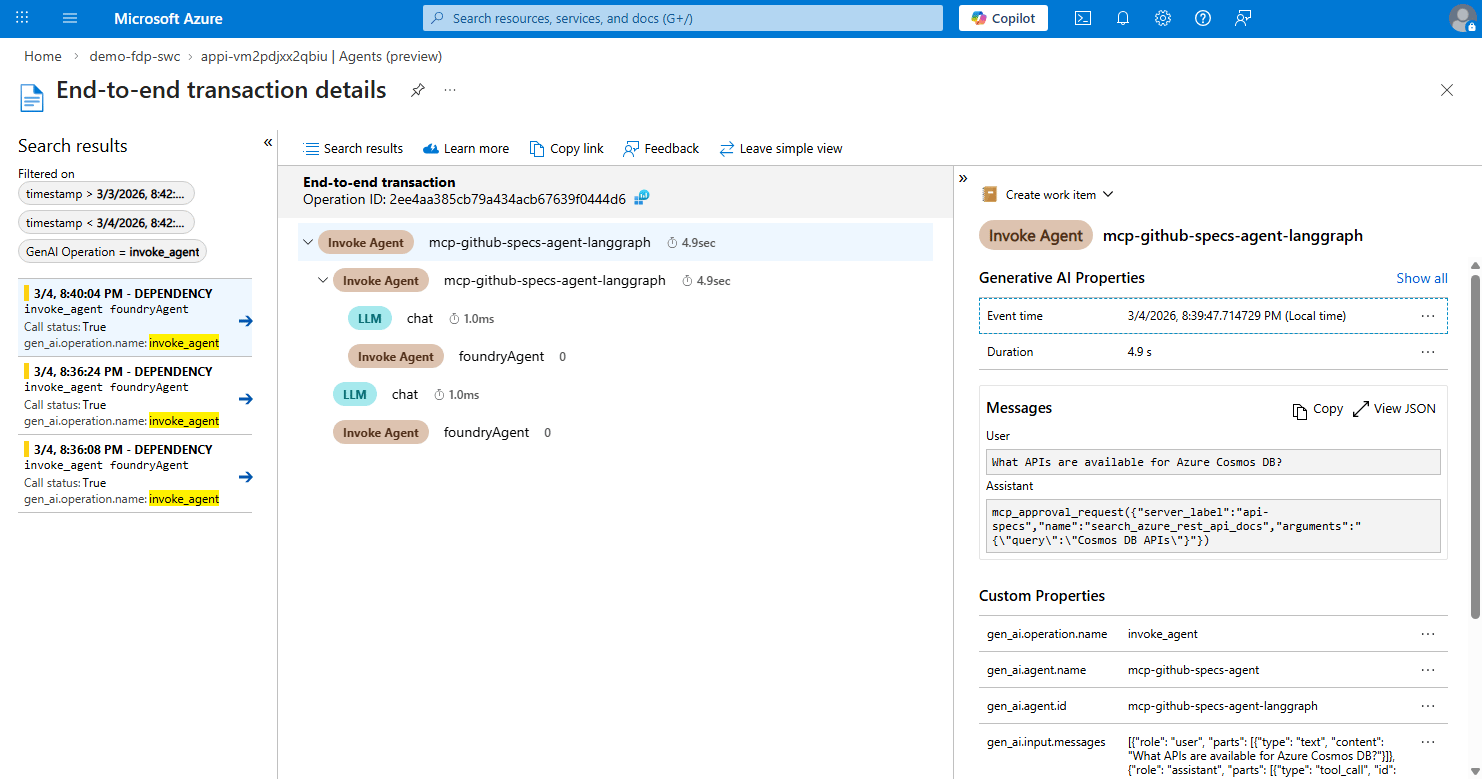 7. Notice how two agents are involved in the conversation: the agent `foundryAgent` and the one named `mcp-github-specs-agent-langgraph`.
## Clean up agents
Delete agents you created in samples to avoid leaving unused resources.
Delete only agents that you created in your session.
```python theme={null}
factory.delete_agent(math_agent)
factory.delete_agent(document_parser_agent)
factory.delete_agent(image_agent)
factory.delete_agent(code_interpreter_agent)
factory.delete_agent(mcp_agent)
factory.delete_agent(file_search_agent)
```
After deletion, the LangGraph object can no longer be used.
## Troubleshooting
Use this checklist to diagnose common problems when using `langchain-azure-ai`
with Agent Service.
### Enable diagnostic logging
Turn on debug logs first so you can inspect authentication, request flow, and
tool execution details.
```python theme={null}
import logging
logging.getLogger("langchain_azure_ai").setLevel(logging.DEBUG)
```
If you need more details, increase the logging to include other libraries:
```python theme={null}
import logging
logging.basicConfig(level=logging.DEBUG)
```
### Validate configuration early
* Confirm `AZURE_AI_PROJECT_ENDPOINT` points to the correct project endpoint and you are using a Foundry project with the new experience.
* Confirm `MODEL_DEPLOYMENT_NAME` matches an existing deployed model.
* Verify authentication context with `az account show`.
* Use a minimal `create_prompt_agent` example first.
### Verify resource and permission access
* Ensure your account has access to the Foundry project and model deployment.
* Ensure downstream dependencies (for example, vector stores or tool resources)
exist and are reachable.
* If a tool requires a specific resource type, verify that resource is
provisioned in the correct subscription and region.
## Related content
* [Get started with Microsoft Foundry SDKs and Endpoints](sdk-overview)
* [Set up tracing integrations for agent frameworks](/observability/trace-agent-framework)
* [Foundry Agent Service quickstart](/agents/quickstart-hosted-agent)
* [langchain-azure-ai package on PyPI](https://pypi.org/project/langchain-azure-ai/)
7. Notice how two agents are involved in the conversation: the agent `foundryAgent` and the one named `mcp-github-specs-agent-langgraph`.
## Clean up agents
Delete agents you created in samples to avoid leaving unused resources.
Delete only agents that you created in your session.
```python theme={null}
factory.delete_agent(math_agent)
factory.delete_agent(document_parser_agent)
factory.delete_agent(image_agent)
factory.delete_agent(code_interpreter_agent)
factory.delete_agent(mcp_agent)
factory.delete_agent(file_search_agent)
```
After deletion, the LangGraph object can no longer be used.
## Troubleshooting
Use this checklist to diagnose common problems when using `langchain-azure-ai`
with Agent Service.
### Enable diagnostic logging
Turn on debug logs first so you can inspect authentication, request flow, and
tool execution details.
```python theme={null}
import logging
logging.getLogger("langchain_azure_ai").setLevel(logging.DEBUG)
```
If you need more details, increase the logging to include other libraries:
```python theme={null}
import logging
logging.basicConfig(level=logging.DEBUG)
```
### Validate configuration early
* Confirm `AZURE_AI_PROJECT_ENDPOINT` points to the correct project endpoint and you are using a Foundry project with the new experience.
* Confirm `MODEL_DEPLOYMENT_NAME` matches an existing deployed model.
* Verify authentication context with `az account show`.
* Use a minimal `create_prompt_agent` example first.
### Verify resource and permission access
* Ensure your account has access to the Foundry project and model deployment.
* Ensure downstream dependencies (for example, vector stores or tool resources)
exist and are reachable.
* If a tool requires a specific resource type, verify that resource is
provisioned in the correct subscription and region.
## Related content
* [Get started with Microsoft Foundry SDKs and Endpoints](sdk-overview)
* [Set up tracing integrations for agent frameworks](/observability/trace-agent-framework)
* [Foundry Agent Service quickstart](/agents/quickstart-hosted-agent)
* [langchain-azure-ai package on PyPI](https://pypi.org/project/langchain-azure-ai/)