> ## Documentation Index
> Fetch the complete documentation index at: https://hobbyist-e43fa225.mintlify.site/llms.txt
> Use this file to discover all available pages before exploring further.
# Build a workflow in Microsoft Foundry (Preview)
> Build workflows in Microsoft Foundry to orchestrate AI agents with visual logic, branching, and Power Fx formulas. Create intelligent automation without writing code.
Items marked (preview) in this article are currently in public preview. This preview is provided without a service-level agreement, and we don't recommend it for production workloads. Certain features might not be supported or might have constrained capabilities. For more information, see [Supplemental Terms of Use for Microsoft Azure Previews](https://azure.microsoft.com/support/legal/preview-supplemental-terms/).
Microsoft Foundry is retiring workflows on December 1, 2026.
If you're looking to build new workflows, use Microsoft Agent Framework. To migrate existing workflows, see the [Migration guide](#migration-guide) section of this article for all supported paths.
Workflows are UI-based tools in Microsoft Foundry. Use them to create declarative, predefined sequences of actions that orchestrate agents and business logic in a visual builder.
Workflows enable you to build intelligent automation systems that seamlessly blend AI agents with business processes in a visual manner. Traditional single-agent systems are limited in their ability to handle complex, multifaceted tasks. By orchestrating multiple agents, each powered by a Foundry model with specialized skills or roles, you can create systems that are more robust, adaptive, and capable of solving real-world problems collaboratively.
## Prerequisites
* An Azure account with an active subscription. If you don't have one, create a [free Azure account, which includes a free trial subscription](https://azure.microsoft.com/pricing/purchase-options/azure-account?cid=msft_learn).
* A project in Microsoft Foundry. For more information, see [Create projects](../../how-to/create-projects).
* Access to create and run workflows in your Foundry project. For more information, see [Azure role-based access control (RBAC) in Foundry](../../concepts/rbac-foundry).
## Decide when to use workflows
Workflows are ideal for scenarios where you need to:
* Orchestrate multiple agents in a repeatable process.
* Add branching logic (for example, if/else) and variable handling without writing code.
* Create human-in-the-loop steps (for example, approvals or clarifying questions).
If you want to edit workflow YAML in Visual Studio Code or run workflows in a local playground, see:
* [Work with Declarative (Low-code) Agent workflows in Visual Studio Code](/developer-tools-and-integrations/vs-code-agents-workflow-low-code)
* [Work with Hosted (Pro-code) Agent workflows in Visual Studio Code](/developer-tools-and-integrations/vs-code-agents-workflow-pro-code)
## Understand workflow patterns
Foundry provides templates for common orchestration patterns. Start with a blank workflow or select a template:
| Pattern | Description | Typical use case |
| ----------------- | ------------------------------------------------------------------- | --------------------------------------------------------------------------------------------------------------------------- |
| Human in the loop | Asks the user a question and awaits user input to proceed | Creating approval requests during workflow execution and waiting for human approval, or obtaining information from the user |
| Sequential | Passes the result from one agent to the next in a defined order | Step-by-step workflows, pipelines, or multiple-stage processing |
| Group chat | Dynamically passes control between agents based on context or rules | Dynamic workflows, escalation, fallback, or expert handoff scenarios |
For more information, see [Microsoft Agent Framework workflow orchestrations](/agent-framework/user-guide/workflows/orchestrations/overview).
## Create a workflow
This procedure shows how to create a sequential workflow. The same general steps apply to other workflow types.
1. Sign in to [Microsoft Foundry](https://ai.azure.com/?cid=learnDocs). Make sure the **New Foundry** toggle is on. These steps refer to **Foundry (new)**.
 1. On the upper-right menu, select **Build**.
2. Select **Create new workflow** > **Sequential**.
3. Assign an agent to the agent nodes by selecting each agent node in the workflow and either selecting the desired agent or creating a new one. For more information, see [Add agents](#add-agents) later in this article.
4. Select **Save** in the visualizer to save the changes.
Foundry doesn't save workflows automatically. Select **Save** after every change to preserve your work.
1. Select **Run Workflow**.
2. Interact with the workflow in the chat window.
3. Optionally, add new nodes to your workflow. The next section in this article provides information about nodes.
## Verify your workflow run
After you select **Run Workflow**, verify that:
* Each node completes in the visualizer.
* You see the expected responses in the chat window.
* Any variables you save (for example, JSON output from an agent node) contain the values you expect.
## Add nodes
Nodes are the building blocks of your workflow. Each node performs a specific action in sequence.
Common node types include:
* **Agent**: Invoke an agent.
* **Logic**: Use *if/else*, *go to*, or *for each*.
* **Data transformation**: Set a variable or parse a value.
* **Basic chat**: Send a message or ask a question to an agent.
When you select a prebuilt workflow, the builder displays the nodes in sequence. To reorder nodes, select the three dots on a node and then select **move**. To add nodes, select the plus (**+**) icon in the workspace.
## Add agents
Add any Foundry agent from your project to the workflow. Agent nodes also let you create new agents with customized capabilities by configuring their model, prompt, and tools.
For advanced agent creation options, go to the **Foundry Agent** tab in the Foundry portal.
Hosted agents aren't supported in the workflow designer. To coordinate tasks, call other agents, or orchestrate workflows within a Hosted agent, use [Microsoft Agent Framework workflows](/agent-framework/workflows/) or another agent framework that supports workflow capabilities from your Hosted agent code.
### Add an existing agent
1. In the workflow visualizer, select the plus sign.
2. In the pop-up dropdown list, select **Invoke agent**.
3. In the **Create new agent** window, select **existing**.
4. Enter the agent name to search for existing agents in your Foundry project.
5. Select the desired agent to add it into your workflow.
### Create a new agent
1. In the workflow visualizer, select the plus sign.
2. In the pop-up dropdown list, select **Invoke agent**.
3. Enter an agent name and description of what the agent does.
4. Select **Add**.
5. In the **Invoke an agent** window, configure the agent.
6. Select **Save**.
### Configure an output response format
To configure an agent to return structured JSON output:
1. In the **Invoke agent** configuration window, select **Create a new agent**.
2. Configure the agent to send output as a JSON schema:
1. Select **Details**.
2. Select the parameter icon.
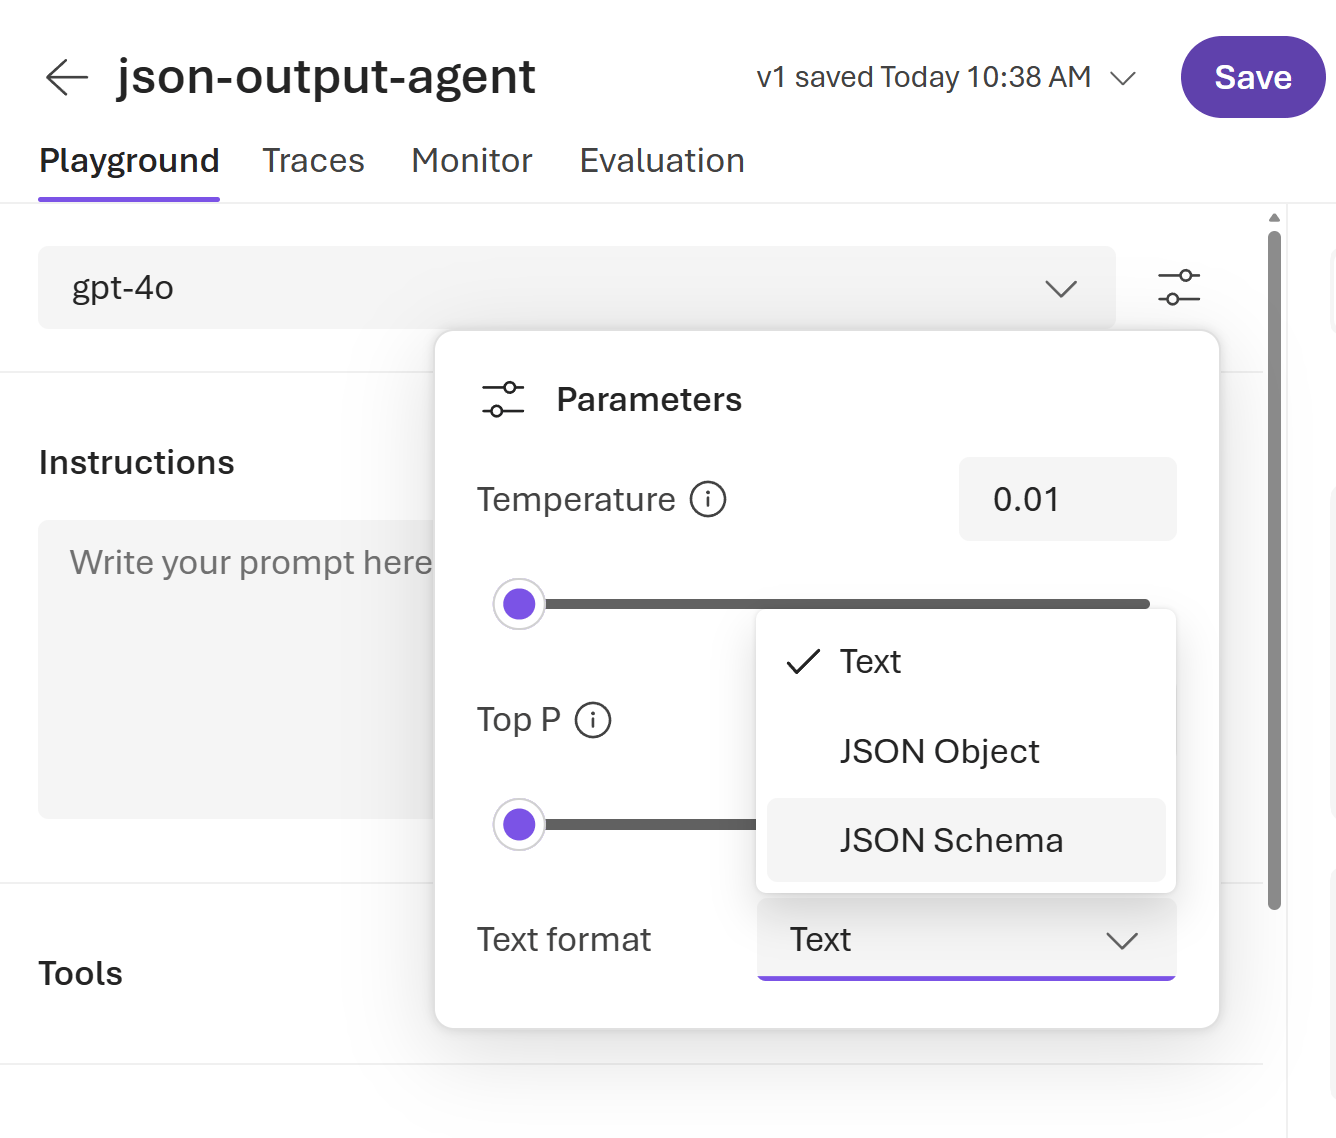
3. For **Text format**, select **JSON Schema**.
1. On the upper-right menu, select **Build**.
2. Select **Create new workflow** > **Sequential**.
3. Assign an agent to the agent nodes by selecting each agent node in the workflow and either selecting the desired agent or creating a new one. For more information, see [Add agents](#add-agents) later in this article.
4. Select **Save** in the visualizer to save the changes.
Foundry doesn't save workflows automatically. Select **Save** after every change to preserve your work.
1. Select **Run Workflow**.
2. Interact with the workflow in the chat window.
3. Optionally, add new nodes to your workflow. The next section in this article provides information about nodes.
## Verify your workflow run
After you select **Run Workflow**, verify that:
* Each node completes in the visualizer.
* You see the expected responses in the chat window.
* Any variables you save (for example, JSON output from an agent node) contain the values you expect.
## Add nodes
Nodes are the building blocks of your workflow. Each node performs a specific action in sequence.
Common node types include:
* **Agent**: Invoke an agent.
* **Logic**: Use *if/else*, *go to*, or *for each*.
* **Data transformation**: Set a variable or parse a value.
* **Basic chat**: Send a message or ask a question to an agent.
When you select a prebuilt workflow, the builder displays the nodes in sequence. To reorder nodes, select the three dots on a node and then select **move**. To add nodes, select the plus (**+**) icon in the workspace.
## Add agents
Add any Foundry agent from your project to the workflow. Agent nodes also let you create new agents with customized capabilities by configuring their model, prompt, and tools.
For advanced agent creation options, go to the **Foundry Agent** tab in the Foundry portal.
Hosted agents aren't supported in the workflow designer. To coordinate tasks, call other agents, or orchestrate workflows within a Hosted agent, use [Microsoft Agent Framework workflows](/agent-framework/workflows/) or another agent framework that supports workflow capabilities from your Hosted agent code.
### Add an existing agent
1. In the workflow visualizer, select the plus sign.
2. In the pop-up dropdown list, select **Invoke agent**.
3. In the **Create new agent** window, select **existing**.
4. Enter the agent name to search for existing agents in your Foundry project.
5. Select the desired agent to add it into your workflow.
### Create a new agent
1. In the workflow visualizer, select the plus sign.
2. In the pop-up dropdown list, select **Invoke agent**.
3. Enter an agent name and description of what the agent does.
4. Select **Add**.
5. In the **Invoke an agent** window, configure the agent.
6. Select **Save**.
### Configure an output response format
To configure an agent to return structured JSON output:
1. In the **Invoke agent** configuration window, select **Create a new agent**.
2. Configure the agent to send output as a JSON schema:
1. Select **Details**.
2. Select the parameter icon.
3. For **Text format**, select **JSON Schema**.
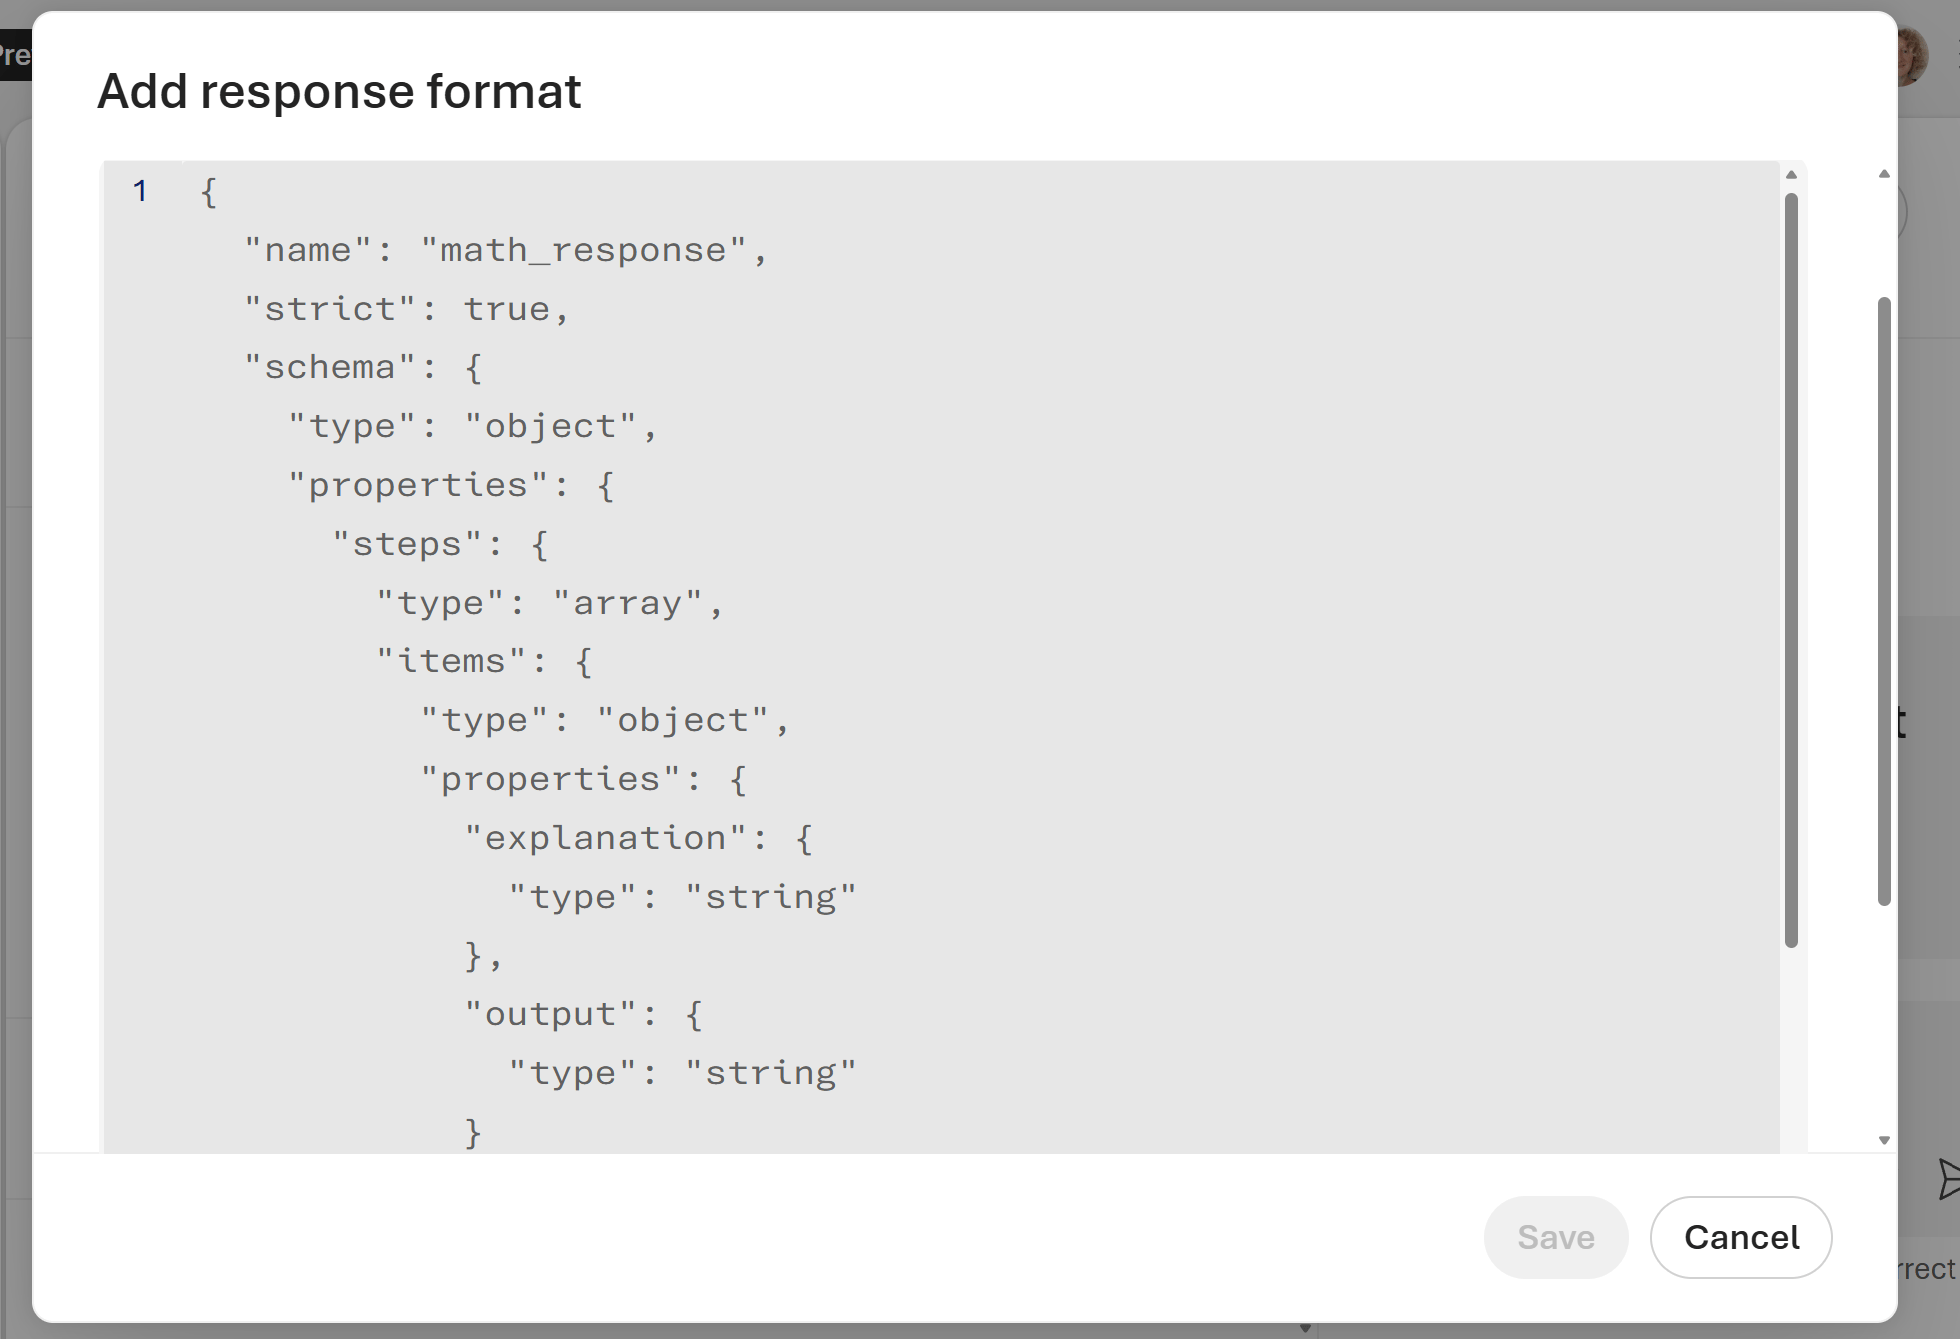
 1. Copy the desired JSON schema and paste it in the **Add response format** window. The following screenshot shows a math example. Select **Save**.
 Don't include secrets (passwords, keys, tokens) in JSON schemas, prompts, or saved workflow variables.
```json theme={null}
{
"name": "math_response",
"schema": {
"type": "object",
"properties": {
"steps": {
"type": "array",
"items": {
"type": "object",
"properties": {
"explanation": {
"type": "string"
},
"output": {
"type": "string"
}
},
"required": [
"explanation",
"output"
],
"additionalProperties": false
}
},
"final_answer": {
"type": "string"
}
},
"additionalProperties": false,
"required": [
"steps",
"final_answer"
]
},
"strict": true
}
```
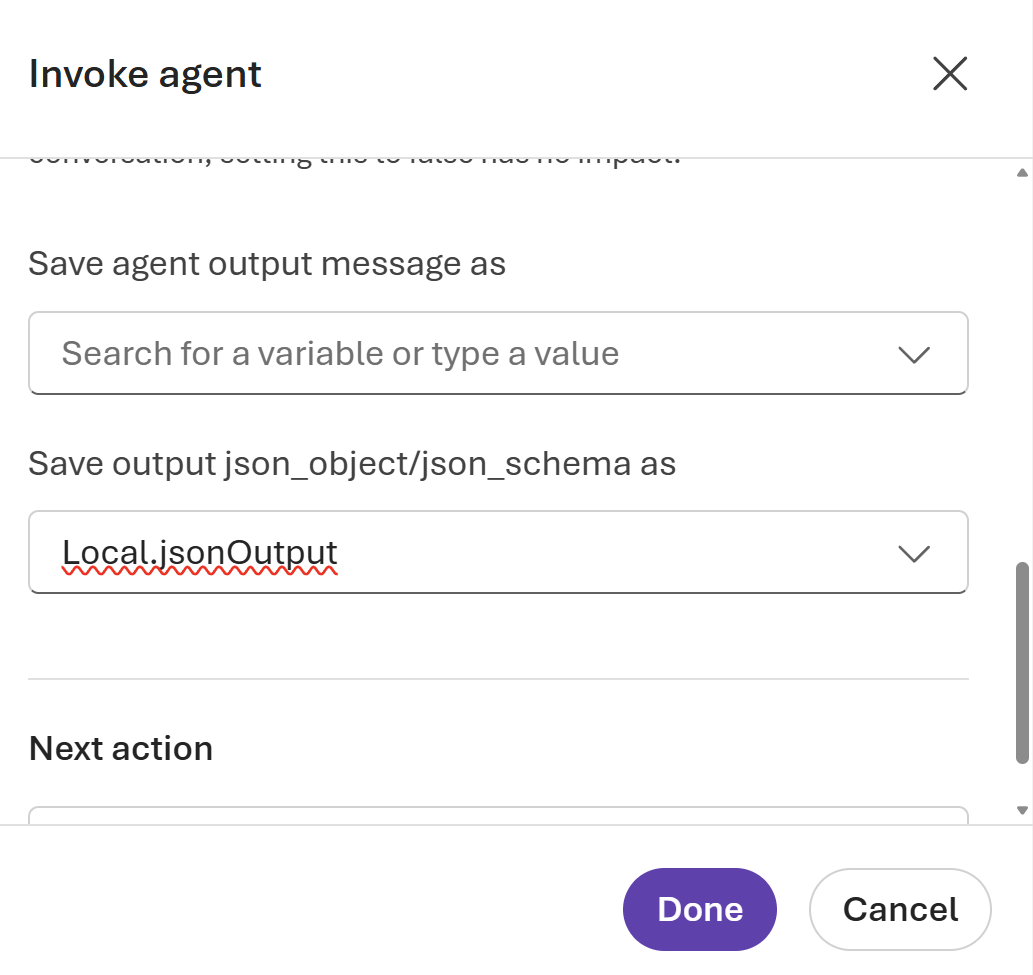
1. Select **Action settings**. Then select **Save output json\_object/json\_schema as**.
2. Select **Create new variable**. Choose a variable name, and then select **Done**.
Don't include secrets (passwords, keys, tokens) in JSON schemas, prompts, or saved workflow variables.
```json theme={null}
{
"name": "math_response",
"schema": {
"type": "object",
"properties": {
"steps": {
"type": "array",
"items": {
"type": "object",
"properties": {
"explanation": {
"type": "string"
},
"output": {
"type": "string"
}
},
"required": [
"explanation",
"output"
],
"additionalProperties": false
}
},
"final_answer": {
"type": "string"
}
},
"additionalProperties": false,
"required": [
"steps",
"final_answer"
]
},
"strict": true
}
```
1. Select **Action settings**. Then select **Save output json\_object/json\_schema as**.
2. Select **Create new variable**. Choose a variable name, and then select **Done**.
 ## Configure additional features
* **YAML visualizer view**: Set the **YAML Visualizer View** toggle to **On** to store the workflow as a YAML file. Edit in either the visualizer or the YAML view. Saving creates a new version with full version history.
Both the visualizer and YAML are editable. Changes to the YAML file appear immediately in the visualizer.
* **Versioning**: Each save creates a new, unchangeable version. To view version history or delete older versions, open the **Version** dropdown list to the left of the **Save** button.
* **Notes**: Add notes to the workflow visualizer for extra context. In the upper-left corner of the visualizer, select **Add note**.
## Create expressions with Power Fx
Power Fx is a low-code language that uses Excel-like formulas. Use Power Fx to create complex logic that lets your agents manipulate data. For example, a Power Fx formula can set a variable value, parse a string, or evaluate a condition. For more information, see the [Power Fx overview](/power-platform/power-fx/overview) and [formula reference](/power-platform/power-fx/formula-reference-copilot-studio).
### Use variables in a formula
To use a variable in a Power Fx formula, you must add a prefix to its name to indicate the variable's scope:
* For system variables, use `System.`
* For local variables, use `Local.`
Here are the system variables:
| Name | Description |
| ---------------------------------- | ------------------------------------------------------------------------------ |
| `Activity` | Information about the current activity |
| `Bot` | Information about the agent |
| `Conversation` | Information about the current conversation |
| `Conversation.Id` | Unique ID of the current conversation |
| `Conversation.LocalTimeZone` | Time zone of the user, in the IANA Time Zone Database format |
| `Conversation.LocalTimeZoneOffset` | Time offset from UTC for the current local time zone |
| `Conversation.InTestMode` | Boolean flag that represents if the conversation is happening on a test canvas |
| `ConversationId` | Unique ID of the current conversation |
| `InternalId` | Internal identifier for the system |
| `LastMessage` | Information about the previous message that the user sent |
| `LastMessage.Id` | ID of the previous message that the user sent |
| `LastMessage.Text` | Previous message that the user sent |
| `LastMessageId` | ID of the previous message that the user sent |
| `LastMessageText` | Previous message that the user sent |
| `Recognizer` | Information about intent recognition and the triggering message |
| `User` | Information about the user currently talking to the agent |
| `User.Language` | User language locale per conversation |
| `UserLanguage` | User language locale per conversation |
### Use literal values in a formula
In addition to using variables in a Power Fx formula, you can enter literal values. To use a literal value in a formula, you must enter it in the format that corresponds to its [type](/microsoft-copilot-studio/authoring-variables-about).
The following table lists the data types and the format of their corresponding literal values:
| Type | Format examples |
| ---------------- | -------------------------------------------------------------------------------------------------------------------------------- |
| String | `"hi"`, `"hello world!"`, `"copilot"` |
| Boolean | Only `true` or `false` |
| Number | `1`, `532`, `5.258`,`-9201` |
| Record and table | `[1]`, `[45, 8, 2]`, `["cats", "dogs"]`, `{ id: 1 }`, `{ message: "hello" }`, `{ name: "John", info: { age: 25, weight: 175 } }` |
| Date and time | `Time(5,0,23)`, `Date(2022,5,24)`, `DateTimeValue("May 10, 2022 5:00:00 PM")` |
| Choice | Not supported |
| Blank | Only `Blank()` |
#### Common Power Fx formulas
The following table lists the Power Fx formulas that you can use with each data type.
| Type | Power Fx formulas |
| ---------------- | ----------------------------------------------------------------------------------------------------------------------------------------------------------------------------------------------------------------------------------------------------------------------------------------------------------------------------------------------------------------------------------------------------------------------------------------------------------------------------------------------------------------------------------------------------------------------------------------------------------------------------------------------------------------------------------------------------------------------------------- |
| String | [Text function](/power-platform/power-fx/reference/function-text)
## Configure additional features
* **YAML visualizer view**: Set the **YAML Visualizer View** toggle to **On** to store the workflow as a YAML file. Edit in either the visualizer or the YAML view. Saving creates a new version with full version history.
Both the visualizer and YAML are editable. Changes to the YAML file appear immediately in the visualizer.
* **Versioning**: Each save creates a new, unchangeable version. To view version history or delete older versions, open the **Version** dropdown list to the left of the **Save** button.
* **Notes**: Add notes to the workflow visualizer for extra context. In the upper-left corner of the visualizer, select **Add note**.
## Create expressions with Power Fx
Power Fx is a low-code language that uses Excel-like formulas. Use Power Fx to create complex logic that lets your agents manipulate data. For example, a Power Fx formula can set a variable value, parse a string, or evaluate a condition. For more information, see the [Power Fx overview](/power-platform/power-fx/overview) and [formula reference](/power-platform/power-fx/formula-reference-copilot-studio).
### Use variables in a formula
To use a variable in a Power Fx formula, you must add a prefix to its name to indicate the variable's scope:
* For system variables, use `System.`
* For local variables, use `Local.`
Here are the system variables:
| Name | Description |
| ---------------------------------- | ------------------------------------------------------------------------------ |
| `Activity` | Information about the current activity |
| `Bot` | Information about the agent |
| `Conversation` | Information about the current conversation |
| `Conversation.Id` | Unique ID of the current conversation |
| `Conversation.LocalTimeZone` | Time zone of the user, in the IANA Time Zone Database format |
| `Conversation.LocalTimeZoneOffset` | Time offset from UTC for the current local time zone |
| `Conversation.InTestMode` | Boolean flag that represents if the conversation is happening on a test canvas |
| `ConversationId` | Unique ID of the current conversation |
| `InternalId` | Internal identifier for the system |
| `LastMessage` | Information about the previous message that the user sent |
| `LastMessage.Id` | ID of the previous message that the user sent |
| `LastMessage.Text` | Previous message that the user sent |
| `LastMessageId` | ID of the previous message that the user sent |
| `LastMessageText` | Previous message that the user sent |
| `Recognizer` | Information about intent recognition and the triggering message |
| `User` | Information about the user currently talking to the agent |
| `User.Language` | User language locale per conversation |
| `UserLanguage` | User language locale per conversation |
### Use literal values in a formula
In addition to using variables in a Power Fx formula, you can enter literal values. To use a literal value in a formula, you must enter it in the format that corresponds to its [type](/microsoft-copilot-studio/authoring-variables-about).
The following table lists the data types and the format of their corresponding literal values:
| Type | Format examples |
| ---------------- | -------------------------------------------------------------------------------------------------------------------------------- |
| String | `"hi"`, `"hello world!"`, `"copilot"` |
| Boolean | Only `true` or `false` |
| Number | `1`, `532`, `5.258`,`-9201` |
| Record and table | `[1]`, `[45, 8, 2]`, `["cats", "dogs"]`, `{ id: 1 }`, `{ message: "hello" }`, `{ name: "John", info: { age: 25, weight: 175 } }` |
| Date and time | `Time(5,0,23)`, `Date(2022,5,24)`, `DateTimeValue("May 10, 2022 5:00:00 PM")` |
| Choice | Not supported |
| Blank | Only `Blank()` |
#### Common Power Fx formulas
The following table lists the Power Fx formulas that you can use with each data type.
| Type | Power Fx formulas |
| ---------------- | ----------------------------------------------------------------------------------------------------------------------------------------------------------------------------------------------------------------------------------------------------------------------------------------------------------------------------------------------------------------------------------------------------------------------------------------------------------------------------------------------------------------------------------------------------------------------------------------------------------------------------------------------------------------------------------------------------------------------------------- |
| String | [Text function](/power-platform/power-fx/reference/function-text)
[Concat and Concatenate functions](/power-platform/power-fx/reference/function-concatenate)
[Len function](/power-platform/power-fx/reference/function-len)
[Lower, Upper, and Proper functions](/power-platform/power-fx/reference/function-lower-upper-proper)
[IsMatch, Match, and MatchAll functions](/power-platform/power-fx/reference/function-ismatch)
[EndsWith and StartsWith functions](/power-platform/power-fx/reference/function-startswith)
[Find function](/power-platform/power-fx/reference/function-find)
[Replace and Substitute function](/power-platform/power-fx/reference/function-replace-substitute) |
| Boolean | [Boolean function](/power-platform/power-fx/reference/function-boolean)
[And, Or, and Not functions](/power-platform/power-fx/reference/function-logicals)
[If and Switch functions](/power-platform/power-fx/reference/function-if) |
| Number | [Decimal, Float, and Value functions](/power-platform/power-fx/reference/function-value)
[Int, Round, RoundDown, RoundUp, and Trunc functions](/power-platform/power-fx/reference/function-round) |
| Record and table | [Concat and Concatenate functions](/power-platform/power-fx/reference/function-concatenate)
[Count, CountA, CountIf, and CountRows functions](/power-platform/power-fx/reference/function-table-counts)
[ForAll function](/power-platform/power-fx/reference/function-forall)
[First, FirstN, Index, Last, and LastN functions](/power-platform/power-fx/reference/function-first-last)
[Filter, Search, and LookUp functions](/power-platform/power-fx/reference/function-filter-lookup)
[JSON function](/power-platform/power-fx/reference/function-json)
[ParseJSON function](/power-platform/power-fx/reference/function-parsejson) |
| Date and time | [Date, DateTime, and Time functions](/power-platform/power-fx/reference/function-date-time)
[DateValue, TimeValue, and DateTimeValue functions](/power-platform/power-fx/reference/function-datevalue-timevalue)
[Day, Month, Year, Hour, Minute, Second, and Weekday functions](/power-platform/power-fx/reference/function-datetime-parts)
[Now, Today, IsToday, UTCNow, UTCToday, IsUTCToday functions](/power-platform/power-fx/reference/function-now-today-istoday)
[DateAdd, DateDiff, and TimeZoneOffset functions](/power-platform/power-fx/reference/function-dateadd-datediff)
[Text function](/power-platform/power-fx/reference/function-text) |
| Blank | [Blank, Coalesce, IsBlank, and IsEmpty functions](/power-platform/power-fx/reference/function-isblank-isempty)
[Error, IfError, IsError, IsBlankOrError functions](/power-platform/power-fx/reference/function-iferror) |
### Set a variable with Power Fx
This example shows how to store and output a customer's name in capital letters:
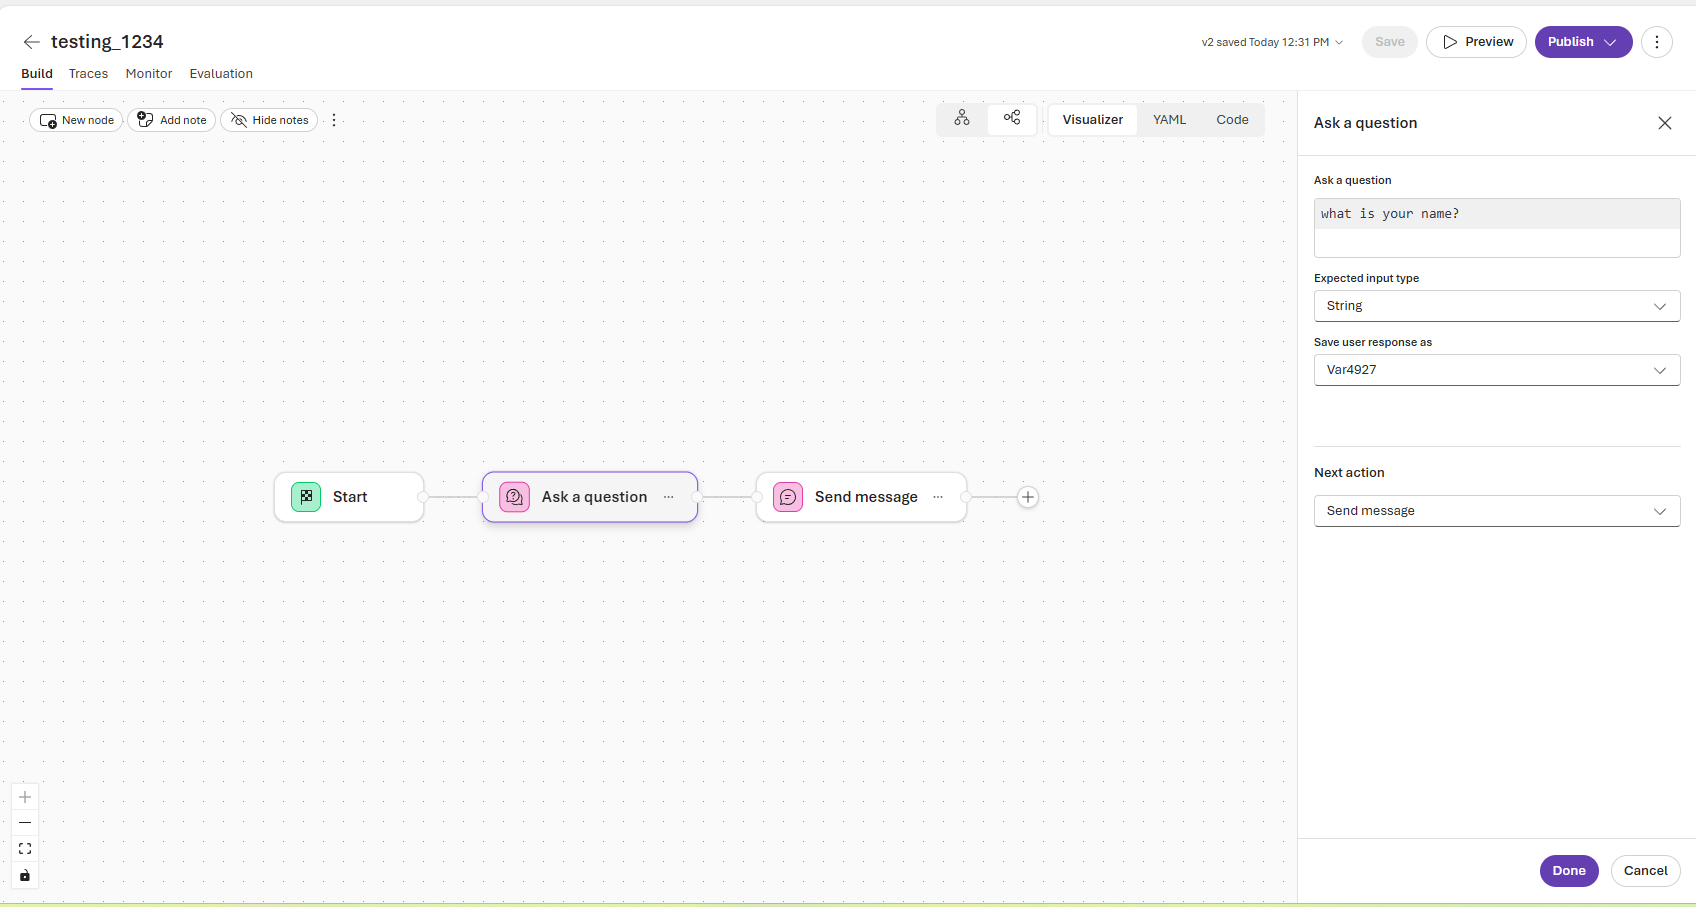
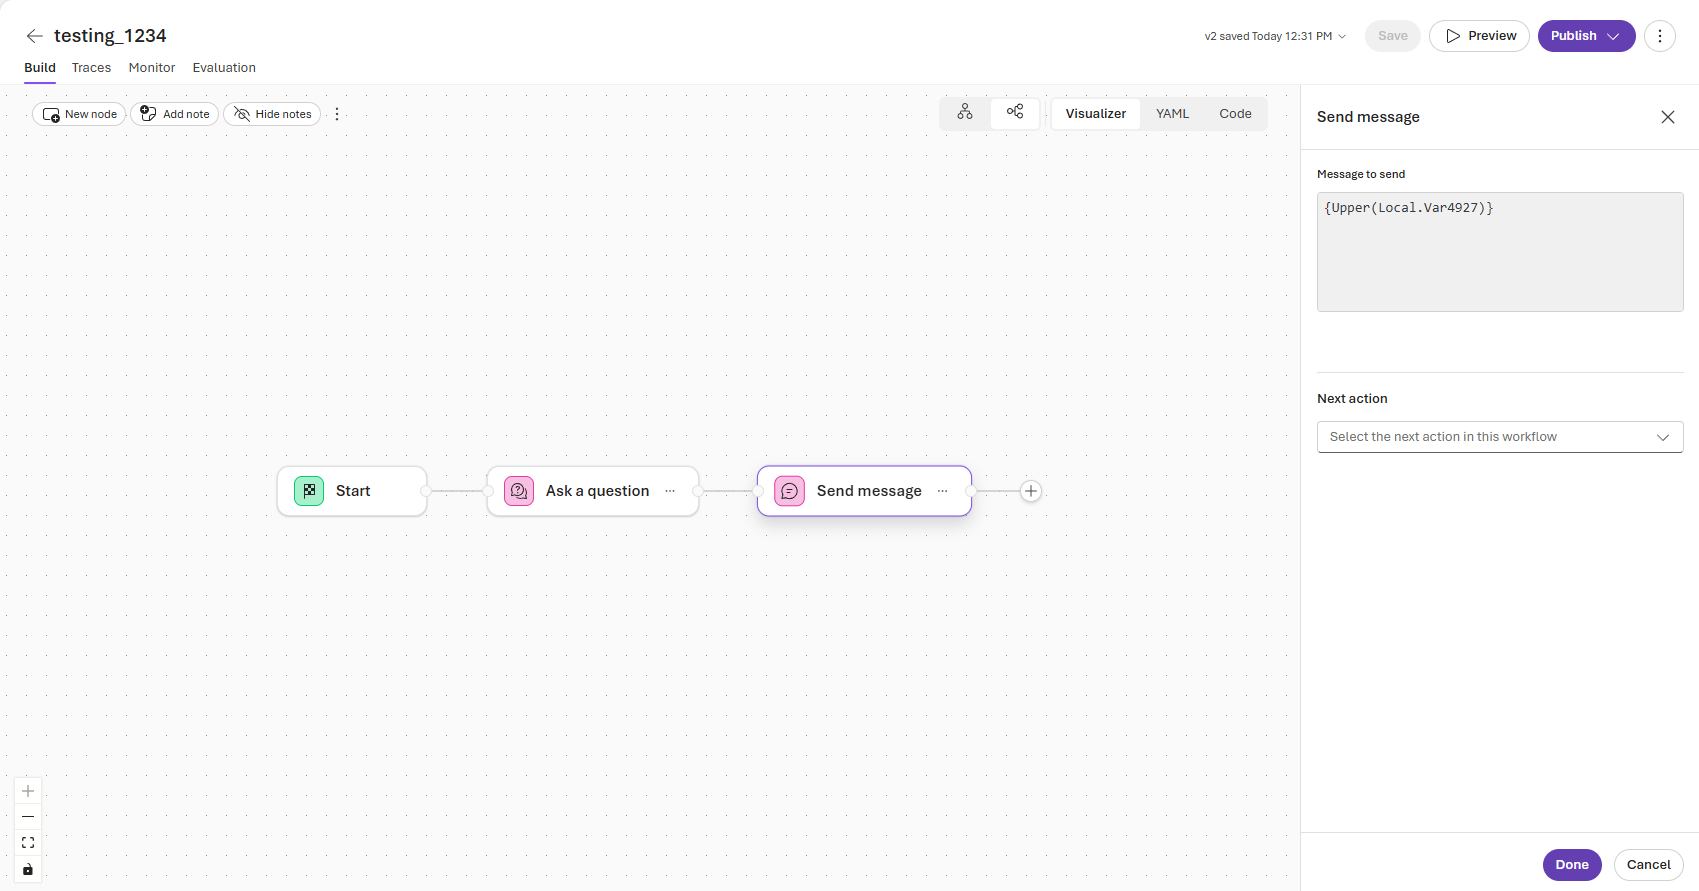
1. Create a workflow and add an **Ask a question** node.
2. On the pane that appears, in the **Ask a question** box, enter **What is your name?** or another message. In the **Save user response as** box, enter a variable name; for example, `Var01`. Then select **Done**.
 1. Add a **Send message** action. On the pane that appears, in the **Message to send** area, enter `{Upper(Local.Var01)}`. Then select **Done**.
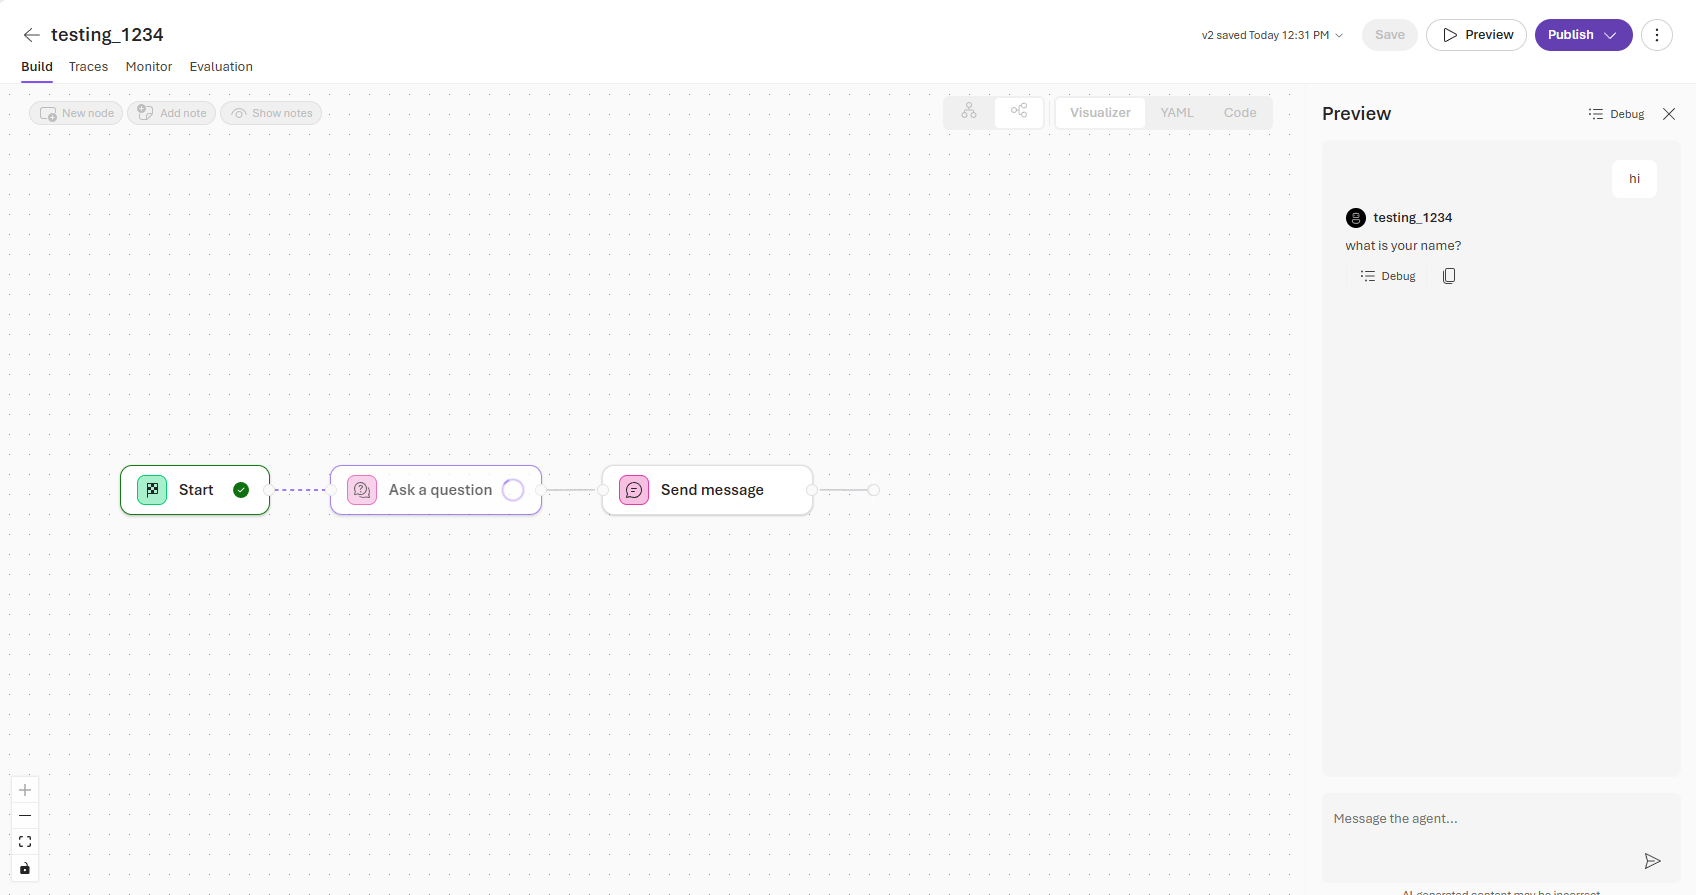
 1. Select **Preview**.
2. On the preview pane, send a message to the agent to invoke the workflow.
1. Select **Preview**.
2. On the preview pane, send a message to the agent to invoke the workflow.
 ## Create if/else flows with Power Fx
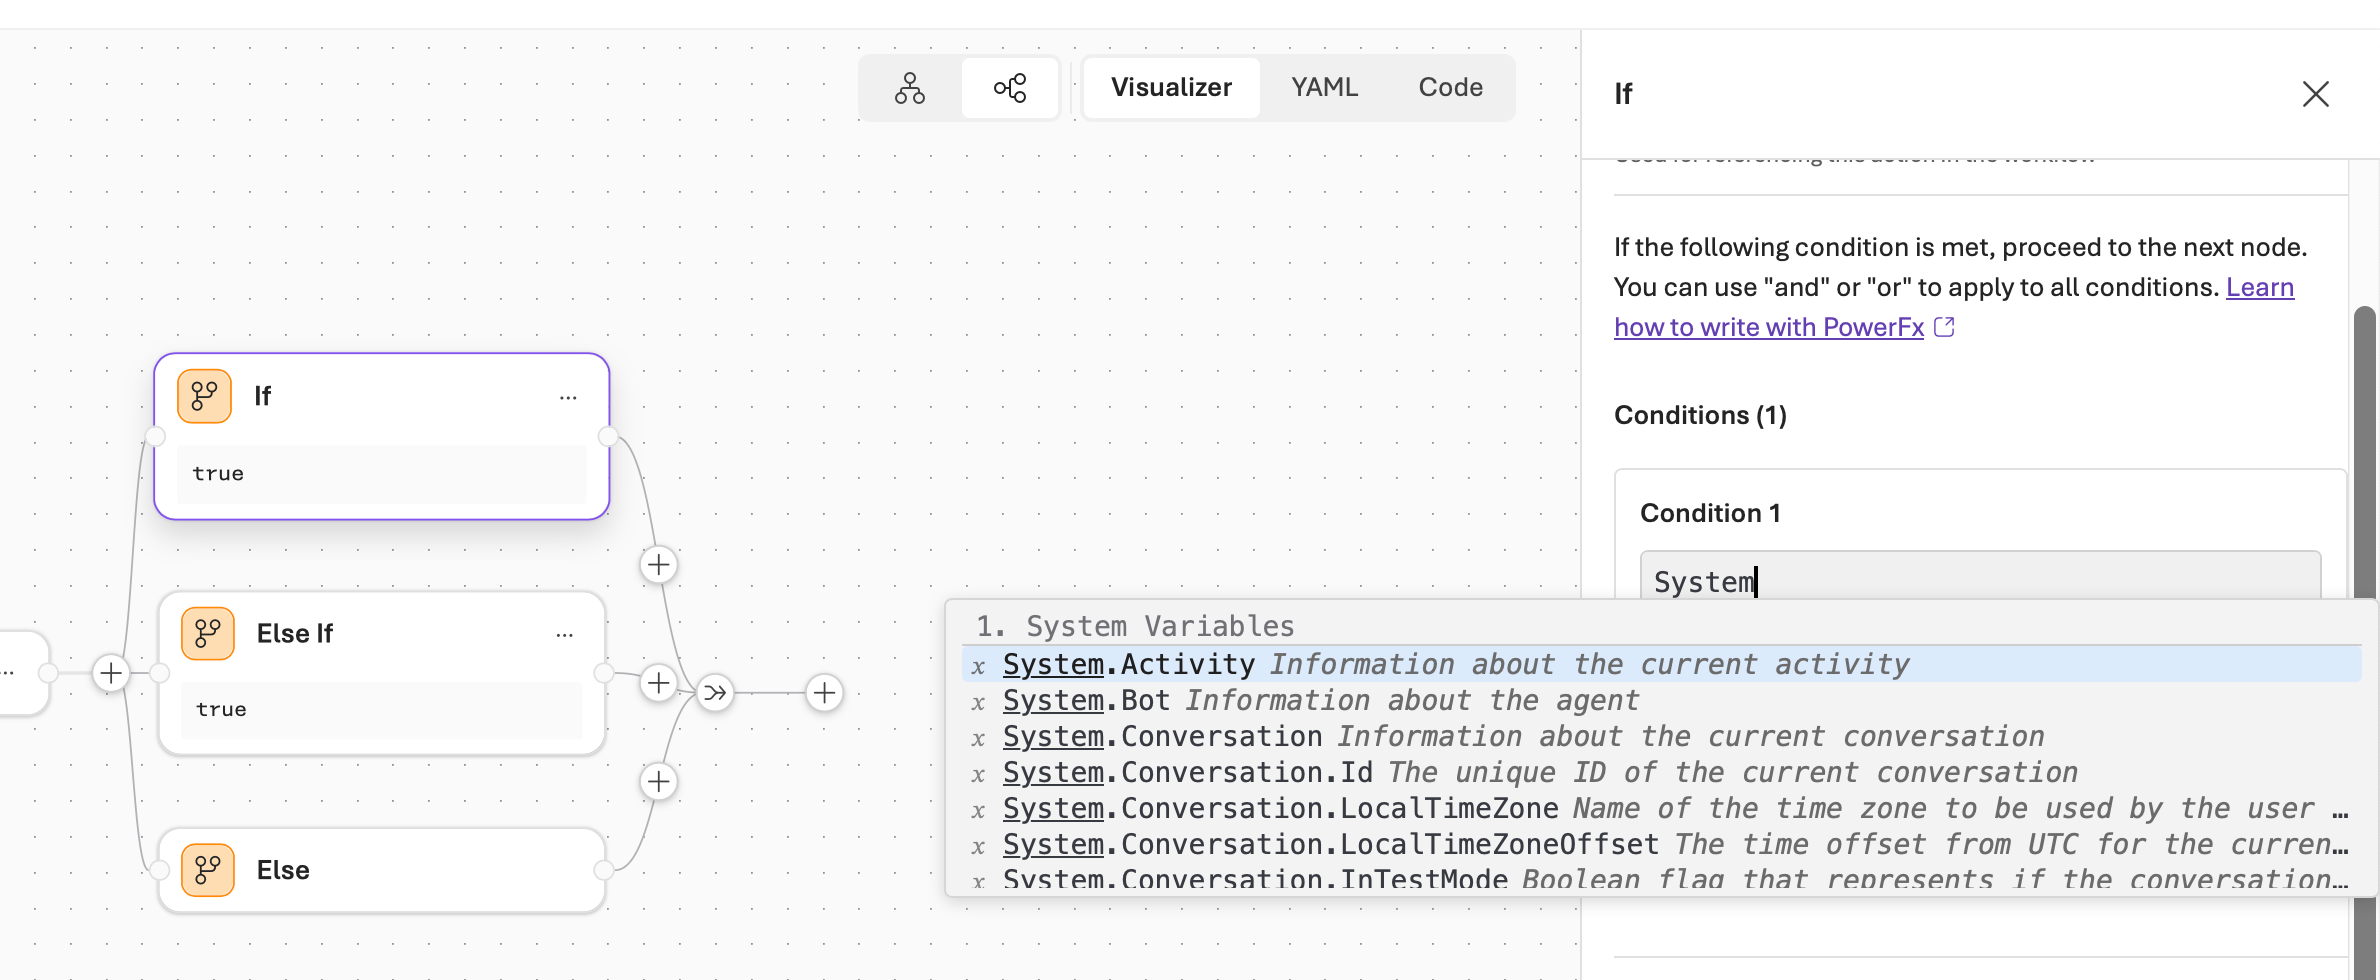
This example shows how to add an if/else flow and build a condition with system variables.
1. Create a workflow and add an **Ask a question** node.
2. Select the **+** icon and add an **if/else** flow.
3. Type `System.` in the **Condition** box to build a condition statement for each if/else branch.
## Create if/else flows with Power Fx
This example shows how to add an if/else flow and build a condition with system variables.
1. Create a workflow and add an **Ask a question** node.
2. Select the **+** icon and add an **if/else** flow.
3. Type `System.` in the **Condition** box to build a condition statement for each if/else branch.
 1. Select a **Next Action** for the next step in the workflow.
2. Select **Done**. Select **Save** to save your workflow.
## Troubleshooting
| Issue | Solution |
| --------------------------------------------------------------- | ---------------------------------------------------------------------------------------------------------------------------------------------------------- |
| **Workflows** option not visible or can't create/edit workflows | Confirm you have the **Contributor** role or higher on your project. See [Azure role-based access control (RBAC) in Foundry](../../concepts/rbac-foundry). |
| Changes don't appear after editing | Select **Save** in the visualizer. Foundry doesn't save changes automatically. |
| Workflow run produces unexpected output | Verify each agent node has an agent assigned. Check that saved outputs (JSON schema) are valid. |
| Power Fx formula error: "Name isn't valid" | Add the correct scope prefix. Use `System.` for system variables and `Local.` for local variables. |
| Power Fx formula error: "Type mismatch" | Verify the variable type matches the expected input. Use conversion functions like `Text()` or `Value()` if needed. |
| Workflow times out | Break complex workflows into smaller segments. Check that external services respond within expected timeframes. |
## Clean up resources
To delete a workflow you no longer need:
1. Open the workflow in the Foundry portal.
2. Select the **Version** dropdown list to the left of the **Save** button.
3. Select **Delete** for the version you want to remove.
## Migration guide
Foundry is moving workflow authoring to a code-first model. Visual workflows aren't disappearing as a capability. The orchestration patterns you built visually (sequential and group-chat coordination, branching logic, and human-in-the-loop steps) are all expressible in code and configuration, so you keep them when you migrate. After December 1, 2026, the visual designer and in-portal workflow execution aren't supported, but Foundry continues to run YAML-based workflow definitions when you deploy them as a [hosted agent](/agents/hosted-agents).
Pick the path that matches how you want to build. Most teams should start with Microsoft Agent Framework.
| If you want to... | Migrate to | Best for |
| ---------------------------------------------------------------- | ---------------------------------------------------------------------------- | ----------------------------------------------------------------------------------- |
| Keep your orchestration logic on a supported, code-first runtime | [Microsoft Agent Framework](#option-1-microsoft-agent-framework-recommended) | Teams comfortable with YAML or code who want the closest match to today's workflows |
| Keep a fully visual, low-code designer | [Azure Logic Apps](#option-2-azure-logic-apps) | Business-process automation that mixes deterministic steps with AI reasoning |
| Connect one agent to another without a formal workflow | [Agent-to-agent (A2A)](#option-3-connect-agents-directly-with-a2a) | Lightweight hand-offs between two agents |
### Before you migrate: export your workflow definition
Your workflow's YAML definition is the portable artifact you carry to any of the paths below. Save it before the designer is retired:
1. Open your workflow in the Foundry workflow designer.
2. Switch to the **YAML** view to see the full configuration.
3. Copy or export the YAML file so you can reuse it in your new environment.
The Agent Inspector in the Foundry AI Toolkit for Visual Studio Code lets you visualize and run Foundry workflow definitions, which is helpful while you validate a migration. For more information, see [Develop agents with Agent Inspector](/agents/agent-inspector).
### Option 1: Microsoft Agent Framework (recommended)
Use Microsoft Agent Framework for most workflows. The orchestration you build visually maps directly onto Agent Framework, which supports the same patterns through **declarative YAML** or **code-first** authoring. In many cases, you can bring your exported workflow YAML into an Agent Framework project and run it with minimal changes. Then, keep iterating in Visual Studio Code instead of the portal. Because workflows are no longer a separate agent type, you run the result by [deploying it as a hosted agent](/agents/hosted-agents)—the same managed runtime that hosts your other code-based agents.
* Build and run workflows: [Microsoft Agent Framework workflows](/agent-framework/workflows/)
* Reuse your exported YAML with declarative workflows: [Declarative workflows overview](/agent-framework/workflows/declarative)
* Deploy to Foundry as a hosted agent: [Foundry-hosted agents](/agent-framework/hosting/foundry-hosted-agent)
### Option 2: Azure Logic Apps
If a visual designer is the main reason you use workflows, Azure Logic Apps gives you a fully featured, low-code canvas for orchestration and can call Foundry agents as steps. Logic Apps lets you combine deterministic steps - connectors, conditions, approvals, and hundreds of prebuilt actions - with the probabilistic reasoning of Foundry agents in the same run. You can adopt agents incrementally and enrich processes you already have, instead of rebuilding them from scratch.
* Build automated workflows with the visual designer: [Azure Logic Apps overview](https://learn.microsoft.com/azure/logic-apps/logic-apps-overview)
* Call and orchestrate Foundry agents from a workflow: [Run automated workflows from Foundry agents](https://learn.microsoft.com/azure/logic-apps/add-agent-action-create-run-workflow)
### Option 3: Connect agents directly with A2A
For lightweight scenarios where one agent just needs to call another - without a formal, multistep workflow - expose an agent as an agent-to-agent (A2A) endpoint and call it directly. This approach keeps the calling agent in control while it delegates a task to a specialized agent. For more information, see [Enable an incoming A2A endpoint on a Foundry agent](/agents/enable-agent-to-agent-endpoint).
## Related content
* [Foundry Agent Service FAQ](../../agents/faq.yml)
* [Tool best practices for Foundry agents](/agents/tool-best-practice)
* [Work with Declarative (Low-code) Agent workflows in Visual Studio Code](/developer-tools-and-integrations/vs-code-agents-workflow-low-code)
* [Work with Hosted (Pro-code) Agent workflows in Visual Studio Code](/developer-tools-and-integrations/vs-code-agents-workflow-pro-code)
1. Select a **Next Action** for the next step in the workflow.
2. Select **Done**. Select **Save** to save your workflow.
## Troubleshooting
| Issue | Solution |
| --------------------------------------------------------------- | ---------------------------------------------------------------------------------------------------------------------------------------------------------- |
| **Workflows** option not visible or can't create/edit workflows | Confirm you have the **Contributor** role or higher on your project. See [Azure role-based access control (RBAC) in Foundry](../../concepts/rbac-foundry). |
| Changes don't appear after editing | Select **Save** in the visualizer. Foundry doesn't save changes automatically. |
| Workflow run produces unexpected output | Verify each agent node has an agent assigned. Check that saved outputs (JSON schema) are valid. |
| Power Fx formula error: "Name isn't valid" | Add the correct scope prefix. Use `System.` for system variables and `Local.` for local variables. |
| Power Fx formula error: "Type mismatch" | Verify the variable type matches the expected input. Use conversion functions like `Text()` or `Value()` if needed. |
| Workflow times out | Break complex workflows into smaller segments. Check that external services respond within expected timeframes. |
## Clean up resources
To delete a workflow you no longer need:
1. Open the workflow in the Foundry portal.
2. Select the **Version** dropdown list to the left of the **Save** button.
3. Select **Delete** for the version you want to remove.
## Migration guide
Foundry is moving workflow authoring to a code-first model. Visual workflows aren't disappearing as a capability. The orchestration patterns you built visually (sequential and group-chat coordination, branching logic, and human-in-the-loop steps) are all expressible in code and configuration, so you keep them when you migrate. After December 1, 2026, the visual designer and in-portal workflow execution aren't supported, but Foundry continues to run YAML-based workflow definitions when you deploy them as a [hosted agent](/agents/hosted-agents).
Pick the path that matches how you want to build. Most teams should start with Microsoft Agent Framework.
| If you want to... | Migrate to | Best for |
| ---------------------------------------------------------------- | ---------------------------------------------------------------------------- | ----------------------------------------------------------------------------------- |
| Keep your orchestration logic on a supported, code-first runtime | [Microsoft Agent Framework](#option-1-microsoft-agent-framework-recommended) | Teams comfortable with YAML or code who want the closest match to today's workflows |
| Keep a fully visual, low-code designer | [Azure Logic Apps](#option-2-azure-logic-apps) | Business-process automation that mixes deterministic steps with AI reasoning |
| Connect one agent to another without a formal workflow | [Agent-to-agent (A2A)](#option-3-connect-agents-directly-with-a2a) | Lightweight hand-offs between two agents |
### Before you migrate: export your workflow definition
Your workflow's YAML definition is the portable artifact you carry to any of the paths below. Save it before the designer is retired:
1. Open your workflow in the Foundry workflow designer.
2. Switch to the **YAML** view to see the full configuration.
3. Copy or export the YAML file so you can reuse it in your new environment.
The Agent Inspector in the Foundry AI Toolkit for Visual Studio Code lets you visualize and run Foundry workflow definitions, which is helpful while you validate a migration. For more information, see [Develop agents with Agent Inspector](/agents/agent-inspector).
### Option 1: Microsoft Agent Framework (recommended)
Use Microsoft Agent Framework for most workflows. The orchestration you build visually maps directly onto Agent Framework, which supports the same patterns through **declarative YAML** or **code-first** authoring. In many cases, you can bring your exported workflow YAML into an Agent Framework project and run it with minimal changes. Then, keep iterating in Visual Studio Code instead of the portal. Because workflows are no longer a separate agent type, you run the result by [deploying it as a hosted agent](/agents/hosted-agents)—the same managed runtime that hosts your other code-based agents.
* Build and run workflows: [Microsoft Agent Framework workflows](/agent-framework/workflows/)
* Reuse your exported YAML with declarative workflows: [Declarative workflows overview](/agent-framework/workflows/declarative)
* Deploy to Foundry as a hosted agent: [Foundry-hosted agents](/agent-framework/hosting/foundry-hosted-agent)
### Option 2: Azure Logic Apps
If a visual designer is the main reason you use workflows, Azure Logic Apps gives you a fully featured, low-code canvas for orchestration and can call Foundry agents as steps. Logic Apps lets you combine deterministic steps - connectors, conditions, approvals, and hundreds of prebuilt actions - with the probabilistic reasoning of Foundry agents in the same run. You can adopt agents incrementally and enrich processes you already have, instead of rebuilding them from scratch.
* Build automated workflows with the visual designer: [Azure Logic Apps overview](https://learn.microsoft.com/azure/logic-apps/logic-apps-overview)
* Call and orchestrate Foundry agents from a workflow: [Run automated workflows from Foundry agents](https://learn.microsoft.com/azure/logic-apps/add-agent-action-create-run-workflow)
### Option 3: Connect agents directly with A2A
For lightweight scenarios where one agent just needs to call another - without a formal, multistep workflow - expose an agent as an agent-to-agent (A2A) endpoint and call it directly. This approach keeps the calling agent in control while it delegates a task to a specialized agent. For more information, see [Enable an incoming A2A endpoint on a Foundry agent](/agents/enable-agent-to-agent-endpoint).
## Related content
* [Foundry Agent Service FAQ](../../agents/faq.yml)
* [Tool best practices for Foundry agents](/agents/tool-best-practice)
* [Work with Declarative (Low-code) Agent workflows in Visual Studio Code](/developer-tools-and-integrations/vs-code-agents-workflow-low-code)
* [Work with Hosted (Pro-code) Agent workflows in Visual Studio Code](/developer-tools-and-integrations/vs-code-agents-workflow-pro-code)